13_Loading and Preprocessing Data from multiple CSV with TensorFlow_custom training loop_TFRecord
So far we have used only datasets that fit in memory, but Deep Learning systems are often trained on very large datasets that will not fit in RAM. Ingesting摄取 a large dataset and preprocessing it efficiently can be tricky to implement with other Deep Learning libraries, but TensorFlow makes it easy thanks to the Data API: you just create a dataset object, and tell it where to get the data and how to transform it. TensorFlow takes care of all the implementation details, such as multithreading, queuing, batching, and prefetching. Moreover, the Data API works seamlessly with tf.keras!
Off the shelf, the Data API can read from text files (such as CSV files), binary files with fixed-size records, and binary files that use TensorFlow’s TFRecord format, which supports records of varying sizes. TFRecord is a flexible and efficient binary format usually containing protocol buffers (an open source binary format). The Data API also has support for reading from SQL databases. Moreover, many open source extensions are available to read from all sorts of data sources, such as Google’s Big‐Query service.
Reading huge datasets efficiently is not the only difficulty: the data also needs to be preprocessed, usually normalized. Moreover, it is not always composed strictly of convenient numerical fields: there may be text features, categorical features, and so on. These need to be encoded, for example using one-hot encoding, bag-of-words encoding, or embeddings (as we will see, an embedding is a trainable dense vector that represents a category or token). One option to handle all this preprocessing is to
write your own custom preprocessing layers. Another is to use the standard preprocessing layers provided by Keras.
In this chapter, we will cover the Data API, the TFRecord format, and how to create custom preprocessing layers and use the standard Keras ones. We will also take a quick look at a few related projects from TensorFlow’s ecosystem:
TF Transform (tf.Transform)
- Makes it possible to write a single preprocessing function that can be run in batch mode on your full training set, before training (to speed it up), and then exported to a TF Function and incorporated into your trained model so that once it is deployed in production it can take care of preprocessing new instances on the fly.
TF Datasets (TFDS)
- Provides a convenient function to download many common datasets of all kinds, including large ones like ImageNet, as well as convenient dataset objects to manipulate them using the Data API.
So let’s get started!
The Data API
The whole Data API revolves around the concept of a dataset: as you might suspect, this represents a sequence of data items. Usually you will use datasets that gradually read data from disk, but for simplicity
let’s create a dataset entirely in RAM using tf.data.Dataset.from_tensor_slices():
import tensorflow as tf

X =tf.range(10)#
dataset = tf.data.Dataset.from_tensor_slices(X)
dataset ![]()
The from_tensor_slices() function takes a tensor and creates a tf.data.Dataset whose elements are all the slices of X (along the first dimension), so this dataset contains 10 items: tensors 0, 1, 2, …, 9.
for item in dataset:
    print(item)
In this case we would have obtained the same dataset if we had used  tf.data.Dataset.range(10)
![]() .
.
dataset2=tf.data.Dataset.range(10)
dataset2![]()
You can simply iterate over a dataset’s items like this:
for item in dataset2:
    print(item)
Chaining Transformations
Once you have a dataset, you can apply all sorts of transformations to it by calling its transformation methods. Each method returns a new dataset, so you can chain transformations like this (this chain is illustrated in Figure 13-1):
Figure 13-1. Chaining dataset transformations dataset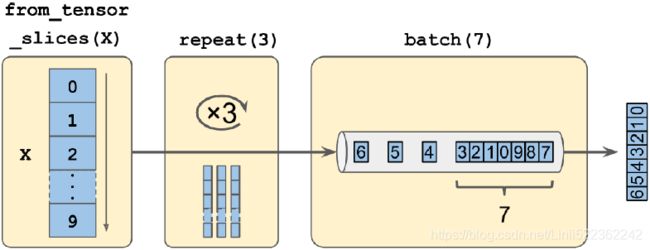
dataset = dataset.repeat(3).batch(7)
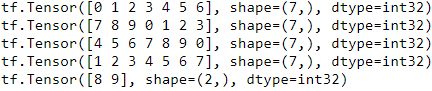
for item in dataset:
print(item) In this example, we first call the repeat() method on the original dataset, and it returns a new dataset that will repeat the items of the original dataset three times. Of course, this will not copy all the data in memory three times! (If you call this repeat() method with no arguments, the new dataset will repeat the source dataset forever, so the code that iterates over the dataset will have to decide when to stop.)
Then we call the batch() method on this new dataset, and again this creates a new dataset. This one will group the items of the previous dataset in batches of seven items. Finally, we iterate over the items of this final dataset by using for loop statement. As you can see, the batch() method had to output a final batch of size two instead of seven, but you can call it with drop_remainder=True if you want it to drop this final batch so that all batches have the exact same size.
The dataset methods do not modify datasets, they create new ones, so make sure to keep a reference to these new datasets (e.g., with dataset = ...), or else nothing will happen.
You can also transform the items by calling the map() method. For example, this creates a new dataset with all items doubled:
dataset = dataset.map(lambda x: x*2) # [0 1 2 3 4 5 6] ==> [0,2,4,6,8,10,12]

for item in dataset:
    print(item)
This function ###dataset = dataset.map(lambda x: x * 2)### is the one you will call to apply any preprocessing you want to your data. Sometimes this will include computations that can be quite intensive, such as reshaping or rotating an image, so you will usually want to spawn multiple threads to speed things up: it’s as simple as setting the num_parallel_calls argument. Note that the function you pass to the map() method must be convertible to a TF Function (see Chapter 12).
While the map() method applies a transformation to each item, the apply() method applies a transformation to the dataset as a whole. For example, the following code applies the unbatch() function to the dataset (this function is currently experimental,
but it will most likely move to the core API in a future release). Each item in the new dataset will be a single-integer tensor instead of a batch of seven integers:
#dataset = dataset.apply(tf.data.experimental.unbatch()) # Now deprecated
dataset = dataset.unbatch()

for item in dataset:
    print(item)
It is also possible to simply filter the dataset using the filter() method:
dataset = dataset.filter(lambda x: x<10) # Items: 0 2 4 6 8 0 2 4 6...

for item in dataset:
    print(item)
You will often want to look at just a few items from a dataset. You can use the take() method for that:
for item in dataset.take(3):
    print(item)
Shuffling the Data
As you know, Gradient Descent works best when the instances in the training set are independent and identically distributed分布均匀 (see Chapter 4). A simple way to ensure this is to shuffle the instances, using the shuffle() method. It will create a new dataset that will start by filling up a buffer with the first items of the source dataset. Then, whenever it is asked for an item, it will pull one out randomly from the buffer and replace it with a fresh one from the source dataset, until it has iterated entirely through the source dataset. At this point it continues to pull out items randomly from the buffer until it is empty. You must specify the buffer size, and it is important to make it large enough, or else shuffling will not be very effective. Just don’t exceed the amount of RAM you have, and even if you have plenty of it, there’s no need to go beyond the dataset’s size. You can provide a random seed if you want the same random order every time you run your program.
For example, the following code creates and displays a dataset containing the integers 0 to 9, repeated 3 times, shuffled using a buffer of size 3 and a random seed of 42, and batched with a batch size of 7:
tf.data.Dataset.shuffle(buffer_size): https://www.jianshu.com/p/1285036e314c
tf.random.set_seed(42)

dataset = tf.data.Dataset.range(10).repeat(3) #(0~9, 0~9, 0~9)
dataset = dataset.shuffle(buffer_size=3, seed=42).batch(7)

for item in dataset:
    print(item)
If you call repeat() on a shuffled dataset, by default it will generate a new order at every iteration. This is generally a good idea, but if you prefer to reuse the same order at each iteration (e.g., for tests or debugging), you can set reshuffle_each_iteration=False.
tf.random.set_seed(42)

dataset = tf.data.Dataset.range(10)
# tf.Tensor(0, shape=(), dtype=int64)
# tf.Tensor(1, shape=(), dtype=int64)
# tf.Tensor(2, shape=(), dtype=int64)
# tf.Tensor(3, shape=(), dtype=int64)
# tf.Tensor(4, shape=(), dtype=int64)
# tf.Tensor(5, shape=(), dtype=int64)
# tf.Tensor(6, shape=(), dtype=int64)
# tf.Tensor(7, shape=(), dtype=int64)
# tf.Tensor(8, shape=(), dtype=int64)
# tf.Tensor(9, shape=(), dtype=int64)
dataset = dataset.shuffle(buffer_size=3, seed=42).batch(7)
# tf.Tensor([1 3 0 4 2 5 6], shape=(7,), dtype=int64)
# tf.Tensor([8 7 9], shape=(3,), dtype=int64)
dataset = dataset.repeat(3)
for item in dataset:
print(item) 
tf.random.set_seed(42)

dataset = tf.data.Dataset.range(10)
# tf.Tensor(0, shape=(), dtype=int64)
# tf.Tensor(1, shape=(), dtype=int64)
# tf.Tensor(2, shape=(), dtype=int64)
# tf.Tensor(3, shape=(), dtype=int64)
# tf.Tensor(4, shape=(), dtype=int64)
# tf.Tensor(5, shape=(), dtype=int64)
# tf.Tensor(6, shape=(), dtype=int64)
# tf.Tensor(7, shape=(), dtype=int64)
# tf.Tensor(8, shape=(), dtype=int64)
# tf.Tensor(9, shape=(), dtype=int64)
dataset = dataset.shuffle(buffer_size=3, seed=42, reshuffle_each_iteration=False).batch(7)#########
# tf.Tensor([0 2 3 5 6 4 8], shape=(7,), dtype=int64)
# tf.Tensor([9 1 7], shape=(3,), dtype=int64)
dataset = dataset.repeat(3)##########################
for item in dataset:
    print(item)
tf.random.set_seed(42)

dataset = tf.data.Dataset.range(10)
# tf.Tensor(0, shape=(), dtype=int64)
# tf.Tensor(1, shape=(), dtype=int64)
# tf.Tensor(2, shape=(), dtype=int64)
# tf.Tensor(3, shape=(), dtype=int64)
# tf.Tensor(4, shape=(), dtype=int64)
# tf.Tensor(5, shape=(), dtype=int64)
# tf.Tensor(6, shape=(), dtype=int64)
# tf.Tensor(7, shape=(), dtype=int64)
# tf.Tensor(8, shape=(), dtype=int64)
# tf.Tensor(9, shape=(), dtype=int64)
dataset = dataset.shuffle(buffer_size=3, seed=42, reshuffle_each_iteration=False).batch(7).repeat(3)###########
# tf.Tensor([0 2 3 5 6 4 8], shape=(7,), dtype=int64)
# tf.Tensor([9 1 7], shape=(3,), dtype=int64
for item in dataset:
print(item) 
For a large dataset that does not fit in memory, ![]() this simple shuffling-buffer approach may not be sufficient, since the buffer will be small compared to the dataset.
this simple shuffling-buffer approach may not be sufficient, since the buffer will be small compared to the dataset.![]() One solution is to shuffle the source data itself (for example, on Linux you can shuffle text files using the shuf command). This will definitely improve shuffling a lot! Even if the source data is shuffled, you will usually want to shuffle it some more, or else the same order will be repeated at each epoch, and the model may end up being biased (e.g., due to some spurious patterns present by chance in the source data’s order).
One solution is to shuffle the source data itself (for example, on Linux you can shuffle text files using the shuf command). This will definitely improve shuffling a lot! Even if the source data is shuffled, you will usually want to shuffle it some more, or else the same order will be repeated at each epoch, and the model may end up being biased (e.g., due to some spurious patterns present by chance in the source data’s order).
To shuffle the instances some more, a common approach is ![]() to split the source data into multiple files, then
to split the source data into multiple files, then![]() read them in a random order during training. However, instances located in the same file will still end up close to each other. To avoid this you can
read them in a random order during training. However, instances located in the same file will still end up close to each other. To avoid this you can ![]() pick multiple files randomly and read them simultaneously, interleaving交错 their records. Then on top of that you can add a shuffling buffer using the shuffle() method
pick multiple files randomly and read them simultaneously, interleaving交错 their records. Then on top of that you can add a shuffling buffer using the shuffle() method![]() . If all this sounds like a lot of work, don’t worry: the Data API makes all this possible in just a few lines of code. Let’s see how to do this.
. If all this sounds like a lot of work, don’t worry: the Data API makes all this possible in just a few lines of code. Let’s see how to do this.
Interleaving lines from multiple files
Split the California dataset to multiple CSV files
Let's start by loading and preparing the California housing dataset. We first load it, then split it into a training set, a validation set and a test set, and finally we scale it:
from sklearn.datasets import fetch_california_housing
from sklearn.model_selection import train_test_split
from sklearn.preprocessing import StandardScaler

housing = fetch_california_housing()
X_train_full, X_test, y_train_full, y_test = train_test_split(
    housing.data, housing.target.reshape(-1, 1), random_state=42
)
X_train, X_valid, y_train, y_valid = train_test_split(
    X_train_full, y_train_full, random_state=42
)

scaler = StandardScaler()
scaler.fit(X_train)
X_mean = scaler.mean_
X_std = scaler.scale_
For a very large dataset that does not fit in memory, you will typically want to split it into many files first, then have TensorFlow read these files in parallel. To demonstrate this, let's start by splitting the housing dataset and save it to 20 CSV files:
import os

os.path ![]()
os.makedirs(name, mode=0o777, exist_ok=False)
作用
- 用来创建多层目录(单层请用os.mkdir)
参数说明
- name:你想创建的目录名
- mode:要为目录设置的权限数字模式,默认的模式为 0o777 (八进制)。
- exist_ok:是否在目录存在时触发异常。如果exist_ok为False(默认值),则在目标目录已存在的情况下触发FileExistsError异常;如果exist_ok为True,则在目标目录已存在的情况下不会触发FileExistsError异常。
makedirs(name, mode=511, exist_ok=False)
makedirs(name [, mode=0o777][, exist_ok=False])
Super-mkdir; create a leaf directory and all intermediate ones. Works like mkdir, except that any intermediate path segment (not just the rightmost) will be created if it does not exist. If the target directory already exists, raise an OSError if exist_ok is False. Otherwise no exception is raised. This is recursive.
import numpy as np

def save_to_multiple_csv_files(data, name_prefix, header=None, n_parts=10):
    housing_dir = os.path.join("datasets", "housing")
    os.makedirs( housing_dir, exist_ok=True)
    path_format = os.path.join(housing_dir, "my_{}_{:02d}.csv")

    filepaths = []
    m = len(data)

    # file_idx: group indices of multiple arrays
    # row_indices: element indices in an array
    for file_idx, row_indices in enumerate( np.array_split(np.arange(m), n_parts) ): # iterate files
        part_csv = path_format.format(name_prefix, file_idx)
        filepaths.append(part_csv)

        #"t": refers to the text mode
        with open(part_csv, "wt", encoding="utf-8") as f:
            if header is not None:
                f.write(header)
                f.write("\n")

            for row_idx in row_indices: # iterate rows
                # str()主要面向用户,其目的是可读性,返回形式为用户友好性和可读性都较强的字符串类型;
                # repr() 函数将对象转化为供解释器读取的形式
                # 当我们想所有环境下都统一显示的话,可以重构__repr__方法;
                # 当我们想在不同环境下"支持不同的显示",例如终端用户显示使用__str__,
                # 而程序员在开发期间则使用底层的__repr__来显示,实际上__str__只是覆盖了__repr__
                # 以得到更友好的用户显示。
                f.write(",".join([repr(col) for col in data[row_idx]
                                 ])
                       )
                f.write("\n")

    return filepaths
train_data = np.c_[X_train, y_train]
valid_data = np.c_[X_valid, y_valid]
test_data = np.c_[X_test, y_test]
# y_name
header_cols = housing.feature_names + ["MedianHouseValue"]
header = ",".join(header_cols)
train_filepaths = save_to_multiple_csv_files( train_data, "train", header, n_parts=20 )
valid_filepaths = save_to_multiple_csv_files( valid_data, "valid", header, n_parts=10 )
test_filepaths = save_to_multiple_csv_files( test_data, "test", header, n_parts=10 ) 
Okay, now let's take a peek at the first few lines of one of these CSV files:
import pandas as pd

pd.read_csv( train_filepaths[0]).head() 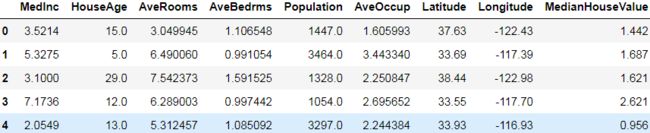
Or in text mode:
with open(train_filepaths[0]) as f:
    for i in range(5):
        print(f.readline(), end="")
Now, you’ve loaded the California housing dataset, shuffled it (unless it was already shuffled), and split it into a training set, a validation set, and a test set. Then you split each set into many CSV files that each look like this (each row contains eight input features plus the target median house value).
Let’s also suppose train_filepaths contains the list of training file paths (and you also have valid_filepaths and test_filepaths):
train_filepaths
Alternatively, you could use file patterns; for example, train_filepaths = "datasets/housing/my_train_*.csv". Now let’s create a dataset containing only these file paths:
@staticmethodlist_files( file_pattern, shuffle=None, seed=None )
Note: The default behavior of this method is to return filenames in a non-deterministic random shuffled order. Pass a seed or shuffle=False to get results in a deterministic order.
file_pattern |
A string, a list of strings, or a tf.Tensor of string type (scalar or vector), representing the filename glob (i.e. shell wildcard) pattern(s) that will be matched. |
The file_pattern argument should be a small number of glob patterns . If your filenames have already been globbed(### a group : X =tf.range(10): Dataset.from_tensor_slices(filenames) instead(see previous example), as re-globbing every filename with list_files may result in poor performance with remote storage systems.
https://www.tensorflow.org/api_docs/python/tf/data/Dataset
filepath_dataset = tf.data.Dataset.list_files(train_filepaths, seed=42)

for filepath in filepath_dataset:
    print(filepath)
By default, the list_files() function returns a dataset that shuffles the file paths. In general this is a good thing, but you can set shuffle=False if you do not want that for some reason.

Alternatively, you could use file patterns; for example, train_filepaths = "datasets/housing/my_train_*.csv". Now let’s create a dataset containing only these file paths:
train_filepaths= "datasets/housing/my_train_*.csv"
train_filepaths![]()
filepath_dataset = tf.data.Dataset.list_files(train_filepaths, seed=42)

for filepath in filepath_dataset:
    print(filepath)
Next, you can call the interleave() method to read from five files (n_readers = 5) at a time and interleave their lines (skipping the first line of each file, which is the header row, using the skip() method):
n_readers = 5
dataset = filepath_dataset.interleave(
    lambda filepath: tf.data.TextLineDataset(filepath).skip(1), #skip the header row #map_func
    cycle_length=n_readers
)
The interleave() method will create a dataset that will pull five file paths(cycle_length=n_readers) from the filepath_dataset, and for each one(filepath) it will call the function you gave it (a lambda in this example) to create a new dataset (in this case a TextLineDataset).
To be clear, at this stage there will be seven datasets in all: the filepath dataset, the interleave dataset, and the 5 TextLineDatasets created internally by the interleave dataset.
When we iterate over the interleave dataset, it will cycle through these five TextLineDatasets, reading one line at a time from each until all datasets are out of items. Then it will get the next five file paths from the filepath_dataset and interleave them the same way, and so on until it runs out of file paths.
For interleaving to work best, it is preferable to have files of identical length; otherwise the ends of the longest files will not be interleaved.
interleave(
    map_func, cycle_length=None, block_length=None, num_parallel_calls=None,
    deterministic=None
)
By default, interleave() does not use parallelism; it just reads one line at a time from each file, sequentially. If you want it to actually read files in parallel, you can set the num_parallel_calls argument to the number of threads you want (note that the map() method also has this argument). You can even set it to tf.data.experimental.AUTOTUNE to make TensorFlow choose the right number of threads dynamically based on the available CPU (however, this is an experimental feature for now). Let’s look at what the dataset contains now:
for line in dataset.take(5):
    print(line.numpy())
These are the first rows (ignoring the header row) of five CSV files, chosen randomly. Looks good! But as you can see, these are just byte strings; we need to parse them and scale the data.
At first,
Notice that field 4 is interpreted as a string.
[0, np.nan, tf.constant(np.nan, dtype=tf.float64), "Hello", tf.constant([])]
tf.io.decode_csv(
    records, record_defaults, field_delim=',', use_quote_delim=True, na_value='',
    select_cols=None, name=None
)
Convert CSV records to tensors. Each column maps to one tensor.
record_defaults: A list of Tensor objects with specific types. Acceptable types are float32, float64, int32, int64, string. One tensor per column of the input record, with either a scalar default value for that column or an empty vector if the column is required.
record_defaults = [0,
                    np.nan,
                    tf.constant(np.nan, dtype=tf.float64),
                    "Hello",
                    tf.constant([])
                   ]
parsed_fields = tf.io.decode_csv( '1,2,3,4,5', record_defaults )
parsed_fields
Note the string '4' in 4th tensor
Notice that all missing fields are replaced with their default value(here is 5.0), when provided:
parsed_fields = tf.io.decode_csv(',,,,5', record_defaults)
parsed_fields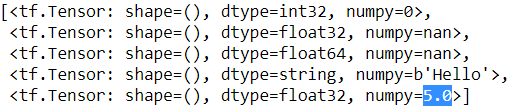
The 5th field is compulsory[kəmˈpəlsəri] 必须做的,强制性的(since we provided tf.constant([]) as the "default value"), so we get an exception if we do not provide it:
try:
    parsed_fields = tf.io.decode_csv('1,2,3,4,5,6,7', record_defaults)
except tf.errors.InvalidArgumentError as ex:
    print(ex)
Loading and Preprocessing Data from multiple CSVs, then training
Preprocessing the Data
Let’s implement a small function that will perform this preprocessing:
https://blog.csdn.net/Linli522362242/article/details/107459161
Once the optimized graph is ready, the TF Function efficiently executes the operations in the graph, in the appropriate order (and in parallel when it can). As a result, a TF Function will usually run much faster than the original Python function, especially if it performs complex computations
# scaler = StandardScaler()
# scaler.fit(X_train)
# X_mean = scaler.mean_
# X_std = scaler.scale_

n_inputs = 8 # X_train.shape[-1] # X_train.shape=(11610, 8)

@tf.function
def preprocess(line):
    defs =[0.]*n_inputs + [tf.constant([], dtype=tf.float32)] # record_defaults
    fields = tf.io.decode_csv(line, record_defaults=defs)
    x = tf.stack(fields[:-1])
    y = tf.stack(fields[-1:])
    return (x - X_mean)/X_std, y
Let’s walk through this code:
- First, the code assumes that we have precomputed the mean and standard deviation of each feature in the training set. X_mean and X_std are just 1D tensors (or NumPy arrays) containing eight floats, one per input feature.
- The preprocess() function takes one CSV line and starts by parsing it. For this it uses the tf.io.decode_csv() function, which takes two arguments: the first is the line to parse, and the second is an array containing the default value for each column in the CSV file. This array tells TensorFlow not only the default value for each column, but also the number of columns and their types. In this example, we tell it that all feature columns are floats and that missing values should default to 0., but we provide an empty array of type tf.float32 as the default value for the last column (the target): the array tells TensorFlow that this column contains floats, but that there is no default value, so it will raise an exception if it encounters a missing value.
- The decode_csv() function returns a list of scalar tensors (one per column), but we need to return 1D tensor arrays. So we call tf.stack() on all tensors except for the last one (the target): this will stack these tensors into a 1D array with multiple values. We then do the same for the target value (this makes it a 1D tensor array with a single value, rather than a scalar tensor).
- Finally, we scale the input features by subtracting the feature means and then dividing by the feature standard deviations, and we return a tuple containing the scaled features and the target.
Let’s test this preprocessing function:
preprocess(b'4.2083,44.0,5.3232,0.9171,846.0,2.3370,37.47,-122.2,2.782')
Looks good! We can now apply the function to the dataset.
Putting Everything Together
To make the code reusable, let’s put together everything we have discussed so far into a small helper function: it will create and return a dataset that will efficiently load California housing data from multiple CSV files, preprocess it, shuffle it, optionally
repeat it, and batch it (see Figure 13-2):
def csv_reader_dataset(filepaths, repeat=1,
                       n_readers=5,# number of files or filepaths
                       n_read_threads=None,
                       shuffle_buffer_size=10000,
                       n_parse_threads=5,
                       batch_size=32
                      ):
    ######### pick multiple files randomly and read them simultaneously, interleaving交错 their records #########
    # list_files() function returns a dataset that "shuffles" the file paths, then repeat 'repeat' times
    dataset = tf.data.Dataset.list_files(filepaths).repeat(repeat)

    # interleave() method to read from cycle_length(=n_readers) files at a time and
    # "interleave their lines" (called cycle) : reading one line at a time from each until all datasets are out of items
    # Then it will get the next five file paths from the 'dataset' and interleave them the same way,
    # and so on until it runs out of file paths
    dataset = dataset.interleave(
        lambda filepath: tf.data.TextLineDataset(filepath).skip(1), # skip the header row via map_func
        cycle_length=n_readers,# 'interleave' pull cycle_length(=n_readers) file paths(1 by 1) from the 'dataset'
        num_parallel_calls=n_read_threads
    )#and for each one(filepath) it will call the function you gave it(lambda) to create a new dataset(TextLineDataset)
    #the interleave dataset including cycle_length(=n_readers) datasets

    ############## Then on top of that you can add a shuffling buffer using the shuffle() method ##############
    dataset = dataset.shuffle(shuffle_buffer_size)
    dataset = dataset.map(preprocess, #split and combine to form x_train and y_train, then scale
                          num_parallel_calls=n_parse_threads)
    dataset = dataset.batch(batch_size)#group the items of the previous dataset in batches of 'batch_size' items

    return dataset.prefetch(1)
Everything should make sense in this code, except the very last line (prefetch(1)), which is important for performance.
Figure 13-2. Loading and preprocessing data from multiple CSV files
Prefetching
By calling prefetch(1) at the end, we are creating a dataset that will do its best to always be one batch ahead. In other words, while our training algorithm is working on one batch, the dataset will already be working in parallel on getting the next batch
ready (e.g., reading the data from disk and preprocessing it). This can improve performance dramatically, as is illustrated in Figure 13-3. If we also ensure that loading and preprocessing are multithreaded (by setting num_parallel_calls when calling interleave() and map()), we can exploit multiple cores on the CPU and hopefully make preparing one batch of data shorter than running a training step on the GPU:
this way the GPU will be almost 100% utilized (except for the data transfer time from the CPU to the GPU3), and training will run much faster.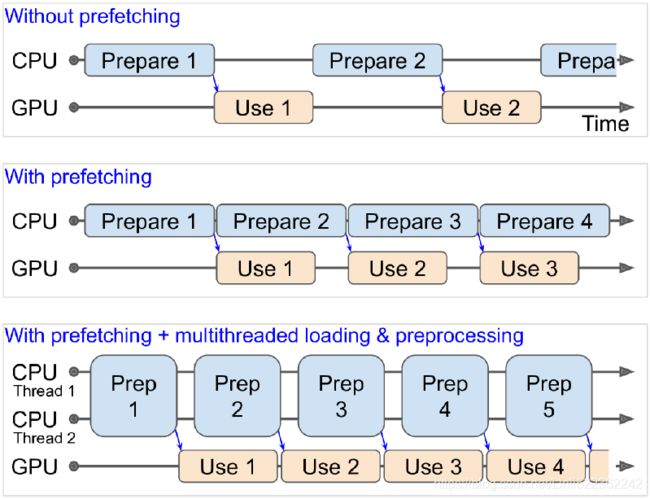 Figure 13-3. With prefetching, the CPU and the GPU work in parallel: as the GPU works on one batch, the CPU works on the next
If you plan to purchase a GPU card, its processing power and its memory size are of course very important (in particular, a large amount of RAM is crucial for computer vision). Just as important to get good performance is its memory bandwidth; this is the number of gigabytes of data it can get into or out of its RAM per second.
tf.random.set_seed(42)

train_set = csv_reader_dataset(train_filepaths, batch_size=3)
for X_batch, y_batch in train_set.take(2):
    print('X =', X_batch)
    print('y =', y_batch)
print() 
If the dataset is small enough to fit in memory, you can significantly speed up training by using the dataset’s cache() method to cache its content to RAM. You should generally do this after loading and preprocessing the data, but before shuffling, repeating, batching, and prefetching. This way, each instance will only be read and preprocessed once (instead of once per epoch), but the data will still be shuffled differently at each epoch, and the next batch will still be prepared in advance.
You now know how to build efficient input pipelines to load and preprocess data from multiple text files. We have discussed the most common dataset methods, but there are a few more you may want to look at: concatenate(), zip(), window(), reduce(), shard(), flat_map(), and padded_batch(). There are also a couple more class methods: from_generator() and from_tensors(), which create a new dataset from a Python generator or a list of tensors, respectively. Please check the API documentation for more details. Also note that there are experimental features available in tf.data.experimental, many of which will likely make it to the core API in future releases (e.g., check out the CsvDataset class, as well as the make_csv_dataset() method, which takes care of inferring the type of each column).
Here is a short description of each method in the Dataset class:
for m in dir(tf.data.Dataset):
    if not (m.startswith("_") or m.endswith("_")):
        func = getattr(tf.data.Dataset, m)
        if hasattr(func, "__doc__"):
            print("● {:21s}{}".format(m + "()", func.__doc__.split("\n")[0]))
● apply() Applies a transformation function to this dataset.
● as_numpy_iterator() Returns an iterator which converts all elements of the dataset to numpy.
● batch() Combines consecutive elements of this dataset into batches.
● cache() Caches the elements in this dataset.
● concatenate() Creates a `Dataset` by concatenating the given dataset with this dataset.
● element_spec() The type specification of an element of this dataset.
● enumerate() Enumerates the elements of this dataset.
● filter() Filters this dataset according to `predicate`.
● flat_map() Maps `map_func` across this dataset and flattens the result.
● from_generator() Creates a `Dataset` whose elements are generated by `generator`.
● from_tensor_slices() Creates a `Dataset` whose elements are slices of the given tensors.
● from_tensors() Creates a `Dataset` with a single element, comprising the given tensors.
● interleave() Maps `map_func` across this dataset, and interleaves the results.
● list_files() A dataset of all files matching one or more glob patterns.
● map() Maps `map_func` across the elements of this dataset.
● options() Returns the options for this dataset and its inputs.
● padded_batch() Combines consecutive elements of this dataset into padded batches.
● prefetch() Creates a `Dataset` that prefetches elements from this dataset.
● range() Creates a `Dataset` of a step-separated range of values.
● reduce() Reduces the input dataset to a single element.
● repeat() Repeats this dataset so each original value is seen `count` times.
● shard() Creates a `Dataset` that includes only 1/`num_shards` of this dataset.
● shuffle() Randomly shuffles the elements of this dataset.
● skip() Creates a `Dataset` that skips `count` elements from this dataset.
● take() Creates a `Dataset` with at most `count` elements from this dataset.
● unbatch() Splits elements of a dataset into multiple elements.
● window() Combines (nests of) input elements into a dataset of (nests of) windows.
● with_options() Returns a new `tf.data.Dataset` with the given options set.
● zip() Creates a `Dataset` by zipping together the given datasets.Using the Dataset with tf.keras
Now we can use the csv_reader_dataset() function to create a dataset for the training set. Note that we do not need to repeat it, as this will be taken care of by tf.keras. We also create datasets for the validation set and the test set:
train_set = csv_reader_dataset(train_filepaths, repeat=None) # 'PrefetchDataset'
valid_set = csv_reader_dataset(valid_filepaths) # 'PrefetchDataset'
test_set = csv_reader_dataset(test_filepaths) # 'PrefetchDataset'
And now we can simply build and train a Keras model using these datasets. All we need to do is pass the training and validation datasets to the fit() method, instead of X_train, y_train, X_valid, and y_valid:
from tensorflow import keras
import numpy as np

keras.backend.clear_session()
np.random.seed(42)
tf.random.set_seed(42)

model = keras.models.Sequential([
    keras.layers.Dense(30, activation='relu', input_shape=X_train.shape[1:]),
    keras.layers.Dense(1),
])

model.compile(loss="mse", optimizer=keras.optimizers.SGD(lr=1e-3))

batch_size=32 #default
model.fit(train_set, steps_per_epoch=len(X_train)//batch_size, #=362
          epochs=10,
          validation_data=valid_set)
The fit() method will take care of repeating the training dataset. Alternatively, you could call repeat() on the training dataset so that it repeats forever and specify the steps_per_epoch argument when calling the fit() method. This may be useful in some rare cases, for example if you want to use a shuffle buffer that crosses over epochs.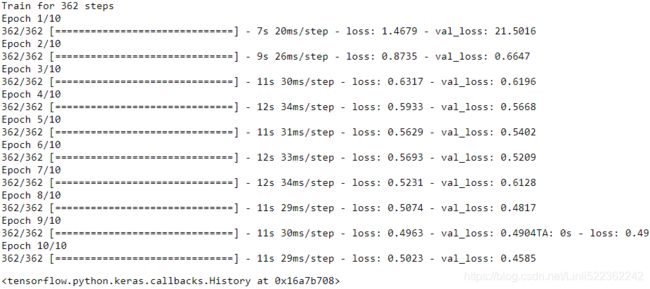
Similarly, we can pass a dataset to the evaluate() and predict() methods:
model.evaluate( test_set, steps=len(X_test)//batch_size)![]()
test_set ![]()
test_set includes labels
#csv_reader_dataset(test_filepaths)
new_set = test_set# we could instead just pass test_set, Keras would ignore the labels
X_new = X_test
model.predict(new_set, steps=len(X_new)//batch_size) 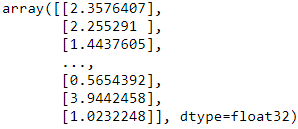
new_set ![]()
Alternatively, re-run from train_set = csv_reader_dataset(train_filepaths, repeat=None) to
#csv_reader_dataset(test_filepaths)
new_set = test_set.map(lambda X, y:X) # we could instead just pass test_set, Keras would ignore the labels
X_new = X_test
model.predict(new_set, steps=len(X_new)//batch_size)
lambda X, y:X ==> just return X
new_set ![]()
# X_new = X_test
X_new.shape ![]()
Unlike the other sets, the new_set will usually not contain labels (if it does, Keras will ignore them). Note that in all these cases, you can still use NumPy arrays instead of datasets if you want (but of course they need to have been loaded and preprocessed first).
Custom Training Loop after Loading and Preprocessing Data from multiple CSVs
If you want to build your own custom training loop (as in cp12 _Custom Models and Training with TensorFlow_2_progress_status_bar_Training Loops_concrete https://blog.csdn.net/Linli522362242/article/details/107459161), you can just iterate over the training set, very naturally:
# train_filepaths = save_to_multiple_csv_files( train_data, "train", header, n_parts=20 )

keras.backend.clear_session()
np.random.seed(42)
tf.random.set_seed(42)

model = keras.models.Sequential([
    keras.layers.Dense(30, activation="relu", input_shape=X_train.shape[1:]),
    keras.layers.Dense(1),
])

optimizer = keras.optimizers.Nadam(lr=0.01)
loss_fn = keras.losses.mean_squared_error # returns one loss per instance(with few features)

@tf.function
def train(model, n_epochs, batch_size=32,
          n_reader=5, n_read_threads=5, shuffle_buffer_size=10000, n_parse_threads=5):
    train_set = csv_reader_dataset(train_filepaths,
                                   repeat = n_epochs, # list_files() returns a dataset that "shuffles" the file paths, then repeat
                                   n_readers=n_readers, # interleave() fread from cycle_length files at a time
                                   n_read_threads = n_read_threads,
                                   shuffle_buffer_size=shuffle_buffer_size, # shuffle
                                   n_parse_threads=n_parse_threads, #map(preprocess, num_parallel_calls = n_parse_threads)
                                   batch_size=batch_size, #batch()
                                   #prefetch()
                                  )
    ##############################################
    n_steps_per_epoch = len(X_train) // batch_size # 11610 // 32 = 362 steps per epochs
    total_steps = n_epochs * n_steps_per_epoch # if n_epochs=5, then total_steps=1810
    global_step = 0
    ##############################################

    for X_batch, y_batch in train_set.take(total_steps): # 11610//32 * 5 =1810 (taken times) # each time, take 32 instances

        #tracking
        global_step +=1
        if tf.equal( global_step % 100, 0):
            #'\r' moves the cursor ahead on current row
            tf.print("\rGlobal step", global_step, "/", total_steps )

        with tf.GradientTape() as tape:
            y_pred = model(X_batch) # prediction
            main_loss = tf.reduce_mean( loss_fn(y_batch, y_pred) )# returns a mean loss per batch
            loss = tf.add_n([main_loss] + model.losses) #model.losses: there is one "regularization loss" per layer

        # compute the gradient of the loss with regard to each trainable variable
        gradients = tape.gradient(loss, model.trainable_variables)
        optimizer.apply_gradients( zip(gradients, model.trainable_variables))

        ######################## constraint ########################

train(model, 5) 
Congratulations, you now know how to build powerful input pipelines using the Data API! However, so far we have used CSV files, which are common, simple, and convenient but not really efficient, and do not support large or complex data structures (such as images or audio) very well. So let’s see how to use TFRecords instead.
If you are happy with CSV files (or whatever other format you are using), you do not have to use TFRecords. As the saying goes, if it ain’t broke, don’t fix it! TFRecords are useful when the bottleneck during training is loading and parsing the data.
The TFRecord Format
The TFRecord format is TensorFlow’s preferred format for storing large amounts of data and reading it efficiently. It is a very simple binary format that just contains a sequence of binary records of varying sizes (each record is comprised of a length, a
CRC checksum to check that the length was not corrupted, then the actual data, and finally a CRC checksum for the data). You can easily create a TFRecord file using the tf.io.TFRecordWriter class:
A TFRecord file is just a list of binary records. You can create one using a tf.io.TFRecordWriter:
tf.io.TFRecordWriter(
    path, options=None
)
with tf.io.TFRecordWriter("my_data.tfrecord") as f:
f.write(b"This is the first record")
f.write(b"This is the seconde record") ![]()
And you can then use a tf.data.TFRecordDataset to read one or more TFRecord files:
tf.data.TFRecordDataset(
    filenames, compression_type=None, buffer_size=None, num_parallel_reads=None
)
filepaths = ["my_data.tfrecord"]
dataset = tf.data.TFRecordDataset(filepaths)
# dataset :
for item in dataset:
print(item) This will output:
![]()
By default, a TFRecordDataset will read files one by one, but you can make it read multiple files in parallel and interleave their records by setting num_parallel_reads. Alternatively, you could obtain the same result by using list_files() and interleave() as we did earlier to read multiple CSV files.
filepaths = ["my_test_{}.tfrecord".format(i) for i in range(5)]
# ['my_test_0.tfrecord',
#  'my_test_1.tfrecord',
#  'my_test_2.tfrecord',
#  'my_test_3.tfrecord',
#  'my_test_4.tfrecord']
for i, filepath in enumerate(filepaths):
    with tf.io.TFRecordWriter(filepath) as f:
        for j in range(3):
            f.write("File {} record {}".format(i,j).encode('utf-8'))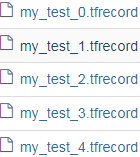
You can read multiple TFRecord files with just one TFRecordDataset. By default it will read them one at a time, but if you set num_parallel_reads=3, it will read 3 at a time in parallel and interleave their records:
dataset = tf.data.TFRecordDataset(filepaths, num_parallel_reads=3)
for item in dataset:
    print(item)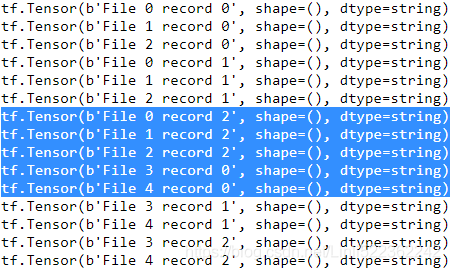
Alternatively, you could obtain the same result by using list_files() and interleave() as we did earlier to read multiple CSV files.
dataset = tf.data.Dataset.list_files(filepaths).repeat(1)
dataset = dataset.interleave(lambda filepath: tf.data.TFRecordDataset(filepath),#######
                             cycle_length=3,#######
                             num_parallel_calls =3########
                            )
for item in dataset:
    print(item)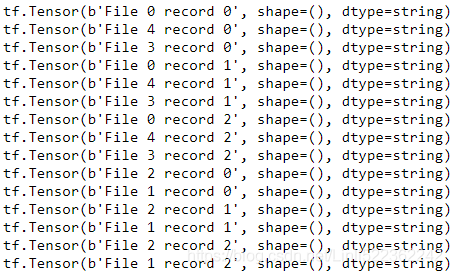
Compressed TFRecord Files
It can sometimes be useful to compress your TFRecord files, especially if they need to be loaded via a network connection. You can create a compressed TFRecord file by setting the options argument:
options = tf.io.TFRecordOptions( compression_type="GZIP")
with tf.io.TFRecordWriter("my_compressed.tfrecord", options) as f:
    f.write(b"This the first record")
f.write(b"This the second record")![]()
When reading a compressed TFRecord file, you need to specify the compression type:
dataset = tf.data.TFRecordDataset(["my_compressed.tfrecord"], compression_type="GZIP")
for item in dataset:
print(item)![]()
A Brief Introduction to Protocol Buffers
Even though each record can use any binary format you want, TFRecord files usually contain serialized protocol buffers (also called protobufs). This is a portable, extensible, and efficient binary format developed at Google back in 2001 and made open source in 2008; protobufs are now widely used, in particular in gRPC, Google’s remote procedure call system. They are defined using a simple language that looks like this:
For this section you need to install protobuf: https://developers.google.com/protocol-buffers/docs/downloads. In general you will not have to do so when using TensorFlow, as it comes with functions to create and parse protocol buffers of type tf.train.Example, which are generally sufficient. However, in this section we will learn about protocol buffers by creating our own simple protobuf definition, so we need the protobuf compiler (protoc): we will use it to compile the protobuf definition to a Python module that we can then use in our code
First let's write a simple protobuf definition:
你指定的 message 字段可以是下面几种情况之一:
- required: 格式良好的 message 必须包含该字段一次。
- optional: 格式良好的 message 可以包含该字段零次或一次(不超过一次)。
- repeated: 该字段可以在格式良好的消息中重复任意多次(包括零)。其中重复值的顺序会被保留。
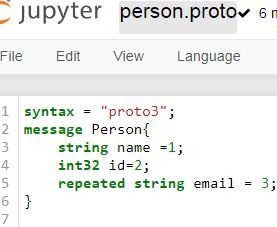
%%writefile person.proto
syntax = "proto3";
message Person{
    string name =1;
    int32 id=2;
    repeated string email = 3;
}
This definition says we are using version 3 of the protobuf format, and it specifies that each Person object(Since protobuf objects are meant to be serialized and transmitted, they are called messages) may (optionally) have a name of type string, an id of type int32, and zero or more email fields, each of type string. The numbers 1, 2, and 3 are the field identifiers: they will be used in each record’s binary representation. Once you have a definition in a .proto file, you can compile it. This requires protoc, the protobuf compiler, to generate access classes in Python (or some other language).
Note that the protobuf definitions we will use have already been compiled for you, and their Python classes are part of TensorFlow, so you will not need to use protoc. All you need to know is how to use protobuf access classes in Python. To illustrate the basics, let’s look at a simple example that uses the access classes generated for the Person protobuf (the code is explained in the comments):
And let's compile it (the --descriptor_set_out and --include_imports options are only required for the tf.io.decode_proto() example below):
所在的源目录 生成python代码(person_pb2.py)
!protoc person.proto --python_out=. --descriptor_set_out=person.desc --include_imports
!protoc person.proto --python_out=. --descriptor_set_out=person.desc --include_imports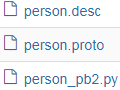


# -*- coding: utf-8 -*-
# Generated by the protocol buffer compiler.  DO NOT EDIT!
# source: person.proto

from google.protobuf import descriptor as _descriptor
from google.protobuf import message as _message
from google.protobuf import reflection as _reflection
from google.protobuf import symbol_database as _symbol_database
# @@protoc_insertion_point(imports)

_sym_db = _symbol_database.Default()


DESCRIPTOR = _descriptor.FileDescriptor(
  name='person.proto',
  package='',
  syntax='proto3',
  serialized_options=None,
  serialized_pb=b'\n\x0cperson.proto\"1\n\x06Person\x12\x0c\n\x04name\x18\x01 \x01(\t\x12\n\n\x02id\x18\x02 \x01(\x05\x12\r\n\x05\x65mail\x18\x03 \x03(\tb\x06proto3'
)


_PERSON = _descriptor.Descriptor(
  name='Person',
  full_name='Person',
  filename=None,
  file=DESCRIPTOR,
  containing_type=None,
  fields=[
    _descriptor.FieldDescriptor(
      name='name', full_name='Person.name', index=0,
      number=1, type=9, cpp_type=9, label=1,
      has_default_value=False, default_value=b"".decode('utf-8'),
      message_type=None, enum_type=None, containing_type=None,
      is_extension=False, extension_scope=None,
      serialized_options=None, file=DESCRIPTOR),
    _descriptor.FieldDescriptor(
      name='id', full_name='Person.id', index=1,
      number=2, type=5, cpp_type=1, label=1,
      has_default_value=False, default_value=0,
      message_type=None, enum_type=None, containing_type=None,
      is_extension=False, extension_scope=None,
      serialized_options=None, file=DESCRIPTOR),
    _descriptor.FieldDescriptor(
      name='email', full_name='Person.email', index=2,
      number=3, type=9, cpp_type=9, label=3,
      has_default_value=False, default_value=[],
      message_type=None, enum_type=None, containing_type=None,
      is_extension=False, extension_scope=None,
      serialized_options=None, file=DESCRIPTOR),
  ],
  extensions=[
  ],
  nested_types=[],
  enum_types=[
  ],
  serialized_options=None,
  is_extendable=False,
  syntax='proto3',
  extension_ranges=[],
  oneofs=[
  ],
  serialized_start=16,
  serialized_end=65,
)

DESCRIPTOR.message_types_by_name['Person'] = _PERSON
_sym_db.RegisterFileDescriptor(DESCRIPTOR)

Person = _reflection.GeneratedProtocolMessageType('Person', (_message.Message,), {
  'DESCRIPTOR' : _PERSON,
  '__module__' : 'person_pb2'
  # @@protoc_insertion_point(class_scope:Person)
  })
_sym_db.RegisterMessage(Person)


# @@protoc_insertion_point(module_scope)
!dir person* # !ls person* #note 'ls' is for linux system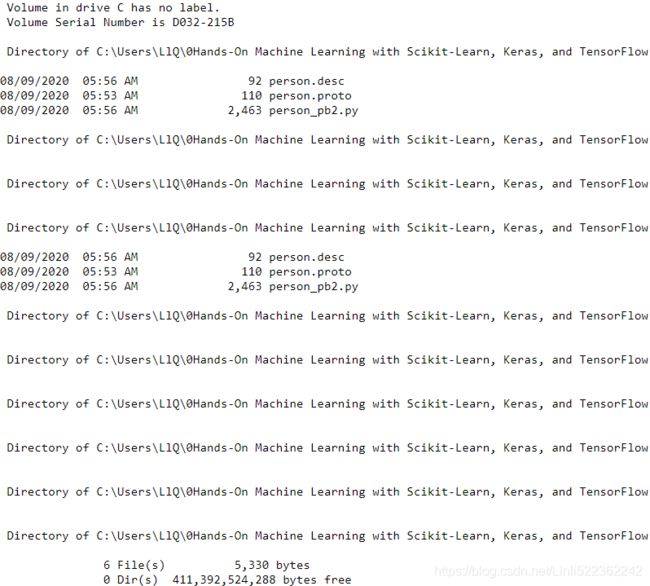
from person_pb2 import Person

person = Person(name='Al', id = 123, email=["[email protected]"]) # create a Person
print(person) # display the Person
person.name # read a field![]()
person.name = 'Alice' # modify a field
person.name![]()
person.email[0] # repeated fields can be accessed like arrays![]()
person.email.append('[email protected]') # add an email address
s = person.SerializePartialToString()# serialize the object to a byte string
s
# serialize the object to a byte string

person2 = Person() # create a new Person
person2.ParseFromString(s) # parse the byte string (27 bytes long)
# parse the byte string (27 bytes long)
![]()
person == person2 # now they are equal![]()
In short, we import the Person class generated by protoc, we create an instance and play with it, visualizing it and reading and writing some fields, then we serialize it using the SerializeToString() method. This is the binary data that is ready to be
saved or transmitted over the network. When reading or receiving this binary data, we can parse it using the ParseFromString() method, and we get a copy of the object that was serialized.
person2.name, person2.id, person2.email![]()
We could save the serialized Person object to a TFRecord file, then we could load and parse it: everything would work fine. However, SerializeToString() and ParseFrom String() are not TensorFlow operations (and neither are the other operations in this code), so they cannot be included in a TensorFlow Function (except by wrapping them in a tf.py_function() operation, which would make the code slower and less portable, as we saw in Chapter 12). Fortunately, TensorFlow does include special protobuf definitions for which it provides parsing operations.
TensorFlow Protobufs
The main protobuf typically used in a TFRecord file is the Example protobuf, which represents one instance in a dataset. It contains a list of named features, where each feature can either be a list of byte strings, a list of floats, or a list of integers. Here is the protobuf definition:
Custom protobuf
In rare cases, you may want to parse a custom protobuf (like the one we just created) in TensorFlow. For this you can use the tf.io.decode_proto() function:
person_tf = tf.io.decode_proto(
    bytes=s,
    message_type="Person",
    field_names=["name", "id", "email"],
    output_types=[tf.string, tf.int32, tf.string],
    descriptor_source="person.desc"
)

person_tf
person_tf.values
Here is the definition of the tf.train.Example protobuf:
The numbers 1, 2, and 3 are the field identifiers: they will be used in each record’s binary representation
syntax = "proto3";

message BytesList { repeated bytes value = 1; }
message FloatList { repeated float value = 1 [packed = true]; }
message Int64List { repeated int64 value = 1 [packed = true]; }
message Feature {
    oneof kind {
        BytesList bytes_list = 1;
        FloatList float_list = 2;
        Int64List int64_list = 3;
    }
};
message Features { map feature = 1; };
message Example { Features features = 1; };
The definitions of BytesList, FloatList, and Int64List are straightforward enough. Note that [packed = true] is used for repeated numerical fields, for a more efficient encoding. A Feature contains either a BytesList, a FloatList, or an Int64List. A Features (with an s) contains a dictionary that maps a feature name to the corresponding feature value. And finally, an Example contains only a Features object. Here is how you could create a tf.train.Example representing the same person as earlier and write it to a TFRecord file:
Warning: there's currently a bug preventing from tensorflow.train import X so we work around it by writing X = tf.train.X. See https://github.com/tensorflow/tensorflow/issues/33289 for more details
from tensorflow.train import BytesList, FloatList, Int64List
from tensorflow.train import Feature, Features, Example
---------------------------------------------------------------------------
ModuleNotFoundError Traceback (most recent call last)
in
----> 1 from tensorflow.train import BytesList, FloatList, Int64List
2 from tensorflow.train import Feature, Features, Example
ModuleNotFoundError: No module named 'tensorflow.train' Solution:
import tensorflow as tf

BytesList = tf.train.BytesList
FloatList = tf.train.FloatList
Int64List = tf.train.Int64List

Feature = tf.train.Feature
Features = tf.train.Features
Example = tf.train.Example

person_example = Example(
    #message 'Example' { Features 'features' = 1; };
    features = Features(
        #message 'Features' { map 'feature' = 1; };
        feature={
            #map
            "name": Feature( bytes_list=BytesList( value=[b"Alice"] ) ),
            "id": Feature( int64_list=Int64List( value=[123] ) ),
            "emails": Feature( bytes_list=BytesList( value=[b"[email protected]",
                                                            b"[email protected]"]
                                                   )
                             )
        }
    )
)
The code is a bit verbose and repetitive, but it’s rather straightforward (and you could easily wrap it inside a small helper function). Now that we have an Example protobuf, we can serialize it by calling its SerializeToString() method, then write the resulting data to a TFRecord file:
with tf.io.TFRecordWriter("my_contacts.tfrecord") as f:
f.write(person_example.SerializeToString())![]()
Normally you would write much more than one Example! Typically, you would create a conversion script that reads from your current format (say, CSV files), creates an Example protobuf for each instance, serializes them, and saves them to several TFRecord files, ideally shuffling them in the process. This requires a bit of work, so once again make sure it is really necessary (perhaps your pipeline works fine with CSV files).
Now that we have a nice TFRecord file containing a serialized Example, let’s try to load it.
Loading and Parsing Examples
To load the serialized Example protobufs, we will use a tf.data.TFRecordDataset once again, and we will parse each Example using tf.io.parse_single_example(). This is a TensorFlow operation, so it can be included in a TF Function. It requires at least two arguments: a string scalar tensor containing the serialized data, and a description of each feature. The description is a dictionary that maps each feature name to either a tf.io.FixedLenFeature descriptor indicating the feature’s shape, type, and default value, or a tf.io.VarLenFeature descriptor indicating only the type (if the length of the feature’s list may vary, such as for the "emails" feature).
The following code defines a description dictionary, then it iterates over the TFRecord Dataset and parses(based on description) the serialized Example protobuf this dataset contains:
feature_description = {
                                # feature’s shape, type, and default value
    "name": tf.io.FixedLenFeature([], tf.string, default_value=""),
    "id": tf.io.FixedLenFeature([], tf.int64, default_value=0),
            # only the type (if the length of the feature’s list may vary
    "emails": tf.io.VarLenFeature(tf.string)
}

for serialized_example in tf.data.TFRecordDataset(["my_contacts.tfrecord"]):
    parsed_example = tf.io.parse_single_example(serialized_example,
                                                feature_description)
parsed_example
The fixed-length features("name", "id") are parsed as regular tensors, but the variable-length features("emails") are parsed as sparse tensors. You can convert a sparse tensor to a dense tensor using tf.sparse.to_dense(), but in this case it is simpler to just access its values:
parsed_example['emails'].values[0]![]()
tf.sparse.to_dense(parsed_example["emails"], default_value=b"")![]()
parsed_example["emails"].values![]()
parsed_example
A BytesList can contain any binary data you want, including any serialized object. For example, you can use tf.io.encode_jpeg() to encode an image using the JPEG format and put this binary data in a BytesList. Later, when your code reads the TFRecord, it will start by parsing the Example, then it will need to call tf.io.decode_jpeg() to parse the data and get the original image (or you can use tf.io.decode_image(), which can decode any BMP, GIF, JPEG, or PNG image). You can also store any tensor you want in a BytesList by serializing the tensor using tf.io.serialize_tensor() then putting the resulting byte string in a BytesList feature. Later, when you parse the TFRecord, you can parse this data using tf.io.parse_tensor().
Putting Images in TFRecords
from sklearn.datasets import load_sample_images

img = load_sample_images()['images'][0]
plt.imshow(img)
plt.axis('off')
plt.title('Original Image')
plt.show()
... ...
ImportError: The Python Imaging Library (PIL) is required to load data from jpeg files. Please refer to https://pillow.readthedocs.io/en/stable/installation.html for installing PIL.
Solution:

Next, restart your Kernel in your jupyter notebook
from sklearn.datasets import load_sample_images
import matplotlib.pyplot as plt

img = load_sample_images()['images'][0]
plt.imshow(img)
plt.axis('off')
plt.title('Original Image')
plt.show()
# encode an image using the JPEG format and put this binary data in a BytesList.
data = tf.io.encode_jpeg(img)
# message Example { Features features = 1; };
example_with_image = Example( features=Features(
    # message Features { map feature = 1; };
    feature={
        #map       #BytesList bytes_list = 1;
        "image": Feature( bytes_list=BytesList( value=[data.numpy()] ) )
    }))

serialized_example = example_with_image.SerializeToString()
# This is the binary data that is ready to be saved or transmitted over the network.
# then write the resulting data to a TFRecord file
Later, when your code reads the TFRecord, it will start by parsing the Example, then it will need to call tf.io.decode_jpeg() to parse the data and get the original image
feature_description = { 'image': tf.io.VarLenFeature(tf.string) }
example_with_image = tf.io.parse_single_example( serialized_example, feature_description )

decoded_img = tf.io.decode_jpeg( example_with_image['image'].values[0] )

plt.imshow(decoded_img)
plt.title("Decoded Image")
plt.axis("off")
plt.show()
Or use decode_image() which supports BMP, GIF, JPEG and PNG formats:
decoded_img = tf.io.decode_image( example_with_image['image'].values[0] )

plt.imshow(decoded_img)
plt.title("Decoded Image")
plt.axis("off")
plt.show()
Putting Tensors and Sparse Tensors in TFRecords
Tensors can be serialized and parsed easily using tf.io.serialize_tensor() and tf.io.parse_tensor():
t = tf.constant([ [0., 1.], [2., 3.], [4., 5.] ])
# store current tensor in a BytesList by serializing the tensor
s = tf.io.serialize_tensor(t)
s![]()
tf.io.parse_tensor(s, out_type=tf.float32)
parsed_example["emails"]![]()
serialized_sparse = tf.io.serialize_sparse( parsed_example["emails"])
serialized_sparse
BytesList(value=serialized_sparse.numpy())
Instead of parsing examples one by one using tf.io.parse_single_example(), you may want to parse them batch by batch using tf.io.parse_example():
feature_description = {
                                # feature’s shape, type, and default value
    "name": tf.io.FixedLenFeature([], tf.string, default_value=""),
    "id": tf.io.FixedLenFeature([], tf.int64, default_value=0),
            # only the type (if the length of the feature’s list may vary
    "emails": tf.io.VarLenFeature(tf.string)
}

# for serialized_example in tf.data.TFRecordDataset(["my_contacts.tfrecord"]):
#     parsed_example = tf.io.parse_single_example(serialized_example,
#                                                 feature_description)
# parsed_example

dataset = tf.data.TFRecordDataset(["my_contacts.tfrecord"]).batch(10)

for serialized_examples in dataset:
    parsed_examples = tf.io.parse_example(serialized_examples, feature_description)

parsed_examples
parsed_examples['emails'].values![]()
As you can see, the Example protobuf will probably be sufficient for most use cases. However, it may be a bit cumbersome to use when you are dealing with lists of lists.
For example, suppose you want to classify text documents. Each document may be represented as a list of sentences, where each sentence is represented as a list of words. And perhaps each document also has a list of comments, where each comment is represented as a list of words. There may be some contextual data too, such as the document’s author, title, and publication date. TensorFlow’s SequenceExample protobuf is designed for such use cases.
Handling Lists of Lists Using the SequenceExample Protobuf
Here is the definition of the SequenceExample protobuf:
syntax = "proto3";

message FeatureList { repeated Feature feature = 1; };
message FeatureLists { map feature_list = 1; };
message SequenceExample {
  Features context = 1;
  FeatureLists feature_lists = 2;
};
A SequenceExample contains a Features object for the contextual data and a FeatureLists object that contains one or more named FeatureList objects (e.g., a FeatureList named "content" and another named "comments"). Each FeatureList contains a list of Feature objects, each of which may be a list of byte strings, a list of 64-bit integers, or a list of floats (in this example, each Feature would represent a sentence or a comment, perhaps in the form of a list of word identifiers). Building a SequenceExample, serializing it, and parsing it is similar to building, serializing, and parsing an Example, but you must use tf.io.parse_single_sequence_example() to parse a single SequenceExample or tf.io.parse_sequence_example() to parse a batch. Both functions return a tuple containing the context features (as a dictionary) and the feature lists (also as a dictionary). If the feature lists contain sequences of varying sizes (as in the preceding example), you may want to convert them to ragged tensors, using tf.RaggedTensor.from_sparse():
Warning: there's currently a bug preventing from tensorflow.train import X so we work around it by writing X = tf.train.X. See https://github.com/tensorflow/tensorflow/issues/33289 for more details.
# from tensorflow.train import FeatureList, FeatureLists, SequenceExample
BytesList = tf.train.BytesList
Int64List = tf.train.Int64List
Feature = tf.train.Feature
Features = tf.train.Features
FeatureList = tf.train.FeatureList
FeatureLists = tf.train.FeatureLists
SequenceExample = tf.train.SequenceExample
# Features context = 1;
context = Features(
# message Features { map feature = 1; };
feature={
# map;
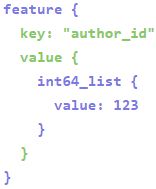
"author_id": Feature( int64_list=Int64List(value=[123]) ),
"title": Feature( bytes_list=BytesList(value=[b"A", b"desert", b"place", b"."]) ),
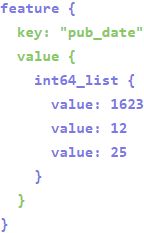
"pub_date": Feature( int64_list=Int64List(value=[1623, 12, 25]) ),
}
)
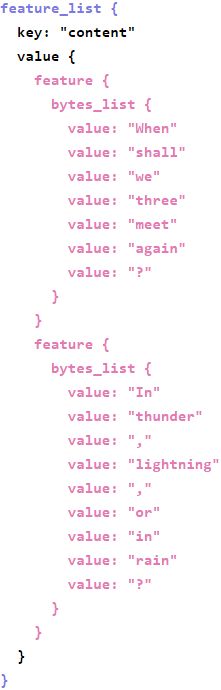
content = [["When", "shall", "we", "three", "meet", "again", "?"],
["In", "thunder", ",", "lightning", ",", "or", "in", "rain", "?"]
]
comments = [["When", "the", "hurlyburly", "'s", "done", "."],
["When", "the", "battle", "'s", "lost", "and", "won", "."]
]
# message Feature {
# oneof kind {
# BytesList 'bytes_list' = 1;
# FloatList 'float_list' = 2;
# Int64List 'int64_list' = 3;
# }
# };
def words_to_feature(words):
return Feature( bytes_list=BytesList( value=[word.encode("utf-8") for word in words] ) )
#repeated Feature feature =>[feature, feature] :each Feature would represent a sentence or comment
# feature=content_features
content_features = [words_to_feature(sentence) for sentence in content]
comments_features = [words_to_feature(comment) for comment in comments]
sequence_example = SequenceExample(
# Features 'context' = 1;
context = context,
# FeatureLists 'feature_lists' = 2;
feature_lists = FeatureLists(
# FeatureLists { map feature_list = 1; };
feature_list={
# map
# FeatureList { repeated Feature feature = 1; };
# Each FeatureList contains a list of Feature objects
"content": FeatureList( feature=content_features),
"comments": FeatureList( feature=comments_features)
}
)
)
sequence_example A SequenceExample contains a Features object(context) for the contextual data and a FeatureLists object(feature_lists) that contains one or more named FeatureList objects (e.g., a FeatureList named "content" and another named "comments").
Each FeatureList contains a list of Feature objects, each of which may be a list of byte strings, a list of 64-bit integers, or a list of floats (in this example, each Feature would represent a sentence or a comment, perhaps in the form of a list of word identifiers).
context {

}
feature_lists {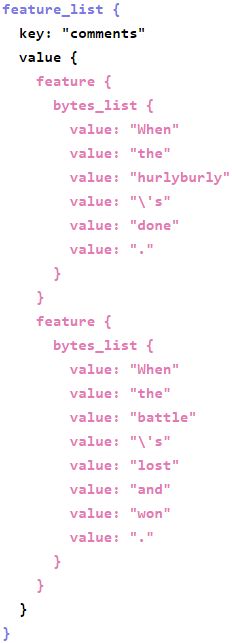
}
serialized_sequence_example = sequence_example.SerializePartialToString()Building a SequenceExample, serializing it, and parsing it is similar to building, serializing, and parsing an Example, but you must use tf.io.parse_single_sequence_example() to parse a single SequenceExample or tf.io.parse_sequence_example() to parse a batch. Both functions return a tuple containing the context features (as a dictionary) and the feature lists (also as a dictionary). If the feature lists contain sequences of varying sizes (as in the preceding example), you may want to convert them to ragged tensors, using tf.RaggedTensor.from_sparse():
context_feature_descriptions = {
    "author_id": tf.io.FixedLenFeature([], tf.int64, default_value=0),
    "title": tf.io.VarLenFeature(tf.string),
    "pub_date": tf.io.FixedLenFeature([3], tf.int64, default_value=[0,0,0]),
}

sequence_feature_descriptions = {
    "content": tf.io.VarLenFeature(tf.string),
    "comments": tf.io.VarLenFeature(tf.string)
}

parsed_context, parsed_feature_lists = tf.io.parse_single_sequence_example(
    serialized_sequence_example, context_feature_descriptions, sequence_feature_descriptions
)

parsed_context![]()
parsed_context['title'].values![]()
parsed_feature_lists![]()
print(
    tf.RaggedTensor.from_sparse(parsed_feature_lists['content'])
)![]()
Now that you know how to efficiently store, load, and parse data, the next step is to prepare it so that it can be fed to a neural network.
Preprocessing the Input Features
https://blog.csdn.net/Linli522362242/article/details/107933572