使用anaconda安装pytorch(gpu)
安装anaconda
在anaconda官网下载包
bash Anaconda3-2020.11-Linux-x86_64.sh
默认进行,完成之后,重启终端。
如果输入conda之后能够使用,即安装成功。
如果显示没有此命令,需要在~/.bashrc文件中添加:
export PATH="~/anaconda3/bin:$PATH"
然后
source ~/.bashrc
重启即可
创建conda虚拟环境
创建conda虚拟环境,以防止与其他版本冲突
conda create -n pytorch_gpu python=3.8
激活虚拟环境
conda activate pytorch_gpu
在虚拟环境中安装pytorch
安装pytorch
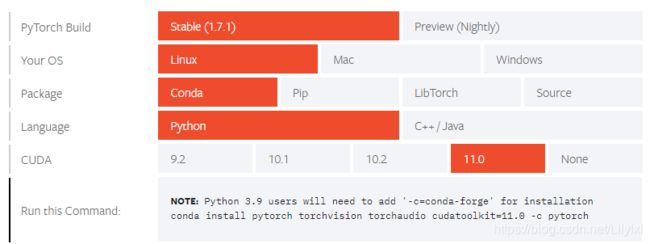
打开pytorch管网,选择conda对应的gpu的版本(由于网速原因,建议使用国内镜像)

在命令行输入以下命令,让conda使用国内镜像下载:
conda config --add channels https://mirrors.tuna.tsinghua.edu.cn/anaconda/cloud/msys2/
conda config --add channels https://mirrors.tuna.tsinghua.edu.cn/anaconda/cloud/conda-forge/
conda config --add channels https://mirrors.tuna.tsinghua.edu.cn/anaconda/pkgs/free/
conda config --add channels https://mirrors.tuna.tsinghua.edu.cn/anaconda/cloud/pytorch/
conda config --set show_channel_urls yes
然后在命令行输入:
conda install pytorch torchvision torchaudio cudatoolkit=11.0
完成pytorch安装。
测试是否成功:
输入:python;
测试一下:import torch
验证pytorch的gpu加速
import torch
torch.cuda.is_available()
cuda是否可用;

torch.cuda.device_count()
返回gpu数量;

torch.cuda.get_device_name(0)
返回gpu名字,设备索引默认从0开始;

torch.cuda.current_device()
返回当前设备索引;

params.device = torch.device(‘cuda’ if torch.cuda.is_available() else ‘cpu’)
params.device = torch.device(‘cpu’)
params.n_gpu = torch.cuda.device_count()
params.multi_gpu = args.multi_gpu
示例代码验证:
import torch
import torch.nn as nn
import torch.utils.data as Data
import torchvision
# torch.manual_seed(1)

EPOCH = 1
BATCH_SIZE = 50
LR = 0.001
DOWNLOAD_MNIST = True

train_data = torchvision.datasets.MNIST(root='./mnist/', train=True, transform=torchvision.transforms.ToTensor(), download=DOWNLOAD_MNIST,)
train_loader = Data.DataLoader(dataset=train_data, batch_size=BATCH_SIZE, shuffle=True)

test_data = torchvision.datasets.MNIST(root='./mnist/', train=False)

# !!!!!!!! Change in here !!!!!!!!! #
test_x = torch.unsqueeze(test_data.test_data, dim=1).type(torch.FloatTensor)[:2000].cuda()/255. # Tensor on GPU
test_y = test_data.test_labels[:2000].cuda()

class CNN(nn.Module):
 def __init__(self):
  super(CNN, self).__init__()
  self.conv1 = nn.Sequential(nn.Conv2d(in_channels=1, out_channels=16, kernel_size=5, stride=1, padding=2,),
         nn.ReLU(), nn.MaxPool2d(kernel_size=2),)
  self.conv2 = nn.Sequential(nn.Conv2d(16, 32, 5, 1, 2), nn.ReLU(), nn.MaxPool2d(2),)
  self.out = nn.Linear(32 * 7 * 7, 10)

 def forward(self, x):
  x = self.conv1(x)
  x = self.conv2(x)
  x = x.view(x.size(0), -1)
  output = self.out(x)
  return output

cnn = CNN()

# !!!!!!!! Change in here !!!!!!!!! #
cnn.cuda()  # Moves all model parameters and buffers to the GPU.

optimizer = torch.optim.Adam(cnn.parameters(), lr=LR)
loss_func = nn.CrossEntropyLoss()

for epoch in range(EPOCH):
 for step, (x, y) in enumerate(train_loader):

  # !!!!!!!! Change in here !!!!!!!!! #
  b_x = x.cuda() # Tensor on GPU
  b_y = y.cuda() # Tensor on GPU

  output = cnn(b_x)
  loss = loss_func(output, b_y)
  optimizer.zero_grad()
  loss.backward()
  optimizer.step()

  if step % 50 == 0:
   test_output = cnn(test_x)

   # !!!!!!!! Change in here !!!!!!!!! #
   pred_y = torch.max(test_output, 1)[1].cuda().data # move the computation in GPU

   accuracy = torch.sum(pred_y == test_y).type(torch.FloatTensor) / test_y.size(0)
   print('Epoch: ', epoch, '| train loss: %.4f' % loss, '| test accuracy: %.2f' % accuracy)

test_output = cnn(test_x[:10])

# !!!!!!!! Change in here !!!!!!!!! #
pred_y = torch.max(test_output, 1)[1].cuda().data # move the computation in GPU

print(pred_y, 'prediction number')
print(test_y[:10], 'real number')