Jetson Nano学习笔记
目录
-
- 1.开发环境配置
-
- 1.1 更新源和软件
- 2.1 安装Code OSS
- 2.2 安装Qt5
- 3. 项目案例
-
- 3.1 人脸检测
- 3.1.1 安装pip
- 3.1.2 安装Python常用机器学习包
- 3.1.3 配置用于Python的Opencv
- 3.1.4 基于Opencv的人脸检测
-
-
- (1)python实现人脸检测
- (2)如何找到/usr/share/opencv4/
- (3)C++实现人脸检测
-
- 3.2 二维码检测(制作扫码枪)
-
- 3.2.1 读取摄像头
-
- (1)读取CSI摄像头
- (2)读取USB摄像头
- 3.2.2 二维码检测和识读
- 4.总结
- 4.0 [原文](https://blog.csdn.net/qianbin3200896/article/details/103760640)
-
-
- 4.1使用这个就会出现CSDN文档编辑目录 去掉()前到空格 **@[TOC] (目录)**
- 4.2Ubuntu 截屏快捷键设置
-
1.开发环境配置
1.1 更新源和软件
安装完系统后首先应该更新源,但是由于Jetson Nano采用的是aarch64架构的Ubuntu 18.04.2 LTS系统,与AMD架构的Ubuntu系统不同,因此不建议使用国内源进行换源,因为其兼容性存在很多问题。这里直接使用Jetson Nano默认的源即可。
sudo apt-get update
sudo apt-get full-upgrade
上述更新时间较长,往往需要数小时才能更新完成,中间可能由于网速的关系会更新失败,此时不要关
由于在开发过程中经常需要使用中文搜索以及书写必要的中文注释,所以推荐为系统安装中文输入法。Jetson Nano自带ibus中文输入法,但是要简单的配置下才能进行中文的输入。在终端中直接输入命令ibus会出现下图所示界面,说明Jetson Nano已经自带了ibus输入法环境了。
sudo apt-get install ibus-pinyin
上述下载和安装大概需要数十分钟的时间。安装完成后进入系统配置System Settings界面,选择语言支持选项Language Support ,
2.1 安装Code OSS
Visual Studio Code(VS Code)是一个免费的集成开发环境(IDE),适用于Windows,Mac和Linux。VS Code近年来获得了越来越多的关注,成为广大编程开发者的首选编译环境。它作为微软推出的开源项目,吸引了无数第三方开发者和终端用户,成为顶尖开源项目之一。它功能强大、速度快,更在拥有海量插件的情况下做到了简洁流畅的用户体验,属于一款非常优秀的IDE。
原生的VS Code并不适用于Jetson Nano,当前,还没有针对Jetson Nano这样的ARM设备的VS Code正式版本。但是,由于它是开源的,所以任何人都可以编译一个版本。其中,Code-OSS就是这样一款嵌入式环境下的“VS Code”。Code-OSS基于VS Code,它并不仅仅是一个代码编辑器,它具有用于管理整个项目文件夹而不是单个脚本的内置资源管理器功能以及丰富的第三方插件。实际上Code-OSS几乎具备了VS Code的所有完整功能,因此用它作为代码编辑器来编辑代码,例如python,会使得整个开发过程更加便捷。下面讲解具体的安装方法。
打开Chromiun浏览器:下载
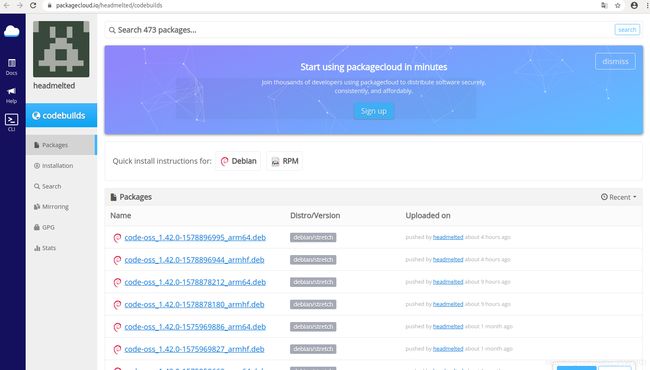
点击Packsges,查看列出来的包名,选择后缀带有arm64的,如下图所示:
单击后进入详情页面,找到对应的wget命令,如下图所示:
该命令演示了如何下载该安装包,具体如下:
wget --content-disposition https://packagecloud.io/headmelted/codebuilds/packages/debian/stretch/code-oss_1.42.0-1575969886_arm64.deb/download.deb
将该命令复制到终端中 回车实现安装包下载。如下图所示:
此时,安装包已经下载到home根目录下,可以通过文件资源管理器查看下载的deb安装包,如下所示:

sudo dpkg -i code-oss_1.42.0-1575969886_arm64.deb
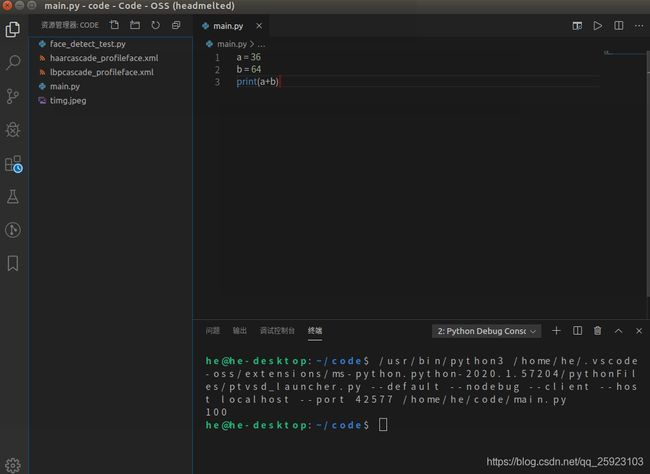
安装完成后从可以在搜索中搜索Code OSS,会弹出Code OSS应用程序,这个即为我们需要的Python编程IDE。单击应用程序打开如下图所示:

下面简单演示下如何使用Code OSS执行Python脚本。
首先在Code OSS中安装Python插件,其插件安装方法和普通的VS Code完全相同,不熟悉VS Code的读者可以先在桌面PC上熟悉VS Code基本用法再切换到Jetson Nano环境中来。插件安装如下图所示,在Extensions面板中搜索python,c/c++,chinese->用于汉化,选择第一个弹出的插件进行安装即可:
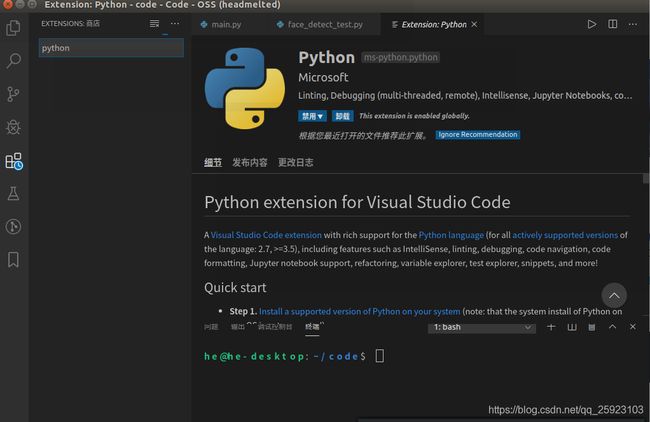
接下来在home目录下新建一个code文件夹,该文件夹用于存放Python代码脚本。然后在Code OSS中打开刚才创建的随意到文件夹名称,然后新建一个文件,按ctrl+s键保存文件,将文件命名为main.py,然后输入下面的代码:
a = 36
b = 64
print(a+b)
至此,已完成Python编辑器的安装和运行。
2.2 安装Qt5
在实际的产品部署阶段,考虑到终端设备速度、稳定性、内存占用等因素,一般会采用C++来开发最终的成品,而只有在产品模型设计阶段才会使用python进行算法开发。因此,需要一款能够在Jetson Nano中开发C++的编译器方便我们开发落地产品。VS Code本身可以开发C++应用,但是Code-OSS对于C++的支持并不好,因此,需要另外安装一个优秀的C++编译器来完成C++开发任务。本文推荐使用Qt。
Qt是一个跨平台的 C++ 开发库,主要用来开发图形用户界面(Graphical User Interface,GUI)程序,当然也可以开发不带界面的命令行(Command User Interface,CUI)程序。Qt 是纯 C++ 开发的,所以用它来开发C++应用具有天然的优势。Qt 支持的操作系统有很多,例如通用操作系统 Windows、Linux、Unix,智能手机系统 Android、iOS、WinPhone以及嵌入式系统 QNX、VxWorks 等等。当然,QT也完全支持Jetson Nano的Ubuntu环境。
sudo apt-get install qt5-default qtcreator -y
此时安装的是Qt5.9.5版本。
安装完成后,同样在搜索菜单中搜索Qt,然后会出现Qt Creator,这个即为Qt的IDE,打开它。接下来简单演示如何创建一个简单的C++控制台程序。
打开Qt Creator,如下图所示:
单击New Project创建一个新项目,这里选择Application 下的Qt COnsole Appliation应用,即创建一个Qt版的C++控制台程序:
然后工程命名为随意
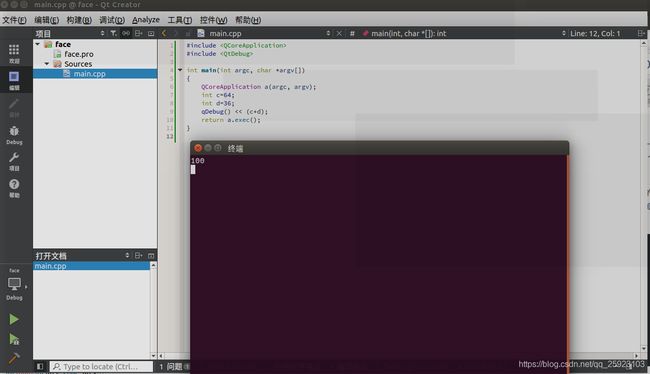
然后一直默认单击下一步即可完成项目的创建。可以看到,Qt已经为我们创建了一个C++文件main.cpp用于编写C++代码,并且还有一个face.pro配置文件用于为整个项目进行配置,效果如下图所示:
此时可以直接按ctrl+r键运行项目,但是由于我们并没有任何输出代码,所以弹出的终端也没有输出任何值。我们修改一下main.cpp的代码,同样来执行两个整数的相加并输出其结果,完成代码如下:
#include 此时,再重新按ctrl+r键运行项目输出终端下图所示结果:
Qt Creator的详细使用请读者自行学习相关教程,这部分资源很多也很成熟,对于开发实际的嵌入式产品来说掌握Qt和C++的使用是一个必要的过程。本文不再对Qt尤其是Qt的界面编程作深入介绍。
最后我们再看一下在主目录下生成了一个与文件名对照的debug可执行项目build-face-unknown-Debug,在这个文件夹中生成来debug版本的可执行程序。通过终端cd命令进入到该文件夹,然后输入

./face 对应你到文件名
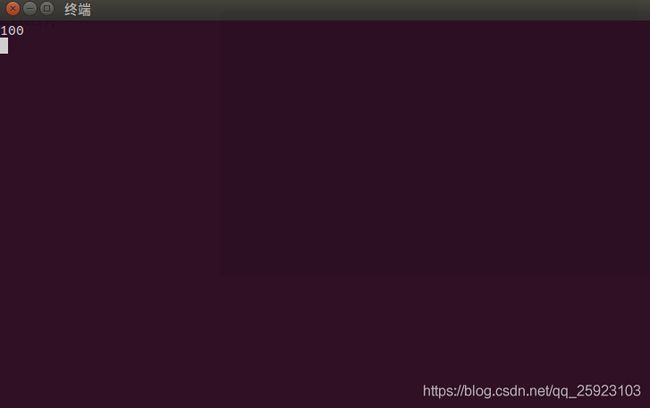
会直接执行程序,如下图所示:

也就是说本质上我们已经成功的部署开发了一个应用,该应用功能很简单,仅仅实现了两个固定整数的相加。尽管简单,但是却梳理了我们正常开发人工智能产品的一种比较常见的形式,即先在VS Code中用python脚本进行算法验证,最后再用QT编写对应的C++应用,最后生成二进制可执行程序,这个最终生成的二进制可执行程序就是我们的“产品”,这个可执行程序代码是封装起来的、不可见的、可以直接运行的。
至此,我们已经完成了Jetson Nano的常规开发配置,接下来会进行几个小项目的演示,使读者可以更深入的学习Jetson Nano的开发方法。
3. 项目案例
3.1 人脸检测
本节首先使用Python来完成人脸检测算法,其中会讲解Python配置和使用Opencv的基本方法以及一些常用python库的安装。
3.1.1 安装pip
由于Jetson Nano中已经预装了Python3.6版本,所以可以直接安装pip。
在终端中输入下述命令进行安装:
sudo apt-get install python3-pip python3-dev
安装完成后此时的pip是9.01版本,需要对pip进行一下升级,否则后面在安装其它Python库的时候会出问题。升级命令如下:
python3 -m pip install --upgrade pip
升级后版本为19.0.3。尽管完成了升级,但是这时候pip3有个小bug需要手动修复一下。
首先使用下面的命令打开pip3文件:
sudo vim /usr/bin/pip3
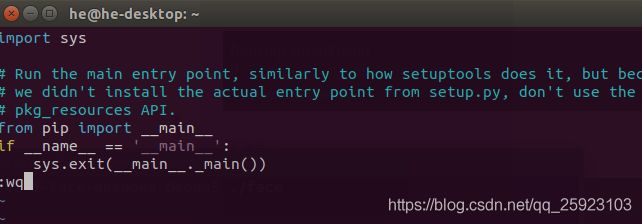
键盘输入字符a进入插入模式,然后可以开始编辑文件,将:
from pip import main
if __name__ == '__main__':
    sys.exit(main())
from pip import __main__
if __name__ == '__main__':
    sys.exit(__main__._main())
然后按Esc键进入到命令模式。最后回车然后按英文的":"键进入模式,敲入wq按回车即可保存修改并退出编辑器。
3.1.2 安装Python常用机器学习包
sudo apt-get install python3-scipy
sudo apt-get install python3-pandas
sudo apt-get install python3-sklearn
3.1.3 配置用于Python的Opencv
有两种方法安装python下的opencv。一种是下载Opencv源码并且重新编译生成对应的python包,然后将该包拷贝到python的安装包路径中;另一种就是直接使用命令 sudo pip3 install python3-opencv。需要注意的是,第二种方式本质上安装的是已经编译好的opencv包,其opencv的版本是固定的,如果想要使用最新的opencv,比如opencv4,那么第二种方法就不合适。本小节先简单的采用第一种方式来安装。
原镜像中已经预装了opencv4.1.1,可以使用下述命令来查看当前Opencv版本号:
sudo opencv_version
输出结果如下图所示:
因此,我们也不需要重新进行编译,直接使用即可。
3.1.4 基于Opencv的人脸检测
(1)python实现人脸检测
本小节首先编写一个python脚本用于检测图像中的人脸,使用Code OSS打开???节中创建的code文件夹,在该文件夹下新建一个python脚本,名为main.py,代码如下所示:
import cv2
filepath = "test.jpg"
img = cv2.imread(filepath) # 读取图片
gray = cv2.cvtColor(img, cv2.COLOR_BGR2GRAY) # 转换灰色
# OpenCV人脸识别分类器
classifier = cv2.CascadeClassifier( "haarcascade_frontalface_default.xml" )
color = (0, 255, 0) # 定义绘制颜色
# 调用识别人脸
faceRects = classifier.detectMultiScale( gray, scaleFactor=1.2, minNeighbors=3, minSize=(32, 32))
if len(faceRects): # 大于0则检测到人脸
    for faceRect in faceRects: # 单独框出每一张人脸
        x, y, w, h = faceRect
        # 框出人脸
        cv2.rectangle(img, (x, y), (x + h, y + w), color, 2)
cv2.imshow("image", img) # 显示图像
c = cv2.waitKey(10)
cv2.waitKey(0)
cv2.destroyAllWindows()
上述代码中filepath用于存放当前需要检测的图像路径,一般可以放在与源文件同目录下即可。在构造opencv人脸检测分类器时,需要对应的人脸检测配置文件,该文件存储了用于人脸检测算法的相关参数,此文件可以从opencv的安装目录找到:/usr/share/opencv4/。找到后将其拷贝到源文件目录下即可。
filepath在这三个文件中到其中一个,haarcascade_frontalface_default.xml

(2)如何找到/usr/share/opencv4/
/计算机/usr/share/opencv4/ 然后点击搜索图标 输入
haarcascade_frontalface_default.xml

haarcascade_profileface.xml

lbpcascade_profileface.xml
(3)C++实现人脸检测
本小节编写一个C++应用,用于检测图像中的人脸,使用Qt5进行开发。相关实现方法与python版相同。主要讲解如何在QT下集成Opencv进行C++项目开发。
C++下开发Opencv需要进行一些额外的配置,先看一下opencv的位置。Jetson Nano预装的Opencv4.1.1的头文件位置如下图所示:
库文件放置在:
/usr/lib/aarch64-linux-gnu
因此,只需要在Qt的pro文件中将上述两个目录包含进来即可。
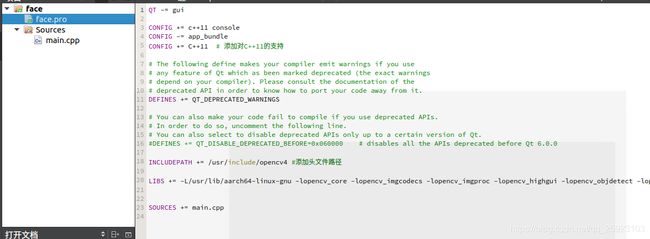
用Qt Creator重新打开2.4.5节创建的face项目,编辑face.pro文件如下:
QT -= gui

CONFIG += c++11 console
CONFIG -= app_bundle
CONFIG += C++11  # 添加对C++11的支持

# The following define makes your compiler emit warnings if you use
# any feature of Qt which as been marked deprecated (the exact warnings
# depend on your compiler). Please consult the documentation of the
# deprecated API in order to know how to port your code away from it.
DEFINES += QT_DEPRECATED_WARNINGS

# You can also make your code fail to compile if you use deprecated APIs.
# In order to do so, uncomment the following line.
# You can also select to disable deprecated APIs only up to a certain version of Qt.
#DEFINES += QT_DISABLE_DEPRECATED_BEFORE=0x060000    # disables all the APIs deprecated before Qt 6.0.0

INCLUDEPATH += /usr/include/opencv4 #添加头文件路径

LIBS += -L/usr/lib/aarch64-linux-gnu -lopencv_core -lopencv_imgcodecs -lopencv_imgproc -lopencv_highgui -lopencv_objdetect  #添加需要链接的库


SOURCES += main.cpp
其中重点需要注意头文件和lib文件的添加方法。
接下来修改main.cpp文件,代码如下:
#include 重新生成整个项目,然后将timg.jpeg和haarcascade_frontalface_default.xml文件放置在编译生成的build-face-unknown-Debug文件夹中,

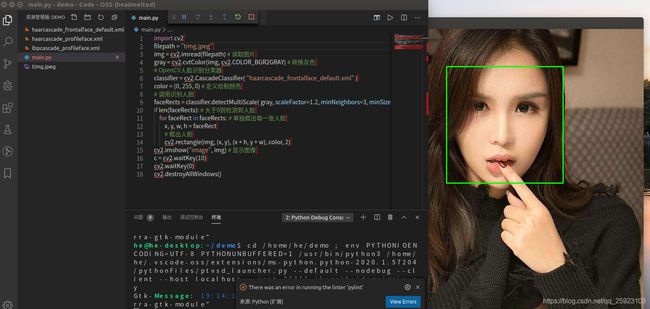
运行项目效果图如下所示:
3.2 二维码检测(制作扫码枪)
现在支付宝和微信广泛使用二维码作为支付手段,在现实生活购物中我们经常会通过手机展示二维码给商家用于扫码,那么我们是否可以自行做一个扫码仪呢?有了Jetson Nano这款嵌入式人工智能开发板,我们就可以自己制作一个扫码枪。
3.2.1 读取摄像头
本小节我们希望能够通过摄像头读取图像,并且对图像中的二维码进行实时解析,也就是实现一个扫码仪的功能。本小节实现摄像头读取功能。摄像头一般有两种可选,一种是相对价格比较便宜的csi摄像头(树莓派摄像头),还有一种是USB摄像头。值得注意的是,如果采用USB摄像头,那么图像的读取和渲染则是会用到Jetson Nano的GPU,如果这个时候我们还在做一些深度学习的推理工作,那么很明显会占用掉一些GPU资源。相反,Jetson Nano对于csi摄像头的读取和渲染则会采用Gstreamer管道来处理,会使用特定的硬件加速,整个处理效果会更好。
本小节我们将详细介绍两种摄像头的读取方式。无论哪种方式,我们均采用Opencv这个强大的图像处理开源库作为基础来执行相关操作。
(1)读取CSI摄像头
使用Gstreamer读取CSI摄像头主要分为3个步骤:创建Gstreamer管道;将管道绑定opencv的视频流;逐帧提取和显示。下面首先给出基于Python的详细代码:
import cv2

# 设置gstreamer管道参数
def gstreamer_pipeline(
    captur_height=720, #摄像头预捕获的图像高度
    display_width=1280, #窗口显示的图像宽度
    display_height=720, #窗口显示的图像高度
    framerate=60,       #捕获帧率
    flip_method=0,      #是否旋转图像
):
    return (
        "nvarguscamerasrc ! "
        "video/x-raw(memory:NVMM), "
        "width=(int)%d, height=(int)%d, "
        "format=(string)NV12, framerate=(fraction)%d/1 ! "
        "nvvidconv flip-method=%d ! "
        "video/x-raw, width=(int)%d, height=(int)%d, format=(string)BGRx ! "
        "videoconvert ! "
        "video/x-raw, format=(string)BGR ! appsink"
        % (
            capture_width,
            capture_height,
            framerate,
            flip_method,
            display_width,
            display_height,
        )
    )


if __name__ == "__main__":
    capture_width = 1280
    capture_height = 720
    display_width = 1280
    display_height = 720
    framerate = 60
    flip_method = 0

    # 创建管道
    print(gstreamer_pipeline(capture_width,capture_height,display_width,display_height,framerate,flip_method))

    #管道与视频流绑定
    cap = cv2.VideoCapture(gstreamer_pipeline(flip_method=0), cv2.CAP_GSTREAMER)

    if cap.isOpened():
        window_handle = cv2.namedWindow("CSI Camera", cv2.WINDOW_AUTOSIZE)

        # 逐帧显示
        while cv2.getWindowProperty("CSI Camera", 0) >= 0:
            ret_val, img = cap.read()
            cv2.imshow("CSI Camera", img)

            keyCode = cv2.waitKey(30) & 0xFF
            if keyCode == 27:# ESC键退出
                break

        cap.release()
        cv2.destroyAllWindows()
    else:
        print("打开摄像头失败")
紧接着3.1.4节中的第一部分内容,在Code-OSS中新建一个文件命名为csi_camera_test.py,然后将上述代码复制到该文件中,保存然后按ctrl+F5运行脚本(前提:确保已经准确安装了CSI树莓派摄像头),运行效果如下所示:
可以看到已经可以正常的显示视频流图像了,但是由于树莓派摄像头本身的原因,其图像中还有很多的噪点,颜色也有些失真(真实工业场景中建议购买更好的摄像头)。下面我们同步的给出C++版本。紧接着3.1.4节中第二部分内容,修改main.cpp文件如下:
#include 其中需要额外的添加opencv用于视频处理的头文件#include
再次修改pro文件
QT -= gui

CONFIG += c++11 console
CONFIG -= app_bundle
CONFIG += C++11  # 添加对C++11的支持

# The following define makes your compiler emit warnings if you use
# any feature of Qt which as been marked deprecated (the exact warnings
# depend on your compiler). Please consult the documentation of the
# deprecated API in order to know how to port your code away from it.
DEFINES += QT_DEPRECATED_WARNINGS

# You can also make your code fail to compile if you use deprecated APIs.
# In order to do so, uncomment the following line.
# You can also select to disable deprecated APIs only up to a certain version of Qt.
#DEFINES += QT_DISABLE_DEPRECATED_BEFORE=0x060000    # disables all the APIs deprecated before Qt 6.0.0

INCLUDEPATH += /usr/include/opencv4 #添加头文件路径

LIBS += -L/usr/lib/aarch64-linux-gnu -lopencv_core -lopencv_imgcodecs -lopencv_imgproc -lopencv_highgui -lopencv_objdetect -lopencv_videoio  #添加需要链接的库


SOURCES += main.cpp
保存所有修改后重新构建项目并运行可以得到相同的结果,视频可以正确显示。
(2)读取USB摄像头
相比于读取CSI摄像头,读取USB摄像头更加简单,只需要两步:打开摄像头;逐帧提取。但是需要注意的是Jetson Nano并不是支持所有的USB摄像头,建议在采购的时候尽量选择Linux免驱的USB摄像头。本文采用的是一个720P高清摄像头。
下面给出Python版本的完整代码:
import cv2

 #创建摄像头捕获模块
cap = cv2.VideoCapture(1)

#创建窗口
window_handle = cv2.namedWindow("USB Camera", cv2.WINDOW_AUTOSIZE)

# 逐帧显示
while cv2.getWindowProperty("USB Camera", 0) >= 0:
    ret_val, img = cap.read()
    print(img.shape)

    # 图像太大需要调整
    height, width = img.shape[0:2]
    if width>800:
        new_width=800
        new_height=int(new_width/width*height)
        img = cv2.resize(img, (new_width,new_height))

    cv2.imshow("USB Camera", img)

    keyCode = cv2.waitKey(30) & 0xFF
    if keyCode == 27:# ESC键退出
        break

#释放资源
cap.release()
cv2.destroyAllWindows()
上述代码在打开摄像头时使用了cap = cv2.VideoCapture(1),这里的参数1是因为当前的Jetson Nano还连接了CSI摄像头,CSI摄像头的标识为0,因此这个USB摄像头的标识为1,这个可以在实际使用时通过测试来得到。另外,上述代码中对图像的尺寸做了限制,如果宽度超过800,则等比的缩放图像再显示。可以看到这个USB 720摄像头对于图像的显示效果还是不错的,颜色更加真实,噪点少。后面我们会继续使用这个摄像头进行二维码检测。
下面给出C++版本代码,修改main.cpp文件,代码如下:
#include 效果如下所示:
3.2.2 二维码检测和识读
本小节将使用Opencv实现二维码检测和识读功能。在opencv4.0以后,已经集成了二维码识读模块,因此,我们可以采用最新的opencv来实现二维码检测和识读。二维码检测和识别主要分为3步:使用QRCodeDetector()函数创建二维码检测器;使用detectAndDecode函数对图像进行二维码检测和识别;将检测结果输出。
这里主要是读取视频流的每帧图像然后对图像进行检测,为了方便,我们仅给出针对USB摄像头的完整实例,对于CSI摄像头可以根据3.2.1节内容将相关二维码检测代码迁移过去即可。结合3.2.1节中获取USB摄像头视频的代码,给出完整的Python版二维码检测和识读代码:
import cv2
import numpy as np

 #创建摄像头捕获模块
cap = cv2.VideoCapture(1)

#创建窗口
window_handle = cv2.namedWindow("USB Camera", cv2.WINDOW_AUTOSIZE)

#创建二维码检测器
qrDecoder = cv2.QRCodeDetector()

# 逐帧显示
while cv2.getWindowProperty("USB Camera", 0) >= 0:
    ret_val, img = cap.read()
    #print(img.shape)

    # 图像太大需要调整
    height, width = img.shape[0:2]
    if width>800:
        new_width=800
        new_height=int(new_width/width*height)
        img = cv2.resize(img, (new_width,new_height))

    # 二维码检测和识别
    data,bbox,rectifiedImage = qrDecoder.detectAndDecode(img)
    if len(data)>0:
        print("解码数据 : {}".format(data))
        n = len(bbox)
        for j in range(n):
            cv2.line(img, tuple(bbox[j][0]), tuple(bbox[ (j+1) % n][0]), (255,0,0), 3)
    else:
        print("没有检测到二维码")

    #显示图像
    cv2.imshow("USB Camera", img)

    keyCode = cv2.waitKey(30) & 0xFF
    if keyCode == 27:# ESC键退出
        break

#释放资源
cap.release()
cv2.destroyAllWindows()
效果图如下:
C++版本完整代码如下:
#include
//调整图像大小
new_width=800;
if(width>800)
{
new_height=int(new_width*1.0/width*height);
}
resize(img, img, cv::Size(new_width, new_height));
//二维码检测和识读
Mat bbox, rectifiedImage;
std::string data = qrDecoder.detectAndDecode(img, bbox, rectifiedImage);
if(data.length()>0)
{
cout << "解码数据: " << data << endl;
int n = bbox.rows;
for(int i = 0 ; i < n ; i++)
{
line(img, Point2i(bbox.at<float>(i,0),bbox.at<float>(i,1)), Point2i(bbox.at<float>((i+1) % n,0), bbox.at<float>((i+1) % n,1)), Scalar(255,0,0), 3);
}
}
else
cout << "没有检测到二维码" << endl;
imshow("USB Camera",img);
int keycode = cv::waitKey(30) & 0xff ; //ESC键退出
if (keycode == 27) break ;
}
cap.release();
destroyAllWindows() ;
}
效果如下图所示:
4.总结
4.0 原文
4.1使用这个就会出现CSDN文档编辑目录 去掉()前到空格 @[TOC] (目录)
4.2Ubuntu 截屏快捷键设置
(建议将pip也换成国内的)
第一步:
cd ~
mkdir .pip
sudo gedit .pip/pip.conf
第二步:将下面的文件复制进去(用的阿里的)
[global]
trusted-host = mirrors.aliyun.com
index-url = http://mirrors.aliyun.com/pypi/simple
1.更换apt源(我这里换的是清华大学的源,中科大的一些源我有些东西下载不了)
sudo gedit /etc/apt/sources.list
2.将以下的文件覆盖原来的文件并保存
#阿里源
deb http://mirrors.aliyun.com/ubuntu/ focal main restricted universe multiverse
deb http://mirrors.aliyun.com/ubuntu/ focal-security main restricted universe multiverse
deb http://mirrors.aliyun.com/ubuntu/ focal-updates main restricted universe multiverse
deb http://mirrors.aliyun.com/ubuntu/ focal-proposed main restricted universe multiverse
deb http://mirrors.aliyun.com/ubuntu/ focal-backports main restricted universe multiverse
deb-src http://mirrors.aliyun.com/ubuntu/ focal main restricted universe multiverse
deb-src http://mirrors.aliyun.com/ubuntu/ focal-security main restricted universe multiverse
deb-src http://mirrors.aliyun.com/ubuntu/ focal-updates main restricted universe multiverse
deb-src http://mirrors.aliyun.com/ubuntu/ focal-proposed main restricted universe multiverse
deb-src http://mirrors.aliyun.com/ubuntu/ focal-backports main restricted universe multiverse

#清华源
# 默认注释了源码镜像以提高 apt update 速度,如有需要可自行取消注释
deb https://mirrors.tuna.tsinghua.edu.cn/ubuntu/ focal main restricted universe multiverse
# deb-src https://mirrors.tuna.tsinghua.edu.cn/ubuntu/ focal main restricted universe multiverse
deb https://mirrors.tuna.tsinghua.edu.cn/ubuntu/ focal-updates main restricted universe multiverse
# deb-src https://mirrors.tuna.tsinghua.edu.cn/ubuntu/ focal-updates main restricted universe multiverse
deb https://mirrors.tuna.tsinghua.edu.cn/ubuntu/ focal-backports main restricted universe multiverse
# deb-src https://mirrors.tuna.tsinghua.edu.cn/ubuntu/ focal-backports main restricted universe multiverse
deb https://mirrors.tuna.tsinghua.edu.cn/ubuntu/ focal-security main restricted universe multiverse
# deb-src https://mirrors.tuna.tsinghua.edu.cn/ubuntu/ focal-security main restricted universe multiverse
# 预发布软件源,不建议启用
# deb https://mirrors.tuna.tsinghua.edu.cn/ubuntu/ focal-proposed main restricted universe multiverse
# deb-src https://mirrors.tuna.tsinghua.edu.cn/ubuntu/ focal-proposed main restricted universe multiverse
#中科大源
deb https://mirrors.ustc.edu.cn/ubuntu/ focal main restricted universe multiverse
deb https://mirrors.ustc.edu.cn/ubuntu/ focal-updates main restricted universe multiverse
deb https://mirrors.ustc.edu.cn/ubuntu/ focal-backports main restricted universe multiverse
deb https://mirrors.ustc.edu.cn/ubuntu/ focal-security main restricted universe multiverse
deb https://mirrors.ustc.edu.cn/ubuntu/ focal-proposed main restricted universe multiverse
deb-src https://mirrors.ustc.edu.cn/ubuntu/ focal main restricted universe multiverse
deb-src https://mirrors.ustc.edu.cn/ubuntu/ focal-updates main restricted universe multiverse
deb-src https://mirrors.ustc.edu.cn/ubuntu/ focal-backports main restricted universe multiverse
deb-src https://mirrors.ustc.edu.cn/ubuntu/ focal-security main restricted universe multiverse
deb-src https://mirrors.ustc.edu.cn/ubuntu/ focal-proposed main restricted universe multiverse
3.更新
sudo apt-get update
sudo apt-get upgrade
#deb cdrom:[Ubuntu 20.04 LTS _Focal Fossa_ - Release amd64 (20200423)]/ focal main restricted

# See http://help.ubuntu.com/community/UpgradeNotes for how to upgrade to
# newer versions of the distribution.
deb http://us.archive.ubuntu.com/ubuntu/ focal main restricted
# deb-src http://us.archive.ubuntu.com/ubuntu/ focal main restricted

## Major bug fix updates produced after the final release of the
## distribution.
deb http://us.archive.ubuntu.com/ubuntu/ focal-updates main restricted
# deb-src http://us.archive.ubuntu.com/ubuntu/ focal-updates main restricted

## N.B. software from this repository is ENTIRELY UNSUPPORTED by the Ubuntu
## team. Also, please note that software in universe WILL NOT receive any
## review or updates from the Ubuntu security team.
deb http://us.archive.ubuntu.com/ubuntu/ focal universe
# deb-src http://us.archive.ubuntu.com/ubuntu/ focal universe
deb http://us.archive.ubuntu.com/ubuntu/ focal-updates universe
# deb-src http://us.archive.ubuntu.com/ubuntu/ focal-updates universe

## N.B. software from this repository is ENTIRELY UNSUPPORTED by the Ubuntu
## team, and may not be under a free licence. Please satisfy yourself as to
## your rights to use the software. Also, please note that software in
## multiverse WILL NOT receive any review or updates from the Ubuntu
## security team.
deb http://us.archive.ubuntu.com/ubuntu/ focal multiverse
# deb-src http://us.archive.ubuntu.com/ubuntu/ focal multiverse
deb http://us.archive.ubuntu.com/ubuntu/ focal-updates multiverse
# deb-src http://us.archive.ubuntu.com/ubuntu/ focal-updates multiverse

## N.B. software from this repository may not have been tested as
## extensively as that contained in the main release, although it includes
## newer versions of some applications which may provide useful features.
## Also, please note that software in backports WILL NOT receive any review
## or updates from the Ubuntu security team.
deb http://us.archive.ubuntu.com/ubuntu/ focal-backports main restricted universe multiverse
# deb-src http://us.archive.ubuntu.com/ubuntu/ focal-backports main restricted universe multiverse

## Uncomment the following two lines to add software from Canonical's
## 'partner' repository.
## This software is not part of Ubuntu, but is offered by Canonical and the
## respective vendors as a service to Ubuntu users.
# deb http://archive.canonical.com/ubuntu focal partner
# deb-src http://archive.canonical.com/ubuntu focal partner

deb http://security.ubuntu.com/ubuntu focal-security main restricted
# deb-src http://security.ubuntu.com/ubuntu focal-security main restricted
deb http://security.ubuntu.com/ubuntu focal-security universe
# deb-src http://security.ubuntu.com/ubuntu focal-security universe
deb http://security.ubuntu.com/ubuntu focal-security multiverse
# deb-src http://security.ubuntu.com/ubuntu focal-security multiverse

# This system was installed using small removable media
# (e.g. netinst, live or single CD). The matching "deb cdrom"
# entries were disabled at the end of the installation process.
# For information about how to configure apt package sources,
# see the sources.list(5) manual.
