双边滤波原理和实现
双边滤波原理
双边滤波(Bilateral filter)是一种非线性的滤波方法,是结合图像的空间邻近度和像素值相似度的一种折衷处理,同时考虑空域信息和灰度相似性,达到保边去噪的目的。
双边滤波器之所以能够做到在平滑去噪的同时还能够很好的保存边缘(Edge Preserve),是由于其滤波器的核由两个函数生成:
一个函数由像素欧式距离决定滤波器模板的系数,另一个函数由像素的灰度差值决定滤波器的系数
众所周知,高斯滤波器它仅仅是欧式距离进行滤波,这种对于边缘处理不是很好,而双边滤波结合了高斯滤波以及均值滤波的特点。很明显他效果要更好。
上述三个公式就是双边滤波的全部了,我给大家简单介绍一下他的参数含义,就很容易明白他到底是如何实现的了。
首先第一个公式,很明显他是一个指数形式下,某两个点之间的差值的平方,如下图:因为图像的基础单位是像素,所以每一个坐标中就存储着一个值或者三个值(也就是灰度图像和彩色图像的区别)。(k,l)就是模板中心坐标,比如下图(0,0)就是这个3*3模块窗口的中心,(i,j)就是模板窗口其他点,这里的σ是高斯函数的标准差。补充一句,这里面求的是像素差值
| (-1,-1) | (0,-1) | |
| (0,0) | (1,0) | |
| (1,1) |
第二个公式是距离模板。同样(k,l)是模板窗口中心点坐标,(i,j)是其他点坐标,这里求得是距离的平方。
第一个公式和第二个公式相乘就得到了我们最重要的权重。
双边滤波器的实现
我们通常实现双边滤波器,其实只要调用opencv的API就可,里面帮我们封装好了函数。
std::string filePath_1 = "tmp.jpg";
	cv::Mat src0 = cv::imread(filePath_1, 0);
cv::Mat dst;
	bilateralFilter(src0, dst, 5, 50, 50);
实现起来还是蛮简单的,但是既然我们了解了它的原理不妨自己写一下试试:
我这里使用的是c语言写的 ,最后封装静态库。
代码如下:
void bilateral_filter_ys(unsigned int* src, unsigned int* dst, int ksize, int channels, int cols, int rows, double space_sigma, double color_sigma)
{


	//Assert(channels == 1 || channels == 3);

//这部分是定义灰度值模板系数的。
	double space_coeff = -0.5 / (space_sigma * space_sigma);
	double color_coeff = -0.5 / (color_sigma * color_sigma);
	int radius = ksize / 2;


	double color_weight[256 * 3] = { 0 };
	double space_weight[49] = { 0 };

	//本文使用的方法是查表法,首先将距离模板和像素模板写入数组。之后再读取这些数据。这样可以节约时间成本,不需要定义较大的数组
	for (int i = 0; i < channels * 256; i++)//像素模板
	{
		color_weight[i] = exp(i * i * color_coeff);
	}

	int L = 0;


		for (int i = -radius; i < radius; i++)//距离模板
		{
			for (int j = -radius; j < radius; j++)
			{
				double distance = -sqrt(i * i + j * j);
				space_weight[L] = exp(distance * distance * space_coeff);
				L++;
			}
		}

//开始滤波,滤波部分
	if (channels == 3) {

		for (int i = radius; i < rows - radius; i++)
		{
			for (int j = radius; j < cols - radius; j++)
			{
				double sumb = 0, sumg = 0, sumr = 0, wsum = 0;
				int b0 = src[(i*cols + j) * 3 + 0];
				int g0 = src[(i*cols + j) * 3 + 1];
				int r0 = src[(i*cols + j) * 3 + 2];

				for (int p = i - radius; p <= i + radius; p++)
				{
					for (int q = j - radius; q <= j + radius; q++)
					{
						int b = src[(p * cols + q) * 3 + 0];
						int g = src[(p * cols + q) * 3 + 1];
						int r = src[(p * cols + q) * 3 + 2];
						double space_w = space_weight[(p + radius - i) * ksize + (q + radius - j)];
						double color_w = color_weight[abs(b - b0) + abs(g - g0) + abs(r - r0)];
						double weight = space_w * color_w;

						sumb += b * weight;
						sumg += g * weight;
						sumr += r * weight;
						wsum += weight;

					}
				}


				dst[(i * cols + j) * 3 + 0] = round(sumb/ wsum);//像素要取整
				dst[(i * cols + j) * 3 + 1] = round(sumg / wsum);
				dst[(i * cols + j) * 3 + 2] = round(sumr / wsum);
			}
		}
	}


	}
上述是一个三通道双线性滤波,我实现之后和opencv自带的对比。下述是实现过程,第一张代码图主要是转换成Mat类型,所以看着可能有点复杂,但其实只是在转换而已。
第二张是主函数的实现
void S(cv::Mat image_src,cv::Mat image_dst){
	//cv::copyMakeBorder(image_src, image_src, 2, 2, 2, 2, cv::BorderTypes::BORDER_REFLECT);
	int cols = image_src.cols;
	int rows = image_src.rows;
	int channels = image_src.channels();
	if (channels == 3)
	{
		//define matrix space memory
		unsigned int* image_src_rgb = (unsigned int*)malloc(rows * cols * sizeof(unsigned int) * 3);
		unsigned int* image_dst_rgb = (unsigned int*)malloc(rows * cols * sizeof(unsigned int) * 3);


		//value exchange
		for (int i = 0; i < rows; i++)
		{
			for (int j = 0; j < cols; j++)
			{
				image_src_rgb[(i * cols + j) * 3 + 0] = image_src.at(i, j)[2];
				image_src_rgb[(i * cols + j) * 3 + 1] = image_src.at(i, j)[1];
				image_src_rgb[(i * cols + j) * 3 + 2] = image_src.at(i, j)[0];
			}
		}

		//filtering
		bilateral_filter_ys(image_src_rgb, image_dst_rgb, 5, channels, cols, rows, 50, 50);

		//matrix 2 Mat

		for (int i = 0; i < rows; i++)
		{
			for (int j = 0; j < cols; j++)
			{
				image_dst.at(i, j)[2] = image_dst_rgb[(i * cols + j) * 3 + 0];
				image_dst.at(i, j)[1] = image_dst_rgb[(i * cols + j) * 3 + 1];
				image_dst.at(i, j)[0] = image_dst_rgb[(i * cols + j) * 3 + 2];
			}
		}

	}
	if (channels == 1)
	{

		//define matrix space memory
		unsigned char* image_src_gray = (unsigned char*)malloc(rows * cols * sizeof(unsigned char) );
		unsigned char* image_dst_gray= (unsigned char*)malloc(rows * cols * sizeof(unsigned char));


		//value exchange
		for (int i = 0; i < rows; i++)
		{
			for (int j = 0; j < cols; j++)
			{
				image_src_gray[i*cols + j] = image_src.at(i,j);

			}
		}

		//filtering

		bilateral_filter_ys1(image_src_gray, image_dst_gray, 5, channels, cols, rows, 50, 50);

		//matrix 2 Mat

		for (int i = 0; i < rows; i++)
		{
			for (int j = 0; j < cols; j++)
			{
				image_dst.at(i,j) = image_dst_gray[i * cols + j];
			}
		}


	}


}
int main()
{
std::string filePath_1 = "tmp.jpg";
cv::Mat src0 = cv::imread(filePath_1, 1);
cv::Mat dst1(src0.size(), src0.type());
S(src0,dst1);
cv::Mat dst;
bilateralFilter(src0, dst, 5, 50, 50);
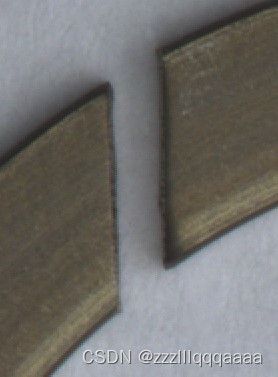
}图像使用的是这张图。
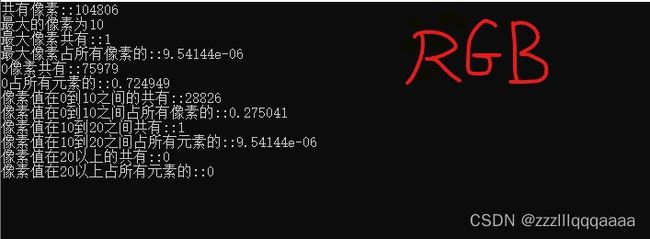
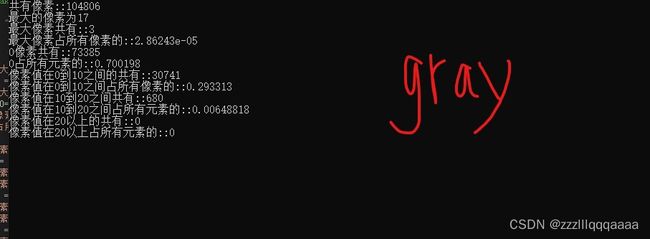
在经过像素值的对比,得到以下结果。这是与opencv双边滤波结果图做差值产生的。这段代码有点长但是很简单。
单通道说实话实现效果要差一些,这里我就不放了代码了,看一下结果吧


