2.triton 项目编译运行
使用镜像的dockerfile为
FROM nvcr.io/nvidia/tritonserver:22.06-py3

RUN apt-get update \
    && apt-get install openssl -y \
    && apt-get install libssl-dev -y \
    && apt-get install rapidjson-dev -y \
    && wget https://cmake.org/files/v3.20/cmake-3.20.0.tar.gz \
    && tar zxvf cmake-3.20.0.tar.gz \
    && cd cmake-3.20.0 \
    && ./bootstrap \
    && make \
    && make install \
    && apt-get install libcurl4-openssl-dev -y
nvcr.io/nvidia/tritonserver:22.06-py3镜像以ubuntu:20.04为基础镜像构建
- [server] triton服务外层框架,包含了http收发请求,服务内存分配等一些功能代码
- [core] triton主框架,处理请求、后端管理、模型调度啥的全在这里
- [common] 通用工具,打日志的代码在这里
- [backend] backend后端框架代码,存放了一些后端通用父类,自定义后端可以集成这些类仿写新的后端
- [third_party] triton使用的第三方库的汇总,主要是cmake里头会包含
- [tensorrt_backend] tensorrt后端代码
- [pytorch_backend] libtorch后端代码
1.triton inference server
git clone --recursive https://github.com/triton-inference-server/server.git编译步骤为:
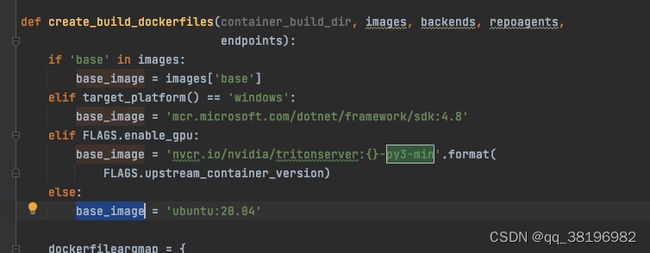
引申:build.py的执行逻辑
-------------------------------------------------------------------------------------
建议,手动拉取py3-min,否则有可能直接执行./build.py时失败。
可以看到使用GPU时基础镜像是py3-min,不使用时基础镜像是ubuntu:20.04
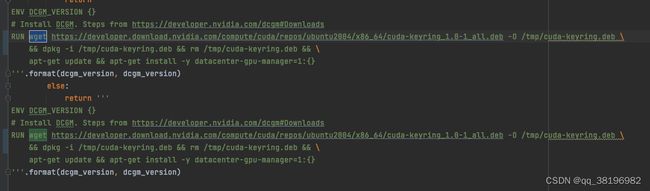
将build.py中下述的curl改为wget
-----------------------------------------------------------------------------------------------
默认情况下,build.py不启用Triton的任何可选功能
如果您想在不支持 GPU 的情况下构建,则必须指定单独的功能标志,并且不包括 --enable-gpu 和 --enable-gpu-metrics 标志。只有以下后端可用于非 GPU / CPU-only 构建:identity、repeat、square、tensorflow2、pytorch、onnxruntime、openvino、python 和 fil。
在不支持 GPU 的情况下构建时,您必须使用 --image=gpu-base,nvcr.io/nvidia/tritonserver:
要让 Triton 支持 NVIDIA GPU,您必须安装 CUDA、cuBLAS 和 cuDNN。这些库必须安装在系统包含和库路径上,以便它们可用于构建。用于给定版本的库版本可以在框架容器支持矩阵中找到
TensorRT 头文件和库必须安装在系统包含和库路径上,以便它们可用于构建。给定版本中使用的 TensorRT 版本可以在框架容器支持矩阵中找到。
1)查看依赖
执行server目录下的./build.py --dryrun将得到一个build目录,该目录下将得到5个文件
cmake_build脚本、
docker_build脚本:执行
Dockerfile、
Dockerfile.buildbase
Dockerfile.cibase
2)执行docker_build脚本
2.triton inference core
core是
修改CmakeLists.txt
git clone --recursive https://github.com/triton-inference-server/core.git
cd core
mkdir build
cd build
cmake -DCMAKE_INSTALL_PREFIX:PATH=`pwd`/install -DTRITON_CORE_HEADERS_ONLY=OFF ..
make install
默认编译GPU,若编译CPU
cmake -DCMAKE_INSTALL_PREFIX:PATH=`pwd`/install -DTRITON_CORE_HEADERS_ONLY=OFF -DTRITON_ENABLE_GPU=OFF -DTRITON_ENABLE_METRICS_GPU=OFF ..
make install
编译完测试程序的路径为build/triton-core/test
编译可以得到libtritonserver.so,位于/core/build目录下
3.common
1)拉取分支,设置cmake选项
git clone --recursive https://github.com/triton-inference-server/common.git
cd common
mkdir build
cd build
2)修改CMakeLists.txt
SET(CMAKE_CXX_STANDARD 14)
SET(CMAKE_CXX_FLAGS  "-D_GLIBCXX_USE_CXX11_ABI=0")
3)编译
cmake -DCMAKE_INSTALL_PREFIX:PATH=`pwd`/install ..
make install
默认得到静态库
![]()
3.triton inference backend
git clone --recursive https://github.com/triton-inference-server/backend.git4.developer_tools编译运行
在nvcr.io/nvidia/tritonserver:22.06-py3镜像容器内进行,为了使用gdb,在启动容器时使用了--privileged=true
1)需要安装openssl-devel、rapidjson-dev,cmake,gdb(调试使用)
2)克隆编译项目
git clone --recursive https://github.com/triton-inference-server/developer_tools.git
cd developer_tools/server
mkdir build
cd build
cmake -DCMAKE_INSTALL_PREFIX:PATH=`pwd`/install ..
make install

###编译CPU版本的

cd build
cmake -DCMAKE_INSTALL_PREFIX:PATH=`pwd`/install -DTRITON_ENABLE_GPU=OFF ..
make install
3)测试运行
# Prepare the models required by the examples.

 cd /path/to/triton_developer_tools/server

 mkdir -p ./examples/models

# Copy over the models placed in the qa folder.
cp -r ../qa/L0_server_unit_test/models/add_sub* ./examples/models/.

# Copy over the models placed in the server repository.
 git clone https://github.com/triton-inference-server/server.git
cp -r server/docs/examples/model_repository/simple ./examples/models/.

# Copy over the decoupled model placed in the python_backend repository.
git clone https://github.com/triton-inference-server/python_backend.git
 mkdir -p ./examples/models/square_int32/1

 cp python_backend/examples/decoupled/square_model.py ./examples/models/square_int32/1/model.py

$ cp python_backend/examples/decoupled/square_config.pbtxt ./examples/models/square_int32/config.pbtxt

# Copy over the executables from the install directory.
$ cp /path/to/install/bin/simple_addsub_async_infer ./examples
$ cp /path/to/install/bin/addsub_string_async_infer ./examples
$ cp /path/to/install/bin/square_async_infer ./examples

# Assume libtritonserver.so is placed under "/opt/tritonserver/lib"
$ LD_LIBRARY_PATH=/opt/tritonserver/lib:${LD_LIBRARY_PATH}

cd /opt/tritonserver/lib
cp /developer_tools/server/build/install/lib/stubs/libtritonserver.so ./


$ cd ./examples

# Run examples
$ ./simple_addsub_async_infer
$ ./addsub_string_async_infer
$ ./square_async_infer
遇到如下错误
1)./square_async_infer: symbol lookup error: ./square_async_infer: undefined symbol: TRITONSERVER_ServerOptionsSetCpuMetrics

使用ldd -r square_async_infer | grep tritonserver查看发现找到了/opt/tritonserver下的so
执行 cp /developer_tools/server/build/install/lib/stubs/libtritonserver.so /opt/tritonserver/lib
解决了该问题
2)Segmentation fault (core dumped)

出现了段错误,同时产生了core文件,使用gdb进行调试
在/developer_tools/server下的CMakeLists.txt中添加如下代码
SET(CMAKE_BUILD_TYPE "Debug")
SET(CMAKE_CXX_FLAGS_DEBUG "$ENV{CXXFLAGS} -O0 -Wall -g2 -ggdb")
SET(CMAKE_CXX_FLAGS_RELEASE "$ENV{CXXFLAGS} -O3 -Wall")
然后重新编译
cmake -DCMAKE_INSTALL_PREFIX:PATH=`pwd`/install -DCMAKE_BUILD_TYPE=Debug ..
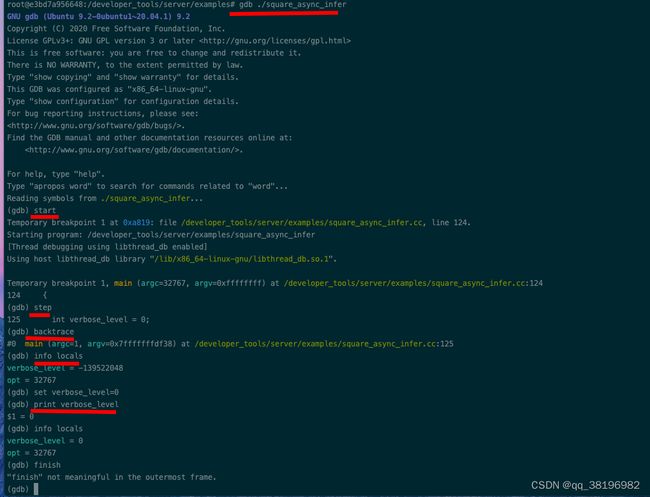
make install使用GDB调试二进制程序
root@e3bd7a956648:/developer_tools/server/examples# gdb square_async_infer
使用GDB调试core文件
gdb --core=core.1502 ./square_async_infer3)Actual: it throws triton::developer_tools::server::TritonException with description "Error - LoadModel: Invalid argument-load failed for model 'add_sub_str': version 1 is at UNAVAILABLE state: Internal: Unable to initialize shared memory key 'triton_python_backend_shm_region_3' to requested size (67108864 bytes). If you are running Triton inside docker, use '--shm-size' flag to control the shared memory region size. Each Python backend model instance requires at least 64MBs of shared memory. Error: No such file or directory;
docker的share memory默认大小是64M
docker run 时使用--shm-size="1G"
docker run -it --shm-size="1g" ubuntu
修改CMakeLists.txt
SET(CMAKE_CXX_STANDARD 14)
SET(CMAKE_CXX_FLAGS  "-D_GLIBCXX_USE_CXX11_ABI=0")
5.client
git clone --recursive https://github.com/triton-inference-server/client.git
mkdir build
cd build
cmake -DCMAKE_INSTALL_PREFIX=`pwd`/install -DTRITON_ENABLE_CC_HTTP=ON -DTRITON_ENABLE_CC_GRPC=ON -DTRITON_ENABLE_PERF_ANALYZER=ON -DTRITON_ENABLE_PERF_ANALYZER_C_API=ON -DTRITON_ENABLE_PERF_ANALYZER_TFS=ON -DTRITON_ENABLE_PERF_ANALYZER_TS=ON -DTRITON_ENABLE_PYTHON_HTTP=ON -DTRITON_ENABLE_PYTHON_GRPC=ON -DTRITON_ENABLE_JAVA_HTTP=ON -DTRITON_ENABLE_GPU=ON -DTRITON_ENABLE_EXAMPLES=ON -DTRITON_ENABLE_TESTS=ON ..

make cc-clients python-clients java-clients
编译CPU版本的
cmake -DCMAKE_INSTALL_PREFIX=`pwd`/install -DTRITON_ENABLE_CC_HTTP=ON -DTRITON_ENABLE_CC_GRPC=ON -DTRITON_ENABLE_PERF_ANALYZER=ON -DTRITON_ENABLE_PERF_ANALYZER_C_API=ON -DTRITON_ENABLE_PERF_ANALYZER_TFS=ON -DTRITON_ENABLE_PERF_ANALYZER_TS=ON -DTRITON_ENABLE_PYTHON_HTTP=ON -DTRITON_ENABLE_PYTHON_GRPC=ON -DTRITON_ENABLE_JAVA_HTTP=ON -DTRITON_ENABLE_GPU=OFF -DTRITON_ENABLE_EXAMPLES=ON -DTRITON_ENABLE_TESTS=ON ..

 make cc-clients python-clients java-clients
安装依赖
apt-get install zlib1g-dev -y
apt-get install libopencv-dev -y
apt-get install libb64-dev -y


##可能需要安装
pip3 install grpcio
pip3 install grpcio-tools
6.tensorrt_backend
git clone --recursive https://github.com/triton-inference-server/tensorrt_backend.git7.python_backend
编译需要:
- cmake >= 3.17
- numpy
- rapidjson-dev
- libarchive-dev
- zlib1g-dev
 git clone --recursive https://github.com/triton-inference-server/python_backend.git

cd python_backend
mkdir build
cd build
设置编译选项
修改CMakeLists.txt,python_backend目录下的CMakeLists.txt修改为如下:
cmake_minimum_required(VERSION 3.17)
SET(CMAKE_CXX_STANDARD 14)
SET(CMAKE_CXX_FLAGS  "-D_GLIBCXX_USE_CXX11_ABI=0")
project(tritonpythonbackend LANGUAGES C CXX)
指定使用旧版本的CXX11_ABI
cmake -DTRITON_ENABLE_GPU=ON -DCMAKE_INSTALL_PREFIX:PATH=${pwd}/install ..
在编译python_backend时需要用到backend,common,core三个Triton库,若不指定版本,则默认使用main,若需要编译特定版本的,则在cmake时指定
-DTRITON_BACKEND_REPO_TAG=
cmake -DTRITON_ENABLE_GPU=ON -DTRITON_BACKEND_REPO_TAG= -DTRITON_COMMON_REPO_TAG= -DTRITON_CORE_REPO_TAG= -DCMAKE_INSTALL_PREFIX:PATH=`pwd`/install ..
使用了boost-1.76
8.pytorch backend
git clone --recursive https://github.com/triton-inference-server/pytorch_backend.gitubuntu20.04安装其他依赖
官方依赖网址http://developer.download.nvidia.com/compute/cuda/repos/ubuntu2004/x86_64/
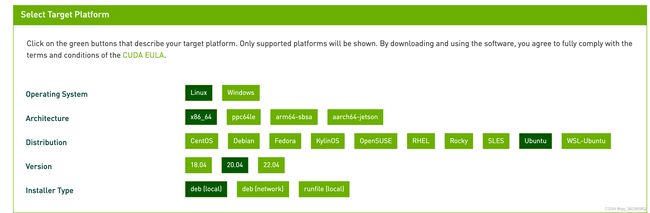
1)安装cuda
这里以docker镜像为例,在Ubuntu:20.04内操作,不需要安装驱动,驱动是在宿主机已经安装好的,若不是docker镜像,且想安装驱动,CUDA安装包里是包含驱动的,所以可以直接安装CUDA。
cuda官网CUDA Toolkit 11.8 Downloads | NVIDIA Developer
官方文档Installation Guide Linux :: CUDA Toolkit Documentation
wget https://developer.download.nvidia.com/compute/cuda/repos/ubuntu2004/x86_64/cuda-ubuntu2004.pin
sudo mv cuda-ubuntu2004.pin /etc/apt/preferences.d/cuda-repository-pin-600
wget https://developer.download.nvidia.com/compute/cuda/11.8.0/local_installers/cuda-repo-ubuntu2004-11-8-local_11.8.0-520.61.05-1_amd64.deb
sudo dpkg -i cuda-repo-ubuntu2004-11-8-local_11.8.0-520.61.05-1_amd64.deb
sudo cp /var/cuda-repo-ubuntu2004-11-8-local/cuda-*-keyring.gpg /usr/share/keyrings/
sudo apt-get update
sudo apt-get -y install cuda
将被安装到/usr/local目录下
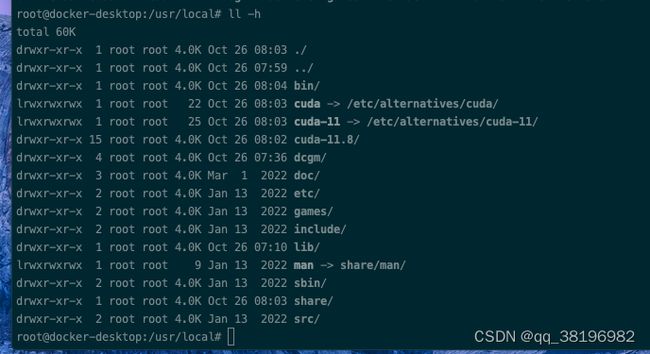
设置环境变量
echo PATH=/usr/local/cuda/bin:$PATH >> ~/.bashrc
source ~/.bashrc
dockerfile中不支持source,是因为sh不支持source,bash支持source
1)在dockerfile中使用source,需要切换到bash
RUN rm /bin/sh && ln -s /bin/bash /bin/sh
2)也可以使用bash执行对应的指令
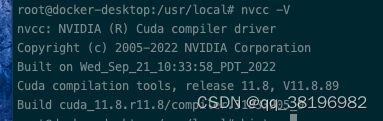
RUN /bin/bash -c "source ~/.bashrc"nvcc -V查看cuda版本信息
若要使用更早的cuda版本,点击本页面尾部Archive of Previous CUDA Releases
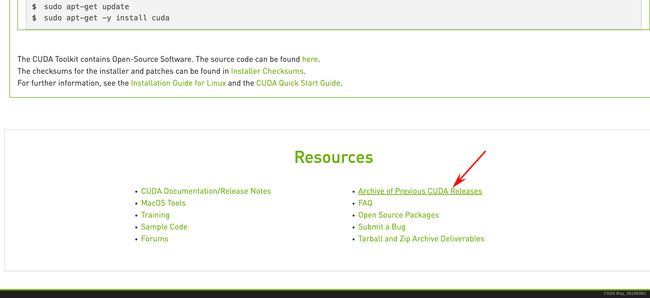
下面给出cuda11.7.0的安装步骤
wget https://developer.download.nvidia.com/compute/cuda/repos/ubuntu2004/x86_64/cuda-ubuntu2004.pin
sudo mv cuda-ubuntu2004.pin /etc/apt/preferences.d/cuda-repository-pin-600
wget https://developer.download.nvidia.com/compute/cuda/11.7.0/local_installers/cuda-repo-ubuntu2004-11-7-local_11.7.0-515.43.04-1_amd64.deb
sudo dpkg -i cuda-repo-ubuntu2004-11-7-local_11.7.0-515.43.04-1_amd64.deb
sudo cp /var/cuda-repo-ubuntu2004-11-7-local/cuda-*-keyring.gpg /usr/share/keyrings/
sudo apt-get update
sudo apt-get -y install cuda
cuda默认安装在/usr/local目录下,
2)cudnn
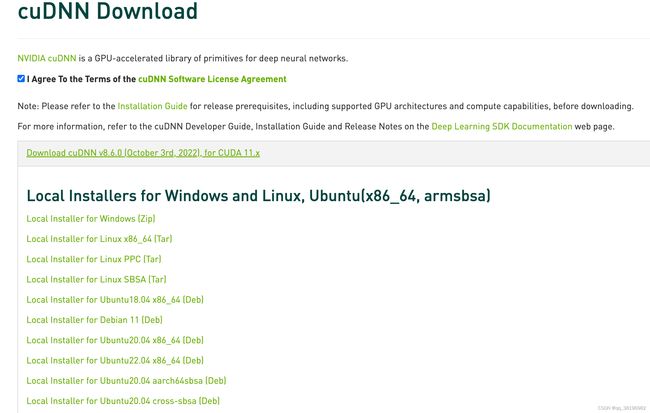
登录官网https://developer.nvidia.com/rdp/cudnn-download
官方文档Installation Guide :: NVIDIA Deep Learning cuDNN Documentation
注意,要先登录。选择tar包,这里选择Local Installer for Linux x86_64[Tar]。然后使用docker cp拷贝到容器里,使用wget无法下载
拷贝到Ubuntu:20.04之后解压安装
tar xvf cudnn-linux-x86_64-8.6.0.163_cuda11-archive.tar.xz

##拷贝到相关目录即安装成功

cp cudnn-*-archive/include/cudnn*.h /usr/local/cuda/include
cp -P cudnn-*-archive/lib/libcudnn* /usr/local/cuda/lib64
chmod a+r /usr/local/cuda/include/cudnn*.h /usr/local/cuda/lib64/libcudnn*
查看cudnn版本
cat /usr/local/cuda/include/cudnn.h | grep CUDNN_MAJOR -A 2

##若无效果,那是因为新版本换位置了,需要用
cat /usr/local/cuda/include/cudnn_version.h | grep CUDNN_MAJOR -A 2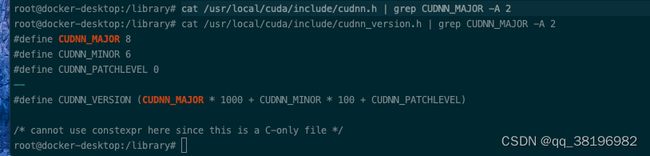
cudnn安装完成
3)tensorrt
官网https://developer.nvidia.com/nvidia-tensorrt-8x-download
官方文档Documentation Archives :: NVIDIA Deep Learning TensorRT Documentation
选择和cuda11.7相匹配的包,使用deb包

安装
dpkg -i nv-tensorrt-repo-ubuntu2004-cuda11.6-trt8.4.1.5-ga-20220604_1-1_amd64.deb
apt-key add /var/nv-tensorrt-repo-ubuntu2004-cuda11.6-trt8.4.1.5-ga-20220604/9a60d8bf.pub
apt-get update
apt-get install tensorrt -y
查看版本
dpkg -l | grep TensorRT

root@d3a6acdc3d37:/etc/alternatives# dpkg -l | grep TensorRT
ii  libnvinfer-bin                       8.2.5-1+cuda11.4                  amd64        TensorRT binaries
ii  libnvinfer-dev                       8.2.5-1+cuda11.4                  amd64        TensorRT development libraries and headers
ii  libnvinfer-plugin-dev                8.2.5-1+cuda11.4                  amd64        TensorRT plugin libraries and headers
ii  libnvinfer-plugin8                   8.2.5-1+cuda11.4                  amd64        TensorRT plugin library
ii  libnvinfer8                          8.2.5-1+cuda11.4                  amd64        TensorRT runtime libraries
ii  libnvonnxparsers-dev                 8.2.5-1+cuda11.4                  amd64        TensorRT ONNX libraries
ii  libnvonnxparsers8                    8.2.5-1+cuda11.4                  amd64        TensorRT ONNX libraries
ii  libnvparsers-dev                     8.2.5-1+cuda11.4                  amd64        TensorRT parsers libraries
ii  libnvparsers8                        8.2.5-1+cuda11.4                  amd64        TensorRT parsers libraries
这些头文件在/usr/include/x86_64-linux-gnu
依赖库在/usr/lib/x86_64-linux-gnu
4)安装cutensor
官网cuTENSOR Download Page | NVIDIA Developer
官方文档https://docs.nvidia.com/cuda/cutensor/
选择适合自己系统的版本,这种方式下载最新的
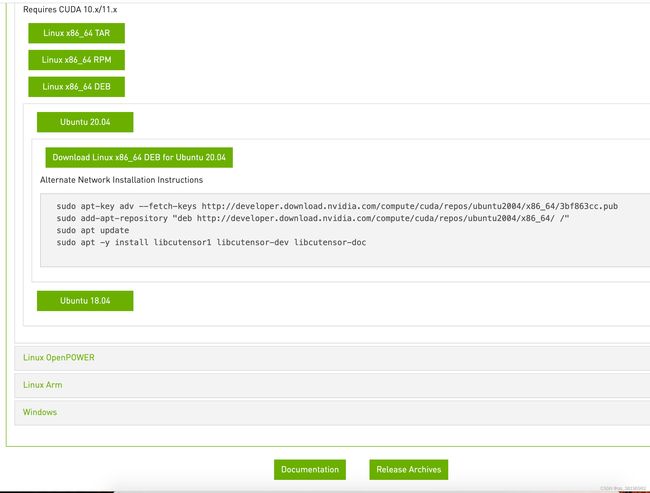
Release Archives可以选择其他版本的cutensor
5)安装pytorch
官网PyTorch
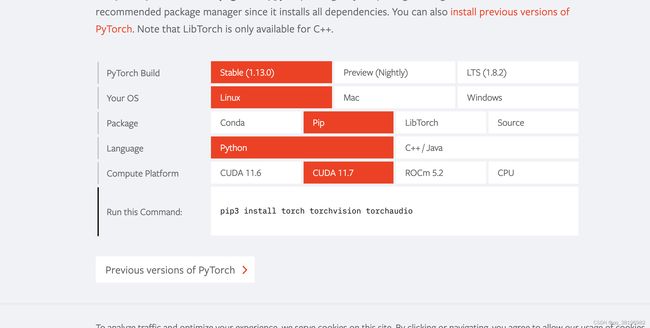
安装
pip3 install torch torchvision torchaudio1.添加源
elrepo是CentOS十分有用的稳定的软件源,与其他软件源不一样的是,这个第三方源主要是提供硬件驱动、内核更新方面的支持,如显卡、无线网卡、内核等等,现在已经支持centos7.x+,更新较快。
sudo rpm --import https://www.elrepo.org/RPM-GPG-KEY-elrepo.org
sudo rpm -Uvh http://www.elrepo.org/elrepo-release-7.0-2.el7.elrepo.noarch.rpm
2)安装显卡检测程序
yum install nvidia-detect -y