OpenCV基础(21)使用 OpenCV 中的applyColorMap实现伪着色
在本教程中,我们将首先展示一种使用 OpenCV 的预定义颜色图对灰度图像进行伪彩色/假彩色的简单方法。如果您更愿意使用自己的颜色图,我们还将展示一种定义自定义颜色图的方法。
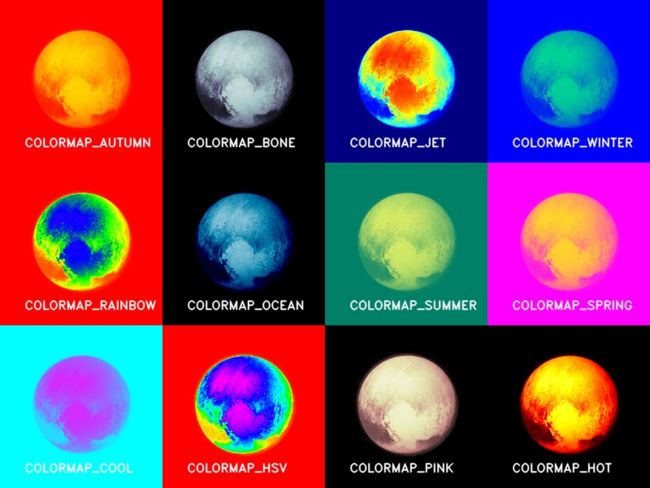
行星和其他空间物体的灰度图像通常是伪彩色的,以显示细节,并以不同的颜色标记不同材料对应的区域。在本教程中,我们将使用新视野号拍摄的一张冥王星的灰度照片作为示例。
1.什么是颜色图?
假设我们想在地图上显示中国不同地区的温度。我们可以将温度数据叠加在中国地图上作为灰度图像——较暗的区域代表较冷的温度,较亮的区域代表较热的区域。这样的表示不仅令人难以置信的无聊,而且由于两个重要原因,它是一种糟糕的表示。首先,人类视觉系统没有被优化来测量灰度强度的微小变化。我们更善于感知颜色的变化。其次,我们将不同的含义与不同的颜色联系起来。用蓝色表示较冷的温度,用红色表示较暖的温度更有意义。
温度数据只是一个例子,但还有其他几种数据是单值(灰度)的情况,但将其转换为颜色数据以进行可视化是有意义的。通过伪着色更好地可视化数据的其他示例是高度、压力、密度、湿度等。
2.代码实现
2.1使用OpenCV预定义颜色图
(1)Python
# colormap.py
#!/usr/bin/env python
import cv2
import numpy as np


def colormap_name(id):
    switcher = {
        0: "COLORMAP_AUTUMN",
        1: "COLORMAP_BONE",
        2: "COLORMAP_JET",
        3: "COLORMAP_WINTER",
        4: "COLORMAP_RAINBOW",
        5: "COLORMAP_OCEAN",
        6: "COLORMAP_SUMMER",
        7: "COLORMAP_SPRING",
        8: "COLORMAP_COOL",
        9: "COLORMAP_HSV",
        10: "COLORMAP_PINK",
        11: "COLORMAP_HOT"

    }
    return switcher.get(id, "NONE")


if __name__ == '__main__':

    im = cv2.imread("pluto.jpg", cv2.IMREAD_GRAYSCALE)
    im_out = np.zeros((600, 800, 3), np.uint8);

    for i in range(0, 4):
        for j in range(0, 3):
            k = i + j * 4
            im_color = cv2.applyColorMap(im, k)
            cv2.putText(im_color, colormap_name(k), (30, 180), cv2.FONT_HERSHEY_DUPLEX, 0.5, (255, 255, 255), 1, cv2.LINE_AA);

            ix200 = i * 200
            jx200 = j * 200

            im_out[jx200: jx200 + 200, ix200: ix200 + 200, :] = im_color

    cv2.imwrite("PseudoColored.jpg", im_out)
    cv2.imshow("Pseudo Colored", im_out);
    cv2.waitKey(0);
(2)C++
// colormap.cpp
#include "opencv2/opencv.hpp"

using namespace cv;
using namespace std;

string colormap_name(int id)
{
    switch(id){
        case COLORMAP_AUTUMN :
            return "COLORMAP_AUTUMN";
        case COLORMAP_BONE :
            return "COLORMAP_BONE";
        case COLORMAP_JET :
            return "COLORMAP_JET";
        case COLORMAP_WINTER :
            return "COLORMAP_WINTER";
        case COLORMAP_RAINBOW :
            return "COLORMAP_RAINBOW";
        case COLORMAP_OCEAN :
            return "COLORMAP_OCEAN";
        case COLORMAP_SUMMER:
            return "COLORMAP_SUMMER";
        case COLORMAP_SPRING :
            return "COLORMAP_SPRING";
        case COLORMAP_COOL :
            return "COLORMAP_COOL";
        case COLORMAP_HSV :
            return "COLORMAP_HSV";
        case COLORMAP_PINK :
            return "COLORMAP_PINK";
        case COLORMAP_HOT :
            return "COLORMAP_HOT";
    }

    return "NONE";
}

int main( int argc, char** argv )
{
    // 读取 8 位灰度图像
    Mat im = imread("pluto.jpg", IMREAD_GRAYSCALE);

    Mat im_out = Mat::zeros(600, 800, CV_8UC3);

    for (int i=0; i < 4; i++){
        for(int j=0; j < 3; j++){
            int k = i + j * 4;
            Mat im_color = im_out(Rect(i * 200, j * 200, 200, 200));
            applyColorMap(im, im_color, k);
            putText(im_color, colormap_name(k), Point(30, 180), cv::FONT_HERSHEY_DUPLEX, 0.5, Scalar::all(255), 1, cv::LINE_AA);
        }
    }
    imshow("Pseudo Colored", im_out);
    waitKey(0);
}
2.2使用自定义颜色图
(1)Python
#!/usr/bin/env python
import cv2
import numpy as np


def applyCustomColorMap(im_gray):
    lut = np.zeros((256, 1, 3), dtype=np.uint8)

    lut[:, 0, 0] = [255, 255, 255, 255, 255, 255, 255, 255, 255, 255, 255, 255, 255, 255, 255, 255, 255, 255, 255, 255,
                    255, 255, 255, 255, 255, 255, 255, 255, 255, 255, 255, 255, 255, 255, 255, 255, 255, 255, 255, 255,
                    255, 255, 255, 255, 255, 255, 255, 255, 255, 255, 255, 255, 255, 255, 255, 255, 255, 255, 255, 255,
                    255, 255, 255, 255, 255, 253, 251, 249, 247, 245, 242, 241, 238, 237, 235, 233, 231, 229, 227, 225,
                    223, 221, 219, 217, 215, 213, 211, 209, 207, 205, 203, 201, 199, 197, 195, 193, 191, 189, 187, 185,
                    183, 181, 179, 177, 175, 173, 171, 169, 167, 165, 163, 161, 159, 157, 155, 153, 151, 149, 147, 145,
                    143, 141, 138, 136, 134, 132, 131, 129, 126, 125, 122, 121, 118, 116, 115, 113, 111, 109, 107, 105,
                    102, 100, 98, 97, 94, 93, 91, 89, 87, 84, 83, 81, 79, 77, 75, 73, 70, 68, 66, 64, 63, 61, 59, 57,
                    54, 52, 51, 49, 47, 44, 42, 40, 39, 37, 34, 33, 31, 29, 27, 25, 22, 20, 18, 17, 14, 13, 11, 9, 6, 4,
                    2, 0, 0, 0, 0, 0, 0, 0, 0, 0, 0, 0, 0, 0, 0, 0, 0, 0, 0, 0, 0, 0, 0, 0, 0, 0, 0, 0, 0, 0, 0, 0, 0,
                    0, 0, 0, 0, 0, 0, 0, 0, 0, 0, 0, 0, 0, 0, 0, 0, 0, 0, 0, 0, 0, 0, 0, 0, 0, 0, 0, 0, 0, 0, 0, 0, 0]

    lut[:, 0, 1] = [255, 255, 255, 255, 255, 255, 255, 255, 255, 255, 255, 255, 255, 255, 255, 255, 255, 255, 255, 255,
                    255, 255, 255, 255, 255, 255, 255, 255, 255, 255, 255, 255, 255, 255, 255, 255, 255, 255, 255, 255,
                    255, 255, 255, 255, 255, 255, 255, 255, 255, 255, 255, 255, 255, 255, 255, 255, 255, 255, 255, 255,
                    255, 255, 255, 255, 255, 255, 255, 255, 255, 255, 255, 255, 255, 255, 255, 255, 255, 255, 255, 255,
                    255, 255, 255, 255, 255, 255, 255, 255, 255, 255, 255, 255, 255, 255, 255, 255, 255, 255, 255, 255,
                    255, 255, 255, 255, 255, 255, 255, 255, 255, 255, 255, 255, 255, 255, 255, 255, 255, 255, 255, 255,
                    255, 255, 255, 255, 255, 255, 255, 255, 254, 252, 250, 248, 246, 244, 242, 240, 238, 236, 234, 232,
                    230, 228, 226, 224, 222, 220, 218, 216, 214, 212, 210, 208, 206, 204, 202, 200, 198, 196, 194, 192,
                    190, 188, 186, 184, 182, 180, 178, 176, 174, 171, 169, 167, 165, 163, 161, 159, 157, 155, 153, 151,
                    149, 147, 145, 143, 141, 139, 137, 135, 133, 131, 129, 127, 125, 123, 121, 119, 117, 115, 113, 111,
                    109, 107, 105, 103, 101, 99, 97, 95, 93, 91, 89, 87, 85, 83, 82, 80, 78, 76, 74, 72, 70, 68, 66, 64,
                    62, 60, 58, 56, 54, 52, 50, 48, 46, 44, 42, 40, 38, 36, 34, 32, 30, 28, 26, 24, 22, 20, 18, 16, 14,
                    12, 10, 8, 6, 4, 2, 0]

    lut[:, 0, 2] = [195, 194, 193, 191, 190, 189, 188, 187, 186, 185, 184, 183, 182, 181, 179, 178, 177, 176, 175, 174,
                    173, 172, 171, 170, 169, 167, 166, 165, 164, 163, 162, 161, 160, 159, 158, 157, 155, 154, 153, 152,
                    151, 150, 149, 148, 147, 146, 145, 143, 142, 141, 140, 139, 138, 137, 136, 135, 134, 133, 131, 130,
                    129, 128, 127, 126, 125, 125, 125, 125, 125, 125, 125, 125, 125, 125, 125, 125, 125, 126, 126, 126,
                    126, 126, 126, 126, 126, 126, 126, 126, 126, 126, 126, 126, 126, 126, 126, 126, 126, 126, 126, 126,
                    126, 126, 126, 126, 126, 126, 126, 126, 126, 126, 126, 126, 126, 126, 126, 126, 126, 126, 126, 127,
                    127, 127, 127, 127, 127, 127, 127, 127, 127, 127, 127, 127, 127, 127, 127, 127, 127, 127, 127, 127,
                    127, 127, 127, 127, 127, 127, 127, 127, 127, 127, 127, 127, 127, 127, 127, 127, 127, 127, 127, 127,
                    127, 127, 127, 127, 127, 127, 127, 127, 127, 127, 127, 127, 127, 127, 127, 127, 127, 127, 127, 127,
                    127, 127, 127, 127, 127, 127, 127, 127, 127, 127, 127, 127, 127, 127, 127, 127, 127, 127, 127, 127,
                    127, 127, 127, 127, 127, 127, 127, 127, 127, 127, 127, 126, 126, 126, 126, 126, 126, 126, 126, 126,
                    126, 126, 126, 126, 126, 126, 126, 126, 126, 126, 126, 126, 126, 126, 126, 126, 126, 126, 126, 126,
                    126, 126, 126, 126, 126, 126, 126, 126, 126, 126, 126, 126, 126, 126, 126, 126]

    im_color = cv2.LUT(im_gray, lut)

    return im_color;


if __name__ == '__main__':
    im = cv2.imread("pluto.jpg", cv2.IMREAD_GRAYSCALE);
    im = cv2.cvtColor(im, cv2.COLOR_GRAY2BGR);
    im_color = applyCustomColorMap(im);

    cv2.imwrite('colormap_algae.jpg', im_color)
    cv2.imshow("Pseudo Colored Image", im_color);
    cv2.waitKey(0);
(2)C++
#include "opencv2/opencv.hpp"

using namespace cv;
using namespace std;

Mat applyCustomColorMap(Mat& im_gray)
{
    unsigned char b[] = {255,255,255,255,255,255,255,255,255,255,255,255,255,255,255,255,255,255,255,255,255,255,255,255,255,255,255,255,255,255,255,255,255,255,255,255,255,255,255,255,255,255,255,255,255,255,255,255,255,255,255,255,255,255,255,255,255,255,255,255,255,255,255,255,255,253,251,249,247,245,242,241,238,237,235,233,231,229,227,225,223,221,219,217,215,213,211,209,207,205,203,201,199,197,195,193,191,189,187,185,183,181,179,177,175,173,171,169,167,165,163,161,159,157,155,153,151,149,147,145,143,141,138,136,134,132,131,129,126,125,122,121,118,116,115,113,111,109,107,105,102,100,98,97,94,93,91,89,87,84,83,81,79,77,75,73,70,68,66,64,63,61,59,57,54,52,51,49,47,44,42,40,39,37,34,33,31,29,27,25,22,20,18,17,14,13,11,9,6,4,2,0,0,0,0,0,0,0,0,0,0,0,0,0,0,0,0,0,0,0,0,0,0,0,0,0,0,0,0,0,0,0,0,0,0,0,0,0,0,0,0,0,0,0,0,0,0,0,0,0,0,0,0,0,0,0,0,0,0,0,0,0,0,0,0,0};


    unsigned char g[] = { 255,255,255,255,255,255,255,255,255,255,255,255,255,255,255,255,255,255,255,255,255,255,255,255,255,255,255,255,255,255,255,255,255,255,255,255,255,255,255,255,255,255,255,255,255,255,255,255,255,255,255,255,255,255,255,255,255,255,255,255,255,255,255,255,255,255,255,255,255,255,255,255,255,255,255,255,255,255,255,255,255,255,255,255,255,255,255,255,255,255,255,255,255,255,255,255,255,255,255,255,255,255,255,255,255,255,255,255,255,255,255,255,255,255,255,255,255,255,255,255,255,255,255,255,255,255,255,255,254,252,250,248,246,244,242,240,238,236,234,232,230,228,226,224,222,220,218,216,214,212,210,208,206,204,202,200,198,196,194,192,190,188,186,184,182,180,178,176,174,171,169,167,165,163,161,159,157,155,153,151,149,147,145,143,141,139,137,135,133,131,129,127,125,123,121,119,117,115,113,111,109,107,105,103,101,99,97,95,93,91,89,87,85,83,82,80,78,76,74,72,70,68,66,64,62,60,58,56,54,52,50,48,46,44,42,40,38,36,34,32,30,28,26,24,22,20,18,16,14,12,10,8,6,4,2,0 };


    unsigned char r[] = {195,194,193,191,190,189,188,187,186,185,184,183,182,181,179,178,177,176,175,174,173,172,171,170,169,167,166,165,164,163,162,161,160,159,158,157,155,154,153,152,151,150,149,148,147,146,145,143,142,141,140,139,138,137,136,135,134,133,131,130,129,128,127,126,125,125,125,125,125,125,125,125,125,125,125,125,125,126,126,126,126,126,126,126,126,126,126,126,126,126,126,126,126,126,126,126,126,126,126,126,126,126,126,126,126,126,126,126,126,126,126,126,126,126,126,126,126,126,126,127,127,127,127,127,127,127,127,127,127,127,127,127,127,127,127,127,127,127,127,127,127,127,127,127,127,127,127,127,127,127,127,127,127,127,127,127,127,127,127,127,127,127,127,127,127,127,127,127,127,127,127,127,127,127,127,127,127,127,127,127,127,127,127,127,127,127,127,127,127,127,127,127,127,127,127,127,127,127,127,127,127,127,127,127,127,127,127,127,127,127,127,126,126,126,126,126,126,126,126,126,126,126,126,126,126,126,126,126,126,126,126,126,126,126,126,126,126,126,126,126,126,126,126,126,126,126,126,126,126,126,126,126,126,126,126,126};

    Mat channels[] = {Mat(256,1, CV_8U, b), Mat(256,1, CV_8U, g), Mat(256,1, CV_8U, r)};
    Mat lut; // 创建查找表
    merge(channels, 3, lut);

    Mat im_color;
    LUT(im_gray, lut, im_color);

    return im_color;

}


int main( int argc, char** argv )
{
    // 读取 8 位灰度图像
    Mat im = imread("pluto.jpg", IMREAD_GRAYSCALE);
    cvtColor(im.clone(), im, COLOR_GRAY2BGR);
    Mat im_color = applyCustomColorMap(im);

    imshow("Pseudo Colored Image", im_color);
    waitKey(0);

}
2.3结果展示
3.在OpenCV中使用applyColorMap
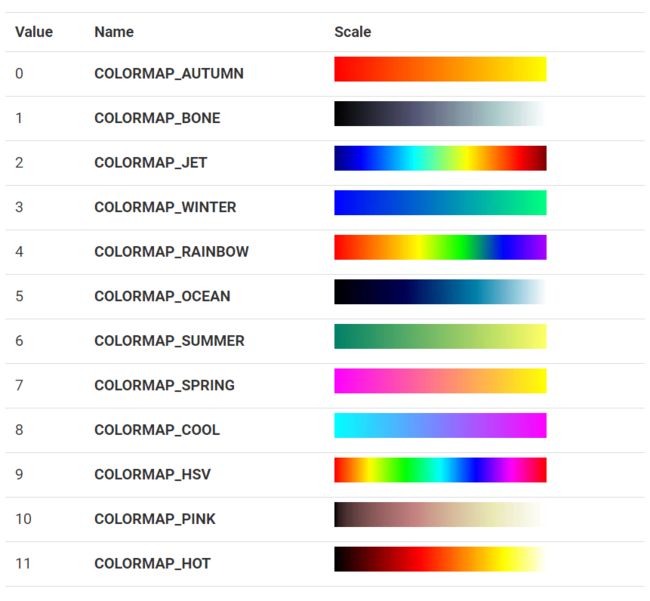
OpenCV 定义了 12 个颜色图,可以使用函数 applyColorMap 将它们应用于灰度图像以生成伪彩色图像。让我们快速了解如何将颜色映射 COLORMAP_JET 应用于图像。
Python
import cv2

im_gray = cv2.imread("pluto.jpg", cv2.IMREAD_GRAYSCALE)
im_color = cv2.applyColorMap(im_gray, cv2.COLORMAP_JET)
C++
using namespace cv;

Mat im_gray = imread("pluto.jpg", IMREAD_GRAYSCALE);
Mat im_color;
applyColorMap(im_gray, im_color, COLORMAP_JET);
下图显示了颜色图的直观表示和 COLORMAP_* 的数值。较低的灰度值由标度左侧的颜色替换,而较高的灰度值在标度的右侧。

4.自定义颜色图
如果您想要创建自己的颜色图,请按以下步骤操作。
- 1.定义颜色图:颜色图是从 0-255 个值到 256 种颜色的映射。在 OpenCV 中,我们需要创建一个大小为 256 x 1 的 8 位彩色图像来存储 256 个颜色值。
- 2.使用查找表映射颜色:在 OpenCV 中,您可以使用查找表 LUT 将存储在 256 x 1 彩色图像中的颜色图应用于图像。
Python
# 注意:im_gray 是具有相同红色、绿色、蓝色通道的 3 通道图像。
im_color = cv2.LUT(im_gray, lut)
C++
Mat im_color;
// 注意:im_gray 是具有相同红色、绿色、蓝色通道的 3 通道图像。
LUT(im_gray, lut, im_color);
参考目录
https://learnopencv.com/applycolormap-for-pseudocoloring-in-opencv-c-python/


