pytorch中Convolutional Neural Networks的真正计算过程与理解
关于Convolutional Neural Networks的真正理解
一般Convolutional Neural Networks包含卷积层,BN层,激活层以及池化层。池化层较为简单,不再赘述。借此机会详细的介绍其他三层是如何实现的,以及如何手动初始化卷积层权值。
Convolution layer
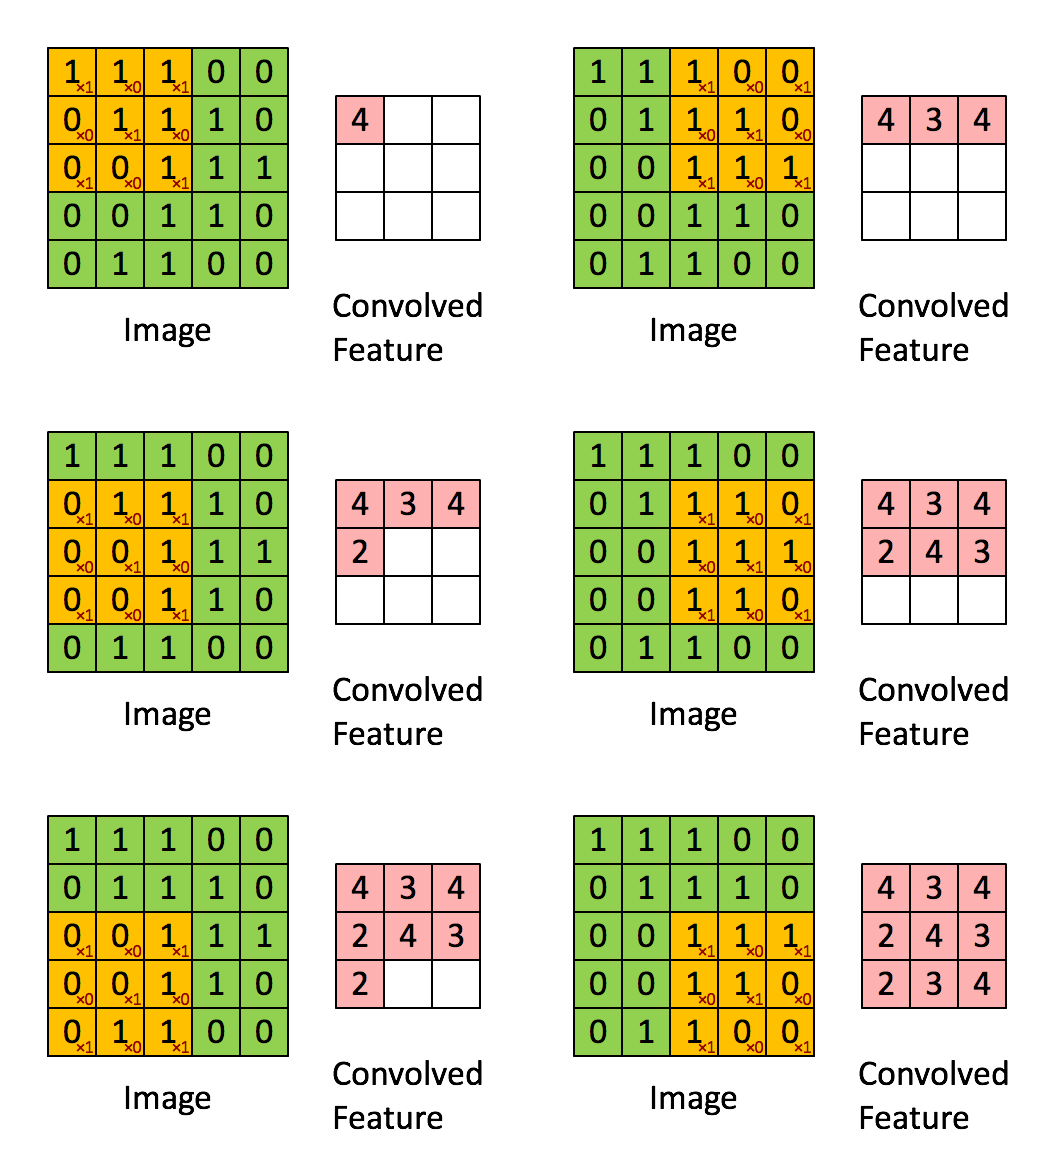
网上写卷积的博客不计其数,大都是长篇大论,其实卷积十分简单,见下图。

上图所示输入为 【5,5 ,1】 的图像,卷积核大小为 3 * 3,步长为1 【一步一步走】,padding=0【如果为1会在图像外面补一圈0】,偏置为0。可以初步的理解卷积操作为提取图像特征。
【注意】当输入的channels为多维时,一个卷积核会生成对应维度的w,进行卷积最后相加。
卷积核中的值是意思代表什么含义中?
经过了解发现卷积核中的值即权重w,偏置bias为b,即y=w * x + b。
如何查看卷积中的权值和偏置?
代码如下:
import torch
import torch.nn as nn
conv = nn.Conv2d(in_channels = 3, out_channels = 1, kernel_size=3,stride=1,padding=0)
print('weight: ',conv.weight)
print('bias: ',conv.bias)
#输出
weight:  Parameter containing:
tensor([[[[ 0.0409, -0.1187, -0.1277],
          [ 0.1090,  0.1126, -0.1540],
          [ 0.0520,  0.0716,  0.0857]],

         [[ 0.1192,  0.0912,  0.0131],
          [-0.0120,  0.0832,  0.0190],
          [ 0.0125,  0.0831,  0.1276]],

         [[-0.1231,  0.1494, -0.0117],
          [ 0.0709,  0.1686, -0.1689],
          [-0.1288,  0.0996,  0.0310]]]], requires_grad=True)
bias:  Parameter containing:
tensor([0.1709], requires_grad=True)
这个值是怎么来的呢?
经观察发现,每次运行这段代码,获得的值均不相同,由此可以推断出w和b是随机生成的。
w和b的值可以自定义吗?
当然可以,代码如下
import torch
import torch.nn as nn
conv = nn.Conv2d(in_channels = 3, out_channels = 1, kernel_size=3,stride=1,padding=0)
ones=torch.Tensor(np.ones([1,3,3,3])) # 产生3*3*3的卷积核,channel与输入的channel对应
        # print(self.conv1.weight)
conv.weight=torch.nn.Parameter(ones)
conv.bias=torch.nn.Parameter(torch.Tensor([1]))
print('weight: ',conv.weight)
print('bias: ',conv.bias)
#输出
weight:  Parameter containing:
tensor([[[[1., 1., 1.],
          [1., 1., 1.],
          [1., 1., 1.]],

         [[1., 1., 1.],
          [1., 1., 1.],
          [1., 1., 1.]],

         [[1., 1., 1.],
          [1., 1., 1.],
          [1., 1., 1.]]]], requires_grad=True)
bias:  Parameter containing:
tensor([1.], requires_grad=True)
实验成功,带入真实数据可否进行卷积运算呢?
代码如下。
import torch
import torch.nn as nn
import numpy as np
data = torch.tensor([[
                [[1,1,1],[10,1,1],[1,1,1],[1,1,1],[1,1,1]],
                [[2,2,2],[20,2,2],[2,2,2],[2,2,2],[2,2,2]],
                [[3,3,3],[30,3,3],[3,3,3],[3,3,3],[3,3,3]],
                [[4,4,4],[40,4,4],[4,4,4],[4,4,4],[4,4,4]],
                [[5,5,5],[50,5,5],[5,5,5],[5,5,5],[5,5,5]]
        ]]).float()
print(data.shape)
data = data.permute(0,3,1,2)   #将输入的shape,(1,5,5,3)——>(1,3,5,5)
class CNN(nn.Module):
    def __init__(self):
        super(CNN,self).__init__()
        ones=torch.Tensor(np.ones([1,3,3,3])) #产生3*3*3的卷积核,channel与输入的channel对应
        self.conv1 = nn.Conv2d(in_channels = 3, out_channels = 1, kernel_size=3,stride=1,padding=0,bias=False)
        self.conv1.weight=torch.nn.Parameter(ones)    #自定义weight
        self.conv1.bias=torch.nn.Parameter(torch.Tensor([1]))  #自定义bias
    def forward(self,x):
        out = self.conv1(x)
        return out
print(data)
net = CNN()
print(net(data))
#input输出
tensor([[[[ 1., 10.,  1.,  1.,  1.],
          [ 2., 20.,  2.,  2.,  2.],
          [ 3., 30.,  3.,  3.,  3.],
          [ 4., 40.,  4.,  4.,  4.],
          [ 5., 50.,  5.,  5.,  5.]],

         [[ 1.,  1.,  1.,  1.,  1.],
          [ 2.,  2.,  2.,  2.,  2.],
          [ 3.,  3.,  3.,  3.,  3.],
          [ 4.,  4.,  4.,  4.,  4.],
          [ 5.,  5.,  5.,  5.,  5.]],

         [[ 1.,  1.,  1.,  1.,  1.],
          [ 2.,  2.,  2.,  2.,  2.],
          [ 3.,  3.,  3.,  3.,  3.],
          [ 4.,  4.,  4.,  4.,  4.],
          [ 5.,  5.,  5.,  5.,  5.]]]])
#output输出
tensor([[[[109., 109.,  55.],
          [163., 163.,  82.],
          [217., 217., 109.]]]], grad_fn=<ThnnConv2DBackward>)
在此我们验证一下左上角数据:109 ,顺便验证卷积操作。卷积核参数已经自定义为全是1。故
左上角卷积结果:
          第一维度:1 + 10 + 1 + 2 + 20 + 2 + 3 + 30 + 3 + 30 + 3 = 72
		  第二维度:1 + 1 + 1 + 2 + 2 + 2 + 3 + 3 + 3 = 18
	      第三维度:1 + 1 + 1 + 2 + 2 + 2 + 3 + 3 + 3 = 18
			                    72 + 18 + 18 = 108
							最后加上偏置bias(自定义为1)= 109
由此验证自定义卷积层参数可行,且卷积操作正确。
Batch Normalization Layer
关于BN层的博客也有很多,其实BN层很简单。

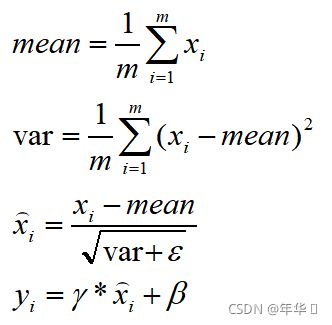
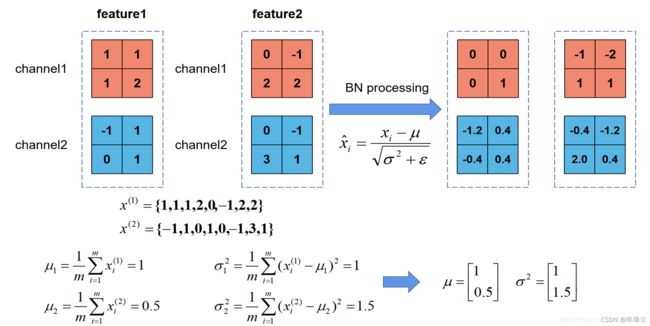
即对输入的一个batch的数据,在同一纬度上求均值和方差,在进行更新。γ初始值为1,β初始值为0,将不断进行学习更新。

验证代码如下。
官方代码实现。
import torch
import torch.nn as nn
import numpy as np
input = torch.tensor([[
                [[1,1,1],[10,1,1],[1,1,1],[1,1,1],[1,1,1]],
                [[2,2,2],[20,2,2],[2,2,2],[2,2,2],[2,2,2]],
                [[3,3,3],[30,3,3],[3,3,3],[3,3,3],[3,3,3]],
                [[4,4,4],[40,4,4],[4,4,4],[4,4,4],[4,4,4]],
                [[5,5,5],[50,5,5],[5,5,5],[5,5,5],[5,5,5]]
        ]]).float()
input = input.permute(0,3,1,2)
m=nn.BatchNorm2d(3)
output=m(input)
print(m.weight)
print(m.bias)
print(output)
#输出
Parameter containing:
tensor([1., 1., 1.], requires_grad=True)
Parameter containing:
tensor([0., 0., 0.], requires_grad=True)
tensor([[[[-0.5883,  0.1272, -0.5883, -0.5883, -0.5883],
          [-0.5088,  0.9221, -0.5088, -0.5088, -0.5088],
          [-0.4293,  1.7171, -0.4293, -0.4293, -0.4293],
          [-0.3498,  2.5121, -0.3498, -0.3498, -0.3498],
          [-0.2703,  3.3070, -0.2703, -0.2703, -0.2703]],

         [[-1.4142, -1.4142, -1.4142, -1.4142, -1.4142],
          [-0.7071, -0.7071, -0.7071, -0.7071, -0.7071],
          [ 0.0000,  0.0000,  0.0000,  0.0000,  0.0000],
          [ 0.7071,  0.7071,  0.7071,  0.7071,  0.7071],
          [ 1.4142,  1.4142,  1.4142,  1.4142,  1.4142]],

         [[-1.4142, -1.4142, -1.4142, -1.4142, -1.4142],
          [-0.7071, -0.7071, -0.7071, -0.7071, -0.7071],
          [ 0.0000,  0.0000,  0.0000,  0.0000,  0.0000],
          [ 0.7071,  0.7071,  0.7071,  0.7071,  0.7071],
          [ 1.4142,  1.4142,  1.4142,  1.4142,  1.4142]]]],
       grad_fn=<NativeBatchNormBackward>)
可以看到初始γ为1,β为0。
通过公式自己实现,代码如下。
import torch
import torch.nn as nn
import numpy as np
input = torch.tensor([[
                [[1,1,1],[10,1,1],[1,1,1],[1,1,1],[1,1,1]],
                [[2,2,2],[20,2,2],[2,2,2],[2,2,2],[2,2,2]],
                [[3,3,3],[30,3,3],[3,3,3],[3,3,3],[3,3,3]],
                [[4,4,4],[40,4,4],[4,4,4],[4,4,4],[4,4,4]],
                [[5,5,5],[50,5,5],[5,5,5],[5,5,5],[5,5,5]]
        ]]).float()
input = input.permute(0,3,1,2)
batch, channel, w, h = input.shape
for c in range(channel):
    data = input[:,c,:,:]
    mean = data.mean()
    var = data.var(unbiased=False)
    input[:,c,:,:] = (input[:,c,:,:] - mean) / (np.sqrt(var+1e-5))
print(input)
#输出
tensor([[[[-0.5883,  0.1272, -0.5883, -0.5883, -0.5883],
          [-0.5088,  0.9221, -0.5088, -0.5088, -0.5088],
          [-0.4293,  1.7171, -0.4293, -0.4293, -0.4293],
          [-0.3498,  2.5121, -0.3498, -0.3498, -0.3498],
          [-0.2703,  3.3070, -0.2703, -0.2703, -0.2703]],

         [[-1.4142, -1.4142, -1.4142, -1.4142, -1.4142],
          [-0.7071, -0.7071, -0.7071, -0.7071, -0.7071],
          [ 0.0000,  0.0000,  0.0000,  0.0000,  0.0000],
          [ 0.7071,  0.7071,  0.7071,  0.7071,  0.7071],
          [ 1.4142,  1.4142,  1.4142,  1.4142,  1.4142]],

         [[-1.4142, -1.4142, -1.4142, -1.4142, -1.4142],
          [-0.7071, -0.7071, -0.7071, -0.7071, -0.7071],
          [ 0.0000,  0.0000,  0.0000,  0.0000,  0.0000],
          [ 0.7071,  0.7071,  0.7071,  0.7071,  0.7071],
          [ 1.4142,  1.4142,  1.4142,  1.4142,  1.4142]]]])
可以看到两个输出值相同,验证了公式的正确性。另外自己实现,使用tensor求解方差时:
var = data.var(unbiased=False)
一定要unbiased=False,即不使用贝塞尔校正。贝塞尔校正求方差公式如下:

正常求取方差公式如下:

使用贝塞尔校正求取的方差会略大于正确值。(足足排查了半个小时才发现)。
Activation function
激活函数比较好理解,主要是将bn层后的输出映射为非线性。这里以实现relu为例。
官方实现
import torch
import torch.nn as nn
input = torch.tensor([[
                [[-1,-1,-1],[-10,-1,-1],[-1,-1,-1],[-1,-1,-1],[-1,-1,-1]],
                [[2,2,2],[20,2,2],[2,2,2],[2,2,2],[2,2,2]],
        ]]).float()
relu = nn.ReLU()
print(relu(input))
自己实现
import torch
import torch.nn as nn
input = torch.tensor([[
                [[-1,-1,-1],[-10,-1,-1],[-1,-1,-1],[-1,-1,-1],[-1,-1,-1]],
                [[2,2,2],[20,2,2],[2,2,2],[2,2,2],[2,2,2]],
        ]]).float()
def relu(input):
    return torch.maximum(input,torch.tensor(0))
print(relu(input))
完整的实现整个过程
代码如下
import torch
import torch.nn as nn
import numpy as np
from torchvision import transforms
data1 = np.array([
                [[1,1,1],[10,1,1],[1,1,1],[1,1,1],[1,1,1]],
                [[2,2,2],[20,2,2],[2,2,2],[2,2,2],[2,2,2]],
                [[3,3,3],[30,3,3],[3,3,3],[3,3,3],[3,3,3]],
                [[4,4,4],[40,4,4],[4,4,4],[4,4,4],[4,4,4]],
                [[5,5,5],[50,5,5],[5,5,5],[5,5,5],[5,5,5]]
        ], dtype='uint8')
data2 = np.ones((5,5,3), dtype='uint8')
print(data1)
print(data2)
print(data1.shape)
print(data2.shape)
#数据预处理,请看前面的博客
data1 = transforms.ToTensor()(data1)
data2 = transforms.ToTensor()(data2)
data1 = torch.unsqueeze(data1, 0)
data2 = torch.unsqueeze(data2, 0)
input = torch.cat((data1, data2),0)

class CNN(nn.Module):
    def __init__(self):
        super(CNN,self).__init__()
        ones=torch.Tensor(np.ones([1,3,3,3]))
        self.conv1 = nn.Conv2d(in_channels = 3, out_channels = 1, kernel_size=3,stride=1,padding=0,bias=False)
        self.conv1.weight=torch.nn.Parameter(ones)
        self.conv1.bias=torch.nn.Parameter(torch.Tensor([1]))
        self.bn1 = nn.BatchNorm2d(1)
        self.relu = nn.ReLU()
    def forward(self,x):
        print(x)
        out = self.conv1(x)
        print(out)
        out = self.bn1(out)
        print(out)
        return out
net = CNN()
net(input)
#输出
# input
tensor([[[[0.0039, 0.0392, 0.0039, 0.0039, 0.0039],
          [0.0078, 0.0784, 0.0078, 0.0078, 0.0078],
          [0.0118, 0.1176, 0.0118, 0.0118, 0.0118],
          [0.0157, 0.1569, 0.0157, 0.0157, 0.0157],
          [0.0196, 0.1961, 0.0196, 0.0196, 0.0196]],

         [[0.0039, 0.0039, 0.0039, 0.0039, 0.0039],
          [0.0078, 0.0078, 0.0078, 0.0078, 0.0078],
          [0.0118, 0.0118, 0.0118, 0.0118, 0.0118],
          [0.0157, 0.0157, 0.0157, 0.0157, 0.0157],
          [0.0196, 0.0196, 0.0196, 0.0196, 0.0196]],

         [[0.0039, 0.0039, 0.0039, 0.0039, 0.0039],
          [0.0078, 0.0078, 0.0078, 0.0078, 0.0078],
          [0.0118, 0.0118, 0.0118, 0.0118, 0.0118],
          [0.0157, 0.0157, 0.0157, 0.0157, 0.0157],
          [0.0196, 0.0196, 0.0196, 0.0196, 0.0196]]],

        [[[0.0039, 0.0039, 0.0039, 0.0039, 0.0039],
          [0.0039, 0.0039, 0.0039, 0.0039, 0.0039],
          [0.0039, 0.0039, 0.0039, 0.0039, 0.0039],
          [0.0039, 0.0039, 0.0039, 0.0039, 0.0039],
          [0.0039, 0.0039, 0.0039, 0.0039, 0.0039]],

         [[0.0039, 0.0039, 0.0039, 0.0039, 0.0039],
          [0.0039, 0.0039, 0.0039, 0.0039, 0.0039],
          [0.0039, 0.0039, 0.0039, 0.0039, 0.0039],
          [0.0039, 0.0039, 0.0039, 0.0039, 0.0039],
          [0.0039, 0.0039, 0.0039, 0.0039, 0.0039]],

         [[0.0039, 0.0039, 0.0039, 0.0039, 0.0039],
          [0.0039, 0.0039, 0.0039, 0.0039, 0.0039],
          [0.0039, 0.0039, 0.0039, 0.0039, 0.0039],
          [0.0039, 0.0039, 0.0039, 0.0039, 0.0039],
          [0.0039, 0.0039, 0.0039, 0.0039, 0.0039]]]])
#卷积
tensor([[[[1.4235, 1.4235, 1.2118],
          [1.6353, 1.6353, 1.3176],
          [1.8471, 1.8471, 1.4235]]],
        [[[1.1059, 1.1059, 1.1059],
          [1.1059, 1.1059, 1.1059],
          [1.1059, 1.1059, 1.1059]]]], grad_fn=<MkldnnConvolutionBackward>)
#BN
tensor([[[[ 4.0822e-01,  4.0822e-01, -4.0822e-01],
          [ 1.2247e+00,  1.2247e+00, -2.7576e-06],
          [ 2.0411e+00,  2.0411e+00,  4.0822e-01]]],
        [[[-8.1644e-01, -8.1644e-01, -8.1644e-01],
          [-8.1644e-01, -8.1644e-01, -8.1644e-01],
          [-8.1644e-01, -8.1644e-01, -8.1644e-01]]]],
       grad_fn=<NativeBatchNormBackward>)
#activation function
tensor([[[[0.4082, 0.4082, 0.0000],
          [1.2247, 1.2247, 0.0000],
          [2.0411, 2.0411, 0.4082]]],
        [[[0.0000, 0.0000, 0.0000],
          [0.0000, 0.0000, 0.0000],
          [0.0000, 0.0000, 0.0000]]]], grad_fn=<ReluBackward0>)