简单图论与PyG环境配置
一、简单图论
图的表示
- 图用节点表示实体(entities ),用边表示实体间的关系(relations)
- 通过邻接矩阵来构造图
- 在无向图中,从结点 v i v_i vi 到 v j v_j vj 的边存在,意味着从结点 v j v_j vj 到 v i v_i vi 的边也存在。因而无向图的邻接矩阵是对称的。
- 在无权图中,各条边的权重被认为是等价的,即认为各条边的权重为1
- 对于有权图,其对应的邻接矩阵通常被记为 W ∈ { 0 , 1 } N ∗ N W \in \{0, 1\}^{N * N} W∈{0,1}N∗N,其中 W i , j = w i j W_{i, j} = w_{ij} Wi,j=wij表示从结点 v i v_i vi 到 v j v_j vj 的边的权重。若边不存在时,边的权重为0
图的属性
- 度
- 出度
- 入度
- 邻接结点
- 行走
- 一个图的邻接矩阵为 A A A, A n A^n An为邻接矩阵的n次方, 那么 A n [ i , j ] A^n[i,j] An[i,j] 等于从结点 v i v_i vi 到结点 v j v_j vj 的长度为n的行走的个数。
- 路径: 结点不可重复的行走
- 子图: 若一个图包含另一个图, 则另一个图是当前图的子图
- 连通分量: 一个图的所有结点至少存在一条路径
- 连通图: 连通图的连通分量为1
- 最短路径: 一个图的所有路径集合为 P s t P_{st} Pst, P s t s p P_{st}^{sp} Pstsp 为最短的一条路径
- 拉普拉斯矩阵: 一个图的邻接矩阵为 A A A, 拉普拉斯矩阵为 L = D − A L = D - A L=D−A, D = d i a g ( d ( v 1 ) , . . . , d ( v N ) ) D = diag(d(v1), ..., d(v_N)) D=diag(d(v1),...,d(vN))
- 对称归一化拉普拉斯矩阵: L = D − 1 2 ( D − A ) D − 1 2 = I − D − 1 2 A D − 1 2 L = D^{-\frac{1}{2}} (D - A) D^{-\frac{1}{2}} = I - D^{-\frac{1}{2}} A D^{-\frac{1}{2}} L=D−21(D−A)D−21=I−D−21AD−21
- 度中心性: 度 中 心 性 = N d e g r e e n − 1 度中心性 = \frac{N_{degree}}{n-1} 度中心性=n−1Ndegree , n为节点个数
- 特征向量中心性: 结点的连接结点的中心性
- betweenness: b e t w e e n n e s s = 经 过 该 节 点 的 最 短 路 径 其 余 两 两 节 点 的 最 短 路 径 betweenness = \frac{经过该节点的最短路径}{其余两两节点的最短路径} betweenness=其余两两节点的最短路径经过该节点的最短路径
- closeness: c l o s e n e s s = n − 1 节 点 到 其 他 节 点 最 短 路 径 之 和 closeness = \frac{n - 1}{节点到其他节点最短路径之和} closeness=节点到其他节点最短路径之和n−1
- pagerank:
- HITS:
import numpy as np
import pandas as pd
import networkx as nx
import matplotlib.pyplot as plt

edges = pd.DataFrame()
edges['sources'] = [0, 1, 2, 3, 4, 4, 6, 7, 7, 9, 1, 4, 4, 4, 6, 7, 5, 8, 9, 8]
edges['targets'] = [1, 4, 4, 4, 6, 7, 5, 8, 9, 8, 0, 1, 2, 3, 4, 4, 6, 7, 7, 9]
edges['weights'] = [1, 1, 1, 1, 1, 1, 1, 1, 1, 1, 1, 1, 1, 1, 1, 1, 1, 1, 1, 1]

G = nx.from_pandas_edgelist(edges, source='sources', target='targets', edge_attr='weights')
print('degree: ', nx.degree(G)) # degree
print('连通分量: ', list(nx.connected_components(G))) # 连通分量
print('图直径: ', nx.diameter(G)) # 图直径
print('度中心性: ', nx.degree_centrality(G)) # 度中心性
print('特征向量中心性: ', nx.eigenvector_centrality(G)) # 特征向量中心性
print('betweenness: ', nx.betweenness_centrality((G))) # betweenness
print('closeness: ', nx.closeness_centrality(G)) # closeness
print('pagerank: ', nx.pagerank(G)) # pagerank
print('HITS: ', nx.hits(G, tol=0.00001)) # HITS
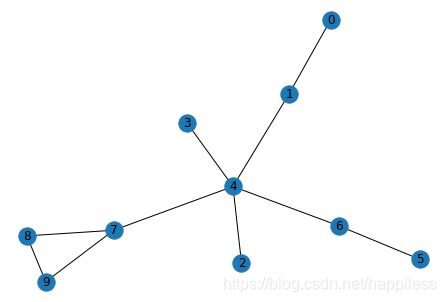
nx.draw(G, with_labels=edges['sources'].tolist())
plt.show()
图的种类
- 同质图(Homogeneous Graph):只有一种类型的节点和一种类型的边的图。
- 异质图(Heterogeneous Graph):存在多种类型的节点和多种类型的边的图。
- 二部图(Bipartite Graphs):节点分为两类,只有不同类的节点之间存在边。
图结构数据上的机器学习
- 节点预测: 预测节点的类别或某类属性的取值
- 边预测: 预测两个节点间是否存在链接
- 图的预测: 对不同的图进行分类或预测图的属性
- 节点聚类:检测节点是否形成一个社区
二、PyG环境配置(Mac)
- 创建虚拟环境
conda create -n env_gnn python=3.6
- 进入虚拟环境
source activate env_gnn
- 退出虚拟环境
source deactivate env_gnn
- 安装pytorch cpu版本
conda install pytorch==1.6.0 torchvision==0.7.0 -c pytorch
- 查看pytorch版本
python -c "import torch; print(torch.__version__)"
python -c "import torch; print(torch.version.cuda)"
- pip安装cpu版本的PyG
pip install torch-scatter -f https://pytorch-geometric.com/whl/torch-1.6.0+cpu.html
    MACOSX_DEPLOYMENT_TARGET=10.9 CC=clang CXX=clang++ pip install torch-scatter

pip install torch-sparse -f https://pytorch-geometric.com/whl/torch-1.6.0+cpu.html
    MACOSX_DEPLOYMENT_TARGET=10.9 CC=clang CXX=clang++ pip install torch-sparse

pip install torch-cluster -f https://pytorch-geometric.com/whl/torch-1.6.0+cpu.html
    MACOSX_DEPLOYMENT_TARGET=10.9 CC=clang CXX=clang++ pip install torch-cluster

pip install torch-spline-conv -f https://pytorch-geometric.com/whl/torch-1.6.0+cpu.html
    MACOSX_DEPLOYMENT_TARGET=10.9 CC=clang CXX=clang++ pip install torch-spline-conv

pip install pytest-runner
pip install torch-geometric
- colab环境配置
!python -V
!nvcc --version

!pip3 install torch==1.8.1+cu111 torchvision==0.9.1+cu111 torchaudio==0.8.1 -f https://download.pytorch.org/whl/torch_stable.html > /dev/null
import torch;
torch.__version__
torch.version.cuda

!pip install torch-scatter -f https://pytorch-geometric.com/whl/torch-1.8.0+cu111.html > /dev/null
!pip install torch-sparse -f https://pytorch-geometric.com/whl/torch-1.8.0+cu111.html > /dev/null
!pip install torch-cluster -f https://pytorch-geometric.com/whl/torch-1.8.0+cu111.html > /dev/null
!pip install torch-spline-conv -f https://pytorch-geometric.com/whl/torch-1.8.0+cu111.html > /dev/null
!pip install torch-geometric > /dev/null
三、PyG中图的表示及其使用
Data 构造函数
- edge_index 的每一列定义一条边,其中第一行为边起始节点的索引,第二行为边结束节点的索引。 这种表示方法被称为COO格式(coordinate format),通常用于表示稀疏矩阵。
- PyG不是用稠密矩阵来持有邻接矩阵的信息,而是用仅存储邻接矩阵 中非元素的稀疏矩阵来表示图。 通常,一个图至少包含x, edge_index, edge_attr, y, num_nodes 5个属性,当图包含其他属性时, 我们可以通过指定额外的参数使Data 对象包含其他的属性
import collections
class Data(object):
    def __init__(self, x=None, edge_index=None, edge_attr=None, y=None, **kwargs):
        """
        Args:
        x (Tensor, optional): 节点属性矩阵,大小为`[num_nodes, num_node_features]`
        edge_index (LongTensor, optional): 边索引矩阵,大小为`[2, num_edges]`,第0行为尾节点,第1行为头节点,头指向尾
        edge_attr (Tensor, optional): 边属性矩阵,大小为`[num_edges, num_edge_features]`
        y (Tensor, optional): 节点或图的标签,任意大小(,其实也可以是边的标签)
        """
        self.x = x
        self.edge_index = edge_index
        self.edge_attr = edge_attr
        self.y = y
        for key, item in kwargs.items():
            if key == 'num_nodes':
                self.__num_nodes__ = item
            else:
                self[key] = item
    @classmethod
    def from_dict(cls, dictionary):
        """
        Creates a data object from a python dictionary.
        """
        data = cls()
        for key, item in dictionary.items():
            data[key] = item
        return data

    def to_dict(self):
        return {key: item for key, item in self}

    def to_namedtuple(self):
        keys = self.keys
        DataTuple = collections.namedtuple('DataTuple', keys)
        return DataTuple(*[self[key] for key in keys])
dict对象转Data
graph_dict = {
'x': x,
'edge_index': edge_index,
'edge_attr': edge_attr,
'y': y,
'num_nodes': num_nodes,
'other_attr': other_attr
}
graph_data = Data.from_dict(graph_dict)
Data对象转换成其他类型数据
-
to_dict()
-
to_namedtuple()
Data对象属性
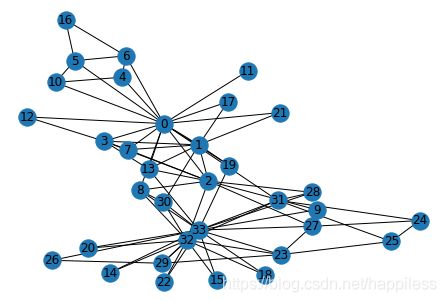
from torch_geometric.datasets import KarateClub
dataset = KarateClub()
data = dataset[0]

print(f'Number of nodes: {data.num_nodes}') # 节点数量
# Number of nodes: 34
print(f'Number of edges: {data.num_edges}') # 边数量
# Number of edges: 156
print(f'Number of node features: {data.num_node_features}') # 节点属性的维度
# Number of node features: 34
print(f'Number of node features: {data.num_features}') # 同样是节点属性的维度
# Number of node features: 34
print(f'Number of edge features: {data.num_edge_features}') # 边属性的维度
# Number of edge features: 0
print(f'Average node degree: {data.num_edges / data.num_nodes:.2f}') # 平均节点度
# Average node degree: 4.59
print(f'if edge indices are ordered and do not contain duplicate entries.: \
      {data.is_coalesced()}') # 是否边是有序的同时不含有重复的边
# if edge indices are ordered and do not contain duplicate entries.:       True
print(f'Number of training nodes: {data.train_mask.sum()}') # 用作训练集的节点
# Number of training nodes: 4
print(f'Training node label rate: {int(data.train_mask.sum()) / data.num_nodes:.2f}') # 用作训练集的节点的数量
# Training node label rate: 0.12
print(f'Contains isolated nodes: {data.contains_isolated_nodes()}') # 此图是否包含孤立的节点
# Contains isolated nodes: False
print(f'Contains self-loops: {data.contains_self_loops()}') # 此图是否包含自环的边
# Contains self-loops: False
print(f'Is undirected: {data.is_undirected()}') # 此图是否是无向图
# Is undirected: True
图可视化
def plot_graph(edge, x, y):
    import networkx as nx
    import matplotlib.pyplot as plt
    # edge, x, y 每个维度都为2,其中第一维度是name,第二个维度是data
    # x表示的是结点,y表示的标签,edge表示的连边, 由两个维度的tensor构成
    x_np = x[1].numpy()
    y_np = y[1].numpy()
    g = nx.Graph()
    src = edge[0].numpy()
    dst = edge[1].numpy()
    edgelist = zip(src, dst)
    for i, j in edgelist:
        g.add_edge(i, j)
    nx.draw(g, with_labels=g.nodes)
    # plt.savefig('test.png')
    plt.show()

edge_index, x, y = data['edge_index'], data['x'], data['y']
plot_graph(edge_index, x, y)
Dataset类的使用
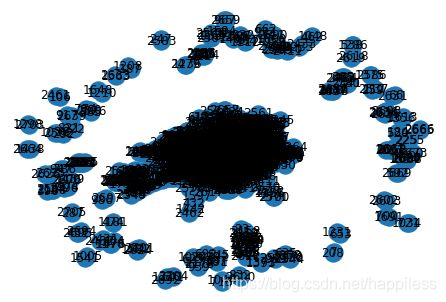
from torch_geometric.datasets import Planetoid
dataset = Planetoid(root='./input/Cora', name='Cora')
data = dataset[0]
edge_index, x, y = data['edge_index'], data['x'], data['y']
plot_graph(edge_index, x, y)
- 查看数据集
data = dataset[0]
print('num_classes: ', dataset.num_classes) # 类别个数
# num_classes:  7
print('num_node_features: ', dataset.num_node_features) # 节点属性的维度
# num_node_features:  1433
print(f'is undirected: {data.is_undirected()}') # 此图是否是无向图
# is undirected: True
print('训练集的节点个数: ', data.train_mask.sum().item())
# 训练集的节点个数:  140
print('验证集的节点个数: ', data.val_mask.sum().item())
# 验证集的节点个数:  500
print('测试集的节点个数: ', data.test_mask.sum().item())
# 测试集的节点个数:  1000
- 使用GCN训练
import torch.nn.functional as F
from torch_geometric.nn import GCNConv

class GCN(torch.nn.Module):
    def __init__(self, feature, hidden, classes):
        super(GCN, self).__init__()
        self.conv1 = GCNConv(feature, hidden)
        self.conv2 = GCNConv(hidden, classes)

    def forward(self, data):
        x, edge_index = data.x, data.edge_index
        x = self.conv1(x, edge_index)
        x = F.relu(x)
        x = F.dropout(x, training=self.training)
        x = self.conv2(x, edge_index)
        return F.log_softmax(x, dim=1)

 device = torch.device('cuda' if torch.cuda.is_available() else 'cpu')
model = GCN(dataset.num_node_features, 16, dataset.num_classes).to(device)
data = dataset[0].to(device)
optimizer = torch.optim.Adam(model.parameters(), lr=0.01, weight_decay=5e-4)

model.train()
for epoch in range(200):
    optimizer.zero_grad()
    out = model(data)
    loss = F.nll_loss(out[data.train_mask],
    data.y[data.train_mask])
    loss.backward()
    optimizer.step()
    print(f'epoch: {epoch}, loss: {loss.item()}')
- 验证
model.eval()
_, pred = model(data).max(dim=1)
correct = pred[data.val_mask].eq(data.y[data.val_mask]).sum()
acc = int(correct) / int(data.val_mask.sum())
print('val_mask acc: ', acc)
# val_mask acc:  0.776
- 测试
model.eval()
_, pred = model(data).max(dim=1)
correct = pred[data.test_mask].eq(data.y[data.test_mask]).sum()
acc = int(correct) / int(data.test_mask.sum())
print('test_mask acc: ', acc)
# test_mask acc:  0.81
四、作业
- 请通过继承Data类实现一个类,专门用于表示“机构-作者-论文”的网络。该网络包含“机构“、”作者“和”论文”三类节点,以及“作者-机构“和“作者-论文“两类边。对要实现的类的要求:
- 1)用不同的属性存储不同节点的属性;
- 2)用不同的属性存储不同的边(边没有属性);
- 3)逐一实现获取不同节点数量的方法。
class MyData(Data):
    def __init__(self, institution_x, author_x, paper_x,
                 work_edge_index, public_edge_index=None,
                 work_edge_attr=None, public_edge_attr=None, y=None, **kwargs):
        super().__init__(**kwargs)
        self.institution_x = institution_x
        self.author_x = author_x
        self.paper_x = paper_x
        self.work_edge_index = work_edge_index
        self.public_edge_index = public_edge_index
        self.work_edge_attr = work_edge_attr
        self.public_edge_attr = public_edge_attr
        self.y = y

    @property
    def num_nodes_institution(self):
        return self.institution_x.shape[0]

    @property
    def num_nodes_author(self):
        return self.author_x.shape[0]

    def num_nodes_author(self):
        return self.paper_x.shape[0]
五、 参考资料
- DataWhale开源学习资料:https://github.com/datawhalechina/team-learning-nlp/tree/master/GNN
- PyG官方文档:https://pytorch-geometric.readthedocs.io/en/latest/index.html


