PyTorch基础知识 | 安装 | 张量 | 自动求导
文章目录
-
- 一、PyTorch安装
-
- 1.基于whl安装
- 2.官网命令行安装
- 二、张量
-
- 1.张量的简介
- 2.创建tensor
-
- 2.1 直接创建
- 2.2 依据数值创建
- 2.3 依概率分布创建
- 3.张量的操作
-
- 3.1 张量的拼接
- 3.2 张量的切分
- 3.3 张量的索引
- 3.4 张量的变换
- 3.5 张量的数学运算
- 4.广播机制
- 5.is_leaf与grad_fn概念
- 三、自动求导
-
- 1.Autograd简介
- 2.torch.autograd—自动求导系统
- 四、并行计算简介
-
- 1.为什么要做并行计算?
- 2.为什么需要CUDA?
- 3.常见的并行的方法
PyTorch基础篇:
- PyTorch基础知识 | 安装 | 张量 | 自动求导
- PyTorch主要组成模块 | 数据读入 | 数据预处理 | 模型构建 | 模型初始化 | 损失函数 | 优化器 | 训练与评估
- PyTorch主要组成模块 | hook函数 | 正则化weight decay与Dropout | 标准化
- PyTorch模型定义 | 模型容器 | 模型块 | 修改模型 | 模型读取与保存
- PyTorch进阶技巧 | 自定义损失函数 | 动态调整学习率 | 模型微调 | 半精度训练 | 使用argparse进行调参
- PyTorch可视化 | 可视化网络结构 | 使用TensorBoard可视化训练过程
一、PyTorch安装
这里介绍两种安装方式:
1.基于whl安装
https://download.pytorch.org/whl/torch_stable.html下载对应cuda版本或cpu,对应pytorch版本,对应python版本、对应电脑系统的文件,选择两个文件torch与torchvision,然后在对应的虚拟环境下pip安装即可。
2.官网命令行安装
https://pytorch.org/get-started/previous-versions/选择对应cuda版本或cpu,对应pytorch版本,对应python版本、对应电脑系统的命令。每个版本都有两种安装方式:conda和wheel。网速快的话,wheel方式更快一点。
二、张量
1.张量的简介
张量的核心就是一个数据容器。
| 张量维度 | 代表含义 |
|---|---|
| 0维张量 | 代表的是标量(数字) |
| 1维张量 | 代表的是向量 |
| 2维张量 | 代表的是矩阵 |
| 3维张量 | 时间序列数据 、股价、 文本数据、单张彩色图片(RGB) |
| 4维张量 | 多张彩色图片(RGB) |
| 5维张量 | 视频 |
多数情况下,它只包含数字。在PyTorch中, 张量(torch.Tensor) 是存储和变换数据的主要工具。Tensor 提供GPU计算和自动求梯度等更多功能。
Tensor有8个属性:

data:被包装的Tensordtype:张量的数据类型,如torch.FloatTensor,torch.cuda.FloatTensor(表示数据放到了GPU上)shape:张量的形状,如(64,3,224,224)device:张量所在设备,GPU/CPU,是加速的关键grad:data的梯度grad_fn:创建Tensor的Function,是自动求导的关键requires_grad:指示是否需要梯度is_leaf:指示是否是叶子结点(张量)
2.创建tensor
常见的构造Tensor的方法如下:
| 函数 | 功能 |
|---|---|
| Tensor(sizes) | 基础构造函数 |
| tensor(data) | data可以传入list, tuple,ndarray, scalar等,返回tensor |
| ones(sizes) | 全1 |
| zeros(sizes) | 全0 |
| eye(sizes) | 对角为1,其余为0 |
| arange(s,e,step) | 从s到e,步长为step |
| linspace(s,e,steps) | 从s到e,均匀分成step份 |
| rand/randn(sizes) | rand是[0,1)均匀分布;randn是服从N(0,1)的正态分布 |
| normal(mean,std) | 正态分布(均值为mean,标准差是std) |
| randperm(m) | 随机排列 |
2.1 直接创建
torch.tensor():直接传入数据list, tuple,ndarray, scalar等,构造一个张量。
torch.tensor(data, dtype=None, device=None, requires_grad=False,pin_memory=False)
功能:从data创建tensor
data:数据,可以是list, tuple,ndarray, scalardtype:数据类型,默认与data的一致device:所在设备,cuda/cpurequires_grad:是否需要梯度pin_memory:是否存于锁页内存(这与转换效率有关)
注意:
torch.tensor创建得到的张量和原数据是不共享内存的,张量对应的变量是独立变量。
传入列表:
import torch
x = torch.tensor([5.5, 3])
print(x)
tensor([5.5000, 3.0000])
传入ndarry:
# tensor和numpy array之间的相互转换
import numpy as np

g = np.array([[1,2,3],[4,5,6]])
h = torch.tensor(g)
print(h)
tensor([[1, 2, 3],
        [4, 5, 6]], dtype=torch.int32)
通过torch.from_numpy()创建张量
torch.from_numpy(ndarray)
注意事项:从torch.from_numpy创建的tensor与原ndarray共享内存,当修改其中一个的数据,另外一个也将会被改动。
import torch
import numpy as np
arr = np.ones((2, 2))
t1 = torch.from_numpy(arr)
print(arr)
print(t1)
t1 += 1
print(arr)
print(t1)
[[1. 1.]
 [1. 1.]]
tensor([[1., 1.],
        [1., 1.]], dtype=torch.float64)
[[2. 2.]
 [2. 2.]]
tensor([[2., 2.],
        [2., 2.]], dtype=torch.float64)
2.2 依据数值创建
torch.zeros():创建全0张量
torch.zeros(*size,
	out=None,dtype=None,
	layout=torch.strided,device=None,
	requires_grad=False)
功能:依size创建全0张量
- size:张量的形状,如(3,3)、(3,224,224)
- out:输出的张量
- layout :内存中布局形式,有strided,sparse_coo等
- device :所在设备,gpu/cpu
- requires_grad:是否需要梯度
torch.zeros_like()
torch.zeros_like( input,
	dtype=None,layout=None,device=None,
	requires_grad=False)
功能:依input形状创建全0张量
- intput:创建与input同形状的全0张量
- dtype:数据类型
- layout :内存中布局形式
torch.ones(),torch.ones_like():创建全1张量
torch.ones( *size,
	out=None,dtype=None,
	layout=torch.strided,device=None,
	requires_grad=False)
功能:依size创建全1张量
torch.ones_like( input,
	dtype=None,layout=None,device=None,
	requires_grad=False)
功能:依input形状创建全1张量
- size:张量的形状,如(3,3)、(3,224,224)
- dtype:数据类型
- layout :内存中布局形式
- device :所在设备,gpu/cpu
- requires_grad:是否需要梯度
torch.full(),torch.full_like():创建指定数据的张量
torch.full(size,
	fill_value,out=None,dtype=None,
	layout=torch.strided,device=None,
	requires_grad=False)
功能:依input形状创建指定数据的张量
- size:张量的形状,如(3,3)
- fill_value:张量的值
t2 = torch.full((3, 3), fill_value=10)
print(t2)

#tensor([[10., 10., 10.],
#        [10., 10., 10.],
#        [10., 10., 10.]])
torch.arange():创建等差张量
torch.arange(start=0,
	end,step=1,
	out=None,dtype=None,
	layout=torch.strided ,device=None,
	requires_grad=False)
功能:创建等差的1维张量
注意事项:数值区间为[start, end),start:数列起始值,end:数列“结束值”,step:数列公差,默认为1
t3 = torch.arange(2, 10, 2)
print(t3)
# tensor([2, 4, 6, 8])
torch.linspace():创建均分的1维张量
torch.linspace(start,
	end,
	steps=100,out=None,dtype=None,
	layout=torch.strided,device=None,
	requires_grad=False)
功能:创建均分的1维张量
注意:数值区间为[start, end],start:数列起始值,end :数列结束值,steps:数列长度
torch.logspace():创建对数均分的1维张量
torch. logspace(start,end,
	steps=100,base=10.0,out=None,dtype=None,
	layout=torch.strided,device=None,
	requires_grad=False)
功能:创建对数均分的1维张量
注意:长度为steps,底为base;start:数列起始值,end :数列结束值,steps:数列长度,base :对数函数的底,默认为10
torch.eye():创建单位对角矩阵
torch.eye(n,
	m=None,out=None,dtype=None,
	layout=torch.strided,device=None,
	requires_grad=False)
功能:创建单位对角矩阵(2维张量)
注意:默认为方阵;n:矩阵行数,m:矩阵列数
2.3 依概率分布创建
torch.normal():生成正态分布的张量。
torch.normal(mean,
	std,
	out=None)
功能:生成正态分布(高斯分布);mean :均值,std :标准差
四种模式:
- mean为标量,std为标量
- mean为标量,std为张量
- mean为张量, std为标量
- mean为张量,std为张量
# mean:张量 std: 张量
mean = torch.arange(1, 5, dtype=torch.float)
std = torch.arange(1, 5, dtype=torch.float)
t_normal = torch.normal(mean, std)
print("mean:{}\nstd:{}".format(mean, std))
print(t_normal)

# mean:标量 std: 标量
t_normal = torch.normal(0., 1., size=(4,))
print(t_normal)

# mean:张量 std: 标量
mean = torch.arange(1, 5, dtype=torch.float)
std = 1
t_normal = torch.normal(mean, std)
print("mean:{}\nstd:{}".format(mean, std))
print(t_normal)
mean:tensor([1., 2., 3., 4.])
std:tensor([1., 2., 3., 4.])
tensor([0.3966, 1.5400, 0.7993, 9.4299])
tensor([-0.0378, -0.6219, -0.1607, -1.1813])
mean:tensor([1., 2., 3., 4.])
std:1
tensor([ 2.0800, -0.3626,  2.8807,  5.2153])
torch.randn(),torch.randn_like():生成标准正态分布的张量
torch.randn(*size,
	out=None,dtype=None,
	layout=torch.strided,device=None,
	requires_grad=False)
功能:生成标准正态分布;size :张量的形状
torch.rand(),torch.rand_like():生成区间[0,1)上均匀分布的张量。
torch.rand(*size,
	out=None,dtype=None,
	layout=torch. strided ,device=None,
	requires_grad=False)
功能:在区间[0,1)上,生成均匀分布
torch.randint(),torch.randint_like():生成区间[low,high)上整数均匀分布的张量。
torch.randint(low=0,
	high,size,
	out=None,dtype=None,
	layout=torch.strided,device=None,
	requires grad=False)
功能:区间[low,high)生成整数均匀分布; size :张量的形状
torch.randperm():生成从0到n-1的随机排列
torch.randperm(n,
	out=None,
	dtype=torch.int64,layout=torch.strided ,device=None,
	requires_grad=False)
功能:生成从0到n-1的随机排列;n:张量的长度
x = torch.randperm(5)
print(x)
tensor([0, 4, 3, 2, 1])
torch.bernoulli():以input为概率,生成伯努利分布的张量
torch.bernoulli(input,
*,
generator=None,
out=None)
功能:以input为概率,生成伯努利分布(0-1分布,两点分布);input :概率值
3.张量的操作
张量的操作这一部分包括张量的拼接、切分、索引、变换以及数学运算
3.1 张量的拼接
张量的拼接有两个方法:torch.cat()与torch.stack(),cat方法不会拓展张量维度,而stack方法会拓展张量的维度。
torch.cat():将张量序列按维度dim进行拼接
torch.cat(tensors,
	dim=0,out=None)
- tensors:张量序列
- dim :要拼接的维度
# torch.cat() t = torch.ones((2, 3)) t_1 = torch.cat((t, t), dim=0) t_2 = torch.cat((t, t), dim=1) print("t_1:{},\nt_1.shape:{}\nt_2:{},\nt_2.shape:{}".format(t_1, t_1.shape, t_2, t_2.shape))t_1:tensor([[1., 1., 1.], [1., 1., 1.], [1., 1., 1.], [1., 1., 1.]]), t_1.shape:torch.Size([4, 3]) t_2:tensor([[1., 1., 1., 1., 1., 1.], [1., 1., 1., 1., 1., 1.]]), t_2.shape:torch.Size([2, 6])
torch.stack():在新创建的维度dim上进行拼接
torch.stack (tensors,
	dim=0,out=None)
-
tensors:张量序列
-
dim :要拼接的维度
t = torch.ones((2, 3)) t_stack = torch.stack((t, t), dim=2) print('t_stack:{},\nt_stack.shape:{}'.format(t_stack, t_stack.shape))t_stack:tensor([[[1., 1.], [1., 1.], [1., 1.]], [[1., 1.], [1., 1.], [1., 1.]]]), t_stack.shape:torch.Size([2, 3, 2])
3.2 张量的切分
张量的切分有两个方法:torch.chunk()与torch.split()
torch.chunk():将张量按维度dim进行平均切分
torch.chunk (input,
	chunks,dim=0)
返回值:张量列表
注意:若不能整除,最后一份张量小于其他张量
-
input:要切分的张量 -
chunks:要切分的份数 -
dim:要切分的维度t = torch.ones((2, 5)) list_of_tensor = torch.chunk(t, dim=1, chunks=2) for idx, tensor in enumerate(list_of_tensor): print('第{}个张量:{},shape:{}'.format(idx, tensor, tensor.shape))第0个张量:tensor([[1., 1., 1.], [1., 1., 1.]]),shape:torch.Size([2, 3]) 第1个张量:tensor([[1., 1.], [1., 1.]]),shape:torch.Size([2, 2])
torch.split():将张量按维度dim进行切分
torch.split(tensor,
	split_size_or_sections,dim=0)
返回值:张量列表
-
tensor:要切分的张量 -
split_size_or_sections: 为int时,表示每一份的长度;为list时,按list元素切分 -
dim:要切分的维度t = torch.ones((2, 5)) list_of_tensor = torch.split(t, [2, 1, 2], dim=1) for idx, tensor in enumerate(list_of_tensor): print('第{}个张量:{},shape:{}'.format(idx, tensor, tensor.shape))第0个张量:tensor([[1., 1.], [1., 1.]]),shape:torch.Size([2, 2]) 第1个张量:tensor([[1.], [1.]]),shape:torch.Size([2, 1]) 第2个张量:tensor([[1., 1.], [1., 1.]]),shape:torch.Size([2, 2])
3.3 张量的索引
张量的索引有如下方法:torch.index_select() 与torch.masked_select()
torch.index_select():在维度dim上,按index索引数据
torch.index_select(input,
	dim,index,out=None)
返回值:依index索引数据拼接的张量
-
input:要索引的张量 -
dim:要索引的维度 -
index:要索引数据的序号# 3*3的均匀分布 t = torch.randint(0, 9, size=(3, 3)) # 生成索引序号-torch.long64位的整型 idx = torch.tensor([0, 2], dtype=torch.long) # 依据索引选择数据 t_select = torch.index_select(t, dim=1, index=idx) print('t:\n{}\nt_select:\n{}'.format(t, t_select))t: tensor([[8, 1, 2], [4, 2, 5], [3, 4, 7]]) t_select: tensor([[8, 2], [4, 5], [3, 7]])
torch.masked_select():按mask中的True进行索引
torch.masked_select(input,
	mask,
	out=None)
返回值:一维张量
-
input:要索引的张量 -
mask: 与input同形状的布尔类型张量# 3*3的均匀分布 t = torch.randint(0, 9, size=(3, 3)) # ge:大于等于;gt:大于 mask = t.ge(5) t_select = torch.masked_select(t, mask) print('t:\n{}\nmask:\n{}\nt_select:\n{}'.format(t, mask, t_select))t: tensor([[0, 7, 7], [5, 6, 5], [6, 7, 1]]) mask: tensor([[False, True, True], [ True, True, True], [ True, True, False]]) t_select: tensor([7, 7, 5, 6, 5, 6, 7])
3.4 张量的变换
张量的变换包括:torch.view()与torch.reshape() 与torch.transpose()与torch.t()与torch.squeeze()与torch.unsqueeze()
torch.view():变换张量形状
注意:torch.view() 返回的新tensor与源tensor共享内存(其实是同一个tensor),更改其中的一个,另外一个也会跟着改变。(顾名思义,view()仅仅是改变了对这个张量的观察角度)
x = torch.randn(4, 4)
y = x.view(16)
z = x.view(-1, 8) # -1是指这一维的维数由其他维度决定
print(x.size(), y.size(), z.size())
torch.Size([4, 4]) torch.Size([16]) torch.Size([2, 8])
x += 1
print(x)
print(y) # 也加了了1
tensor([[ 1.1434,  0.2632,  1.8236,  0.3194],
        [ 1.3223,  1.3341,  1.9673,  1.2045],
        [ 0.7703,  1.5630,  1.2670,  2.3715],
        [ 1.2348,  1.5063, -0.0090,  0.0617]])
tensor([ 1.1434,  0.2632,  1.8236,  0.3194,  1.3223,  1.3341,  1.9673,  1.2045,
         0.7703,  1.5630,  1.2670,  2.3715,  1.2348,  1.5063, -0.0090,  0.0617])
上面我们说过torch.view()会改变原始张量,但是很多情况下,我们希望原始张量和变换后的张量互相不影响。为了使创建的张量和原始张量不共享内存,官方推荐的方法是我们先用 clone() 创造一个张量副本然后再使用 torch.view()进行函数维度变换 。
注意:使用 clone() 还有一个好处是会被记录在计算图中,即梯度回传到副本时也会传到源 Tensor。
x = torch.randn(4, 4)
x_ = x.clone()
y = x_.view(2,8)
x += 1
print(x)
print(y)
tensor([[ 0.8350,  0.6267,  1.5454,  1.6257],
        [ 1.6424, -0.9586,  2.2201,  2.6465],
        [-0.2895,  0.7816,  0.8534,  1.8767],
        [-0.9261,  1.7207,  0.6599, -0.2106]])
tensor([[-0.1650, -0.3733,  0.5454,  0.6257,  0.6424, -1.9586,  1.2201,  1.6465],
        [-1.2895, -0.2184, -0.1466,  0.8767, -1.9261,  0.7207, -0.3401, -1.2106]])
torch.reshape() :变换张量形状
torch.reshape(input,
	shape)
注意:当张量在内存中是连续时,新张量与input共享数据内存
如果两个变量之间共享内存,那么改变其中一个变量的同时,另一个变量也会改变
-
input:要变换的张量 -
shape:新张量的形状# 生成随机排列 t = torch.randperm(8) t_reshape = torch.reshape(t, (2, 4)) print('t:\n{}\nt_reshape:\n{}'.format(t, t_reshape))t: tensor([1, 3, 5, 2, 7, 4, 0, 6]) t_reshape: tensor([[1, 3, 5, 2], [7, 4, 0, 6]])
torch.transpose():交换张量的两个维度
torch.transpose(input,
	dim0,dim1)
-
input:要变换的张量 -
dim0:要交换的维度 -
dim1:要交换的维度t = torch.rand((2, 3, 4)) t_transpose = torch.transpose(t, dim0=1, dim1=2) # c*h*w => c*w*h print("t shape:{}\nt_transpose shape: {}".format(t.shape, t_transpose.shape))t shape:torch.Size([2, 3, 4]) t_transpose shape: torch.Size([2, 4, 3])
torch.t():2维张量转置,对矩阵而言,等价于torch.transpose(input,0,1)
torch.t(input)
torch.squeeze():压缩长度为1的维度(轴)
torch.squeeze(input,
	dim=None,out=None)
-
dim:若为None,移除所有长度为1的轴;若指定维度,当且仅当该轴长度为1时,可以被移除t = torch.rand((1, 2, 3, 1)) # dim为None t_sq = torch.squeeze(t) # dim=0时长度为1 t_0 = torch.squeeze(t, dim=0) # dim=1时长度不为1 t_1 = torch.squeeze(t, dim=1) print(t.shape) print(t_sq.shape) print(t_0.shape) print(t_1.shape)torch.Size([1, 2, 3, 1]) torch.Size([2, 3]) torch.Size([2, 3, 1]) torch.Size([1, 2, 3, 1])
torch.unsqueeze():依据dim扩展维度
torch.usqueeze( input,
	dim,
	out=None)
-
dim:扩展的维度t_unsq = torch.unsqueeze(t_sq, dim=0) print(t_sq.shape) print(t_unsq.shape)torch.Size([2, 3]) torch.Size([1, 2, 3])
3.5 张量的数学运算
PyTorch中提供大量的数学运算,大致可以分为三类:
-
加减乘除
torch.add() torch.addcdiv() torch.addcmul() torch.sub() torch.div() torch.mu()torch.add():逐元素计算input + alpha × othertorch.add(input, alpha=1,other,out=None)input:第一个张量alpha:乘项因子other:第二个张量
torch.addcmul():torch.addcmul(input, value=1,tensor1,tensor2,out=None)
torch.addcdiv():

-
对数指数幂函数
torch.log(input,out=None) torch.log10(input, out=None) torch.log2(input, out=None) torch.exp(input,out=None) torch.pow() -
三角函数
torch.abs(input, out=None)
torch.acos(input, out=None)
torch.cosh(input, out=None)
torch.cos(input, out=None)
torch.asin(input, out=None)
torch.atan(input, out=None)
torch.atan2(input, other, out=None)
PyTorch中的 Tensor 支持超过一百种操作,包括转置、索引、切片、数学运算、线性代数、随机数等等,具体使用方法可参考TORCH.TENSOR。
4.广播机制
当对两个形状不同的 Tensor 按元素运算时,可能会触发广播(broadcasting)机制:先适当复制元素使这两个 Tensor 形状相同后再按元素运算。
import torch
x = torch.arange(1, 3).view(1, 2)
print(x)
y = torch.arange(1, 4).view(3, 1)
print(y)
print(x + y)
tensor([[1, 2]])
tensor([[1],
        [2],
        [3]])
tensor([[2, 3],
        [3, 4],
        [4, 5]])
由于x和y分别是1行2列和3行1列的矩阵,如果要计算x+y,那么x中第一行的2个元素被广播 (复制)到了第二行和第三行,⽽y中第⼀列的3个元素被广播(复制)到了第二列。如此,就可以对2个3行2列的矩阵按元素相加。
5.is_leaf与grad_fn概念
我们可以知道Tensor中有叶子节点is_leaf与grad_fn的概念。
叶子结点︰用户创建的结点称为叶子结点,如 x 与 w x与w x与w
is_leaf:指示张量是否为叶子结点
为什么要设置叶子节点这一概念?主要是为了节省内存,在梯度反向传播之后,非叶子节点的梯度是会被释放掉的。以 y = ( x + w ) ∗ ( w + 1 ) y =(x+ w)* (w+1) y=(x+w)∗(w+1)为例,
import torch

# 需要计算梯度-requires_grad=True
w = torch.tensor([1.], requires_grad=True)
x = torch.tensor([2.], requires_grad=True)

# 前向传播
a = torch.add(w, x)     # retain_grad()
b = torch.add(w, 1)
y = torch.mul(a, b)

# 反向传播-自动求导
y.backward()
print(w.grad)

# 查看叶子结点
print("is_leaf:\n", w.is_leaf, x.is_leaf, a.is_leaf, b.is_leaf, y.is_leaf)

# 查看梯度
print("gradient:\n", w.grad, x.grad, a.grad, b.grad, y.grad)
is_leaf:
 True True False False False
gradient:
 tensor([5.]) tensor([2.]) None None None
如果我们想要保存非叶子节点的梯度,那么应该怎么做呢?使用.retain_grad()
import torch

# 需要计算梯度-requires_grad=True
w = torch.tensor([1.], requires_grad=True)
x = torch.tensor([2.], requires_grad=True)

# 前向传播
a = torch.add(w, x)
# 保存非叶子节点a的梯度
a.retain_grad()
b = torch.add(w, 1)
y = torch.mul(a, b)

# 反向传播-自动求导
y.backward()
print(w.grad)

# 查看叶子结点
print("is_leaf:\n", w.is_leaf, x.is_leaf, a.is_leaf, b.is_leaf, y.is_leaf)

# 查看梯度
print("gradient:\n", w.grad, x.grad, a.grad, b.grad, y.grad)
tensor([5.])
is_leaf:
 True True False False False
gradient:
 tensor([5.]) tensor([2.]) tensor([2.]) None None
grad_fn:记录创建该张量时所用的方法(函数),是自动求导的关键。
import torch

# 需要计算梯度-requires_grad=True
w = torch.tensor([1.], requires_grad=True)
x = torch.tensor([2.], requires_grad=True)

# 前向传播
a = torch.add(w, x)
# 保存非叶子节点a的梯度
a.retain_grad()
b = torch.add(w, 1)
y = torch.mul(a, b)

# 反向传播-自动求导
y.backward()
print(w.grad)

# 查看创建张良所使用的函数
print("grad_fn:\n", w.grad_fn, x.grad_fn, a.grad_fn, b.grad_fn, y.grad_fn)
tensor([5.])
grad_fn:
 None None <AddBackward0 object at 0x0000021BCD8FB710> <AddBackward0 object at 0x0000021BCD900128> <MulBackward0 object at 0x0000021BCD9000F0>
三、自动求导
PyTorch 中,所有神经网络的核心是 autograd 包。autograd包为张量上的所有操作提供了自动求导机制。它是一个在运行时定义 ( define-by-run )的框架,这意味着反向传播是根据代码如何运行来决定的,并且每次迭代可以是不同的。
1.Autograd简介
torch.Tensor 是这个包的核心类。如果设置它的属性 .requires_grad 为 True,那么它将会追踪对于该张量的所有操作。当完成计算后可以通过调用 .backward(),来自动计算所有的梯度。这个张量的所有梯度将会自动累加到.grad属性。
注意:在 y.backward() 时,如果 y 是标量,则不需要为 backward() 传入任何参数;否则,需要传入一个与 y 同形的Tensor。
要阻止一个张量被跟踪历史,可以调用.detach()方法将其与计算历史分离,并阻止它未来的计算记录被跟踪。为了防止跟踪历史记录(和使用内存),可以将代码块包装在 with torch.no_grad(): 中。在评估模型时特别有用,因为模型可能具有 requires_grad = True 的可训练的参数,但是我们不需要在此过程中对他们进行梯度计算。
还有一个类对于autograd的实现非常重要:Function。Tensor 和 Function 互相连接生成了一个无环图 (acyclic graph),它编码了完整的计算历史。每个张量都有一个.grad_fn属性,该属性引用了创建 Tensor 自身的Function(除非这个张量是用户手动创建的,即这个张量的grad_fn是 None )。下面给出的例子中,张量由用户手动创建,因此grad_fn返回结果是None。
import torch
x = torch.randn(3,3,requires_grad=True)
print(x.grad_fn)
None
如果需要计算导数,可以在 Tensor 上调用 .backward()。如果 Tensor 是一个标量(即它包含一个元素的数据),则不需要为 backward() 指定任何参数,但是如果它有更多的元素,则需要指定一个gradient参数,该参数是形状匹配的张量。
创建一个张量并设置requires_grad=True用来追踪其计算历史。
import torch
x = torch.ones(2, 2, requires_grad=True)
print(x)
tensor([[1., 1.],
        [1., 1.]], requires_grad=True)
对这个张量做一次运算。
y = x**2
print(y)
print(y.grad_fn)
tensor([[1., 1.],
        [1., 1.]], grad_fn=<PowBackward0>)
<PowBackward0 object at 0x00000204E1360588>
y是计算的结果,所以它有grad_fn属性。对 y 进行更多操作
z = y * y * 3
out = z.mean()

print(z, out)
tensor([[3., 3.],
        [3., 3.]], grad_fn=<MulBackward0>) tensor(3., grad_fn=<MeanBackward0>)
.requires_grad_(...) 原地改变了现有张量的requires_grad标志。如果没有指定的话,默认输入的这个标志是 False。
import torch
a = torch.randn(2, 2) # 缺失情况下默认 requires_grad = False
a = ((a * 3) / (a - 1))
print(a.requires_grad)
a.requires_grad_(True)
print(a.requires_grad)
b = (a * a).sum()
print(b.grad_fn)
False
True
<SumBackward0 object at 0x00000204FCF0CC88>
2.torch.autograd—自动求导系统

注意:grad在反向传播过程中是累加的(accumulated),这意味着每一次运行反向传播,梯度都会累加之前的梯度,所以一般在反向传播之前需把梯度清零。
深度学习模型的训练就是不断更新权值。权值的更新需要求解梯度。PyTorch提供自动求导系统解决这一问题。自动求导系统autograd只需要搭建前向传播的计算图,然后通过torch.autograd就可以得到每个张量的梯度。下面我们讲解torch.autograd中的方法。
torch.autograd.backward():自动求取梯度。
torch.autograd.backward(tensors,
	grad_tensors=None,
	retain_graph=None,create_graph=False)
-
tensors:用于求导的张量,如loss -
retain_graph:保存计算图(如果想多次使用计算图) -
create_graph:创建导数计算图,用于高阶求导 -
grad_tensors:多梯度权重(用于多个梯度权重的设置)w = torch.tensor([1.], requires_grad=True) x = torch.tensor([2.], requires_grad=True) a = torch.add(w, x) # retain_grad() b = torch.add(w, 1) y0 = torch.mul(a, b) # y0 = (x+w) * (w+1) y1 = torch.add(a, b) # y1 = (x+w) + (w+1) dy1/dw = 2 loss = torch.cat([y0, y1], dim=0) # [y0, y1] grad_tensors = torch.tensor([1., 2.]) loss.backward(gradient=grad_tensors) # gradient 传入 torch.autograd.backward()中的grad_tensors print(w.grad)tensor([9.])
torch.autograd.grad():求取梯度。
torch.autograd.grad(outputs,
	inputs,grad_outputs=None,
	retain_graph=None,create_graph=False)
-
outputs: 用于求导的张量,如 loss -
inputs:需要梯度的张量 -
create_graph:创建导数计算图,用于高阶求导 -
retain_graph:保存计算图 -
grad_outputs:多梯度权重x = torch.tensor([3.], requires_grad=True) y = torch.pow(x, 2) # y = x**2 grad_1 = torch.autograd.grad(y, x, create_graph=True) # grad_1 = dy/dx = 2x = 2 * 3 = 6 print(grad_1) grad_2 = torch.autograd.grad(grad_1[0], x) # grad_2 = d(dy/dx)/dx = d(2x)/dx = 2 print(grad_2)(tensor([6.], grad_fn=<MulBackward0>),) (tensor([2.]),)
torch.autograd()中需要注意如下几点:
-
梯度不自动清零,需要手动清零
w = torch.tensor([1.], requires_grad=True) x = torch.tensor([2.], requires_grad=True) for i in range(4): a = torch.add(w, x) b = torch.add(w, 1) y = torch.mul(a, b) y.backward() print(w.grad) # 梯度清零 # w.grad.zero_()tensor([5.]) tensor([10.]) tensor([15.]) tensor([20.])w = torch.tensor([1.], requires_grad=True) x = torch.tensor([2.], requires_grad=True) for i in range(4): a = torch.add(w, x) b = torch.add(w, 1) y = torch.mul(a, b) y.backward() print(w.grad) # 梯度清零 w.grad.zero_()tensor([5.]) tensor([5.]) tensor([5.]) tensor([5.]) -
依赖于叶子节点的节点,
requires_grad默认为Truew = torch.tensor([1.], requires_grad=True) x = torch.tensor([2.], requires_grad=True) a = torch.add(w, x) b = torch.add(w, 1) y = torch.mul(a, b) print(a.requires_grad, b.requires_grad, y.requires_grad)True True True -
叶子节点不可执行
in-place(原地操作)
四、并行计算简介
在利用PyTorch做深度学习的过程中,可能会遇到数据量较大无法在单块GPU上完成,或者需要提升计算速度的场景,这时就需要用到并行计算。
1.为什么要做并行计算?
深度学习的发展离不开算力的发展,GPU的出现让我们的模型可以训练的更快,更好。所以,如何充分利用GPU的性能来提高我们模型学习的效果就需要用到PyTorch的并行计算。PyTorch可以在编写完模型之后,让多个GPU来参与训练,减少训练时间。
2.为什么需要CUDA?
CUDA是我们使用GPU的提供商——NVIDIA提供的GPU并行计算框架。对于GPU本身的编程,使用的是CUDA语言来实现的。但是,在我们使用PyTorch编写深度学习代码时,使用的CUDA又是另一个意思。在PyTorch使用 CUDA表示要开始要求我们的模型或者数据开始使用GPU了。
在编写程序中,当我们使用了 .cuda() 时,其功能是让我们的模型或者数据从CPU迁移到GPU(0)当中,通过GPU开始计算。
注意:
-
我们使用
GPU时使用的是.cuda()而不是使用.gpu()。这是因为当前GPU的编程接口采用CUDA,但是市面上的GPU并不是都支持CUDA,只有部分NVIDIA的GPU才支持,AMD的GPU编程接口采用的是OpenCL,在现阶段PyTorch并不支持。 -
数据在
GPU和CPU之间进行传递时会比较耗时,我们应当尽量避免数据的切换。 -
GPU运算很快,但是在使用简单的操作时,我们应该尽量使用CPU去完成。 -
当我们的服务器上有多个
GPU,我们应该指明我们使用的GPU是哪一块,如果我们不设置的话,tensor.cuda()方法会默认将tensor保存到第一块GPU上,等价于tensor.cuda(0),这将会导致爆出out of memory的错误。我们可以通过以下两种方式继续设置。#设置在文件最开始部分 import os os.environ["CUDA_VISIBLE_DEVICE"] = "2" # 设置默认的显卡CUDA_VISBLE_DEVICE=0,1 python train.py # 使用0,1两块GPU
3.常见的并行的方法
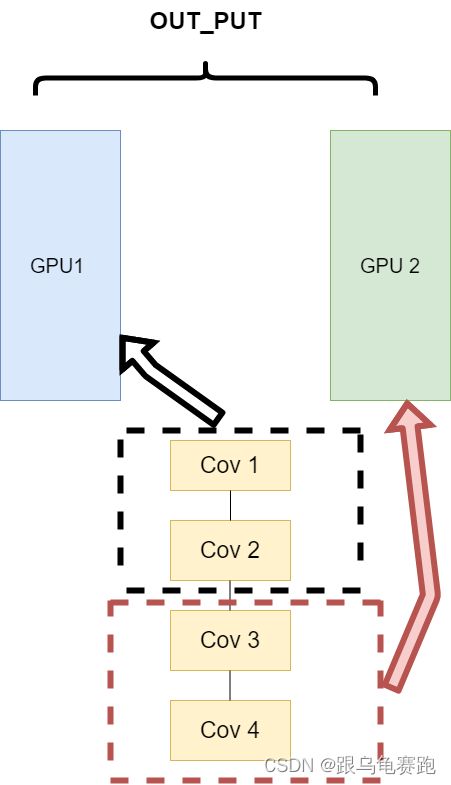
- 网络结构分布到不同的设备中(
Network partitioning)
在刚开始做模型并行的时候,这个方案使用的比较多。其中主要的思路是,将一个模型的各个部分拆分,然后将不同的部分放入到GPU来做不同任务的计算。其架构如下:

这里遇到的问题就是,不同模型组件在不同的GPU上时,GPU之间的传输就很重要,对于GPU之间的通信是一个考验。但是GPU的通信在这种密集任务中很难办到,所以这个方式慢慢淡出了视野。 - 同一层的任务分布到不同数据中(
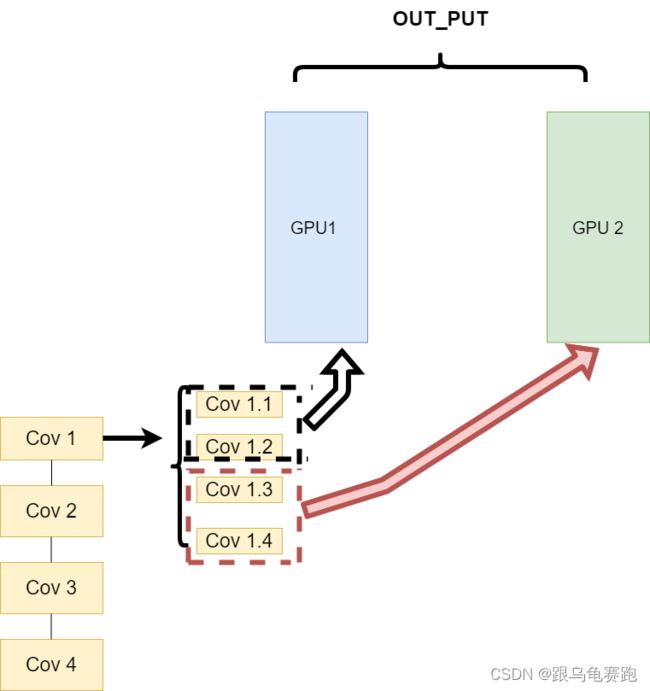
Layer-wise partitioning)
第二种方式就是,同一层的模型做一个拆分,让不同的GPU去训练同一层模型的部分任务。其架构如下:

这样可以保证在不同组件之间传输的问题,但是在我们需要大量的训练,同步任务加重的情况下,会出现和第一种方式一样的问题。 - 不同的数据分布到不同的设备中,执行相同的任务(
Data parallelism)
第三种方式有点不一样,它的逻辑是,我不再拆分模型,我训练的时候模型都是一整个模型。但是我将输入的数据拆分。所谓的拆分数据就是,同一个模型在不同GPU中训练一部分数据,然后再分别计算一部分数据之后,只需要将输出的数据做一个汇总,然后再反传。其架构如下:

这种方式可以解决之前模式遇到的通讯问题。现在的主流方式是数据并行的方式(Data parallelism)。
参考文献:
- https://github.com/datawhalechina/thorough-pytorch