windows下编译tensorflow2.5.0 c++库并调用
近期使用python+keras+unet网络训练了一个图像分割模型(.h5),因为最终需要在C++中使用,所以需要2步转换:
- 模型转换(h5 —> pb):需要的朋友可以参考一下之前写的文章。模型转换
- 编译tensorflow,生成C++库:本文重点说明的内容。
说明:keras没有c++相关接口,所以不能直接在c++中调用由keras.save生成的h5模型,需要将其转换为pb模型,由tensorflow c++相关接口来调用。
1、开始之前
- 明确需要编译的tensorflow版本,这个和训练模型时使用的tensorflow版本有关,最好保持编译的版本和训练的版本一致,因为版本不一致可能导致后期使用报错。
- 保证网络畅通,且能科学上网,编译过程中需要下载大量的依赖库和文件(很多来自git)。网络不畅经常会导致编译过程出错,很让人崩溃呀。
- 保证磁盘空间充足,我编译完后的文件几十个G。
- 要有耐心,因为编译过程中可能会出现很多错误,需要自己去动手解决,不过大多数问题都可以在网上找到解决方法。
2、准备工作
1、编译环境说明:
win10 + bazel4.1.0 + msys2 + tensorflow2.5.0
最终成功编译生成tensorflow GPU版本的C++库
2、各软件下载地址及大体流程:
- step1 安装VS2017
- step2 安装CUDA11.0
- step3 下载tensorflow
- step4 下载tensorflow-windows-build-script
- step5 安装MSYS2
- step6 安装bazel
- step7 使用powershell进行编译
- step8 编译问题及解决方法
- step9 整理生成的dll、lib、include
可通过[百度网盘]获取,提取码:0p8t,其中包括VS2017安装包+tensorflow2.5.0+tensorflow-windows-build-scrip+bazel4.1.0+msys2。
3、开始
step1 安装VS2017
相信大部分小伙伴都已经安装过VS,若还没安装,网上资源很多,可自行安装。
安装地址VS2017:其它版本也可通过此链接下载,VS和tensorflow编译过程无关,主要用于后期C++编程。
step2 安装CUDA11.0
早期安装过,具体流程没有记录,网上资源也很多,大家可根据自己显卡型号选择安装。若编译CPU版本,则可忽略此步骤。
附上CUDA下载地址,可参考:
https://developer.nvidia.com/cuda-toolkit-archive
cuDNN下载地址:
https://developer.nvidia.com/rdp/cudnn-archive
安装过程可参考:
https://www.cnblogs.com/farewell-farewell/p/14046076.html
https://blog.csdn.net/atpalain_csdn/article/details/90755764
step3 tensorflow下载
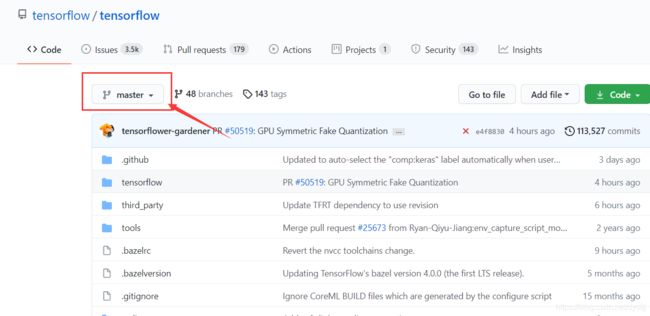
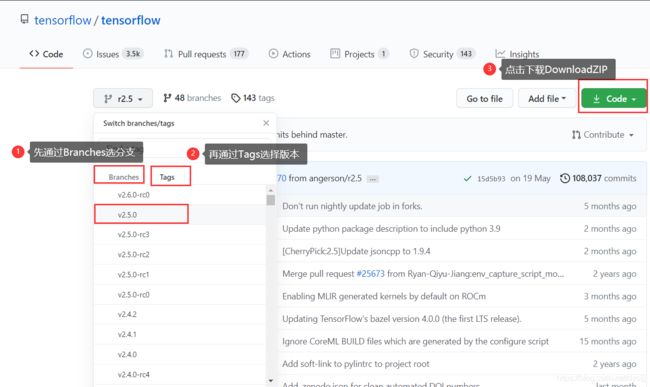
进入tensorflow下载页面,下载所需版本,具体如图所示:
step4 下载tensorflow-windows-build-script
进入git,下载master分支代码,下载地址:tensorflow-windows-build-script
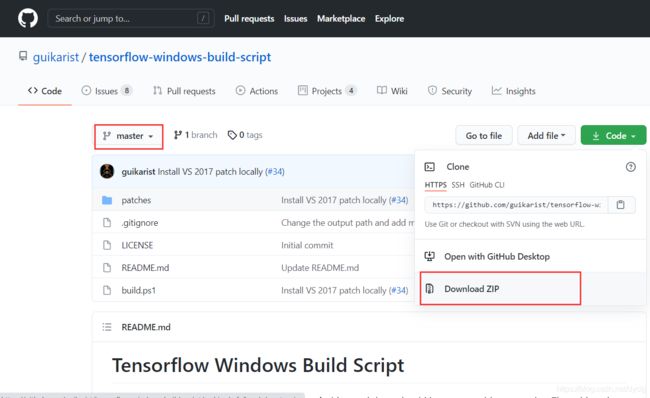
当tensorflow及tensorflow-windows-build-script两个zip均下载完成后,新建一个文件夹命名为tensorflow2.5(根据个人情况,我新建的文件夹放在F:\tensorflow_c++_tools\目录下)
-
将下载好的tensorflow-2.5.0.zip解压至新建文件夹下(tensorflow2.5下),并将解压的文件夹重命名为
source,此处必须重命名,因为后期编译过程中涉及的路径名称为source,不重新命名会报错没有找到source文件夹。 -
将下载好的tensorflow-windows-build-script.zip解压,然后将其中的
patches文件夹和build.ps1文件复制到F:\tensorflow_c++_tools\tensorflow2.5目录下。

-
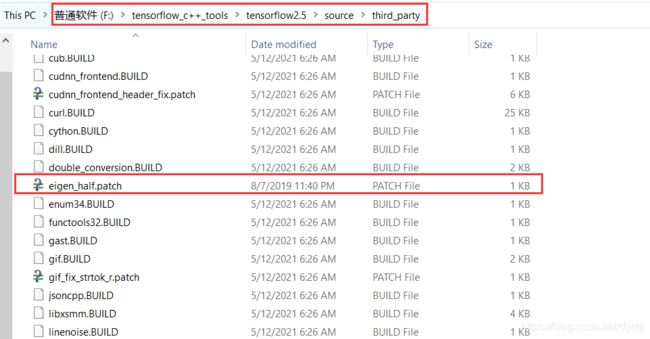
将
patches文件夹下的eigen_half.patch复制到F:\tensorflow_c++_tools\tensorflow2.5\source\third_party目录下:
-
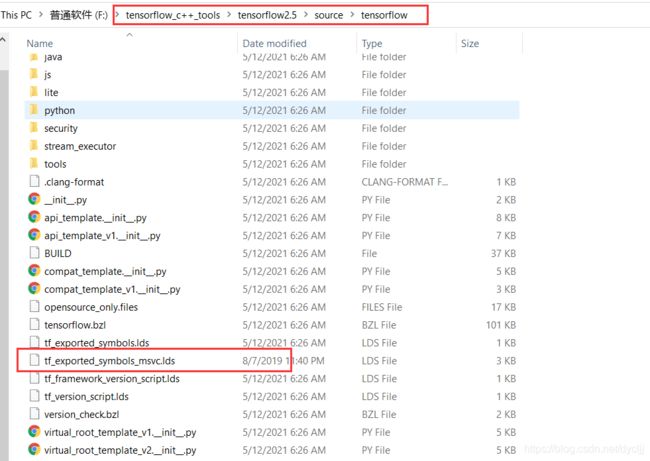
将
patches下的tf_exported_symbols_msvc.lds复制到F:\tensorflow_c++_tools\tensorflow2.5\source\tensorflow目录下:
-
使用文本编辑器打开
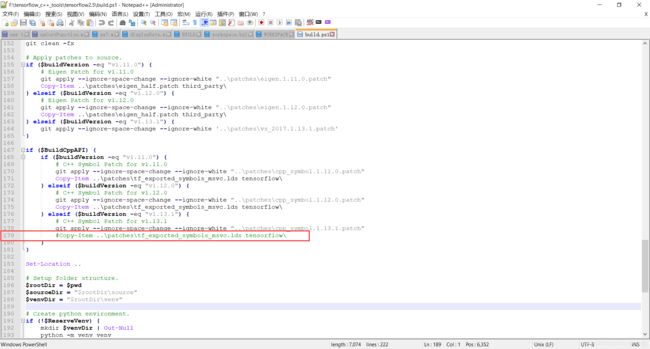
build.ps1,使用“#”注释掉179行代码:
Copy-Item …\patches\tf_exported_symbols_msvc.lds tensorflow\
step5 安装MSYS2
进入MSYS2【官网】,选择msys2-x86_64-20210604.exe下载,具体步骤如图所示,也可在官网上进行查看,有详细的安装及更新教程:
下载好后打开exe进行安装,点击 Next:
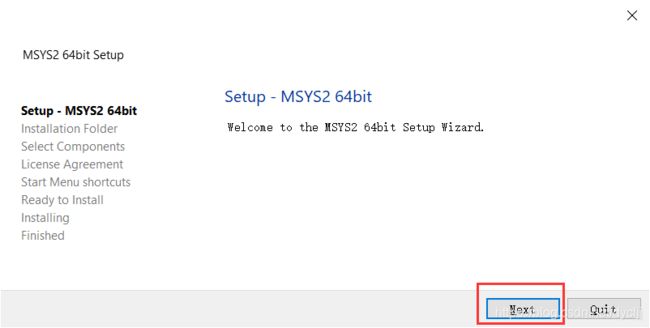
选择安装路径点击Next继续安装,我的安装路径不在C盘:
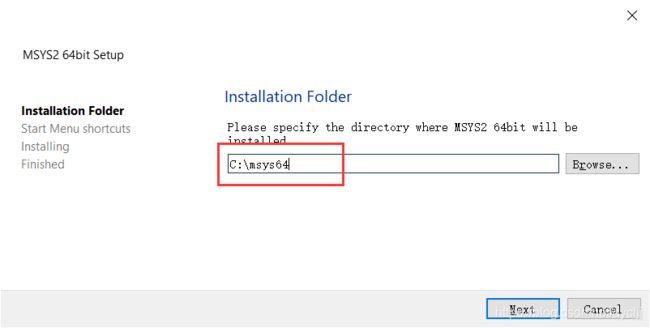
继续Next:
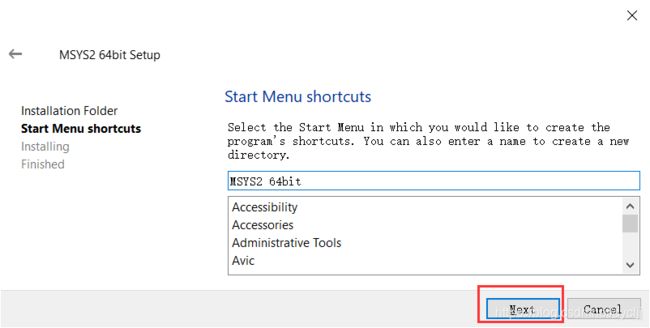
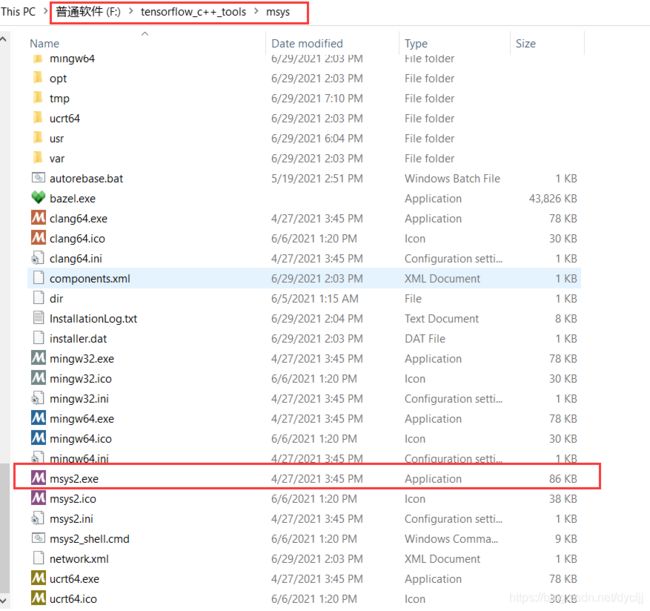
等待安装完成,点击Finish即可完成安装。若选择了Run MSYS2 64bit now,则会弹出一个类似于cmd的窗口;若没有弹出,则在安装路径下找到msys2.exe,点击运行即可。
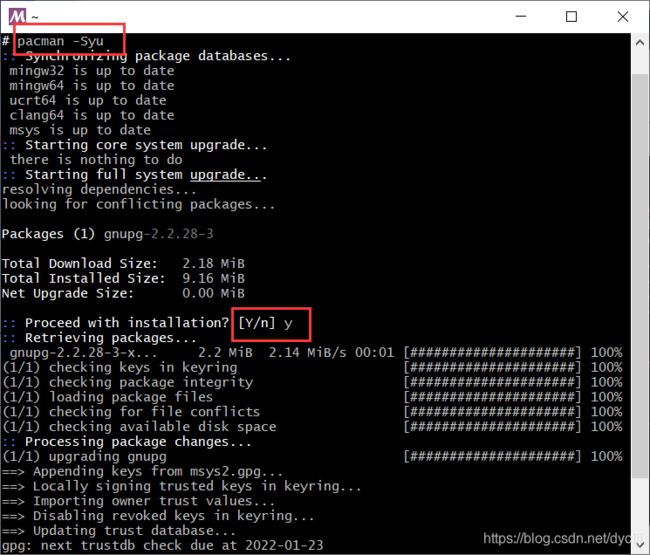
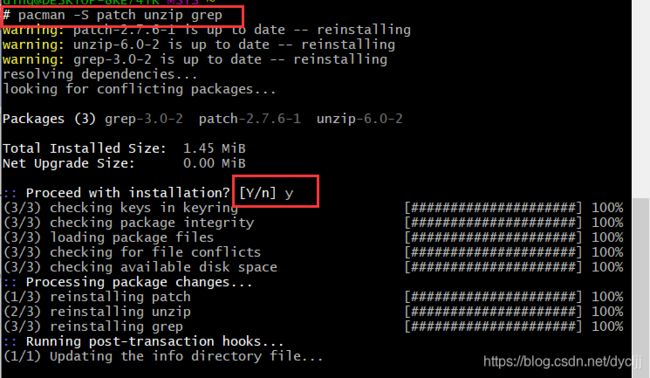
按照官网提示,依次输入以下命令:
pacman -Syu
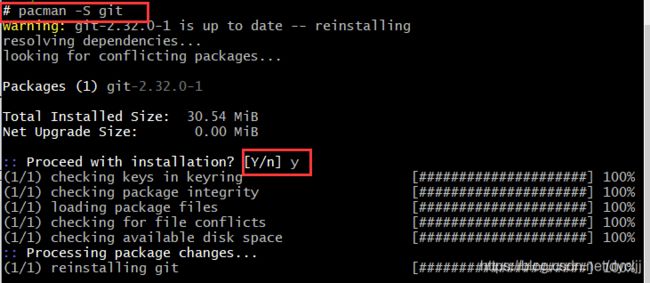
pacman -S git
pacman -S patch unzip grep
同上,输入y,回车。
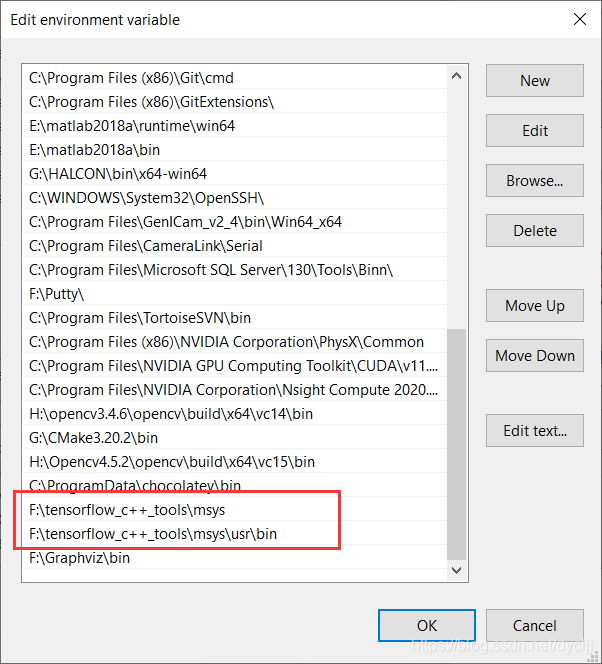
至此,MSYS2安装更新完成。接下来需要将其添加至环境变量中。
F:\tensorflow_c++_tools\msys
F:\tensorflow_c++_tools\msys\usr\bin
大家根据自己的安装路径进行添加。
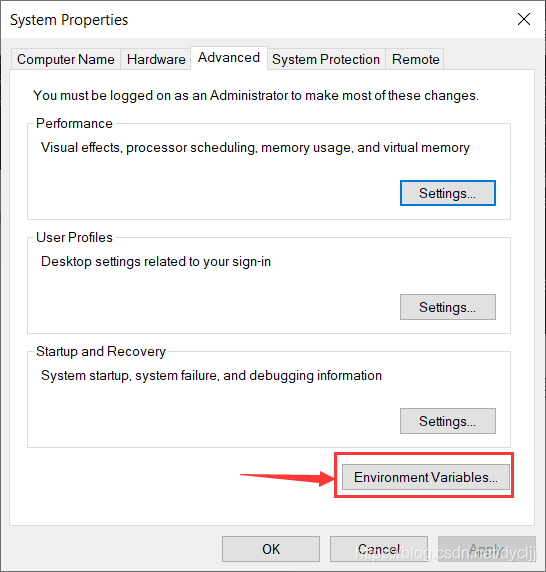
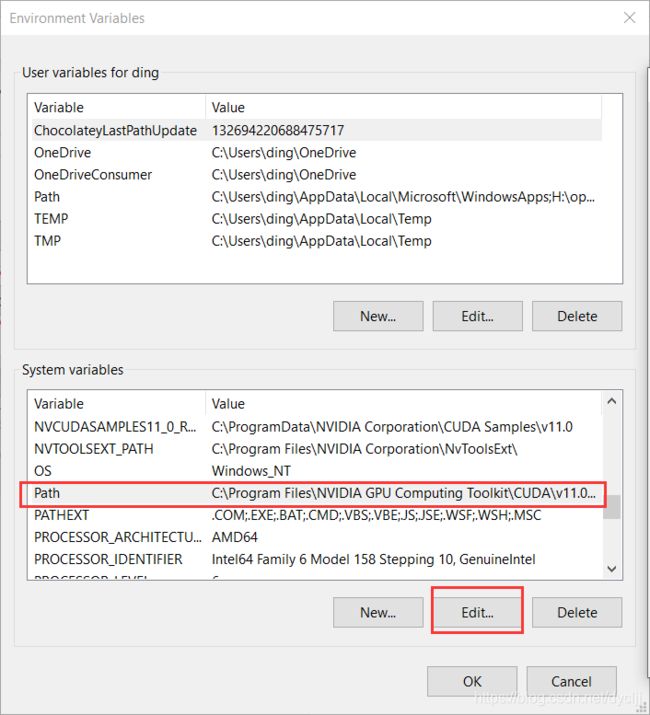
右键“我的电脑(ThisPC)”,选择属性(Properties),选择关于(About),选择系统防护(System protection),选择高级(Advanced),就是以下界面。
step6 安装bazel
进入git下载合适的bazel版本,下载地址:https://github.com/bazelbuild/bazel/tags。
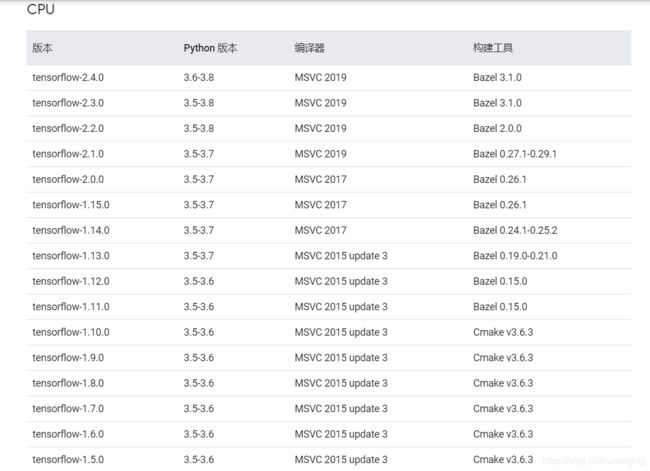
大家可根据自己的tensorflow版本查看bazel对应版本,版本对应查询,此处贴出部分以供参考。
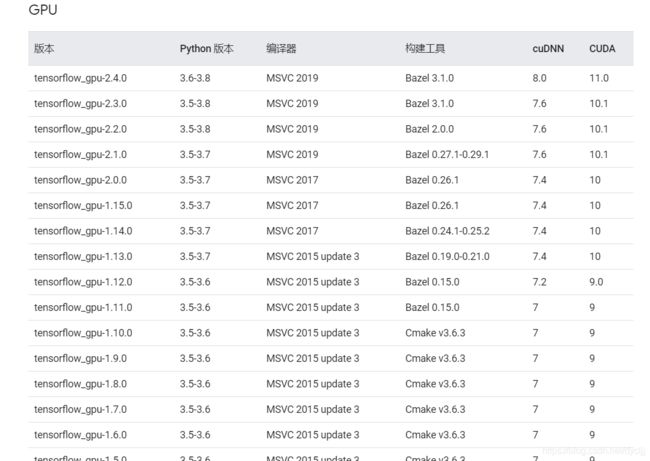
下载过程如下:
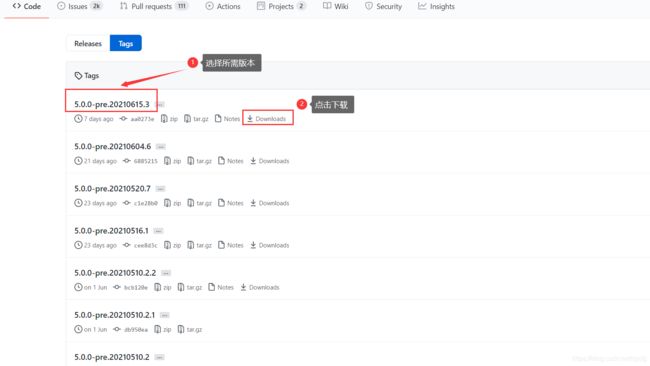
选择所需版本,如图所示为bazel 5.0.0,点击Download
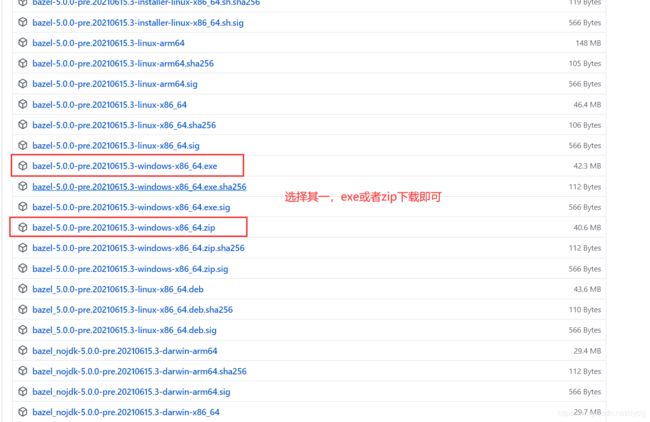
页面往下拖,会看到很多系统的安装包,选择windows下exe或者zip下载即可。
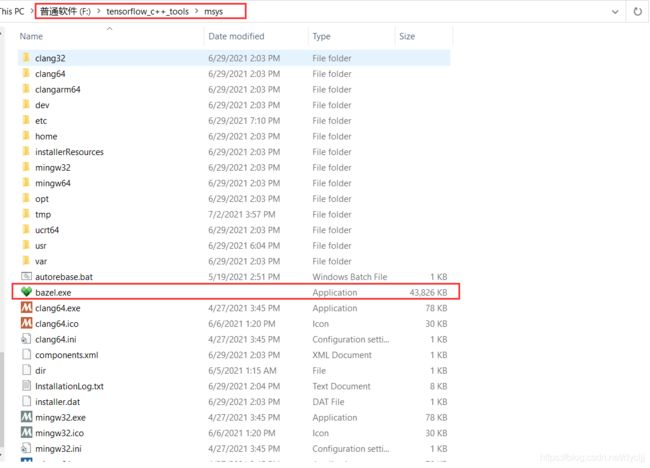
将下载好的exe文件复制到F:\tensorflow_c++_tools\msys下,具体路径根据自己安装位置决定,并且将名字命名为bazel.exe
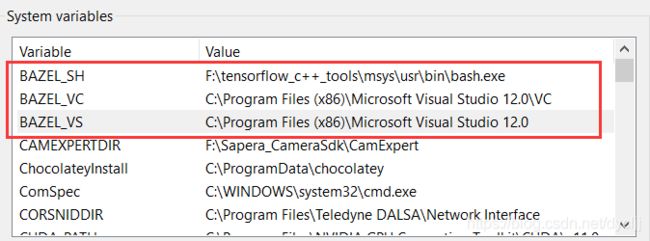
然后配置bazel环境变量,新建三个系统变量:BAZEL_SH,BAZEL_VC,BAZEL_VS,各路径如图所示:
说明:该环境变量应该是为了指定编译器,tensorflow编译过程中会自动指定编译器,但是最好自己指定。我偷懒并没有设置该步骤。
| 环境变量 | 对应值 |
|---|---|
| BAZEL_SH | F:\tensorflow_c++_tools\msys\usr\bin\bash.exe |
| BAZEL_VC | C:\Program Files (x86)\Microsoft Visual Studio 12.0\VC |
| BAZEL_VS | C:\Program Files (x86)\Microsoft Visual Studio 12.0 |
配置如图所示:
首先进入环境变量设置界面,参考step4相关过程,然后点击New,依次输入名称和值,点击ok即可:

step7 使用powershell进行编译
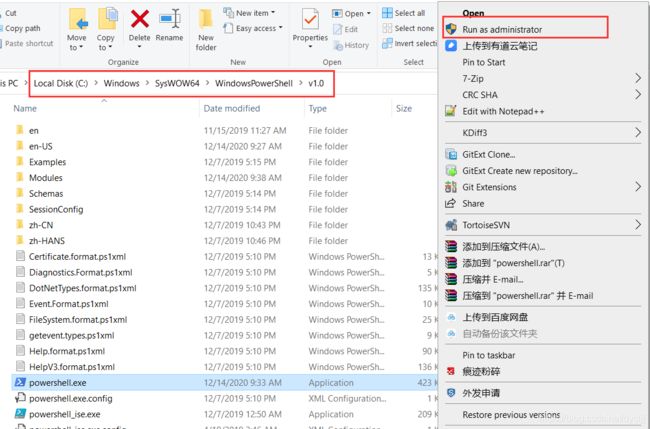
进入C:\Windows\SysWOW64\WindowsPowerShell\v1.0下,使用管理员运行powershell.exe:
将路径切换至刚新建的文件夹中下,如F:\tensorflow_c++_tools\tensorflow2.5,注意不是source文件夹:
cd F:\tensorflow_c++_tools\tensorflow2.5
然后输入bazel编译的选项:
$parameterString = "--config=opt --config=cuda --define=no_tensorflow_py_deps=true --copt=-nvcc_options=disable-warnings //tensorflow:libtensorflow_cc.so --verbose_failures"
最后输入以下命令,执行build.ps1脚本:
.\build.ps1 -BazelBuildParameters $parameterString -BuildCppAPI -ReserveSource
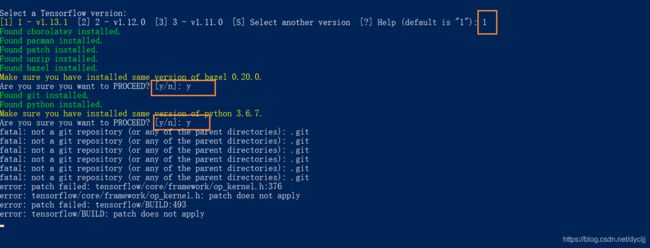
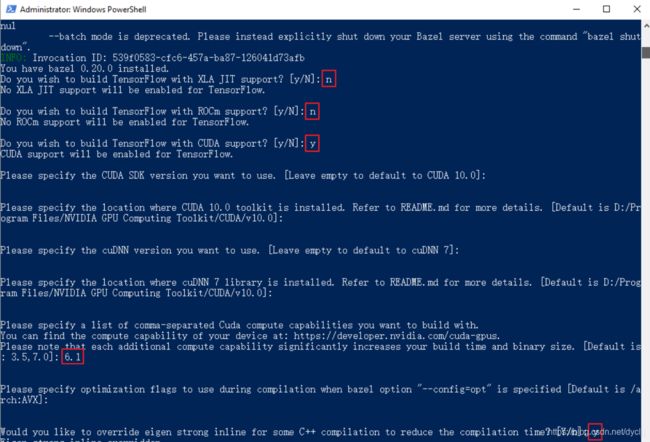
需要编译GPU版本,在CUDA support选项输入y,需要确保已经正确安装CUDA,不然会报错。
接下来需要输入GPU算力,此处需要查看自己电脑GPU算力,方法如下:
- 进入目录
C:\Program Files\NVIDIA GPU Computing Toolkit\CUDA\v11.0\extras\demo_suite
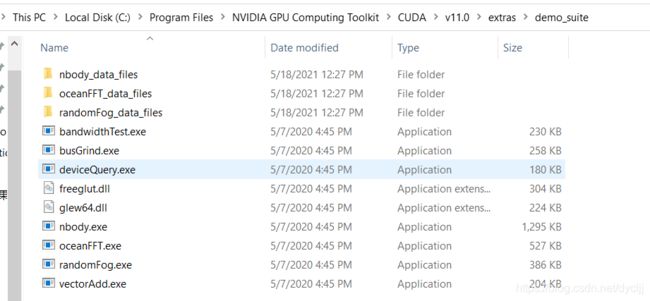
- 点击空白处,删除所有东西,然后输入’cmd’,并按下回车键 如下图所示

- 输入deviceQuery.exe,我的算力为6.1:
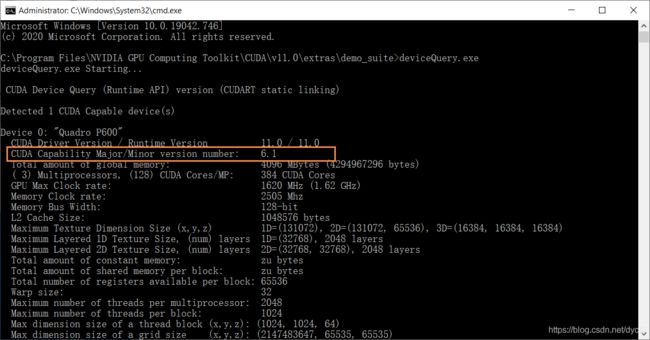
将6.1填入对应选项中,如图所示:
编译过程耗时很长,需要耐心等待。。。
至此,所有编译工作都已结束,不出意外的话,只要等到编译完成就ok了。但是,一般情况下会有很多错误,在此总结一下我遇到的一些问题。
当出现Build completed successfully时,说明编译已经完成。
![]()
step8 编译问题及解决方法
1、执行命令时报错 UnauthorizedAccess
powershell的执行策略受限,输入命令查看当前执行策略:
Get-ExecutionPolicy
若显示为Restricted则说明为受限,需要取消限制,输入,询问是否执行时,输入y回车即可:
Set-ExecutionPolicy Unrestricted
再次输入查询命令查看是否成功取消限制,显示为Unrestricted说明解除限制成功:
Get-ExecutionPolicy

2、 The term 'py' is not recognized
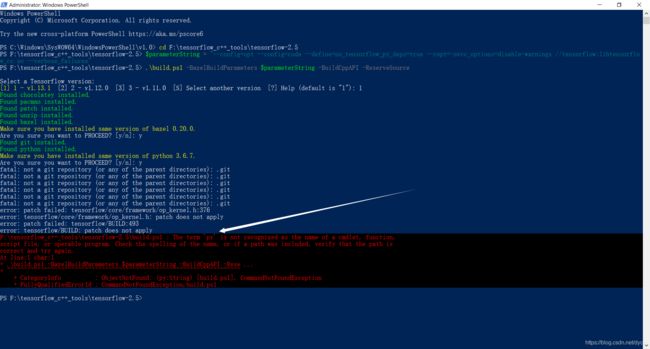
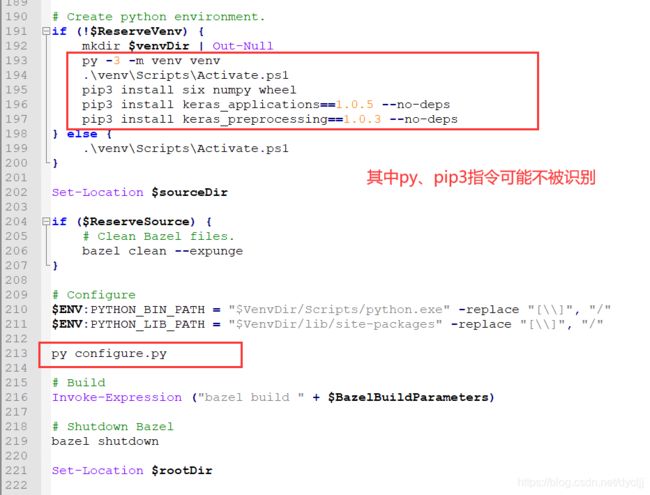
如图所示,该错误是因为build.ps1脚本引起,打开build.ps1脚本,190行开始,对应位置修改如下:
python  -m venv venv   #将py -3 修改为python
pip                                #将pip3修改为pip
python configure.py     #将py修改为python
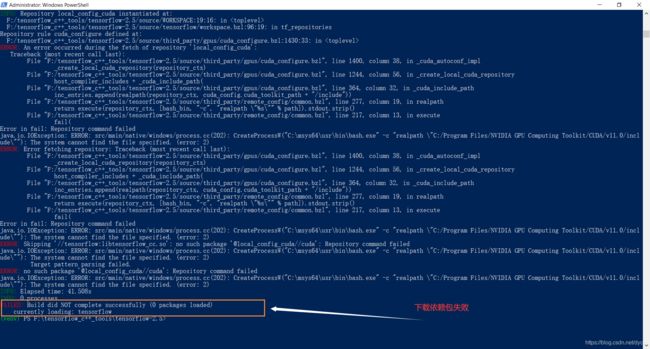
3、 Build did NOT complete successfully (0 packages loaded)
下载依赖包失败,主要是因为网络不畅导致,此处需要科学上网,因为我是公司内网,不上梯子基本跑不了,不知道外网可不可以直接跑。
4、OpenSSL SSL_connect: Connection was reset in connection to github.com:443
我当时已经上了梯子,但是还是报这个错误,意思是连接不上443端口。
首先输入以下命令查看配置情况,检查是否有https.proxy及http.proxy项:
git config --global -l
设置全局代理设置,根据梯子代理软件端口进行修改,我的是1080端口:
git config --global https.proxy 127.0.0.1:1080
已有设置情况修改代理项:
git config --global --unset http.proxy
git config --global --unset https.proxy
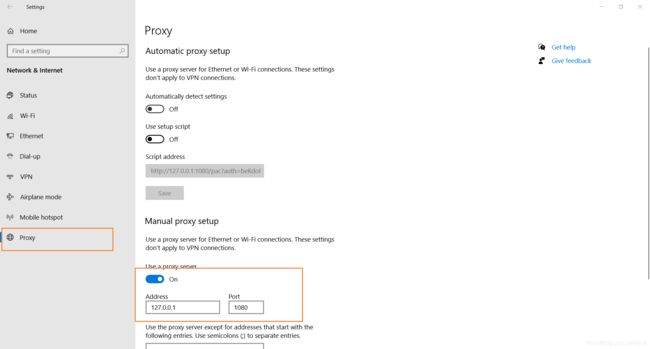
设置好全局代理基本就能保证网络畅通,我的设置如下:

查看代理打开情况,或者通过代理软件进行查看:

5、其它错误说明
一些其它的错误,当时忘记记录了,比如提示bazel版本错误、***.gz压缩包下载失败、无法解析的外部符号、其它错误等,不过这种错误可以通过错误信息找出来,很容易进行修改。刚开始我在尝试编译tf2.4.1版本时遇到某个压缩包下载失败的,结果发现那个压缩包现在已经没有了…换了其它版本的压缩包还是报错,所以果断换了tf2.5.0版本。tf2.4.1版本有个包下载不到:

step9 整理生成的文件
如果编译完成,那么恭喜你,已经完成了一大步。接下来,只需要整理生成的文件,取出需要的dll、lib、include放入项目中即可。
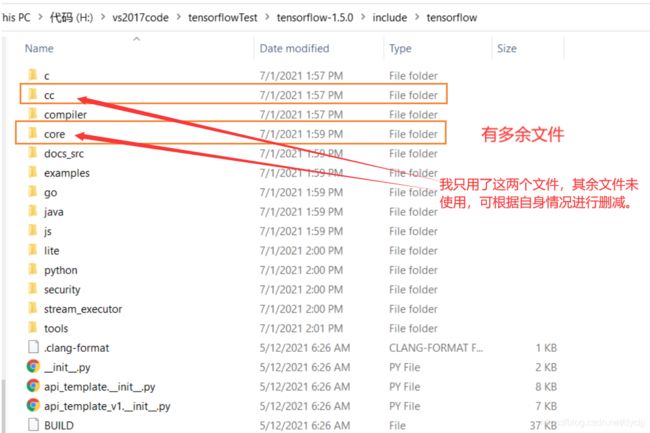
参考了很多教程,有的需要的头文件特别多导致文件很大,我在使用的过程中,只提取了以下内容:
说明:在编译完成时,会显示当前生成的.so路径,可以根据提供的路径找到对应文件(由于当时没有截图,所以此处就不放图了)。
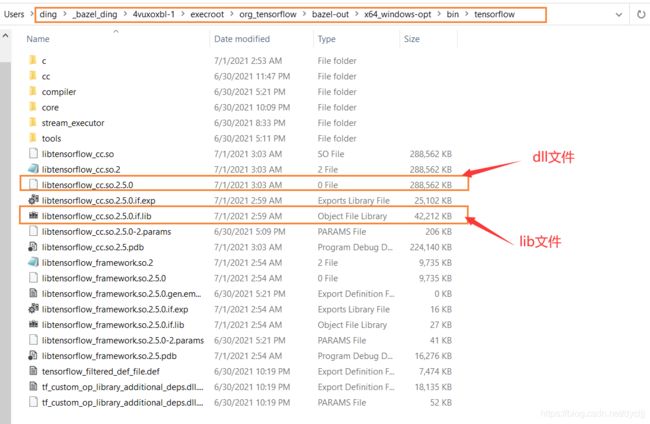
1、dll和lib文件:lib是否需要改名,看vs配置情况,我在此处将其改为tensorflow.lib,dll不需要改名
我的在路径为:
C:\Users\ding_bazel_ding\4vuxoxbl-1\execroot\org_tensorflow\bazel-out\x64_windows-opt\bin\tensorflow
我一共往里边放了8个文件夹,其中有重复文件夹。
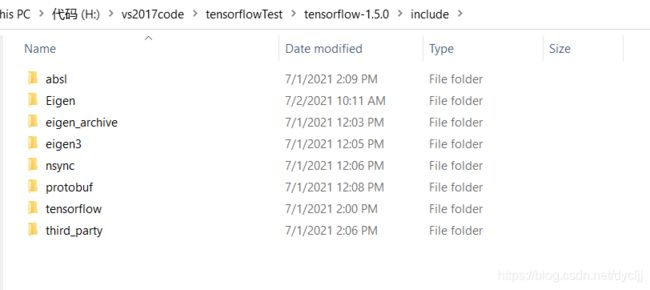
拷贝路径说明:
- absl:
C:\Users\ding_bazel_ding\4vuxoxbl\external\com_google_absl\absl
![]()
- Eigen:
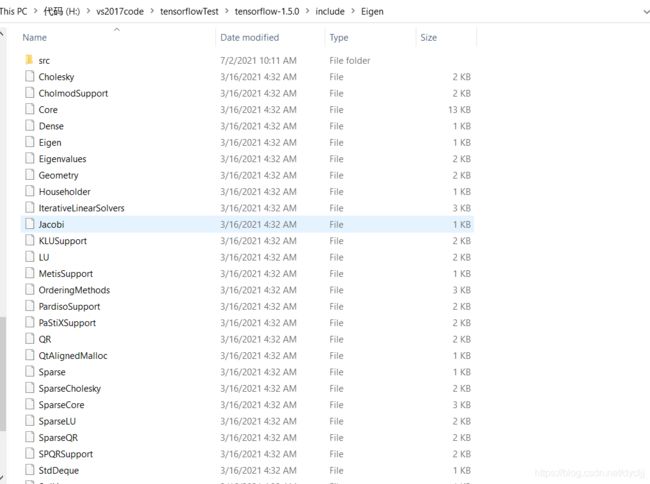
C:\Users\ding_bazel_ding\4vuxoxbl\external\eigen_archive\Eigen
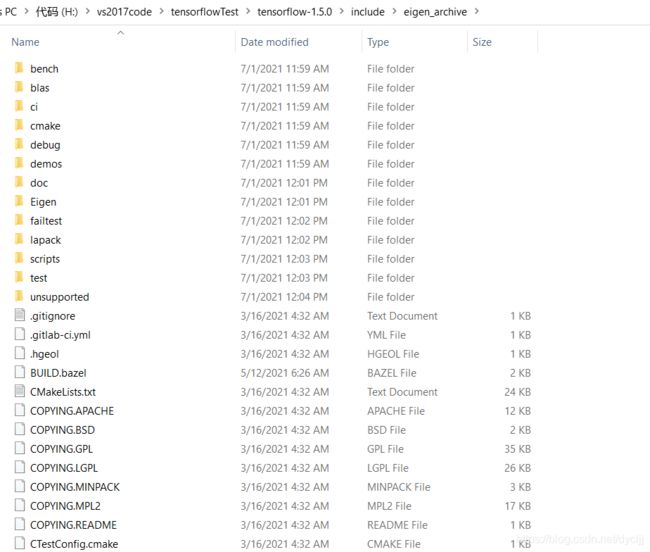
- eigen_archive:
C:\Users\ding_bazel_ding\4vuxoxbl\external\eigen_archive
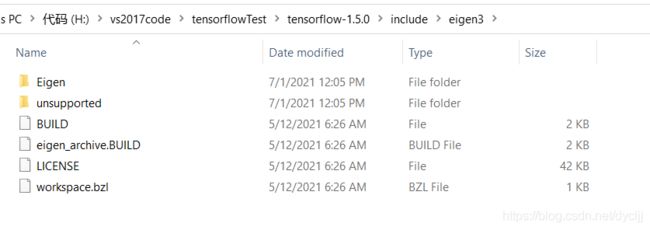
- eigen3:
F:\tensorflow_c++_tools\tensorflow2.5\source\third_party
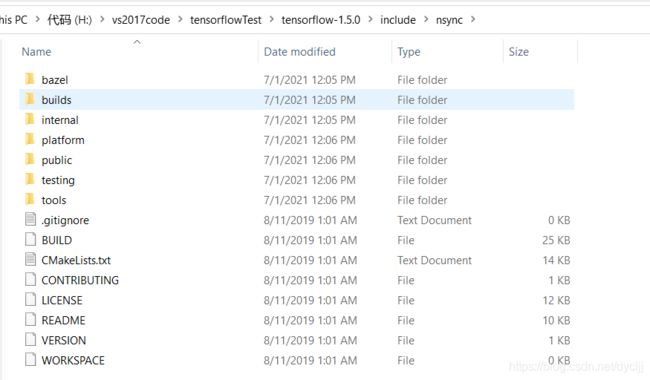
- nsync:
C:\Users\ding_bazel_ding\4vuxoxbl\external\nsync
- protobuf:为自己创建文件夹,里边分别放入 google和solaris两个文件夹
C:\Users\ding_bazel_ding\4vuxoxbl\external\com_google_protobuf\src
- tensorflow:
C:\Users\ding_bazel_ding\4vuxoxbl\execroot\org_tensorflow\bazel-out\x64_windows-opt\bin\tensorflow
- third_party:
C:\Users\ding_bazel_ding\4vuxoxbl\execroot\org_tensorflow\bazel-out\x64_windows-opt\bin
4、测试
首先需要配置环境,选择Relese x64,刚开始选择Debug老是报错,不知道为啥。
(1)配置opencv路径;
(2)配置tensorflow路径;
此处重点说明tensorflow配置,opencv类似。

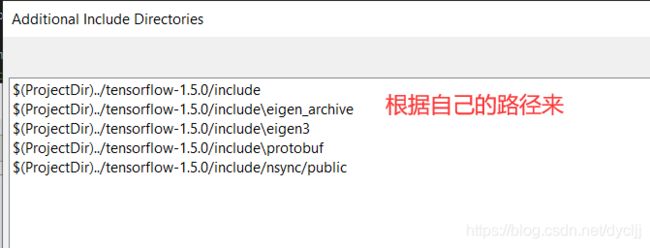
根据自己的路径来填,我将include和lib文件统一放在了tensorflow-1.5.0文件夹下(此处文件见命名错误,应该是2.5.0,小问题),并且移入项目中,使用了相对路径。

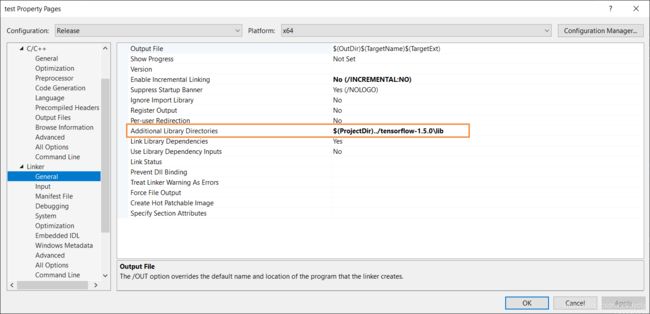
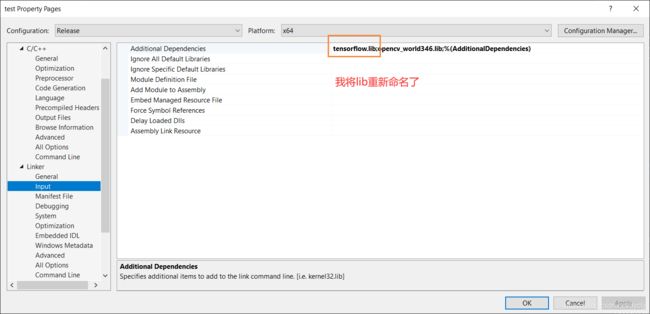
测试代码,我使用unet训练的图像分割模型,转换为pb模型后,在C++中测试通过,由于网上现在大多数编译的为1.x版本,所以拷贝过来的代码可能会报错,有的API已经更新,需要自行修改。
测试的图像及pb文件可以通过百度网盘下载:下载链接,提取码:n0mu。
#include "stdafx.h"
#define COMPILER_MSVC
#define NOMINMAX
#include outputs;
for (int i = 0; i < outputs.size(); ++i)
{
cout << outputs[i].DebugString() << endl;
Tensor_to_Mat(outputs[i], show_image);
}
finish = clock();
cout << "time:" << (double)(finish - start) / CLOCKS_PER_SEC << endl;
namedWindow("show_image", 0);
imshow("show_image", show_image);
waitKey();
return outputs;
}
//读取文件夹下所有图像
vector<Mat> ReadImagesInFolderOfIntersection(const String& pattern)
{
string model_path = "model.pb";
vector<String> fn;
glob(pattern, fn, false);
vector<Mat> images;
const auto count = fn.size(); //number of png files in images folder
for (size_t i = 0; i < count; i++)
{
images.push_back(imread(fn[i]));
cout << "-----------------------------------------------" << endl;
cout << "第" << i + 1 << " " << fn[i] << endl;
//const auto start = static_cast(getTickCount());
//处理
Mat image;
images[i].copyTo(image);
//Mat image_copy;
//image.copyTo(image_copy);
vector<tensorflow::Tensor> outputs;
outputs = image_to_vec(image, model_path);
waitKey(1500);
}
return images;
}
int main(int argc, char** argv)
{
const String pattern = "G:\\Desktop\\20210607image\\test_image\\";
ReadImagesInFolderOfIntersection(pattern);
getchar();
return 1;
getchar();
return 0;
}
