Ubuntu基础环境搭建
一、安装基础配置
- 内核和线程(自由分配)
- 磁盘(多多益善,用多少消耗多少,没用的话,你Windows依然可以继续用)
- Iso选择
- 工作空间的选择
- 密码账户名
- Ubuntu系统基础配置
进入系统后,依次进行如下操作:
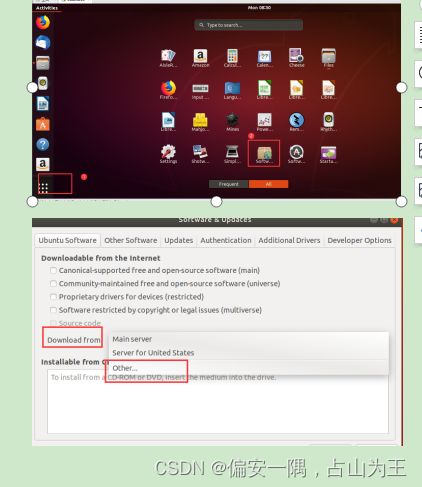
换镜像,加快下载速度
设置好 ,最后reload之后,等待reload可以直接点击取消,最终会设置成你选择的镜像。
设置好镜像,进行如下操作。
hkx@ubuntu:~$ sudo apt update
报错,执行如下几行
hkx@ubuntu:~$ sudo sed -i -e 's/bionic/xenial/g' /etc/apt/sources.list
hkx@ubuntu:~$ sudo apt update
hkx@ubuntu:~$ sudo apt-get install gcc
hkx@ubuntu:~$ sudo apt install make
hkx@ubuntu:~$ sudo apt install git
hkx@ubuntu:~$ sudo apt-get install pkg-config
二、Ubuntu系统基础配置
2.1 中文输入法
sudo apt-get autoremove open-vm-tools
sudo apt-get install open-vm-tools-desktop
重启生效
sudo apt-get install gcc
Sudo gedit /etc/profile
export PATH=$PATH:/usr/bin
source /etc/profile
sudo apt update
sudo apt install build-essential
错误:
dpkg: error processing archive /var/cache/apt/archives/wireless-regdb_2020.11.20-0ubuntu1~16.04.2_al
解决:”dpkg: 处理归档 /var/cache/apt/archives/XXXXXX(--unpack)时出错“的解决方法 - codeg - 博客园
2.2 VSCode
2.3 ROS
Ubuntu18.04下ROS的安装教程、rosdep init问题亲测解决方案_偏安一隅,占山为王的博客-CSDN博客_ubuntu18.04 rosdep init
ros安装_DemoFY的博客-CSDN博客
2.4 VMTOOLS
解决Ubuntu与Windows不能复制粘贴问题_偏安一隅,占山为王的博客-CSDN博客_ubuntugedit不能复制粘贴怎么办
2.5 基础库(FFmpeg OpenCV)
FFmpeg源码下载地址:Index of /releases
hkx@ubuntu:~$ wget http://www.nasm.us/pub/nasm/releasebuilds/2.13.01/nasm-2.13.01.tar.xz
手动解压
cd ~
hkx@ubuntu:~$ cd nasm-2.13.01
hkx@ubuntu:~/nasm-2.13.01$ ./configure
hkx@ubuntu:~/nasm-2.13.01$ make -j8&& sudo make install
上面的hkx@ubuntu:~$ ./configure这一步可以设置你的安装路径等,如:
hkx@ubuntu:~/nasm-2.13.01$ ./configure --prefix=/home/hkx/nasm
安装X264
cd ~
hkx@ubuntu:~$ git -C x264 pull 2> /dev/null || git clone --depth 1 \ https://gitee.com/mirrors_addons/x264.git
hkx@ubuntu:~/x264$ cd x264
hkx@ubuntu:~/x264$ ./configure --enable-shared --enable-static
hkx@ubuntu:~/x264$ make -j8&& sudo make install
安装FFmepg
FFmpeg源码下载地址:Index of /releases
hkx@ubuntu:~/ffmpeg-3.4.9$ ./configure --enable-static --enable-shared --prefix=/home/hkx/ffmpeg_3_4_9 --enable-gpl --enable-nonfree --enable-libx264
make -j8
make install
安装完成,配库和BIN的环境
BIN:
sudo gedit /etc/profile
最后加入:
export PATH=xxx:PATH xxx表示你的bin文件路径
source /etc/profile 立即生效
/usr/local/sbin:/usr/local/bin:/usr/sbin:/usr/bin:/sbin:/bin:/usr/games:/usr/local/games:/snap/bin
库:
sudo gedit /etc/ld.so.conf,输入你库的路径,保存退出,然后执行sudo ldconfig 来重新装载/etc/ld.so.cache文件
或者修改~/.bashrc或系统级别的/etc/profile文件,在其中添加“export PATH=xxx:$LD_LIBRARY_PATH”,然后“source .bashrc”。xxx表示新添加的内容。
2.7 交叉编译工具链
下载:Linaro Releases
比如我安装的 Ubuntu 18.04 是 64 位系统,因此我要使用 gcc-linaro-4.9.4- 2017.01-x86_64_arm-linux-gnueabihf.tar.xz
- 工作需要
3.1 CUDA
3.2 NVIDIA驱动
3.3 ZED2
3.4 Pycharm
3.5 Python3
3.6 Anacoda
3.7 yolov7

