SLAM14讲ch8代码实践部分
一、LK光流法
1.1 optical_flow.cpp文件
#include
#include
#include
#include
#include
#include "opencv2/highgui/highgui_c.h"
using namespace std;
using namespace cv;

string file_1 = "xxx/000001.png";  // first image
string file_2 = "xxx/000002.png";  // second image

/// Optical flow tracker and interface     创建一个光流追踪器的类
class OpticalFlowTracker {
public:
    // 该类的构造函数,这里该函数只是在创建追踪器对象时将传入的参数设置为该追踪器属性的初始值。
	// 即img1 = img1_, img2 = img2_, ...
    OpticalFlowTracker(
        const Mat &img1_,
        const Mat &img2_,
        const vector &kp1_,
        vector &kp2_,
        vector &success_,
        bool inverse_ = true, bool has_initial_ = false) :
        img1(img1_), img2(img2_), kp1(kp1_), kp2(kp2_), success(success_), inverse(inverse_),
        has_initial(has_initial_) {}

    void calculateOpticalFlow(const Range &range);  // 追踪器的追踪函数,这里只写了该函数的声明,具体的实现在该类的外部。

	// 追踪器的属性,包括第一个图像,第二个图像,包含第一个图像关键点的容器,第二个图像的关键点的容器,
	// 是否追踪成功的bool值的容器,是否使用逆公式,dx、dy是否有初始值。
private:
    const Mat &img1;
    const Mat &img2;
    const vector &kp1;//第一个图像关键点的容器
    vector &kp2;
    vector &success;  //是否追踪成功
    bool inverse = true;    //是否使用逆公式
    bool has_initial = false;   //dx,dy是否有初始值
};

/**
 * single level optical flow
 * @param [in] img1 the first image
 * @param [in] img2 the second image
 * @param [in] kp1 keypoints in img1
 * @param [in|out] kp2 keypoints in img2, if empty, use initial guess in kp1
 * @param [out] success true if a keypoint is tracked successfully
 * @param [in] inverse use inverse formulation?
 */
    //实现单层光流函数
void OpticalFlowSingleLevel(
    const Mat &img1,
    const Mat &img2,
    const vector &kp1,//第一个图像关键点容器
    vector &kp2,
    vector &success,  //是否成功追踪
    bool inverse = false,   //是否使用ni公式
    bool has_initial_guess = false
);

/**
 * multi level optical flow, scale of pyramid is set to 2 by default
 * the image pyramid will be create inside the function
 * @param [in] img1 the first pyramid
 * @param [in] img2 the second pyramid
 * @param [in] kp1 keypoints in img1
 * @param [out] kp2 keypoints in img2
 * @param [out] success true if a keypoint is tracked successfully
 * @param [in] inverse set true to enable inverse formulation
 */
void OpticalFlowMultiLevel(
    const Mat &img1,
    const Mat &img2,
    const vector &kp1,
    vector &kp2,
    vector &success,
    bool inverse = false
);

/**
 * get a gray scale value from reference image (bi-linear interpolated)
 * @param img
 * @param x
 * @param y
 * @return the interpolated value of this pixel pixel(像素)
 */
    //获取像素值函数声明
inline float GetPixelValue(const cv::Mat &img, float x, float y) {
    // boundary check 检测边界
    if (x < 0) x = 0;
    if (y < 0) y = 0;
    if (x >= img.cols - 1) x = img.cols - 2;
    if (y >= img.rows - 1) y = img.rows - 2;

    float xx = x - floor(x);// floor(x)表示对x向下取整。
    float yy = y - floor(y);
    int x_a1 = std::min(img.cols - 1, int(x) + 1);
    int y_a1 = std::min(img.rows - 1, int(y) + 1);
    // 就是双线性插值,4个点,离哪个点越近权重越大,总权重为1
    return (1 - xx) * (1 - yy) * img.at(y, x)
    + xx * (1 - yy) * img.at(y, x_a1)
    + (1 - xx) * yy * img.at(y_a1, x)
    + xx * yy * img.at(y_a1, x_a1);
}

int main(int argc, char **argv) {

    // images, note they are CV_8UC1, not CV_8UC3 // 设置flags = 0,相当于图像的格式为CV_8UC1,像素位深8,通道1,即灰度图
    Mat img1 = imread(file_1, 0);
    Mat img2 = imread(file_2, 0);
    cout << img1.size() << endl; // 查看图像尺寸
    cout << img2.size() << endl;
    // key points, using GFTT here.
    vector kp1; //定义一个关键点容器kp1
    Ptr detector = GFTTDetector::create(50000, 0.01, 10); // maximum 500 keypoints 生成一个角点检测器detector
       // 最大角点数量500,角点可以接受的最小特征值0.01,角点间的最小距离20
    detector->detect(img1, kp1); // 检测img1中的角点并存入kp1容器中

    // now lets track these key points in the second image
    // first use single level LK in the validation picture
    vector kp2_single;// 单层光流关键点容器
    vector success_single;// 单层光流关键点追踪成功与否的bool值容器
    OpticalFlowSingleLevel(img1, img2, kp1, kp2_single, success_single);

    // then test multi-level LK
    vector kp2_multi;// 多层光流关键点容器
    vector success_multi;
    chrono::steady_clock::time_point t1 = chrono::steady_clock::now();
    OpticalFlowMultiLevel(img1, img2, kp1, kp2_multi, success_multi, true);
    chrono::steady_clock::time_point t2 = chrono::steady_clock::now();
    auto time_used = chrono::duration_cast>(t2 - t1);
    cout << "optical flow by gauss-newton: " << time_used.count() << endl;

    // use opencv's flow for validation
    vector pt1, pt2;
    for (auto &kp: kp1) pt1.push_back(kp.pt);
     // status : 输出状态向量(无符号字符),如果找到相应特征的流,则向量的每个元素设置为1,否则设置为0。
    vector status;
    // error :输出错误的矢量; 向量的每个元素都设置为相应特征的错误,错误度量的类型可以在flags参数中设置;
    // 如果未找到流,则未定义错误(使用status参数查找此类情况)。
    vector error;
    t1 = chrono::steady_clock::now();
    cv::calcOpticalFlowPyrLK(img1, img2, pt1, pt2, status, error);
    t2 = chrono::steady_clock::now();
    time_used = chrono::duration_cast>(t2 - t1);
    cout << "optical flow by opencv: " << time_used.count() << endl;

    // plot the differences of those functions
    Mat img2_single;//单层
    cv::cvtColor(img2, img2_single, CV_GRAY2BGR);//将img2转化为BGR图并以img2_single输出
    for (int i = 0; i < kp2_single.size(); i++) {
        if (success_single[i]) {
            cv::circle(img2_single, kp2_single[i].pt, 2, cv::Scalar(0, 250, 0), 2);// 第二个图像中追踪到的关键点画绿圆
            cv::line(img2_single, kp1[i].pt, kp2_single[i].pt, cv::Scalar(0, 250, 0));// 追踪到的关键点从第一个图像到第二个图像的流向
        }
    }
    //可视化光流
    Mat img2_multi;//多层
    cv::cvtColor(img2, img2_multi, CV_GRAY2BGR);//将img2转化为BGR图并以img2_single输出
    for (int i = 0; i < kp2_multi.size(); i++) {
        if (success_multi[i])// 追踪成功的关键点
        {
            cv::circle(img2_multi, kp2_multi[i].pt, 2, cv::Scalar(0, 250, 0), 2); 	// 第二个图像中追踪到的关键点画绿圆
            cv::line(img2_multi, kp1[i].pt, kp2_multi[i].pt, cv::Scalar(0, 250, 0)); // 追踪到的关键点从第一个图像到第二个图像的流向
        }
    }

    Mat img2_CV;
    cv::cvtColor(img2, img2_CV, CV_GRAY2BGR);
    for (int i = 0; i < pt2.size(); i++) {
        if (status[i]) {
            cv::circle(img2_CV, pt2[i], 2, cv::Scalar(0, 250, 0), 2);
            cv::line(img2_CV, pt1[i], pt2[i], cv::Scalar(0, 250, 0));
        }
    }

    cv::imshow("tracked single level", img2_single);
    cv::imshow("tracked multi level", img2_multi);
    cv::imshow("tracked by opencv", img2_CV);
    cv::waitKey(0);

    return 0;
}

void OpticalFlowSingleLevel(
    const Mat &img1,
    const Mat &img2,
    const vector &kp1,
    vector &kp2,
    vector &success,
    bool inverse, bool has_initial) {
    kp2.resize(kp1.size()); //将kp2大小设置为和kp1大小一致
    success.resize(kp1.size()); //successs应该与关键点的数量一致
    OpticalFlowTracker tracker(img1, img2, kp1, kp2, success, inverse, has_initial);   //创建一个追踪器tracker
    parallel_for_(Range(0, kp1.size()),
                  std::bind(&OpticalFlowTracker::calculateOpticalFlow, &tracker, placeholders::_1));
}
    // kp1.size()是关键点的数量。bind是一个绑定函数,它相当于调用tracker.calculateOpticalFlow()。
    // placeholders::_1是占位符,表示传入第一个参数,此处Range(0, kp1.size())为传入的参数。
void OpticalFlowTracker::calculateOpticalFlow(const Range &range) {
    // parameters
    int half_patch_size = 4;   //使用关键点周围64个像素
    int iterations = 10;    //迭代次数
    //遍历kp1中每一个关键点
    for (size_t i = range.start; i < range.end; i++) {
        auto kp = kp1[i];
        double dx = 0, dy = 0; // dx,dy need to be estimated 初始化为0
        //如果为true,则将dx,dy设置为两个关键点之间的差值
        if (has_initial) {
            dx = kp2[i].pt.x - kp.pt.x;
            dy = kp2[i].pt.y - kp.pt.y;
            // keypoint.pt表示关键点的坐标,keypoint.pt.x表示关键点的x坐标,keypoint.pt.y表示关键点的y坐标。
        }

        double cost = 0, lastCost = 0;//当前代价和之前的代价
        bool succ = true; // indicate if this point succeeded 假设关键点被成功追踪

        // Gauss-Newton iterations
        Eigen::Matrix2d H = Eigen::Matrix2d::Zero();    // hessian 海赛距证(二阶导数)
        Eigen::Vector2d b = Eigen::Vector2d::Zero();    // bias 偏置
        Eigen::Vector2d J;  // jacobian 求解参数的一阶导
        for (int iter = 0; iter < iterations; iter++) {
            if (inverse == false) {
                H = Eigen::Matrix2d::Zero();
                b = Eigen::Vector2d::Zero();
            } else {
                // only reset b 只重置b矩阵
                b = Eigen::Vector2d::Zero();
            }

            cost = 0;

            // compute cost and jacobian (使用该关键点周围64个像素)
            for (int x = -half_patch_size; x < half_patch_size; x++)
                for (int y = -half_patch_size; y < half_patch_size; y++) {
                    double error = GetPixelValue(img1, kp.pt.x + x, kp.pt.y + y) -
                                   GetPixelValue(img2, kp.pt.x + x + dx, kp.pt.y + y + dy);;  // Jacobian
                    if (inverse == false) {
                        J = -1.0 * Eigen::Vector2d(
                            0.5 * (GetPixelValue(img2, kp.pt.x + dx + x + 1, kp.pt.y + dy + y) -
                                   GetPixelValue(img2, kp.pt.x + dx + x - 1, kp.pt.y + dy + y)),
                            0.5 * (GetPixelValue(img2, kp.pt.x + dx + x, kp.pt.y + dy + y + 1) -
                                   GetPixelValue(img2, kp.pt.x + dx + x, kp.pt.y + dy + y - 1))
                        );
                    } else if (iter == 0) {
                        // in inverse mode, J keeps same for all iterations
                        // NOTE this J does not change when dx, dy is updated, so we can store it and only compute error
                        J = -1.0 * Eigen::Vector2d(
                            0.5 * (GetPixelValue(img1, kp.pt.x + x + 1, kp.pt.y + y) -
                                   GetPixelValue(img1, kp.pt.x + x - 1, kp.pt.y + y)),
                            0.5 * (GetPixelValue(img1, kp.pt.x + x, kp.pt.y + y + 1) -
                                   GetPixelValue(img1, kp.pt.x + x, kp.pt.y + y - 1))
                        );
                    }
                    // compute H, b and set cost;
                    b += -error * J;
                    cost += error * error;
                    if (inverse == false || iter == 0) {
                        // also update H
                        // 单层光流时每次迭代都会更新H,多层光流时只有每层的第0次迭代才会更新H。
                        H += J * J.transpose();
                    }
                }

            // compute update
            Eigen::Vector2d update = H.ldlt().solve(b);

            if (std::isnan(update[0])) {
                // sometimes occurred when we have a black or white patch and H is irreversible  // 在黑色或白色像素点并且H不可逆时,可能会出现nan值,该关键点追踪失败
                cout << "update is nan" << endl;
                succ = false;
                break;
            }

            if (iter > 0 && cost > lastCost) {
                break;
            }

            // update dx, dy
            dx += update[0];
            dy += update[1];
            lastCost = cost;
            succ = true;

            if (update.norm() < 1e-2) {
                // converge
                break;
            }
        }

        success[i] = succ;

        // set kp2
        kp2[i].pt = kp.pt + Point2f(dx, dy);    //追踪到第一个图像点在第二个图像点的位置
    }
}
    //实现多层光流
void OpticalFlowMultiLevel(
    const Mat &img1,
    const Mat &img2,
    const vector &kp1,
    vector &kp2,
    vector &success,
    bool inverse) {

    // parameters
    int pyramids = 4;//金字塔层数为4
    double pyramid_scale = 0.5;//采样率为0.5
    double scales[] = {1.0, 0.5, 0.25, 0.125};// 每一层相对于原始图像的采样率

    // create pyramids 创建金字塔
    chrono::steady_clock::time_point t1 = chrono::steady_clock::now();
    vector pyr1, pyr2; // image pyramids  两个图像容器,包含图像金字塔每一层的图像
    for (int i = 0; i < pyramids; i++) {
        if (i == 0) {
            pyr1.push_back(img1);
            pyr2.push_back(img2);
        }
        // 之后每一层放置前一层0.5上采样的图像(双线性插值的方式修改图像尺寸)
        else {
            Mat img1_pyr, img2_pyr;
            cv::resize(pyr1[i - 1], img1_pyr,
                       cv::Size(pyr1[i - 1].cols * pyramid_scale, pyr1[i - 1].rows * pyramid_scale));
            cv::resize(pyr2[i - 1], img2_pyr,
                       cv::Size(pyr2[i - 1].cols * pyramid_scale, pyr2[i - 1].rows * pyramid_scale));
            pyr1.push_back(img1_pyr);
            pyr2.push_back(img2_pyr);
        }
    }
    chrono::steady_clock::time_point t2 = chrono::steady_clock::now();
    auto time_used = chrono::duration_cast>(t2 - t1);
    cout << "build pyramid time: " << time_used.count() << endl;

    // coarse-to-fine LK tracking in pyramids
    vector kp1_pyr, kp2_pyr; // 两个存储关键点的容器,这里存储的是顶层(第3层,总共4层)图像的关键点
    for (auto &kp:kp1) {
        auto kp_top = kp;// 顶层相对于原图的采样率为0.5^3 = 0.125,
    // 将底层(第一个图像)的关键点的坐标都乘以0.125当作顶层图像的关键点
        kp_top.pt *= scales[pyramids - 1];
        kp1_pyr.push_back(kp_top);
        kp2_pyr.push_back(kp_top);
    }

    for (int level = pyramids - 1; level >= 0; level--) {
        // from coarse to fine
        success.clear();
        t1 = chrono::steady_clock::now();
        OpticalFlowSingleLevel(pyr1[level], pyr2[level], kp1_pyr, kp2_pyr, success, inverse, true);  // 先对顶层应用单层光流。
        t2 = chrono::steady_clock::now();
        auto time_used = chrono::duration_cast>(t2 - t1);
        cout << "track pyr " << level << " cost time: " << time_used.count() << endl;
        //提前准备好下一层的关键点,
        // 就是讲上一层的关键点坐标除以采样率,这里除以0.5,即将关键点坐标乘以2.
        if (level > 0) {
            for (auto &kp: kp1_pyr)
                kp.pt /= pyramid_scale;
            for (auto &kp: kp2_pyr)
                kp.pt /= pyramid_scale;
        }
    }

    for (auto &kp: kp2_pyr)
        kp2.push_back(kp);
}
1.2 CMakeList文件
cmake_minimum_required(VERSION 2.8)
project(ch8)

set(CMAKE_BUILD_TYPE "Release")
add_definitions("-DENABLE_SSE")
set(CMAKE_CXX_FLAGS "-std=c++11 ${SSE_FLAGS} -g -O3 -march=native")
find_package(OpenCV REQUIRED)
find_package(Sophus REQUIRED)
find_package(Pangolin REQUIRED)
include_directories(
        ${OpenCV_INCLUDE_DIRS}
        ${G2O_INCLUDE_DIRS}
        ${Sophus_INCLUDE_DIRS}
        "/usr/include/eigen3/"
        ${Pangolin_INCLUDE_DIRS}
)

add_executable(optical_flow optical_flow.cpp)
target_link_libraries(optical_flow ${OpenCV_LIBS} )
1.3 需要注意的问题
1. 在源代码中没有加头文件 #include "opencv2/highgui/highgui_c.h",这会导致出现CV_GRAY2BGR没有被定义的错误。解决方法就是在cpp文件中加上头文件#include "opencv2/highgui/highgui_c.h",即可。
2.图片路径问题,在上面cpp代码中,作者讲图片路径用了
string file_1 = "xxx/000001.png"; // first image
string file_2 = "xxx/000002.png"; // second image
代替。这里需要将其改成你对应图片的绝对路径。具体做法是找到图片对应的位置,在终端打开,使用命令pwd打印当前路径,复制粘贴进去即可。在作者电脑上这两行代码为,具体路径以你电脑上为准。
string file_1 = "/home/l/learn_slam/ch8/LK1.png";  // first image
string file_2 = "/home/l/learn_slam/ch8/LK2.png";  // second image
改完之后进行编译,执行就可以运行。
二、直接法代码实现
2.1 direct_method.cpp文件
#include
#include
#include
#include
 #include "opencv2/highgui/highgui_c.h"
using namespace std;

typedef vector> VecVector2d;

// Camera intrinsics 相机内参
double fx = 718.856, fy = 718.856, cx = 607.1928, cy = 185.2157;
// baseline   双目相机基线
double baseline = 0.573;
// paths 图像路径
string left_file = "../left.png";
string disparity_file = "../disparity.png";
boost::format fmt_others("../%06d.png");    // other files

// useful typedefs
typedef Eigen::Matrix Matrix6d;
typedef Eigen::Matrix Matrix26d;
typedef Eigen::Matrix Vector6d;

/// class for accumulator jacobians in parallel  用于并行计算雅可比矩阵的类
class JacobianAccumulator {
public:
    //类的构造函数,使用列表进行初始化
    JacobianAccumulator(
        const cv::Mat &img1_,
        const cv::Mat &img2_,
        const VecVector2d &px_ref_,//角点坐标
        const vector depth_ref_,//路标点的Z坐标值
        Sophus::SE3d &T21_) :
        img1(img1_), img2(img2_), px_ref(px_ref_), depth_ref(depth_ref_), T21(T21_) {
        projection = VecVector2d(px_ref.size(), Eigen::Vector2d(0, 0));
    }

    /// accumulate jacobians in a range 在range范围内加速计算雅可比矩阵
    void accumulate_jacobian(const cv::Range &range);

    /// get hessian matrix 获取海塞矩阵
    Matrix6d hessian() const { return H; }

    /// get bias 获取矩阵b
    Vector6d bias() const { return b; }

    /// get total cost  获取总共的代价
    double cost_func() const { return cost; }

    /// get projected points 获取图像2中的角点坐标
    VecVector2d projected_points() const { return projection; }

    /// reset h, b, cost to zero  将海塞矩阵H,矩阵b和代价cost置为0
    void reset() {
        H = Matrix6d::Zero();
        b = Vector6d::Zero();
        cost = 0;
    }

private:
    const cv::Mat &img1;
    const cv::Mat &img2;
    const VecVector2d &px_ref;//图像1中角点坐标
    const vector depth_ref;//图像1中路标点的Z坐标值
    Sophus::SE3d &T21;
    VecVector2d projection; // projected points

    std::mutex hessian_mutex;
    Matrix6d H = Matrix6d::Zero();
    Vector6d b = Vector6d::Zero();
    double cost = 0;
};

/**
 * pose estimation using direct method
 * @param img1
 * @param img2
 * @param px_ref
 * @param depth_ref
 * @param T21
 */
void DirectPoseEstimationMultiLayer(
    const cv::Mat &img1,
    const cv::Mat &img2,
    const VecVector2d &px_ref,
    const vector depth_ref,
    Sophus::SE3d &T21
);
//定义DirectPoseEstimationMultiLayer函数 多层直接法
/**
 * pose estimation using direct method
 * @param img1
 * @param img2
 * @param px_ref
 * @param depth_ref
 * @param T21
 */
void DirectPoseEstimationSingleLayer(
    const cv::Mat &img1,
    const cv::Mat &img2,
    const VecVector2d &px_ref,
    const vector depth_ref,
    Sophus::SE3d &T21
);
//定义DirectPoseEstimationSingleLayer函数 单层直接法
// bilinear interpolation 双线性插值求灰度值
inline float GetPixelValue(const cv::Mat &img, float x, float y) //inline表示内联函数,它是为了解决一些频繁调用的小函数大量消耗栈空间的问题而引入的
{
    // boundary check
    if (x < 0) x = 0;
    if (y < 0) y = 0;
    if (x >= img.cols) x = img.cols - 1;
    if (y >= img.rows) y = img.rows - 1;
    //...|I1      I2|...
    //...|          |...
    //...|          |...
    //...|I3      I4|...
    uchar *data = &img.data[int(y) * img.step + int(x)];//x和y是整数
    //data[0] -> I1  data[1] -> I2  data[img.step] -> I3  data[img.step + 1] -> I4
    float xx = x - floor(x);//xx算出的是x的小数部分
    float yy = y - floor(y);//yy算出的是y的小数部分
    return float//最终的像素灰度值
    (
        (1 - xx) * (1 - yy) * data[0] +
        xx * (1 - yy) * data[1] +
        (1 - xx) * yy * data[img.step] +
        xx * yy * data[img.step + 1]
    );
}

int main(int argc, char **argv) {

    cv::Mat left_img = cv::imread(left_file, 0);//0表示返回灰度图,left.png表示000000.png
    cv::Mat disparity_img = cv::imread(disparity_file, 0);//0表示返回灰度图,disparity.png是left.png的视差图

    // let's randomly pick pixels in the first image and generate some 3d points in the first image's frame
    //在图像1中随机选择一些像素点,然后恢复深度,得到一些路标点
    cv::RNG rng;
    int nPoints = 2000;
    int boarder = 20;
    VecVector2d pixels_ref;
    vector depth_ref;

    // generate pixels in ref and load depth data
    for (int i = 0; i < nPoints; i++) {
        int x = rng.uniform(boarder, left_img.cols - boarder);  // don't pick pixels close to boarder 不要拾取靠近边界的像素
        int y = rng.uniform(boarder, left_img.rows - boarder);  // don't pick pixels close to boarder 不要拾取靠近边界的像素
        int disparity = disparity_img.at(y, x);
        double depth = fx * baseline / disparity; // you know this is disparity to depth
        depth_ref.push_back(depth);
        pixels_ref.push_back(Eigen::Vector2d(x, y));
    }

    // estimates 01~05.png's pose using this information
    Sophus::SE3d T_cur_ref;

    for (int i = 1; i < 6; i++)// 1~5 i从1到5,共5张图
    {
        cv::Mat img = cv::imread((fmt_others % i).str(), 0);//读取图片,0表示返回一张灰度图
        // try single layer by uncomment this line
        // DirectPoseEstimationSingleLayer(left_img, img, pixels_ref, depth_ref, T_cur_ref);
        //利用单层直接法计算图像img相对于left_img的位姿T_cur_ref,以图片left.png为基准
        DirectPoseEstimationMultiLayer(left_img, img, pixels_ref, depth_ref, T_cur_ref);//调用DirectPoseEstimationMultiLayer 多层直接法
    }
    return 0;
}

void DirectPoseEstimationSingleLayer(
    const cv::Mat &img1,
    const cv::Mat &img2,
    const VecVector2d &px_ref,//第1张图中的角点坐标
    const vector depth_ref,//第1张图中路标点的Z坐标值 就是深度信息
    Sophus::SE3d &T21) {

    const int iterations = 10;//设置迭代次数为10
    double cost = 0, lastCost = 0;//将代价和最终代价初始化为0
    auto t1 = chrono::steady_clock::now();//开始计时
    JacobianAccumulator jaco_accu(img1, img2, px_ref, depth_ref, T21);

    for (int iter = 0; iter < iterations; iter++) {
        jaco_accu.reset();//重置
        //完成并行计算海塞矩阵H,矩阵b和代价cost
        cv::parallel_for_(cv::Range(0, px_ref.size()),
                          std::bind(&JacobianAccumulator::accumulate_jacobian, &jaco_accu, std::placeholders::_1));
        Matrix6d H = jaco_accu.hessian();//计算海塞矩阵
        Vector6d b = jaco_accu.bias();//计算b矩阵


        // solve update and put it into estimation
         //求解增量方程更新优化变量T21
        Vector6d update = H.ldlt().solve(b);;
        T21 = Sophus::SE3d::exp(update) * T21;
        cost = jaco_accu.cost_func();

        if (std::isnan(update[0])) //解出来的更新量不是一个数字,退出迭代
        {
            // sometimes occurred when we have a black or white patch and H is irreversible
            cout << "update is nan" << endl;
            break;
        }
        if (iter > 0 && cost > lastCost) //代价不再减小,退出迭代
        {
            cout << "cost increased: " << cost << ", " << lastCost << endl;
            break;
        }
        if (update.norm() < 1e-3) //更新量的模小于1e-3,退出迭代
        {
            // converge
            break;
        }

        lastCost = cost;
        cout << "iteration: " << iter << ", cost: " << cost << endl;
    }//GN(高斯牛顿法)迭代结束

    cout << "T21 = \n" << T21.matrix() << endl;//输出T21矩阵
    auto t2 = chrono::steady_clock::now();//计时结束
    auto time_used = chrono::duration_cast>(t2 - t1);//计算耗时
    cout << "direct method for single layer: " << time_used.count() << endl;//输出使用单层直接法所用时间


    // plot the projected pixels here
    cv::Mat img2_show;
    cv::cvtColor(img2, img2_show, CV_GRAY2BGR);
    VecVector2d projection = jaco_accu.projected_points();
    for (size_t i = 0; i < px_ref.size(); ++i) {
        auto p_ref = px_ref[i];
        auto p_cur = projection[i];
        if (p_cur[0] > 0 && p_cur[1] > 0) {
            cv::circle(img2_show, cv::Point2f(p_cur[0], p_cur[1]), 2, cv::Scalar(0, 250, 0), 2);
            cv::line(img2_show, cv::Point2f(p_ref[0], p_ref[1]), cv::Point2f(p_cur[0], p_cur[1]),
                     cv::Scalar(0, 250, 0));
        }
    }
    cv::imshow("current", img2_show);
    cv::waitKey();
}

void JacobianAccumulator::accumulate_jacobian(const cv::Range &range) {

    // parameters
    const int half_patch_size = 1;
    int cnt_good = 0;
    Matrix6d hessian = Matrix6d::Zero();
    Vector6d bias = Vector6d::Zero();
    double cost_tmp = 0;

    for (size_t i = range.start; i < range.end; i++) {

        // compute the projection in the second image //point_ref表示图像1中的路标点
        Eigen::Vector3d point_ref =
            depth_ref[i] * Eigen::Vector3d((px_ref[i][0] - cx) / fx, (px_ref[i][1] - cy) / fy, 1);
        Eigen::Vector3d point_cur = T21 * point_ref;//point_cur表示图像2中的路标点
        if (point_cur[2] < 0)   // depth invalid
            continue;
        //u,v表示图像2中对应的角点坐标
        float u = fx * point_cur[0] / point_cur[2] + cx, v = fy * point_cur[1] / point_cur[2] + cy;//视觉slam十四讲p99式5.5
        // u = fx * X / Z + cx v = fy * Y / Z + cy  X  -> point_cur[0]  Y  -> point_cur[1] Z  -> point_cur[2]
        if (u < half_patch_size || u > img2.cols - half_patch_size || v < half_patch_size ||
            v > img2.rows - half_patch_size)
            continue;

        projection[i] = Eigen::Vector2d(u, v);//projection表示图像2中相应的角点坐标值
        double X = point_cur[0], Y = point_cur[1], Z = point_cur[2],
            Z2 = Z * Z, Z_inv = 1.0 / Z, Z2_inv = Z_inv * Z_inv;// Z2_inv = (1 / (Z * Z))
        cnt_good++;

        // and compute error and jacobian   计算海塞矩阵H,矩阵b和代价cost
        for (int x = -half_patch_size; x <= half_patch_size; x++)
            for (int y = -half_patch_size; y <= half_patch_size; y++) {
                //ei = I1(p1,i) - I(p2,i)其中p1,p2空间点P在两个时刻的像素位置坐标
                double error = GetPixelValue(img1, px_ref[i][0] + x, px_ref[i][1] + y) -
                               GetPixelValue(img2, u + x, v + y);//视觉slam十四讲p219式8.13
                Matrix26d J_pixel_xi;
                Eigen::Vector2d J_img_pixel;
                //视觉slam十四讲p220式8.18
                J_pixel_xi(0, 0) = fx * Z_inv;
                J_pixel_xi(0, 1) = 0;
                J_pixel_xi(0, 2) = -fx * X * Z2_inv;
                J_pixel_xi(0, 3) = -fx * X * Y * Z2_inv;
                J_pixel_xi(0, 4) = fx + fx * X * X * Z2_inv;
                J_pixel_xi(0, 5) = -fx * Y * Z_inv;

                J_pixel_xi(1, 0) = 0;
                J_pixel_xi(1, 1) = fy * Z_inv;
                J_pixel_xi(1, 2) = -fy * Y * Z2_inv;
                J_pixel_xi(1, 3) = -fy - fy * Y * Y * Z2_inv;
                J_pixel_xi(1, 4) = fy * X * Y * Z2_inv;
                J_pixel_xi(1, 5) = fy * X * Z_inv;
                // -fx * inv_z 相当于-fx / Z
                //0
                // -fx * X * Z2_inv相当于fx * X / ( Z * Z )
                //--fx * X * Y * Z2_inv相当于fx * X * Y / ( Z * Z) +fx
                //fx + fx * X * X * Z2_inv相当于fx * X * X / (Z * Z)
                //-fx * Y * Z_inv相当于 fx * Y / Z
                //0
                //fy * Z_inv相当于-fy / Z
                //-fy * Y * Z2_inv相当于fy * Y / (Z * Z)
                //-fy - fy * Y * Y * Z2_inv相当于fy + fy * Y * Y / (Z * Z)
                //fy * X * Y * Z2_inv相当于fy * X * Y / ( Z * Z)
                //fy * X * Z_inv相当于-fy * X / Z
                J_img_pixel = Eigen::Vector2d(
                    0.5 * (GetPixelValue(img2, u + 1 + x, v + y) - GetPixelValue(img2, u - 1 + x, v + y)),
                    0.5 * (GetPixelValue(img2, u + x, v + 1 + y) - GetPixelValue(img2, u + x, v - 1 + y))
                );//dx,dy是优化变量 即(Δu,Δv) 计算雅克比矩阵
                //dx,dy是优化变量 即(Δu,Δv) 计算雅克比矩阵
                //相当于 J = - [ {I1( u + i + 1,v + j )-I1(u + i - 1,v + j )}/2,I1( u + i,v + j + 1)-I1( u + i ,v + j - 1)}/2]T T表示转置
                //I1 -> 图像1的灰度信息
                //i -> x
                //j -> y

                // total jacobian
                Vector6d J = -1.0 * (J_img_pixel.transpose() * J_pixel_xi).transpose();

                hessian += J * J.transpose();
                bias += -error * J;
                cost_tmp += error * error;
            }
    }

    if (cnt_good) {
        // set hessian, bias and cost
        unique_lock lck(hessian_mutex);
        H += hessian;//H = Jij Jij(T)(累加和)
        b += bias;//b = -Jij * eij(累加和)
        cost += cost_tmp / cnt_good;//cost = || eij ||2 2范数
    }
}

void DirectPoseEstimationMultiLayer(
    const cv::Mat &img1,
    const cv::Mat &img2,
    const VecVector2d &px_ref,
    const vector depth_ref,
    Sophus::SE3d &T21) {

    // parameters
    int pyramids = 4;//金字塔层数为4
    double pyramid_scale = 0.5;//每层之间的缩放因子设为0.5
    double scales[] = {1.0, 0.5, 0.25, 0.125};

    // create pyramids 创建图像金字塔
    vector pyr1, pyr2; // image pyramids pyr1 -> 图像1的金字塔 pyr2 -> 图像2的金字塔
    for (int i = 0; i < pyramids; i++) {
        if (i == 0) {
            pyr1.push_back(img1);
            pyr2.push_back(img2);
        } else {
            cv::Mat img1_pyr, img2_pyr;
            //将图像pyr1[i-1]的宽和高各缩放0.5倍得到图像img1_pyr
            cv::resize(pyr1[i - 1], img1_pyr,
                       cv::Size(pyr1[i - 1].cols * pyramid_scale, pyr1[i - 1].rows * pyramid_scale));
            //将图像pyr2[i-1]的宽和高各缩放0.5倍得到图像img2_pyr
            cv::resize(pyr2[i - 1], img2_pyr,
                       cv::Size(pyr2[i - 1].cols * pyramid_scale, pyr2[i - 1].rows * pyramid_scale));
            pyr1.push_back(img1_pyr);
            pyr2.push_back(img2_pyr);
        }
    }

    double fxG = fx, fyG = fy, cxG = cx, cyG = cy;  // backup the old values 备份旧值
    for (int level = pyramids - 1; level >= 0; level--) {
        VecVector2d px_ref_pyr; // set the keypoints in this pyramid level  设置此金字塔级别中的关键点
        for (auto &px: px_ref) {
            px_ref_pyr.push_back(scales[level] * px);
        }

        // scale fx, fy, cx, cy in different pyramid levels  在不同的金字塔级别缩放 fx, fy, cx, cy
        fx = fxG * scales[level];
        fy = fyG * scales[level];
        cx = cxG * scales[level];
        cy = cyG * scales[level];
        DirectPoseEstimationSingleLayer(pyr1[level], pyr2[level], px_ref_pyr, depth_ref, T21);
    }

}
2.2 CMakeList文件
cmake_minimum_required(VERSION 2.8)
project(ch8)

set(CMAKE_BUILD_TYPE "Release")
add_definitions("-DENABLE_SSE")
# set(CMAKE_CXX_FLAGS "-std=c++11 ${SSE_FLAGS} -g -O3 -march=native")
set(CMAKE_CXX_FLAGS "-std=c++14 -O2 ${SSE_FLAGS} -msse4")
find_package(OpenCV REQUIRED)
find_package(Sophus REQUIRED)
find_package(Pangolin REQUIRED)
include_directories(
        ${OpenCV_INCLUDE_DIRS}
        ${G2O_INCLUDE_DIRS}
        ${Sophus_INCLUDE_DIRS}
        "/usr/include/eigen3/"
        ${Pangolin_INCLUDE_DIRS}
)

add_executable(optical_flow optical_flow.cpp)
target_link_libraries(optical_flow ${OpenCV_LIBS} fmt)

add_executable(direct_method direct_method.cpp)
target_link_libraries(direct_method ${OpenCV_LIBS} ${Pangolin_LIBRARIES} fmt)
2.3 编译时可能遇到的问题
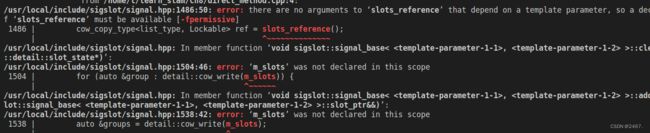
1.可能遇到error: there are no arguments to ‘slots_reference’ that depend on a template parameter, so a declaration of ‘slots_reference’ must be available [-fpermissive]
1486 | cow_copy_type
| ^~~~~~~~~~~~~~~等一系列问题,具体如下图所示。
原因在于C++ 版本不同,在源代码中使用的是
set(CMAKE_CXX_FLAGS "-std=c++11 ${SSE_FLAGS} -g -O3 -march=native")
由上我们可以看到使用的是C++11,故在电脑中会出现一系列未定义的问题。解决方法是改C++版本即可改成c++14即可,具体如下:
set(CMAKE_CXX_FLAGS "-std=c++14 -O2 ${SSE_FLAGS} -msse4")2.改完c++依然出现如下错误

由错误我们可以知道是缺少fmt,如果你之前没有下载fmt可以在csdn上查找相关下载fmt文件,如果你已经下载好了仍然出现上述错误,原因在于最初源代码中在CMakeList.text文件关于target_link_libraries部分没有加fmt,解决方法是在所有target_link_libraries后面加上fmt即可,具体代码见上述cmakelist文件。