python3+opencv3.4+dlib库(人脸识别)
目录
- 一、python3.7 下 dlib 的配置
- 二、人脸检测 + 标注
- 三、人脸检测(戴墨镜)
- 四、参考
一、python3.7 下 dlib 的配置
-
安装dlib
注意:直接输入安装dlib可能会出错,因为可能最新版无whl格式的安装包
由于在安装python版本的opencv支持库回遇到版本以及32位64位的问题,需要自己去寻找python版本的.whl下载.下面的地址是各种whl网址
https://www.lfd.uci.edu/~gohlke/pythonlibs/
也可通过以下方式(python3.7或3.8)
链接:https://pan.baidu.com/s/1Fm1W_Os8Dz1TpiFB8nXcsg
提取码:0614
2. dlib中为我们提供了关于人脸检测标注训练好的文件可在http://dlib.net/files/shape_predictor_68_face_landmarks.dat.bz2下载
(下载完成后解压到工程目录下)
二、人脸检测 + 标注
-
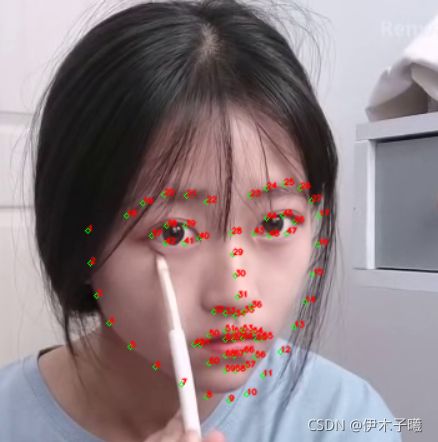
利用Dlib官方训练好的模型“shape_predictor_68_face_landmarks.dat”进行68点标定,利用OpenCv进行图像化处理,在人脸上画出68个点,并标明序号;
如图:

-
获取特征数据集将写入csv。
# -*- coding: utf-8 -*-
# 人脸标出68个点
"""
Created on Wed Oct 27 03:15:10 2021

@author: GT72VR
"""
import numpy as np
import cv2
import dlib
import os
import sys
import random
# 存储位置
output_dir = './dataset/faces'
size = 64

if not os.path.exists(output_dir):
    os.makedirs(output_dir)
# 改变图片的亮度与对比度

def relight(img, light=1, bias=0):
    w = img.shape[1]
    h = img.shape[0]
    #image = []
    for i in range(0,w):
        for j in range(0,h):
            for c in range(3):
                tmp = int(img[j,i,c]*light + bias)
                if tmp > 255:
                    tmp = 255
                elif tmp < 0:
                    tmp = 0
                img[j,i,c] = tmp
    return img

#使用dlib自带的frontal_face_detector作为我们的特征提取器
detector = dlib.get_frontal_face_detector()
# 打开摄像头 参数为输入流,可以为摄像头或视频文件
#camera = cv2.VideoCapture(0)
camera = cv2.VideoCapture('./dataset/video/wanwan.mp4')
ok = True

detector = dlib.get_frontal_face_detector()
predictor = dlib.shape_predictor('./file/shape_predictor_68_face_landmarks.dat')


while ok:
    # 读取摄像头中的图像,ok为是否读取成功的判断参数
    ok, img = camera.read()

    # 转换成灰度图像
    img_gray = cv2.cvtColor(img, cv2.COLOR_BGR2GRAY)

    rects = detector(img_gray, 0)

    for i in range(len(rects)):
        landmarks = np.matrix([[p.x, p.y] for p in predictor(img,rects[i]).parts()])
        for idx, point in enumerate(landmarks):
            # 68点的坐标
            pos = (point[0, 0], point[0, 1])
            print(idx,pos)

            # 利用cv2.circle给每个特征点画一个圈,共68个
            cv2.circle(img, pos, 2, color=(0, 255, 0))
            # 利用cv2.putText输出1-68
            font = cv2.FONT_HERSHEY_SIMPLEX
            cv2.putText(img, str(idx+1), pos, font, 0.2, (0, 0, 255), 1,cv2.LINE_AA)
    cv2.imshow('video', img)
    k = cv2.waitKey(1)
    if k == 27:    # press 'ESC' to quit
        break

camera.release()
cv2.destroyAllWindows()
三、人脸检测(戴墨镜)
1.代码只是对上面的代码稍加改动添加
代码:
# -*- coding: utf-8 -*-
"""
Created on Wed Oct 27 03:15:10 2021

@author: GT72VR
"""
# -----画眼镜-----
import numpy as np
import cv2
import dlib
import os
import sys
import random

# 存储位置
output_dir = './dataset/faces'
size = 64

if not os.path.exists(output_dir):
    os.makedirs(output_dir)


# 改变图片的亮度与对比度

def relight(img, light=1, bias=0):
    w = img.shape[1]
    h = img.shape[0]
    # image = []
    for i in range(0, w):
        for j in range(0, h):
            for c in range(3):
                tmp = int(img[j, i, c] * light + bias)
                if tmp > 255:
                    tmp = 255
                elif tmp < 0:
                    tmp = 0
                img[j, i, c] = tmp
    return img


# 使用dlib自带的frontal_face_detector作为我们的特征提取器
detector = dlib.get_frontal_face_detector()
# 打开摄像头 参数为输入流,可以为摄像头或视频文件
# camera = cv2.VideoCapture(0)
camera = cv2.VideoCapture('./dataset/video/congming.mp4')
ok = True

detector = dlib.get_frontal_face_detector()
predictor = dlib.shape_predictor('./file/shape_predictor_68_face_landmarks.dat')

while ok:
    # 读取摄像头中的图像,ok为是否读取成功的判断参数
    ok, img = camera.read()

    # 转换成灰度图像
    img_gray = cv2.cvtColor(img, cv2.COLOR_BGR2GRAY)

    rects = detector(img_gray, 0)

    for i in range(len(rects)):
        landmarks = np.matrix([[p.x, p.y] for p in predictor(img, rects[i]).parts()])
        for idx, point in enumerate(landmarks):
            # 68点的坐标
            pos = (point[0, 0], point[0, 1])
            print(idx, pos)

            # 利用cv2.circle给画眼镜,
            if idx in range(37, 48):
                cv2.circle(img, pos, 10, (0, 0, 0), -1)
            # 利用cv2.putText输出1-68
            font = cv2.FONT_HERSHEY_SIMPLEX
            if idx == 37:
                pos_s1 = (point[0, 0], point[0, 1])
            elif idx == 38:
                pos_s2 = (point[0, 0], point[0, 1])
                size = (pow(pow(pos_s2[1] - pos_s1[1], 2) + pow(pos_s2[0] - pos_s1[0], 2), 0.5))
            elif idx == 39:
                pos_1 = (point[0, 0], point[0, 1])
            elif idx == 42:
                pos_2 = (point[0, 0], point[0, 1])
            elif idx == 41 or idx == 46:
                cv2.circle(img, pos, int(3 * size), (0, 0, 0), -1)
            if idx > 42:
                cv2.line(img, pos_1, pos_2, (0, 0, 0), 4)
    cv2.imshow('video', img)
    k = cv2.waitKey(1)
    if k == 27:  # press 'ESC' to quit
        break

camera.release()
cv2.destroyAllWindows()
四、参考
Python+OpenCV的人脸识别实现带墨镜效果
https://cungudafa.blog.csdn.net/article/details/93493229

