TensorFlow深度学习-龙曲良-学习笔记1
TensorFlow深度学习-龙曲良-学习笔记
1. 经典的深度学习网络规模
- AlexNet(8 层)
- VGG16(16 层)
- GoogLeNet(22 层)
- ResNet50(50 层)
- DenseNet121(121 层)
2. TensorFlow基础介绍
TensorFlow 2 和 PyTorch 都是采用动态图(优先)模式开发,调试方便,所见即所得。一般来说,动态图模式开发效率高,但是运行效率可能不如静态图模式。TensorFlow 2 也支持通过 tf.function 将动态图优先模式的代码转化为静态图模式,实现开发和运行效率的双赢。
3. 张量
为了区分需要计算梯度信息的张量与不需要计算梯度信息的张量,TensorFlow 增加了一种专门的数据类型来支持梯度信息的记录:tf.Variable。tf.Variable 类型在普通的张量类型基础上添加了 name,trainable 等属性来支持计算图的构建。
3.1 tf.ones创建了常数张量
a = tf.ones([3, 4])
v_a = tf.Variable(a)
print(a)
print(v_a)
3.2 从其他对象去创建张量
tf.convert_to_tensor([1, 2])
tf.convert_to_tensor(np.array([[1, 2.], [3, 4]]))
通过 tf.zeros_like, tf.ones_like 可以方便地新建与某个张量 shape 一致,且内容为全 0 或全 1 的张量。例如,创建与张量A形状一样的全 0 张量
a = tf.convert_to_tensor(np.array([[2, 4], [5, 6], [7, 8]]))
b = tf.zeros_like(a)
print(b)
3.3 通过 tf.fill(shape, value)可以创建全为自定义数值 value 的张量,形状由 shape 参数指定
创建维度是2*3的全是10的矩阵
a = tf.fill([2, 3], 10)
创建已知分布的张量
通过 tf.random.normal(shape, mean=0.0, stddev=1.0)可以创建形状为 shape,均值为mean,标准差为 stddev 的正态分布N(mean, stddev 2 )
tf.random.normal([2,2])
3.4 创建均值为10,标准差为2正态分布的张量
a = tf.random.normal([5, 5], mean=10, stddev=2)
print(a)
通过 tf.random.uniform(shape, minval=0, maxval=None, dtype=tf.float32)可以创建采样自[minval, maxval)区间的均匀分布的张量。例如创建采样自区间[0,1),shape 为[2,2]的矩阵:
tf.random.uniform([2,2])
a = tf.random.uniform([4, 4], minval=0, maxval=100)
3.5 创建序列
创建一个1到10步长为2的序列
a = tf.range(1, 10, delta=2)
print(a)
3.6 模拟模型输出计算误差
out = tf.random.uniform([4, 10])
y = tf.constant([1, 3, 2, 4])
y = tf.one_hot(y, depth=10)

loss = tf.keras.losses.mse(y, out)
loss = tf.reduce_mean(loss)
print(loss)
3.7 一个简单的卷积
x = tf.random.normal([4, 38, 38, 3])
layer = tf.keras.layers.Conv2D(filters=24, kernel_size=3)
out = layer(x)
print(out.shape)
3.8 张量的索引
取第 3 张图片,第 2 行,第 1 列的像素,B 通道(第 2 个通道)颜色强度值
x = tf.random.normal([4, 32, 32, 3])
x = x[2][1][0][1]
or
x = x[2, 1, 0, 1]
3.9 张量的切片
start:end:step
了避免出现像 [: , : , : ,1]这样过多冒号的情况,可以使用⋯符号表示取多个维度上所有的数据,其中维度的数量需根据规则自动推断:当切片方式出现⋯符号时,⋯符号左边的维度将自动对齐到最左边,⋯符号右边的维度将自动对齐到最右边,此时系统再自动推断⋯符号代表的维度数量
图片缩放一倍的切片
x = tf.random.normal([4, 38, 38, 3])
print(x[:, ::2, ::2, :])
读取第 1~2 张图片的 G/B 通道数据,实现如下
print(x[1:3,...,1:]
取G通道的数据
3.10 改变视图
一种正确使用视图变换操作的技巧就是跟踪存储的维度顺序。例如根据“ 图片数量 - 行- 列 - 通道 ”初始视图保存的张量,存储也是按照“ 图片数量 - 行 - 列 - 通道 ”的顺序写入的。如果按着“ 图片数量 - 像素 - 通道 ”的方式恢复视图,并没有与“ 图片数量 - 行 - 列 - 通道 ”相悖,因此能得到合法的数据。但是如果按着“ 图片数量 - 通道 - 像素 ”的方式恢复数据,由于内存布局是按着“ 图片数量 - 行 - 列 - 通道 ”的顺序,视图维度顺序与存储维度顺序相悖,提取的数据将是错乱的
reshape自动变换推导维度,但是存储的顺序还是不变的
x = tf.random.normal([2 ,4, 4])
tf.reshape(x, [4, -1])
3.11 增维度
expand_dims
需要注意的是,tf.expand_dims 的 axis 为正时,表示在当前维度之前插入一个新维度;为负时,表示当前维度之后插入一个新的维度。
x = tf.random.normal([2, 3, 5])
x = tf.expand_dims(x, axis=3)
x.shape
TensorShape([2, 3, 5, 1])
x = tf.random.normal([2, 3, 5])
x = tf.expand_dims(x, -2)
x.shape
TensorShape([2, 3, 1, 5])
3.12 删维度
tf.squeeze()
指定第几个维度就删除第几个维度,不指定就删除所有为1的维度
x = tf.random.normal([1, 2, 5, 1])
tf.squeeze(x, axis=0).shape
3.13 交换维度
tf.transpose
按照所要的顺序传入原来索引号即可
x = tf.range(0, 6)
x = tf.reshape(x, [2, 3])
"""

"""
x = tf.transpose(x, [1, 0])
"""

"""
3.14 复制数据
tf.tile
参数中表示,地一个维度复制*2,第二个维度*3
x = tf.range(4)
x = tf.reshape(x, [2, 2])
x = tf.tile(x, multiples=[2, 3])
# (4, 6)
3.15 Broadcasting广播机制
首先向右对齐,如果满足广播条件,就在各个维度上面进行复制
b = tf.random.normal([3, 1])
tf.broadcast_to(b, [2, 4, 3, 6])
3.16 数学运算
+ - * / // %
乘方,平方根,e的指数,e的对数
tf.pow(x, 3)
tf.sqrt(x)
tf.exp(2.)
tf.math.log(10.)
矩阵相乘
tf.matmul(a, b)
3.17 张量的拼接与堆叠
拼接(不会创建新的维度)
张量的合并可以使用拼接(Concatenate)和堆叠(Stack)操作实现,拼接操作并不会产生新的维度,仅在现有的维度上合并,而堆叠会创建新维度。选择使用拼接还是堆叠操作来合并张量,取决于具体的场景是否需要创建新维度
a = tf.random.normal([4, 35, 8])
b = tf.random.normal([6, 35, 8])
print(tf.concat([a, b], axis=0))
从语法上来说,拼接合并操作可以在任意的维度上进行,唯一的约束是非合并维度的长度必须一致。比如 shape 为[4,32,8]和 shape 为[6,35,8]的张量不能直接在班级维度上进行合并,因为学生数量维度的长度并不一致,一个为 32,另一个为 35
堆叠(会产生新的维度)
比如A保存一个班级35人,8个科目的成绩,shape为[35, 8], 同理B保存的是另一班级35人,8个科目成绩,合并时候就需要产生新维度,合并维度应该是[2, 35, 8]
stack的传入的两个张量必须要shape完全一致才能合并
以下是堆叠操作的例子:
a = tf.random.normal([35, 8])
b = tf.random.normal([35, 8])
print(tf.stack([a, b], axis=0))
3.18 张量的分割
分割即为合并的逆过程
定长切割,直接传入切割分数即可,直接返回由tensor组成的列表
a = tf.random.normal([10, 35, 8])
result = tf.split(a, num_or_size_splits=2, axis=0)
print(result[0].shape)
# (5, 35, 8)
不定长分割,按顺序传入要分割的分数的列表
a = tf.random.normal([10, 35, 8])
result = tf.split(a, num_or_size_splits=[4, 4, 2], axis=0)
print(result[2].shape)
# (2, 35, 8)
定长分割的特例
可以直接分成n等分,但是分割轴的维度会被去掉
a = tf.random.normal([10, 35, 8])
result = tf.unstack(a, axis=0)
print(result[0])
# (35, 8)
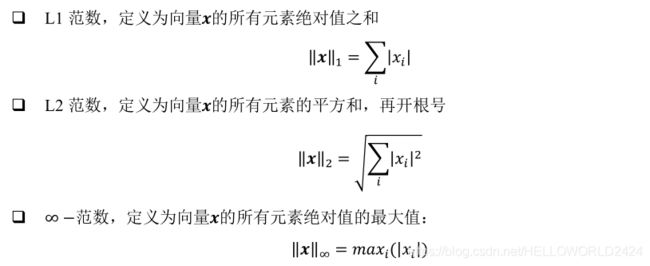
3.19 范数 tf.norm
x = tf.ones([2, 2])
print(tf.norm(x, ord=1))
# 4
print(tf.norm(x, ord=2))
# 2
print(tf.norm(x, ord=np.inf))
# 1
3.18 求最值 tf.reduce_xxx
reduce函数可以求出某个维度上面的最值,均值,和等,需要指定维度
以下求10维度上面的最大值,最小值
x = tf.random.normal([4, 10])
# 最大值
print(tf.reduce_max(x, axis=1))
# tf.Tensor([1.5132605 1.6574516 1.8462632 0.5452541],
# shape=(4,), dtype=float32)
# 最小值
print(tf.reduce_min(x, axis=1)
# 均值
print(tf.reduce_mean(x, axis=1))
如果不指定维度,会求出全局的极值
x = tf.random.normal([4, 10])
print(tf.reduce_max(x))
# tf.Tensor(1.3999054, shape=(), dtype=float32)
以下模拟模型损失函数计算方法
out = tf.random.normal([4, 10])
y = tf.constant([1, 2, 2, 0])
y = tf.one_hot(y, depth=10)
loss = tf.losses.mse(y, out)
loss = tf.reduce_mean(loss)
print(loss)
3.19 返回最值所在位置的索引号argmax,argmin
以下函数可以返回Tensor中某个维度极值所在的索引号
out = tf.random.normal([2, 10])
out = tf.nn.softmax(out, axis=1)
print(out)
# tf.Tensor(
# [[0.07447959 0.02638618 0.20827504 0.28582057 0.18963388 0.07125381
#   0.03359285 0.01217474 0.04156755 0.05681581]
#  [0.12505262 0.0408651  0.20202336 0.02428497 0.11978784 0.20334618
#   0.02393358 0.12550677 0.12109043 0.01410911]], shape=(2, 10), dtype=float32)
pred = tf.argmax(out, axis=1)
print(pred)
# tf.Tensor([3 5], shape=(2,), dtype=int64)
3.20 Tensor中的比较函数tf.equal
tf.equal可以用于统计分类问题中样本与预测的差异值
out = tf.random.normal([100, 10])
out = tf.nn.softmax(out)
pred = tf.argmax(out, axis=1)
y = tf.random.uniform(shape=[100], minval=0, maxval=10, dtype=tf.int64)

result = tf.equal(y, pred)
result = tf.cast(result, dtype=tf.int64)
print(tf.reduce_sum(result)
3.21 张量的填充tf.pad
入参的含义,[[0, 2], [1, 2], […]…]列表里面的每一个子列表,可以对应对于Tensor每个维度的操作,比如第一个为[0 ,2]表示左边填充0, 右边填充2个0
a = tf.constant([1, 2, 3, 4, 5, 6])
b = tf.constant([7, 8, 1, 6])
b = tf.pad(b, [[0, 2]])
print(b)
# tf.Tensor([7 8 1 6 0 0], shape=(6,), dtype=int32)
特殊用法,向图片四周填充0
x = tf.random.normal([4, 28, 28, 1])
print(tf.pad(x, [[0, 0], [2, 2], [2, 2], [0, 0]]))
3.22 数据限幅
tf.maximum: 把Tensor中的最小值,设成一个数,如果里面的值小于传入的这个最小值,就会自动变成这个最小值
x = tf.range(9)
print(x)
# tf.Tensor([0 1 2 3 4 5 6 7 8], shape=(9,), dtype=int32)
print(tf.maximum(x, 2))
# tf.Tensor([2 2 2 3 4 5 6 7 8], shape=(9,), dtype=int32)
tf.minimum: 把Tensor中的最大值,设成一个数,如果里面的值大于传入的这个最大值,就会自动变成这个最大值
x = tf.range(9)
print(x)
# tf.Tensor([0 1 2 3 4 5 6 7 8], shape=(9,), dtype=int32)
print(tf.minimum(x, 5))
# tf.Tensor([0 1 2 3 4 5 5 5 5], shape=(9,), dtype=int32)
clip_by_value: 直接指定地面和天花板
x = tf.range(9)
print(x)
# tf.Tensor([0 1 2 3 4 5 6 7 8], shape=(9,), dtype=int32)
print(tf.clip_by_value(x, 5, 7))
# tf.Tensor([5 5 5 5 5 5 6 7 7], shape=(9,), dtype=int32)
3.23 收集操作tf.gather
可以看到,tf.gather 非常适合索引号没有规则的场合,其中索引号可以乱序排列,此时收集的数据也是对应顺序.
以下代码可以把1班与3班的成绩gather出来
x = tf.random.uniform([4, 35, 8], maxval=100, dtype=tf.int32)
print(tf.gather(x, [0, 2], axis=0))
# shape=(2, 35, 8)
收集第3科和第5科的成绩
print(tf.gather(x, [2, 4], axis=2))
# shape=(4, 35, 2)
以下解决抽取2,3班里面3,4,5,27号同学的成绩
x = tf.random.uniform(shape=(4, 35, 8), minval=0, maxval=100, dtype=tf.int64)
res = tf.gather(x, [1, 2], axis=0)
# (2, 35, 8)
res = tf.gather(res, [2, 3, 5, 26], axis=1)
print(res.shape)
# (2, 4, 8)
3.24 收集操作升级版tf.gather_nd
以下实现了,取2班2号同学的所有成绩,3班3号同学的成绩以及4班号同学的成绩
x = tf.random.uniform(shape=(4, 35, 8), minval=0, maxval=100, dtype=tf.int64)
print(tf.gather_nd(x, [[1, 1], [2, 2], [3, 3]]))
# shape=(3, 8), dtype=int64
3.25 tf.boolean_mask,通过掩码去抽取
x = tf.random.uniform(shape=[4, 35, 8], minval=0, maxval=100, dtype=tf.int64)
print(tf.boolean_mask(x, mask=[True, False, True, True], axis=0))
# shape=(3, 35, 8)
3.26 tf.where
# 按照判断条件去取值
a = tf.ones([3, 3])
b = tf.zeros([3, 3])
cond = tf.constant([[True, False, True], [False, False, True], [True, True, False]])
print(tf.where(cond, a, b))
# tf.Tensor(
# [[1. 0. 1.]
#  [0. 0. 1.]
#  [1. 1. 0.]], shape=(3, 3), dtype=float32)

# 值为True的位置
print(tf.where(cond))
# tf.Tensor(
# [[0 0]
#  [0 2]
#  [1 2]
#  [2 0]
#  [2 1]], shape=(5, 2), dtype=int64)
综合运用,取出Tensor中所有大于0的数值
# 取出所有大于0的数
x = tf.random.normal([3, 3])
print(x)
mask = x > 0
res = tf.boolean_mask(x, mask)
print(res)

indices = tf.where(mask)
res = tf.gather_nd(x, indices)
print(res)
3.26 tf.scatter_nd,白板插入数据
在白板张量(全为0的张量)中插入数据
indices = tf.constant([[2], [5]])
update = tf.constant([2.2, 5.5])
print(tf.scatter_nd(indices=indices, updates=update, shape=[8]))
# tf.Tensor([0.  0.  2.2 0.  0.  5.5 0.  0. ], shape=(8,), dtype=float32)
3.27 tf.meshgrid生成采样点的坐标
生成了能够用于三维作图的网格点,x一共100个,y有50个,一个有100*50个点,生成的点能直接用于画图
x = tf.linspace(-8., 8, 100)
y = tf.linspace(-8., 8, 50)
x, y = tf.meshgrid(x, y)
print(x)
# shape=(50, 100), dtype=float32
print(y)
# shape=(50, 100), dtype=float32

# 画图
z = tf.sqrt(x**2 + y ** 2)
z = tf.sin(z) / z
import matplotlib
from matplotlib import pyplot as plt
# 导入 3D 坐标轴支持
from mpl_toolkits.mplot3d import Axes3D
fig = plt.figure()
ax = Axes3D(fig) # 设置 3D 坐标轴
# 根据网格点绘制 sinc 函数 3D 曲面
ax.contour3D(x.numpy(), y.numpy(), z.numpy(), 50)
plt.show()
4. 数据集处理tf.keras.datasets
4.1 加载数据集,load_data
(x, y), (x_test, y_test) = tf.keras.datasets.mnist.load_data()
print(x.shape, y.shape)
# (60000, 28, 28) (60000,)
4.2 构建dataset对象(tensorflow数据便捷管理)
tf.data.Dataset.from_tensor_slices()
x = tf.random.normal([600, 28, 28])
y = tf.random.uniform([600], maxval=9, minval=0, dtype=tf.int32)
train_db = tf.data.Dataset.from_tensor_slices((x, y))
print(train_db)
#
4.3 dataset对象属性 shuffle
shuffle可以自动对dataset进行打散操作
train_db = train_db.shuffle(buffer_size=1000)
4.3 dataset对象属性 batch
batch对象可以设定每一批喂进去元素的大小
train_db = train_db.batch(20)

for x, y in train_db:
    print(x.shape, y.shape)
    # (20, 28, 28) (20,)
4.4 dataset对象属性map
map: 传入一个专门用于数据预处理的函数,然后按照这个方法,对dataset里面的数据逐一操作,最后返回操作完成后的dataset
(x, y), (x_val, y_val) = tf.keras.datasets.mnist.load_data()
def preprocess(x, y):
    x = tf.cast(x, dtype=tf.float32)
    x = tf.reshape(x, [-1, 28*28])
    y = tf.cast(y, dtype=tf.int32)
    y = tf.one_hot(y, depth=10)
    return x, y

train_db = tf.data.Dataset.from_tensor_slices((x, y))
train_db = train_db.map(preprocess)

for x, y in train_db:
    print(x.shape)
    # (1, 784)
    print(y.shape)
    # (10, )
    break
4.5 dataset的遍历,循环训练
下面是常规用于遍历dataset对象的方法
# epoch是这个dataset要迭代多少次来训练
for epoch in range(20):
    # step是本次迭代里面的第多少步 = total_len // batch_size 如果不能整除就+1
    for step, (x, y) in enumerate(train_db):
        pass
epoch也是有另一种设置的方法,用dataset的repeat属性,直接repeat多次
train_db = train_db.repeat(20)
print(len(train_db))
4.6 手写的mnist训练过程
(x, y), (x_val, y_val) = tf.keras.datasets.mnist.load_data()


def preprocess(x, y):
    x = tf.cast(x, tf.float32)
    x = tf.reshape(x, [-1, 28*28])
    x = x / 255
    y = tf.cast(y, dtype=tf.int64)
    y = tf.one_hot(y, depth=10)
    return x, y

batch_size = 100
train_db = tf.data.Dataset.from_tensor_slices((x, y))
train_db = train_db.shuffle(1000)
train_db = train_db.batch(batch_size)
train_db = train_db.map(preprocess)

test_db = tf.data.Dataset.from_tensor_slices((x, y))
test_db = test_db.batch(100)
test_db = test_db.map(preprocess)


w1 = tf.Variable(tf.random.truncated_normal(shape=[28*28, 100], stddev=0.1))
b1 = tf.Variable(tf.random.truncated_normal(shape=(100, ), stddev=0.1))
w2 = tf.Variable(tf.random.truncated_normal(shape=(w1.shape[1], 10), stddev=0.1))
b2 = tf.Variable(tf.random.truncated_normal(shape=(10, ), stddev=0.1))


def train(x):
    h1 = x @ w1 + b1
    h1 = tf.nn.relu(h1)
    h2 = h1 @ w2 + b2
    h2 = tf.nn.relu(h2)
    return h2


for epoch in range(2):
    for step, (x, y) in enumerate(train_db):
        with tf.GradientTape() as tape:
            out = train(x)
            loss_obj = tf.losses.CategoricalCrossentropy(from_logits=True)
            loss = loss_obj(y, out)

        grads = tape.gradient(loss, [w1, b1, w2, b2])

        initial_learning_rate = 1e-4
        lr_schedule = tf.keras.optimizers.schedules.ExponentialDecay(
            initial_learning_rate=initial_learning_rate,
            decay_steps=100000,
            decay_rate=0.96,
            staircase=True
        )
        optimizer = tf.keras.optimizers.RMSprop(learning_rate=lr_schedule)
        optimizer.apply_gradients(zip(grads, [w1, b1, w2, b2]))

        if step % 20 == 0:
            pred = tf.argmax(out, axis=1)
            y = tf.argmax(y, axis=1)
            correct = tf.equal(y, pred)
            correct_rate = tf.reduce_sum(tf.cast(correct, tf.int32) / batch_size)
            print("current epoch: {}, current step: {}, loss: {}, aac: {}%".format(epoch, step, loss, round(correct_rate.numpy(), 3)*100))


for step, (x, y) in enumerate(test_db):
	out = train(x)
    pred = tf.argmax(out, axis=1)
    y = tf.argmax(y, axis=1)
    correct = tf.equal(y, pred)
    correct_rate = tf.reduce_sum(tf.cast(correct, tf.int32) / batch_size)
    print(" current step: {}, aac: {}%".format(step, round(correct_rate.numpy(), 3) * 100))
5. 神经网络
5.1 感知机
5.2 全连接层
表达式:

全连接层张量的实现方式
底层实现方式
在使用 TensorFlow 自动求导功能计算梯度时,需要将前向计算过程放置在tf.GradientTape()环境中,从而利用 GradientTape 对象的 gradient()方法自动求解参数的梯度,并利用 optimizers 对象更新参数。
x = tf.random.normal([2, 784])
w1 = tf.Variable(tf.random.truncated_normal([784, 256], stddev=0.1))
b1 = tf.Variable(tf.zeros([256]))
o1 = tf.matmul(x, w1) + b1
o1 = tf.nn.relu(o1)
print(o1.shape)
# (2, 256)
高级api实现方式
x = tf.random.normal([4, 28*28])
fc = tf.keras.layers.Dense(512, activation=tf.nn.relu)
h1 = fc(x)
print(h1.shape)
# 获取w权值矩阵
print(fc.kernel)
# 获取偏置
print(fc.bias)
# 获取所有可训练参数
print(fc.trainable_variables)
容器类的封装形式
x = tf.random.normal([100, 784])
model = tf.keras.Sequential([
    tf.keras.layers.Dense(256, activation=tf.nn.relu),
    tf.keras.layers.Dense(64, activation=tf.nn.relu),
    tf.keras.layers.Dense(10, activation=None)
])
out = model(x)
print(out.shape)
# (100, 10)
5.3 优化目标
我们把神经网络从输入到输出的计算过程叫做前向传播(Forward Propagation)或前向计算。神经网络的前向传播过程,也是数据张量(Tensor)从第一层流动(Flow)至输出层的过程,即从输入数据开始,途径每个隐藏层,直至得到输出并计算误差,这也是TensorFlow框架名字由来。
最小化优化问题一般采用误差反向传播(Backward Propagation,简称 BP)算法来求解网络参数的梯度信息,并利用梯度下降(Gradient Descent,简称 GD)算法迭代更新参数
5.4 激活函数
特点: 连续可导,概率分布为(0, 1),
缺点: 在输入值较大或者较小时候,容易出现梯度直接趋近于0,称为梯度弥散
x = tf.linspace(-6., 6., 10)
print(x)
# tf.Tensor(
# [-6.        -4.6666665 -3.3333333 -2.        -0.6666665  0.666667
#   2.         3.333334   4.666667   6.       ], shape=(10,), dtype=float32)
print(tf.nn.sigmoid(x))
# tf.Tensor(
# [0.       0.       0.       0.       0.       0.666667 2.       3.333334
#  4.666667 6.      ], shape=(10,), dtype=float32)
x = tf.linspace(-6., 6., 10)
print(x)
# tf.Tensor(
# [-6.        -4.6666665 -3.3333333 -2.        -0.6666665  0.666667
#   2.         3.333334   4.666667   6.       ], shape=(10,), dtype=float32)
print(tf.nn.relu(x))
# tf.Tensor(
# [0.       0.       0.       0.       0.       0.666667 2.       3.333334
#  4.666667 6.      ], shape=(10,), dtype=float32)
LeakyReLU

p是用户自己设定的一个数值,可以克服当x<0时候梯度消失的现象
print(tf.nn.leaky_relu(x, alpha=0.2))
x = tf.linspace(-6., 6., 10)
print(x)
# tf.Tensor(
# [-6.        -4.6666665 -3.3333333 -2.        -0.6666665  0.666667
#   2.         3.333334   4.666667   6.       ], shape=(10,), dtype=float32)
print(tf.nn.tanh(x, alpha=0.2))
# tf.Tensor(
# [-1.2        -0.93333334 -0.6666667  -0.4        -0.13333331  0.666667
#   2.          3.333334    4.666667    6.        ], shape=(10,), dtype=float32)
5.5 输出层设计
- 输出整个实数空间,比如函数数值趋势预测,年龄预测问题
- 输出[0, 1]区间如图片的生成,图片像素值一般用[0, 1]区间值表示.二分类问题的概率,硬币的正反面问题
- 输出[0, 1]区间并且所有概率和为1. 比如用于MNIST手写数字图片识别,10个概率之和应该为1.
softmax函数

softmax函数不仅满足可以将输出值映射到[0, 1]区间,还满足所有的输出值之和为1的特性,在多分类的问题上面使用很频繁.
x = tf.linspace(0., 5., 5)
print(x)
print(tf.nn.softmax(x))
# tf.Tensor([0.   1.25 2.5  3.75 5.  ], shape=(5,), dtype=float32)
# tf.Tensor([0.00481679 0.01681226 0.05868054 0.20481521 0.7148753 ], shape=(5,), dtype=float32)
与 Dense 层类似,Softmax 函数也可以作为网络层类使用,通过类 layers.Softmax(axis=-1)可以方便添加 Softmax 层,其中 axis 参数指定需要进行计算的维度。
在 Softmax 函数的数值计算过程中,容易因输入值偏大发生数值溢出现象;在计算交叉熵时,也会出现数值溢出的问题。为了数值计算的稳定性,TensorFlow 中提供了一个统一的接口,将 Softmax 与交叉熵损失函数同时实现,同时也处理了数值不稳定的异常,一般推荐使用这些接口函数,避免分开使用 Softmax 函数与交叉熵损失函数。函数式接口为tf.keras.losses.categorical_crossentropy(y_true, y_pred, from_logits=False),其中 y_true 代表了One-hot 编码后的真实标签,y_pred 表示网络的预测值,当 from_logits 设置为 True 时,y_pred 表示须为未经过 Softmax 函数的变量 z;当 from_logits 设置为 False 时,y_pred 表示为经过 Softmax 函数的输出。为了数值计算稳定性,一般设置 from_logits 为 True,此时tf.keras.losses.categorical_crossentropy 将在内部进行 Softmax 函数计算,所以不需要在模型中显式调用 Softmax 函数,例如。
自动softmax与交叉熵损失求解示例
函数接口的实现方式
z = tf.random.normal([2, 10])
y_onehot = tf.constant([1, 3])
y_onehot = tf.one_hot(y_onehot, depth=10)
print(y_onehot)
# shape=(2, 10)
loss = tf.keras.losses.categorical_crossentropy(y_onehot, z, from_logits=True)
print(loss)
# shape=(2,)
print(tf.reduce_mean(loss))
# tf.Tensor(2.7975044, shape=(), dtype=float32)
类的实现方式
z = tf.random.normal([2, 10])
y = tf.constant([1, 3])
y_onehot = tf.one_hot(y, depth=10)
criterion = tf.keras.losses.CategoricalCrossentropy(from_logits=True)
loss = criterion(y_onehot, z)
print(tf.reduce_mean(loss))
- 输出值在[-1, 1]区间
直接用tanh函数
x = tf.linspace(-6., 6., 10)
print(tf.tanh(x))
# tf.Tensor(
# [-0.99998784 -0.99982315 -0.9974579  -0.9640276  -0.58278286  0.58278316
#   0.9640276   0.99745804  0.99982315  0.99998784], shape=(10,), dtype=float32)
5.6 误差计算
均方误差
代码实现
MSE 函数返回的是每个样本的均方差,需要在样本维度上再次平均来获得平均样本的均方差
output = tf.random.normal([2, 10])
y_onehot = tf.constant([1, 3])
y_onehot = tf.one_hot(y_onehot, depth=10)
loss = tf.keras.losses.MSE(y_onehot, output)
print(loss)
# tf.Tensor([0.51852715 1.3113335 ], shape=(2,), dtype=float32)
loss = tf.reduce_mean(loss)
print(loss)
# tf.Tensor(0.91493034, shape=(), dtype=float32)
5.7 交叉熵误差函数
熵的定义:

交叉熵的定义:

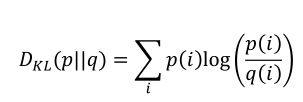
KL散度的定义:

交叉熵也可以等于p的熵与p与q的KL散度之和

5.8 神经网络的类型
- 卷积神经网络CNN
代表模型:用于图片分类的 AlexNet、VGG、GoogLeNet、ResNet、DenseNet 等,用于目标识别的 RCNN、Fast RCNN、Faster RCNN、Mask RCNN、YOLO、SSD - 循环神经网络RNN
代表: LSTM, GRU, 双向RNN - 注意力(机制)网络Transformer
代表: GPT、BERT、GPT-2 - 图卷积神经网络
代表: GAT,EdgeConv,DeepGCN
5.9 标准化数据
标准化数据指的是将当前项中的每一个数据减去当前项的均值,然后除以当前项标准差
6. 反向传播
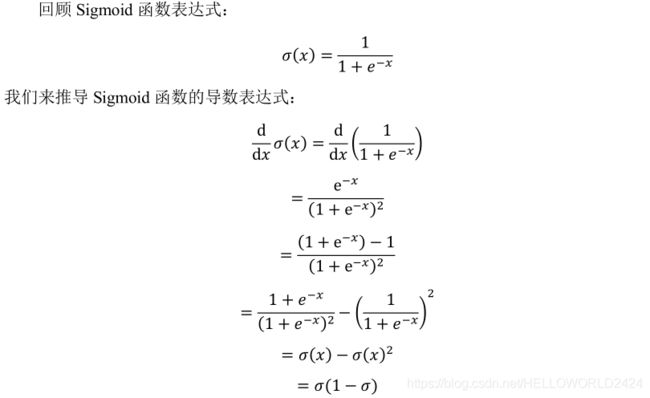
6.1 常见的激活函数的导数
6.2 常见损失函数的导数
6.3 求导的链式法则
x = tf.constant(1.)
w1 = tf.constant(2.)
b1 = tf.constant(1.)
w2 = tf.constant(2.)
b2 = tf.constant(1.)

with tf.GradientTape(persistent=True) as tape:
    tape.watch([w1, b1, w2, b2])
    y1 = x * w1 + b1
    y2 = y1 * w2 + b2

dy2_dy1 = tape.gradient(y2, [y1])[0]
dy1_dw1 = tape.gradient(y1, [w1])[0]
dy2_dw1 = tape.gradient(y2, [w1])[0]

print(dy2_dy1 * dy1_dw1)
print(dy2_dw1)
7. keras的高级接口
7.1 常见网络类
以softmax为例:
x = tf.constant([2., 1., 0.1])
layer = layers.Softmax(axis=-1)
out = layer(x)
print(out)
# tf.Tensor([0.6590012  0.24243298 0.09856589], shape=(3,), dtype=float32)
7.2 网络容器
keras.Sequential
network = keras.Sequential([
    layers.Dense(3, activation=None),
    layers.ReLU(),
    layers.Dense(2, activation=None),
    layers.ReLU()
])
x = tf.random.normal([4, 3])
out = network(x)
print(out.shape)
# (4, 2)
Sequential容器里面也有add方法可以添加层数
layers_num = 2
network = keras.Sequential([])
for _ in range(layers_num):
    network.add(layers.Dense(3))
    network.add(layers.ReLU())
network.build(input_shape=(4, 4))
network.summary()
打印trainable_variables
for p in network.trainable_variables:
    print(p.name, p.shape)
# dense/kernel:0 (4, 3)
# dense/bias:0 (3,)
# dense_1/kernel:0 (3, 3)
# dense_1/bias:0 (3,)
7.3 模型装配compile
compile函数当中需要指定优化器,以及损失函数
network.compile(optimizer=tf.keras.optimizers.Adam(lr=0.01),
                loss=tf.losses.CategoricalCrossentropy(from_logits=True),
                metrics=["accuracy"])
7.4 模型训练 model.fit()
fit()方法
history = network.fit(train_db, epochs=5, validation_data=val_db, validation_freq=2)
其中history会包含训练中记录的一些数据
7.5 模型测试
predict()方法
x, y = net(iter(db_test))
out = network.predict(x)
print(out)
7.6 模型保存与加载
7.6.1 直接保存模型的参数到文件上面,适合模型比较小又有源文件的情况
network.save_weights("weights.ckpt")
加载模型
network.load_weights("weights.ckpt.index")
7.6.2 同时保存网络结构以及网络参数
network.save("model.h5")
network = keras.models.load_model("model.h5")
network.summary()
7.6.3 SavedModel方式
network = tf.saved_model.load("model-savedmodel")
acc_meter = tf.metrics.CategoricalAccuracy()
7.7 自定义网络
自定义一个模型类,并且创建网络
class MyModel(keras.Model):
    def __init__(self):
        super().__init__()
        self.fc1 = layers.Dense(256)
        self.fc2 = layers.Dense(128)
        self.fc3 = layers.Dense(64)
        self.fc4 = layers.Dense(32)
        self.fc5 = layers.Dense(10)

    def call(self, inputs, training=None, mask=None):
        x = self.fc1(inputs)
        x = self.fc2(x)
        x = self.fc3(x)
        x = self.fc4(x)
        x = self.fc5(x)
        return x


model = MyModel()
model.build(input_shape=(None, 28*28))
model.summary()
y = model(inputs=tf.random.normal(shape=[10, 28*28]))
7.8 经典模型的加载
加载resnet50并且在后面拼接层数
resnet = keras.applications.ResNet50(weights="imagenet", include_top=False)
resnet.summary()
x = tf.random.normal([4, 224, 224, 3])
out = resnet(x)
print(out.shape)

# global_average_layer = layers.GlobalAveragePooling2D()
# x = tf.random.normal([4, 7, 7, 2048])
# out = global_average_layer(x)
# print(out.shape)

# resnet的参数不再训练
resnet.trainable = False
mynet = keras.Sequential([resnet,
                          layers.GlobalAveragePooling2D(),
                          layers.Dense(100)])
mynet.summary()
8. 测量工具
8.1 tf.metrics.Mean()
定义测量工具-更新测量数据-更新测量数据-复位测量数据
loss = tf.random.normal([6])
# 定义测量工具
loss_meter = tf.metrics.Mean()
# 更新测量数据
loss_meter.update_state(loss)
# 更新测量数据
print(loss_meter.result())
# tf.Tensor(-1.0193778, shape=(), dtype=float32)
# 复位测量数据
loss_meter.reset_states()
print(loss_meter.result())
8.2 tf.metrics.Accuracy()
acc_meter = tf.metrics.Accuracy()
for _ in range(10000):
    y = tf.random.normal([2])
    y = tf.argmax(y)
    y_pred = tf.random.normal([2])
    y_pred = tf.argmax(y_pred)
    acc_meter.update_state(y, y_pred)
print(acc_meter.result())
8.3 使用tensorboard步骤
- 定义好summarywriter,指向要存储训练数据的文件夹
- 在需要记录训练数据的地方,用with上下文管理器,去记录当前的状态,需要传入变量名,当前值以及step
summary_writer = tf.summary.create_file_writer("./log")

with summary_writer.as_default():
       tf.summary.scalar("train_acc", correct_rate, step=step)

with summary_writer.as_default():
   tf.summary.scalar("train-loss", float(loss), step=step)

with  summary_writer.as_default():
	# 测试集准确率
   tf.summary.scalar("test_acc", correct_rate, step=step)
   # 打印出一个batch的前9张图
   tf.summary.image("val-onebyone-images:", tf.reshape(x, (100, 28, 28, 1)), max_outputs=9, step=step)
   # y的标签分布
   tf.summary.histogram("y-hist", y, step=step)
9.过拟合
9.1 L0正则化
9.2 L1正则化
w1 = tf.random.normal([4, 3])
w2 = tf.random.normal([4, 2])
loss_reg = tf.reduce_sum(tf.math.abs(w1) + tf.math.abs(w1))
print(loss_reg)
# tf.Tensor(16.917477, shape=(), dtype=float32)
9.3 L2正则化
w1 = tf.random.normal([4, 3])
w2 = tf.random.normal([4, 2])
loss_reg = tf.reduce_sum(tf.square(w1)) + tf.reduce_sum(tf.square(w2))
print(loss_reg)
# tf.Tensor(15.511247, shape=(), dtype=float32)
9.4 dropout
训练时候随机断开神经网络连接,但是在测试时候回恢复所有的连接,保证能够获得较好的性能
x = tf.nn.dropout(x, rate=0.5)
model.add(layers.Dropout(rate=0.5))
9.3 数据增强
图片增强
- 旋转
- 翻转
- 裁剪
- 生成数据
正则化TensorFlow相关代码
可以看到正则化系数越大,模型越不容易收敛,越小越容易过拟合
x, y = make_moons(n_samples=2000, noise=0.25, random_state=100)
x, y = shuffle(x, y)
x_train, x_test, y_train, y_test = train_test_split(x, y, test_size=0.2, random_state=42)


def build_model_with_regularization(_lambda):
    model = tf.keras.Sequential()
    model.add(layers.Dense(8, input_dim=2, activation=tf.nn.relu))
    model.add(layers.Dense(256, activation=tf.nn.relu,
                           kernel_regularizer=tf.keras.regularizers.l2(_lambda)))
    model.add(layers.Dense(256, activation=tf.nn.relu,
                           kernel_regularizer=tf.keras.regularizers.l2(_lambda)))
    model.add(layers.Dense(256, activation=tf.nn.relu,
                           kernel_regularizer=tf.keras.regularizers.l2(_lambda)))
    model.add(layers.Dense(1, activation=tf.nn.sigmoid))
    model.compile(loss=tf.losses.binary_crossentropy, optimizer=tf.optimizers.Adam(),
                  metrics=[tf.metrics.binary_accuracy])
    return model
model = build_model_with_regularization(_lambda=0.01)
model.fit(x_train, y_train, epochs=10, verbose=1)

model.evaluate(x_test, y_test)


