CUDA11.1.114安装pytorch
安装pytorch
以下安装都基于conda。如果未安装conda,可以参考第二部分。
cuda+pytorch
Windows下pytorch-gpu安装以及CUDA详细安装过程 附带各个版本安装包; Pytorch安装(CUDA11.1)
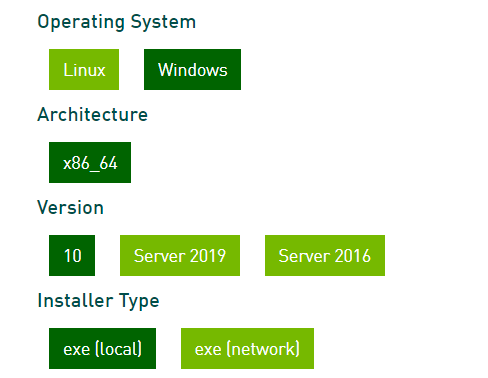
安装的cuda和cudnn版本:
cuda: https://developer.nvidia.com/cuda-11.1.1-download-archive。 历史版本
cudnn: https://developer.nvidia.com/rdp/cudnn-download。历史版本
上面查出的CUDA版本可能不准,如果你曾安装过其他的NVIDIA开发包的话(我就是这样,安装的是11.14.xx,这儿就显示了,导致我查到的pytorch版本不正确)。如果安装过,去程序和功能中删除自己曾经安装的就好了。
安装命令:
conda create -n pytorch python=3.7.9 创建环境
conda activate pytorch 激活环境
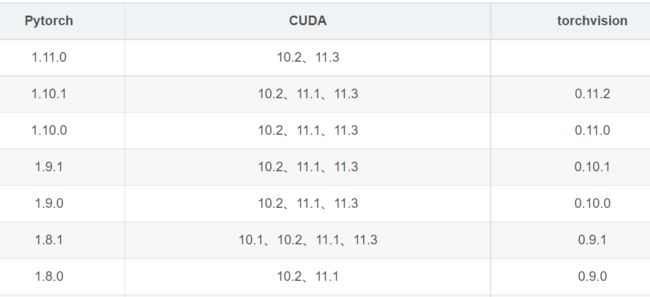
conda install pytorch=1.8.0 torchvision=0.9.0 cudatoolkit=11.1 -c pytorch 安装pytorch,试了很多方法,加上这个-c容易成功。
>>> python
>>> import torch
>>> torch.cuda.is_available()
True
安装一些常用包
pip install tqdm==4.64.1 matplotlib==3.0.3 pillow==6.2.2 numpy==1.21.6
miniconda
安装参考: windows中安装miniconda与环境配置

配置源:Anaconda配置国内镜像源
(base) C:\Users\ItsMe>conda config --add channels https://mirrors.tuna.tsinghua.edu.cn/anaconda/pkgs/free/ (base)
C:\Users\ItsMe>conda config --add channels https://mirrors.tuna.tsinghua.edu.cn/anaconda/pkgs/main/ (base)
C:\Users\ItsMe>conda config --add channels https://mirrors.tuna.tsinghua.edu.cn/anaconda/cloud/conda-forge/
(base) C:\Users\ItsMe>conda config --add channels https://mirrors.ustc.edu.cn/anaconda/pkgs/main/ (base)
C:\Users\ItsMe>conda config --add channels https://mirrors.ustc.edu.cn/anaconda/pkgs/free/ (base)
C:\Users\ItsMe>conda config --add channels https://mirrors.ustc.edu.cn/anaconda/cloud/conda-forge/
设置搜索时显示通道地址
(base) C:\Users\ItsMe>conda config --set show_channel_urls yes
(base) C:\Users\ItsMe>conda config --show channels
pip用-i指定国内镜像源
pip install opencv -i https://mirrors.aliyun.com/pypi/simple/
常用pip安装镜像:
清华:https://pypi.tuna.tsinghua.edu.cn/simple
阿里云:https://mirrors.aliyun.com/pypi/simple/
中国科技大学: https://pypi.mirrors.ustc.edu.cn/simple/
华中理工大学:https://pypi.hustunique.com/
山东理工大学:https://pypi.sdutlinux.org/
豆瓣:https://pypi.douban.com/simple/
配置pip文件pip -v config list可以查看文件在哪儿。C:\Users\ItsMe\pip
Linux安装pytorch
Linux版相对简单。首先查看cuda版本(右上角)。我的是10.2.
nvidia-smi
然后安装anaconda,记得加入系统路径,然后重新编译:
echo 'export PATH="~/anaconda3/bin:$PATH"' >> ~/.bashrc
source ~/.bashrc
这样,最后就可以在命令行直接使用conda xxx了。当然,pycharm也可以这样:
echo 'export PATH="~/pycharm-community-2021.2.2/bin:$PATH"' >> ~/.bashrc
source ~/.bashrc
这样,就可以直接在命令行输入pycharm.sh启动pycharm了。然后,就可以创建一个环境,配置torch了。
conda create -n torch python=3.7
conda activate torch
(torch) conda install pytorch torchvision cudatoolkit=10.2 -c pytorch
最后这个安装一定要用-c pytorch,这味儿才正宗(别问我怎么知道的)。至于下哪个版本,结合版本和官网,就可以确定了。
修改pytorch版本
conda install pytorch==1.8.0 torchvision==0.9.0 torchaudio==0.8.0 cudatoolkit=10.2 -c pytorch当然,我是照例不需要torchaudio的。


