第六章 使用神经网络拟合数据
本章主要内容
1、神经网络与线性模型相比,非线性激活函数是主要的差异。
2、使用pytorch的nn模块。
3、用神经网络求解线性拟合问题。
1.激活函数
##一些激活函数
import math
print(math.tanh(-2.2))
print(math.tanh(0.1))
print(math.tanh(2.5))
输出:
2.pytorch nn模块
pytorch提供的所有nn.Moudle的子类都定义了它们的__call__()方法,这允许我们实例化一个nn.Linear,并可以像调用函数一样调用它。
##pytorch nn模块
%matplotlib inline
import torch
import numpy as np
import torch.optim as optim
###上一章用到的数据
t_c = [0.5,  14.0, 15.0, 28.0, 11.0, 8.0,  3.0,  -4.0, 6.0,  13.0, 21.0]
t_u = [35.7, 55.9, 58.2, 81.9, 56.3, 48.9, 33.9, 21.8, 48.4, 60.4, 68.4]
t_c = torch.tensor(t_c).unsqueeze(1)
t_u = torch.tensor(t_u).unsqueeze(1)

n_samples = t_u.shape[0]
n_val = int(0.2 * n_samples)

shuffled_indices = torch.randperm(n_samples)##randperm()函数将张量元素打乱进行重排列

train_indices = shuffled_indices[:-n_val]
val_indices = shuffled_indices[-n_val:]
print(train_indices,val_indices)
#使用索引张量构建训练集与验证集
t_u_train = t_u[train_indices]
t_c_train = t_c[train_indices]

t_u_val = t_u[val_indices]
t_c_val = t_c[val_indices]

t_un_train = 0.1 * t_u_train
t_un_val = 0.1 * t_u_val使用nn模块:
import torch.nn as nn
linear_model = nn.Linear(1,1)###默认包含偏置项(True)
linear_model(t_un_val)
输出:
查看nn.Linear实例的权重与偏置:
print(linear_model.weight)
print(linear_model.bias)
输出:
小栗子:
###小栗子
x = torch.ones(1)
print(linear_model(x))
输出:
tensor([-0.4636], grad_fn=) 2.1 批量输入
##批量输入
x = torch.ones(10,1)
print(linear_model(x))2.2 优化批次
使用unsqueeze()完成:
##优化批次
t_c = [0.5,  14.0, 15.0, 28.0, 11.0, 8.0,  3.0,  -4.0, 6.0,  13.0, 21.0]
t_u = [35.7, 55.9, 58.2, 81.9, 56.3, 48.9, 33.9, 21.8, 48.4, 60.4, 68.4]
t_c = torch.tensor(t_c).unsqueeze(1)
t_u = torch.tensor(t_u).unsqueeze(1)
print(t_c.shape)
更新训练代码:
##更新训练代码
linear_model = nn.Linear(1,1)
optimizer = optim.SGD(
    linear_model.parameters(),  ###用这种调用方法代替之前的[params]
    lr = 1e-2)
print(linear_model.parameters())
print(list(linear_model.parameters()))
输出:
改进模型:
###改进模型
from matplotlib import pyplot as plt
loss_train_list = []
loss_val_list = []
epoch_list = []
def training_loop(n_epochs, optimizer, model, loss_fn, t_u_train, t_c_train, t_u_val, t_c_val):
    for epoch in range(1, n_epochs + 1):
        t_p_train = model(t_u_train)
        loss_train = loss_fn(t_p_train, t_c_train)

        t_p_val = model(t_u_val)
        loss_val = loss_fn(t_p_val, t_c_val)
        loss_val_list.append(loss_val.item())

        optimizer.zero_grad()
        loss_train.backward()  #仅在训练集上训练模型
        optimizer.step()
        loss_train_list.append(loss_train.item())

        if epoch == 1 or epoch % 1000 == 0:
            print(f"Epoch {epoch},Training loss {loss_train.item():.4f},"f"Validation loss {loss_val.item():.4f}")

    plt.plot(loss_train_list)
    plt.xlabel('epoch')
    plt.ylabel('train loss')
    plt.title("Training loss")
    plt.show()

    plt.plot(loss_val_list)
    plt.xlabel('epoch')
    plt.ylabel('val loss')
    plt.title("Validation loss")
    plt.show()

print()
print(linear_model.weight)
print(linear_model.bias)
2.3 最终完成一个神经网络
###最终完成一个神经网络
##nn提供了一种通过nn.Sequential容器来连接模型的方式:
seq_model = nn.Sequential(
            nn.Linear(1,13),
            nn.Tanh(),
            nn.Linear(13,1))
print(seq_model)
输出:
检查参数:
###检查参数
##调用model.parameters()将从第1/2个线性模块收集权重与偏置
print([param.shape for param in seq_model.parameters()])
##named_parameters()方法可以实现通过名称识别参数的功能:(模块名称就是在参数中出现的序号)
print("------------------------------------------------")
for name, param in seq_model.named_parameters():
    print(name,param.shape)
输出:
同样,Sequential也接受OrderedDict,可以用其来命名传递给Sequential的每个模块:
##Sequential也接收OrderedDict,可以用其来命名传递给Sequential的每个模块:
from collections import OrderedDict

seq_model = nn.Sequential(OrderedDict([
    ('hidden_linear',nn.Linear(1,8)),
    ('hidden_activation',nn.Tanh()),
    ('output_linear',nn.Linear(8,1))
]))
print(seq_model)
print("---------------------------------------------------------")
for name, param in seq_model.named_parameters():
    print(name, param.shape)
print("---------------------------------------------------------")
###可以通过将子模块作为属性来访问一个特定的参数
print(seq_model.output_linear.bias)
输出:
2.4 进行迭代
optimizer = optim.SGD(seq_model.parameters(), lr = 1e-3)##降低lr以提高稳定性

training_loop(
    n_epochs=5000,
    optimizer = optimizer,
    model = seq_model,
    loss_fn = nn.MSELoss(),
    t_u_train = t_un_train,
    t_c_train = t_c_train,
    t_u_val = t_un_val,
    t_c_val = t_c_val)
print('output',seq_model(t_un_val))
print('answer',t_c_val)
print('hidden',seq_model.hidden_linear.weight.grad)
看loss曲线说明模型不咋地。
但是我们可以和线性模型对比一下:
##评估模型
from matplotlib import pyplot as plt
t_range = torch.arange(20.,90.).unsqueeze(1)

fig = plt.figure(dpi=400)
plt.xlabel("Temperature (°Fahrenheit)")
plt.ylabel("Temperature (°Celsius)")
plt.plot(t_u.numpy(), t_c.numpy(),'o')
plt.plot(t_range.numpy(), seq_model(0.1*t_range).detach().numpy(),'c-')
plt.plot(t_u.numpy(),seq_model(0.1*t_u).detach().numpy(),'kx')
比上一章的线性模型包括二次函数模型都好了很多。
3 练习题
1、在简单的神经网络模型中实验隐藏神经元的数量:
a、什么变化会导致模型产生更多的线性输出?
b、可以让模型明显的过拟合吗?
c、训练后的损失高还是低?
构建新模型:
###基于上述问题构建新模型
import torch.nn as nn
seq_model = nn.Sequential(
            nn.Linear(1,32),
            nn.Tanh(),
            nn.Linear(32,16),
            nn.Tanh(),
            nn.Linear(16,8),
            nn.Tanh(),
            nn.Linear(8,1))
print(seq_model)
输出:
准备数据:
###数据
%matplotlib inline
import torch
import numpy as np
import torch.optim as optim
###上一章用到的数据
t_c = [0.5,  14.0, 15.0, 28.0, 11.0, 8.0,  3.0,  -4.0, 6.0,  13.0, 21.0]
t_u = [35.7, 55.9, 58.2, 81.9, 56.3, 48.9, 33.9, 21.8, 48.4, 60.4, 68.4]
t_c = torch.tensor(t_c).unsqueeze(1)
t_u = torch.tensor(t_u).unsqueeze(1)
n_samples = t_u.shape[0]
n_val = int(0.2 * n_samples)

shuffled_indices = torch.randperm(n_samples)##randperm()函数将张量元素打乱进行重排列

train_indices = shuffled_indices[:-n_val]
val_indices = shuffled_indices[-n_val:]
print(train_indices,val_indices)
#使用索引张量构建训练集与验证集
t_u_train = t_u[train_indices]
t_c_train = t_c[train_indices]

t_u_val = t_u[val_indices]
t_c_val = t_c[val_indices]

t_un_train = 0.1 * t_u_train
t_un_val = 0.1 * t_u_val
改进模型:
###改进模型
from matplotlib import pyplot as plt
loss_train_list = []
loss_val_list = []
epoch_list = []
def training_loop(n_epochs, optimizer, model, loss_fn, t_u_train, t_c_train, t_u_val, t_c_val):
    for epoch in range(1, n_epochs + 1):
        t_p_train = model(t_u_train)
        loss_train = loss_fn(t_p_train, t_c_train)

        t_p_val = model(t_u_val)
        loss_val = loss_fn(t_p_val, t_c_val)
        loss_val_list.append(loss_val.item())

        optimizer.zero_grad()
        loss_train.backward()  #仅在训练集上训练模型
        optimizer.step()
        loss_train_list.append(loss_train.item())

        if epoch == 1 or epoch % 1000 == 0:
            print(f"Epoch {epoch},Training loss {loss_train.item():.4f},"f"Validation loss {loss_val.item():.4f}")

    plt.plot(loss_train_list)
    plt.xlabel('epoch')
    plt.ylabel('train loss')
    plt.title("Training loss")
    plt.show()

    plt.plot(loss_val_list)
    plt.xlabel('epoch')
    plt.ylabel('val loss')
    plt.title("Validation loss")
    plt.show()
配置参数进行训练:
optimizer = optim.Adam(seq_model.parameters(), lr = 1e-3)##降低lr以提高稳定性

training_loop(
    n_epochs=10000,
    optimizer = optimizer,
    model = seq_model,
    loss_fn = nn.MSELoss(),
    t_u_train = t_un_train,
    t_c_train = t_c_train,
    t_u_val = t_un_val,
    t_c_val = t_c_val)
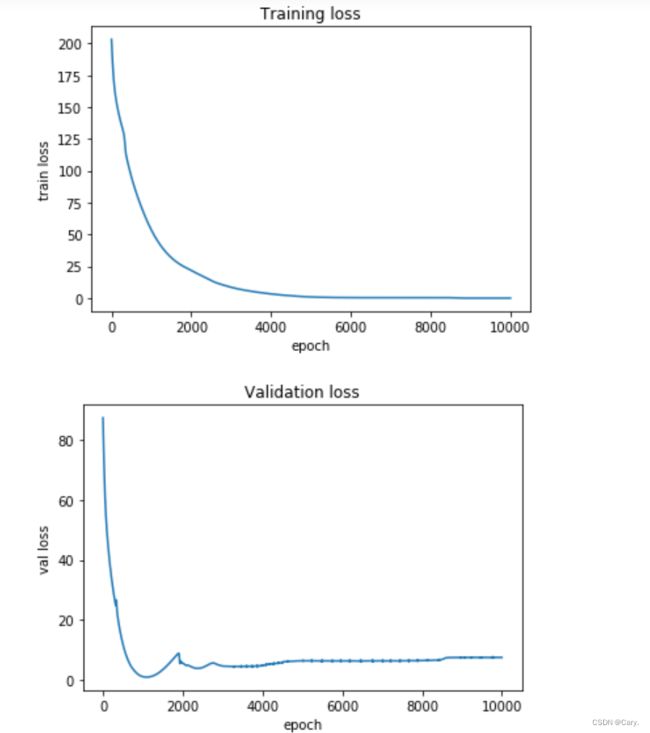
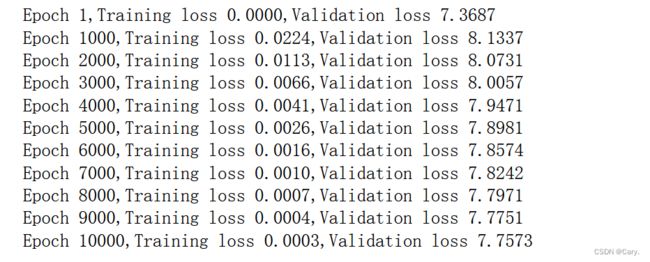
###使用Adam优化器 训练集上loss接近于0,验证集上却很高 过拟合
输出:
验证是否过拟合:
from matplotlib import pyplot as plt
t_range = torch.arange(20.,90.).unsqueeze(1)

fig = plt.figure(dpi=400)
plt.xlabel("Temperature (°Fahrenheit)")
plt.ylabel("Temperature (°Celsius)")
plt.plot(t_u.numpy(), t_c.numpy(),'o')
plt.plot(t_range.numpy(), seq_model(0.1*t_range).detach().numpy(),'c-')
plt.plot(t_u.numpy(),seq_model(0.1*t_u).detach().numpy(),'kx')
过拟合的目的似乎达到了~
换个优化器试试:
optimizer = optim.SGD(seq_model.parameters(), lr = 1e-3)##

training_loop(
    n_epochs=10000,
    optimizer = optimizer,
    model = seq_model,
    loss_fn = nn.MSELoss(),
    t_u_train = t_un_train,
    t_c_train = t_c_train,
    t_u_val = t_un_val,
    t_c_val = t_c_val)
输出:
效果也不咋地
2.加载第四章中的葡萄酒数据集,创建适用的模型
a、与训练温度数据集相比谁的时间更长
b、什么影响了训练时间?
c、如何较减小loss?
d、数据集图形如何绘制?
首先加载数据集:
import csv
import numpy as np
wine_path = 'D:\\DeepLearning data\\data\\p1ch4\\tabular-wine\\winequality-white.csv'
wine_numpy = np.loadtxt(wine_path, dtype=np.float32, delimiter=";",skiprows=1)  ###skiprows=1表示不读第一行,因为其中包含列名
print(wine_numpy)
wine_tensor = torch.from_numpy(wine_numpy)
print(wine_tensor.shape,wine_tensor.dtype)
输出:
####数据集形状[4898,12]  前11列理解为特征,最后一项作为输出(得分)
##首先把特征集读取出来
x = wine_tensor[:,:11]
print(x,x.shape)
target = wine_tensor[:,-1].long() ###以防one_hot报错
print(y,y.shape,type(y))
#将y独热编码
import torch.nn.functional as F
target_onehot = F.one_hot(target)
print(target_onehot,target_onehot.shape)
###将输入进行批处理
x_mean = torch.mean(x, dim=0)
print(x_mean,x_mean.shape)
x_var = torch.var(x, dim=0)
print(x_var,x_var.shape)
x_normalized = (x - x_mean)/torch.sqrt(x_var)
print(x_normalized,x_normalized.shape)
输出:
构建训练集与验证集:
###构建训练集与验证集
n_samples = x.shape[0]
n_val = int(0.2 * n_samples)

shuffled_indices = torch.randperm(n_samples)##randperm()函数将张量元素打乱进行重排列

train_indices = shuffled_indices[:-n_val]
val_indices = shuffled_indices[-n_val:]
print(train_indices,val_indices)
print(train_indices.shape,val_indices.shape)
#使用索引张量构建训练集与验证集
x_train = x_normalized[train_indices]
target_train = target[train_indices]

x_val = x_normalized[val_indices]
target_val = target[val_indices]
构建模型:
###构建模型(11输入,10输出,输出是得分,取最大的一个,与target求loss)
import torch.nn as nn
seq_model = nn.Sequential(
            nn.Linear(11,64),
            nn.Tanh(),
            nn.Linear(64,32),
            nn.Tanh(),
            nn.Linear(32,16),
            nn.Tanh(),
            nn.Linear(16,10),
            nn.Softmax(dim=1))
print(seq_model)
训练:
from matplotlib import pyplot as plt
loss_train_list = []
loss_val_list = []
epoch_list = []

def training_loop(n_epochs, optimizer, model, loss_fn, x_train, target_train, x_val, target_val):
    for epoch in range(1, n_epochs + 1):
        outputs_train = seq_model(x_train)
        loss_train = loss_fn(outputs_train,target_train)

        outputs_val = seq_model(x_val)
        loss_val = loss_fn(outputs_val, target_val)
        loss_val_list.append(loss_val.item())

        optimizer.zero_grad()
        loss_train.backward()  #仅在训练集上训练模型
        optimizer.step()
        loss_train_list.append(loss_train.item())

        if epoch == 1 or epoch % 100 == 0:
            print(f"Epoch {epoch},Training loss {loss_train.item():.4f},"f"Validation loss {loss_val.item():.4f}")

    plt.plot(loss_train_list)
    plt.xlabel('epoch')
    plt.ylabel('train loss')
    plt.title("Training loss")
    plt.show()

    plt.plot(loss_val_list)
    plt.xlabel('epoch')
    plt.ylabel('val loss')
    plt.title("Validation loss")
    plt.show()

optimizer = optim.Adam(seq_model.parameters(), lr = 1e-3)##降低lr以提高稳定性

training_loop(
    n_epochs=10000,
    optimizer = optimizer,
    model = seq_model,
    loss_fn = nn.CrossEntropyLoss(),
    x_train = x_train,
    target_train = target_train,
    x_val = x_val,
    target_val = target_val)
输出:
一些说明:
我这里在设计网络时,最后一层使用了softmax层,这将会在下一章讲解到。因为这里输出的不同于之前,输出评分1-10,我们将其与进行了独热编码的labels求loss,这里的loss是使用的交叉熵损失函数nn.CrossEntropyLoss(),其常用于多分类场景。
如果有错误 可以指出来 我也是小白正在学习~


