vite+vue3+ts路由vue-router的使用,以及参数传递
前边我们分别介绍了pinia以及vite+vue3+ts这套组合的组件传参方式,以及简单todolist的demo,这些基本上都够一个项目的开发了,这时候是不是觉得还缺点什么?那就是路由vue-router,以及数据请求axios了。
axios的用法与vue2的差别不大,就是一些ts的语法问题,所以也就不对axios的用法做介绍了,本篇来介绍下vue-router路由的使用。
本篇也不从创建项目开始了,对vite+vue3这套项目不了解的可以看下《vite+vue3+ts简单例子todolist》,本篇也是在这个例子的基础上,增加的路由操作,文件结构为:

如果想要这个demo,文末有获取的方式,这就开始vue-router
安装vue-router
npm install vue-router -S
安装完成后在src下创建router文件夹和index.ts, 文件结构如上边的图。
编写router
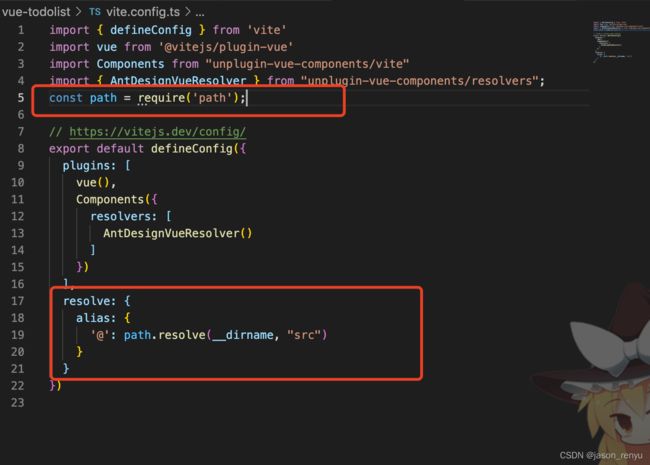
在编写router前我们来设置下别名,在vue2中我们@就代表了src下边的内容非常方便,在vue3中我们想要实现,则要vite中自己配置了,下边我们先来配置下路径别名。
路径别名配置
我们在vite.config.ts, 加入以下内容:

vite.config.ts代码:
import { defineConfig } from 'vite'
import vue from '@vitejs/plugin-vue'
import Components from "unplugin-vue-components/vite"
import { AntDesignVueResolver } from "unplugin-vue-components/resolvers";
const path = require('path');

// https://vitejs.dev/config/
export default defineConfig({
  plugins: [
    vue(),
    Components({
      resolvers: [
        AntDesignVueResolver()
      ]
    })
  ],
  resolve: {
    alias: {
      '@': path.resolve(__dirname, "src")
    }
  }
})
然后在tsconfig.json,加入以下内容:

tsconfig.json代码:
{
  "compilerOptions": {
    "target": "esnext",
    "useDefineForClassFields": true,
    "module": "esnext",
    "moduleResolution": "node",
    "strict": true,
    "jsx": "preserve",
    "sourceMap": true,
    "resolveJsonModule": true,
    "esModuleInterop": true,
    "lib": ["esnext", "dom"],
    "baseUrl": ".",
    "paths": {
      "@/*": ["src/*"]
    }
  },
  "include": ["src/**/*.ts", "src/**/*.d.ts", "src/**/*.tsx", "src/**/*.vue"],
  "references": [{ "path": "./tsconfig.node.json" }]
}
设置router内容
router的内容主要是router/index.ts的内容,与vue2相比里边就是多了类型更加严谨,其他用法与vue2一致,这里就不做过多介绍了,差异比较大的是路由的传参方面。
router/index.ts的代码
/**
 * createRouter 这个为创建路由的方法
 * createWebHashHistory 这个就是vue2中路由的模式,
 *                      这里的是hash模式,这个还可以是createWebHistory等
 * RouteRecordRaw 这个为要添加的路由记录,也可以说是routes的ts类型
 */
import {createRouter, createWebHashHistory, RouteRecordRaw} from 'vue-router';
// 路由记录,这个跟vue2中用法一致,就不做过多解释了
const routes:Array<RouteRecordRaw> = [
  {
    path: '/',
    name: 'todolist',
    component: () => import("@/components/TodoList.vue"),
    alias: '/todolist',
    meta: {
      title: 'todolist页面'
    }
  },
  {
    path: '/father',
    name: 'father',
    component: () => import("@/components/Father.vue"),
    meta: {
      title: 'father页面'
    }
  },
];

const router = createRouter({
  history: createWebHashHistory(),
  routes
});
export default router;
router的使用
import { createApp } from 'vue'
import App from './App.vue'
import 'ant-design-vue/dist/antd.css'
import router from './router/index'

const app = createApp(App);
app.use(router)
app.mount('#app')
然后修改App.vue如下内容
<script setup lang="ts">
script>

<template>
  <div>
    <router-link to="/" >todolistrouter-link>
    |
    <router-link to="/father" >fatherrouter-link>
  div>
  <router-view>router-view>
template>

<style>
#app {
  font-family: Avenir, Helvetica, Arial, sans-serif;
  -webkit-font-smoothing: antialiased;
  -moz-osx-font-smoothing: grayscale;
  text-align: center;
  color: #2c3e50;
  margin-top: 60px;
}
style>
这样便实现了基本的vue路由切换的功能
路由传参
对于vite+vue3+ts的这套Componsition Api的组合,vue-router的传参数也给了与$routes和$router对应的useRoute和useRouter等方法,以及路由守卫的onBeforeRouteLeave和onBeforeRouteUpdate,用法和vue2基本一样这里对useRoute和useRouter做简单介绍。
先在App.vue中增加一个跳转的按钮,如下:
<script setup lang="ts">
import {Button as AButton} from 'ant-design-vue';
// useRouter的使用
import { useRouter } from 'vue-router';
const router = useRouter();

const jumpFather = () => {
  // 编程式跳转和传参
  router.push({
    path: '/father',
    query: {
      msg: '这是路由传入的参数'
    }
  })
};
script>

<template>
  <div>
    <router-link to="/" >todolistrouter-link>
    |
    <router-link to="/father" >fatherrouter-link>
  div>
  <div>
    <a-button @click="jumpFather" >跳转到fathera-button>
  div>
  <router-view>router-view>
template>

<style>
#app {
  font-family: Avenir, Helvetica, Arial, sans-serif;
  -webkit-font-smoothing: antialiased;
  -moz-osx-font-smoothing: grayscale;
  text-align: center;
  color: #2c3e50;
  margin-top: 60px;
}
style>
然后就是在father.vue组件中,接收路由的传参了, 如下:

father.vue的代码
<template>
  <div>
    <h2>这是父组件h2>
    <div>
      <a-button @click="useSonExpose" >使用子组暴露的属性a-button>
      <h4>子组件触发父组件接收的值h4>
      <p>{{receiveMsg}}p>
    div>
    <h4>下方是子组件的内容h4>
    <SonVue ref="sonRef" />
    <hr>
    <h3>路由传入的参数{{route.query.msg}}h3>
  div>
template>

<script setup lang="ts">
import {Button as AButton} from 'ant-design-vue';
import SonVue from './Son.vue';
import { ref } from 'vue';
// 路由接收参数
import {useRoute} from 'vue-router';
const route = useRoute();
// 接收路由传入的参数
let routeMsg = ref('');
if(route.query.msg){
  routeMsg.value = route.query.msg as string;
}

// 接收子组件的传入的值
const receiveMsg = ref('');

// 父组件接收子组件暴露的方法,使用子组件的ref
const sonRef = ref<{
  inputVal: string;
  exposeFun(name:string): void;
}>();
// 使用子组件暴露的内容
const useSonExpose = () => {
  // 由于ts认为inputVal可能位undefined不能赋值给string的reveiveMsg
  // 因此使用了一个断言
  receiveMsg.value = sonRef.value?.inputVal as string;

  // 触发子组件暴露的方法
  sonRef.value?.exposeFun('父组件');
}
script>

<style scoped>style>
以上就是vue-router传参的使用,由于name的传递参数的取值方式和vue2相同,只是在这里使用了useRouter和useRoute,在这里就不做过多描述了
如有疑问可以留言,也可以到QQ群一起探讨:
QQ群1: 657011407, QQ群2: 492593055,也可以到微信找我 shenzhipeng1023
