微信小游戏飞机大战Cocos Creator+TypeScript
微信小游戏飞机大战
- 实现工具:
Cocos Creator + VSCode
- 实现原理:
1. 背景移动
实现飞机飞行的方法不是让飞机往前跑,而是通过后移背景图片,使得产生飞机向前跑的视觉效果。
这里设置两个一样的背景图,为了同时控制两个背景图,所以放在一个节点下面,将背景控制的脚本加载在背景节点上。通过this.node.children获得两个背景图,在update(dt)中移动两个背景图, 考虑到越界问题,当背景超过下界的时候,将图片下界向上移动到Canvas上端,从而实现一直有背景图片的效果。

Code:
const {ccclass, property} = cc._decorator;
const height : number = 810;
@ccclass
export default class BgControl extends cc.Component {
    update (dt) {
        //让节点下的bg移动,然而节点并没有移动
        for(let bgnode of this.node.children){
            bgnode.y -= dt*80;
            //判断是否越界
            if(bgnode.y < -height/2){
                bgnode.y += height*2;
            }
        }
    }
}
2. 玩家操控飞机
添加飞机图片,小程序实现的是玩家触碰手机,跟随手触的位置更新更新位置,所以,给飞机添加监听器。

在玩家控制脚本中的onload()方法中添加监听器:
const {ccclass, property} = cc._decorator;

@ccclass
export default class PlayerControl extends cc.Component {
    //子弹预设体
    @property(cc.Prefab)
    BulletPre: cc.Prefab = null;
    onLoad () {
        /*
            匿名函数
            this.node.on(cc.Node.EventType.TOUCH_MOVE,(event)=>{
            this.node.setPosition(event.getLocation());
        });
        */
        //声明函数
        this.node.on(cc.Node.EventType.TOUCH_MOVE,this.TouchAction,this);
        this.schedule(this.Shot, 0.5);
        //开启碰撞检测
        cc.director.getCollisionManager().enabled=true;
    }
    //如果点击了
    TouchAction(event){
        this.node.setPosition(event.getLocation());
    }
运行就可以发现点击飞机,飞机就可以跟着鼠标的位置移动了。
3. 飞机打出子弹
子弹要设置碰撞组件,为下面子弹和飞机碰撞做准备,先编写子弹控制脚本,因为要将子弹设为预设体,当设置为碰撞组件并添加好子弹控制脚本后,将子弹拖到到资源管理中,生成子弹预设体,再删除原子弹精灵。
export default class BulletControl extends cc.Component {
    //设置子弹的速度
    @property()
    speed : number = 900;

    update (dt) {
        //子弹前进
        this.node.y += dt*this.speed;
        //如果越界则自动销毁
        if(this.node.y>810){
            this.node.destroy();
        }
    }
子弹越界后要销毁子弹,这里暂时只实现子弹向前飞行的脚本,后面将实现碰撞的检测。
实现子弹的基本功能后,子弹初始化的位置是飞机的头部,所以在飞机节点下生成子弹,这里设置飞机0.5秒产生一个子弹,在玩家脚本中,添加子弹生成脚本。
    onLoad () {
        /*
            匿名函数
            this.node.on(cc.Node.EventType.TOUCH_MOVE,(event)=>{
            this.node.setPosition(event.getLocation());
        });
        */
        //声明函数
        this.node.on(cc.Node.EventType.TOUCH_MOVE,this.TouchAction,this);
        this.schedule(this.Shot, 0.5);
        //开启碰撞检测
        cc.director.getCollisionManager().enabled=true;
    }
    //如果点击了
    TouchAction(event){
        this.node.setPosition(event.getLocation());
    }
    //打子弹
    Shot(){
        //加载预设体
        let bullet = cc.instantiate(this.BulletPre);
        //获得当前的场景
        let scene = cc.director.getScene();
        //设置子弹的父节点
        bullet.parent = scene;
        //设置子弹的位置
        bullet.x = this.node.x;
        bullet.y = this.node.y + 65;
    }
这时候运行程序,应该会实现子弹打出子弹的功能,若出现问题,请检测有没有没有将资源拖动到脚本中。
4. 敌人被击毁
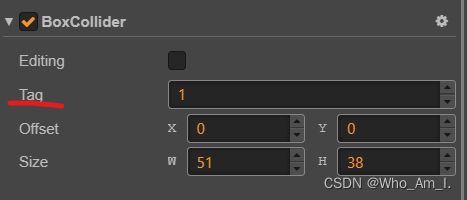
将敌机图片拖动层级管理器,并添加碰撞,并设置tag=1

以按照tag值检测碰撞,给敌机添加敌机控制脚本
const {ccclass, property} = cc._decorator;

@ccclass
export default class EnemyControl extends cc.Component {
    [x: string]: any;

    IsDie : boolean = false;

    start () {

    }

    //敌人死亡
    die(){
        this.IsDie = true;
        cc.loader.loadRes("enemy0_die", cc.SpriteFrame, (err, res)=>{
            this.node.getComponent(cc.Sprite).spriteFrame=res;//不知道错在哪里了
        });
        this.schedule(function() {
            this.node.destroy();
        }, 0.3);
        this.father.AddScore();
    }

    update (dt) {
        if(!this.IsDie){
            this.node.y -= 300*dt;
        }
        if(this.node.y < 0){
            this.node.destroy();
        }
    }
}
这里的die()函数是敌机死亡动作,会先加载爆炸图片,然后过0.3s后才毁灭。在upadate(dt)使敌机向前跑,并越界后销毁。
子弹碰撞事件在子弹脚本中实现
//碰撞事件
    onCollisionStay(other) {
        console.log('on collision stay');
        //如果碰撞的是敌人
        if(other.tag==1){
            //调用敌方的死亡方法
            //因为other是敌人的一个控件,所以通过other获得敌人脚本
            let enemy = other.getComponent(EnemyControl);
            //敌人死亡
            enemy.die();
            //得分加1

            //销毁自己
            this.node.destroy();
        }
        //如果碰撞的是自己
        if(other.tag==0){
            let  self = other.getComponent(PlayerControl);
            //敌人死亡
            self.GameOver();
            //销毁自己
            this.node.destroy();
        }
    }
通过other.getComponent(EnemyControl)方法获得敌人脚本,同样如果要实现子弹碰撞自己的功能,先要为自己添加碰撞组件,这里我设置自己的tag=0,然后先调用被碰撞体的死亡事件,再自己毁灭。
5. 产生敌人
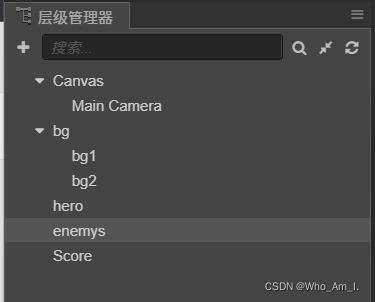
由于一个敌人是不够的,所以要自动生成更多敌人,这里的做法和之前的子弹做法有点相似,将敌人设为预设体,设置敌人产生节点。

设置一个空节点用于产生敌机
import EnemyControl from "./EnemyControl";
const {ccclass, property} = cc._decorator;

@ccclass
export default class EnemysControl extends cc.Component {

    // LIFE-CYCLE CALLBACKS:
    @property(cc.Prefab)
    enemyPre : cc.Prefab = null;
    score : number = 0;

    @property(cc.Label)
    Score: cc.Label = null;

    onLoad () {
        this.schedule(function() {
            //创建敌机
            let enemy = cc.instantiate(this.enemyPre);
            //获得当前的场景
            let scene = cc.director.getScene();
            //设置敌机的父节点
            enemy.parent = scene;
            //设置敌机位置
            enemy.y = this.node.y;//y和节点位置相同
            enemy.x = Math.random()*400;
            //保存EnemysControl脚本
            enemy.getComponent(EnemyControl).father = this;
            //输出一下得分
            console.log(this.score);
            this.Score.string= "得分:"+this.score;
        }, 2);
    }
    AddScore(){
        this.score++;
    }
    start () {

    }

	//检测敌机飞出界面
    PassLine(){
    }

    // update (dt) {}
}
这里我设置2s产生一个敌人,节点y的位置为空节点的位置,x为0-400的随机数。
6. 实现计分功能
我的思路是按照击毁的飞机计分,在敌机毁灭的时候,调用敌机产生器的AddScore()方法,但是我是怎么实现调用产生它的节点的方法呢。
 //敌人死亡
    die(){
        this.IsDie = true;
        cc.loader.loadRes("enemy0_die", cc.SpriteFrame, (err, res)=>{
            this.node.getComponent(cc.Sprite).spriteFrame=res;//不知道错在哪里了
        });
        this.schedule(function() {
            this.node.destroy();
        }, 0.3);
        this.father.AddScore();
    }

我获得敌人生成的脚本,然后保存在敌机的father中,敌机通过访问生成敌机脚本中的AddScore()方法让score加以,并更新Label Score的值.
Code:
import EnemyControl from "./EnemyControl";
const {ccclass, property} = cc._decorator;

@ccclass
export default class EnemysControl extends cc.Component {

    // LIFE-CYCLE CALLBACKS:
    @property(cc.Prefab)
    enemyPre : cc.Prefab = null;
    score : number = 0;

    @property(cc.Label)
    Score: cc.Label = null;

    onLoad () {
        this.schedule(function() {
            //创建敌机
            let enemy = cc.instantiate(this.enemyPre);
            //获得当前的场景
            let scene = cc.director.getScene();
            //设置敌机的父节点
            enemy.parent = scene;
            //设置敌机位置
            enemy.y = this.node.y;//y和节点位置相同
            enemy.x = Math.random()*400;
            //保存EnemysControl脚本
            enemy.getComponent(EnemyControl).father = this;
            //输出一下得分
            console.log(this.score);
        }, 2);
    }
    AddScore(){
        this.score++;
        this.Score.string= "得分:"+this.score;
    }
    start () {

    }

    PassLine(){
    }

    // update (dt) {}
}
总的代码及资源结构:
层级管理器:

资源管理器:

飞机控件

敌人产生控件

脚本
const {ccclass, property} = cc._decorator;
const height : number = 810;
@ccclass
export default class BgControl extends cc.Component {
    update (dt) {
        //让节点下的bg移动,然而节点并没有移动
        for(let bgnode of this.node.children){
            bgnode.y -= dt*80;
            //判断是否越界
            if(bgnode.y < -height/2){
                bgnode.y += height*2;
            }
        }
    }
}
const {ccclass, property} = cc._decorator;

@ccclass
export default class PlayerControl extends cc.Component {
    //子弹预设体
    @property(cc.Prefab)
    BulletPre: cc.Prefab = null;
    onLoad () {
        /*
            匿名函数
            this.node.on(cc.Node.EventType.TOUCH_MOVE,(event)=>{
            this.node.setPosition(event.getLocation());
        });
        */
        //声明函数
        this.node.on(cc.Node.EventType.TOUCH_MOVE,this.TouchAction,this);
        this.schedule(this.Shot, 0.5);
        //开启碰撞检测
        cc.director.getCollisionManager().enabled=true;
    }
    //如果点击了
    TouchAction(event){
        this.node.setPosition(event.getLocation());
    }
    //打子弹
    Shot(){
        //加载预设体
        let bullet = cc.instantiate(this.BulletPre);
        //获得当前的场景
        let scene = cc.director.getScene();
        //设置子弹的父节点
        bullet.parent = scene;
        //设置子弹的位置
        bullet.x = this.node.x;
        bullet.y = this.node.y + 65;
    }

    start () {

    }

    //游戏结束
    GameOver(){
        // 停止 Player 节点的跳跃动作
        this.node.stopAllActions();
        // 重新加载场景 game
        cc.director.loadScene('Game');
        this.node.destroy();
    }
    //碰撞事件
    onCollisionStay(other) {
        //如果碰撞的是敌人
        if(other.tag==1){
            this.GameOver();
        }
    }
}
import EnemyControl from "./EnemyControl";
import PlayerControl from "./PlayerControl";

const {ccclass, property} = cc._decorator;

@ccclass
export default class BulletControl extends cc.Component {
    //设置子弹的速度
    @property()
    speed : number = 900;

    update (dt) {
        //子弹前进
        this.node.y += dt*this.speed;
        //如果越界则自动销毁
        if(this.node.y>810){
            this.node.destroy();
        }
    }

    //碰撞事件
    onCollisionStay(other) {
        console.log('on collision stay');
        //如果碰撞的是敌人
        if(other.tag==1){
            //调用敌方的死亡方法
            //因为other是敌人的一个控件,所以通过other获得敌人脚本
            let enemy = other.getComponent(EnemyControl);
            //敌人死亡
            enemy.die();
            //得分加1

            //销毁自己
            this.node.destroy();
        }
        //如果碰撞的是自己
        if(other.tag==0){
            let  self = other.getComponent(PlayerControl);
            //敌人死亡
            self.GameOver();
            //销毁自己
            this.node.destroy();
        }
    }
}
const {ccclass, property} = cc._decorator;

@ccclass
export default class EnemyControl extends cc.Component {
    [x: string]: any;

    IsDie : boolean = false;

    // LIFE-CYCLE CALLBACKS:

    // onLoad () {}

    start () {

    }

    //敌人死亡
    die(){
        this.IsDie = true;
        cc.loader.loadRes("enemy0_die", cc.SpriteFrame, (err, res)=>{
            this.node.getComponent(cc.Sprite).spriteFrame=res;//不知道错在哪里了
        });
        this.schedule(function() {
            this.node.destroy();
        }, 0.3);
        this.father.AddScore();
    }

    update (dt) {
        if(!this.IsDie){
            this.node.y -= 300*dt;
        }
        if(this.node.y < 0){
            this.node.destroy();
        }
    }
}
import EnemyControl from "./EnemyControl";
const {ccclass, property} = cc._decorator;

@ccclass
export default class EnemysControl extends cc.Component {

    // LIFE-CYCLE CALLBACKS:
    @property(cc.Prefab)
    enemyPre : cc.Prefab = null;
    score : number = 0;

    @property(cc.Label)
    Score: cc.Label = null;

    onLoad () {
        this.schedule(function() {
            //创建敌机
            let enemy = cc.instantiate(this.enemyPre);
            //获得当前的场景
            let scene = cc.director.getScene();
            //设置敌机的父节点
            enemy.parent = scene;
            //设置敌机位置
            enemy.y = this.node.y;//y和节点位置相同
            enemy.x = Math.random()*400;
            //保存EnemysControl脚本
            enemy.getComponent(EnemyControl).father = this;
            //输出一下得分
            console.log(this.score);
        }, 2);
    }
    AddScore(){
        this.score++;
        this.Score.string= "得分:"+this.score;
    }
    start () {

    }

    PassLine(){
    }

    // update (dt) {}
}
运行结果:

代码及素材我保存在百度云盘:
链接:https://pan.baidu.com/s/1EkMg7z981c4BDqEYtXi9-Q
提取码:8421
–来自百度网盘超级会员V3的分享
Cocos Creator版本是2.4.0哦,如有错误还请指导。

