hive详细安装步骤启动等
目录
1.安装hadoop集群
2.安装mysql ,且配置mysql远程连接权限
3.cp hive-default.xml.template hive-site.xml
4.cp hive-env.sh.template hive-env.sh
5.配置hive-site.xml 配置mysql
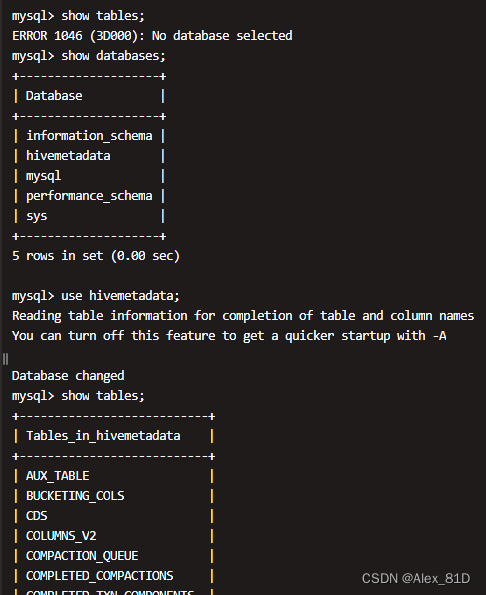
6.在mysql中建立 上面配置文件中指定的数据库(必须)
7.下载mysql的驱动包,放入hive 安装目录下的lib目录下
8.配置 hive-env.sh
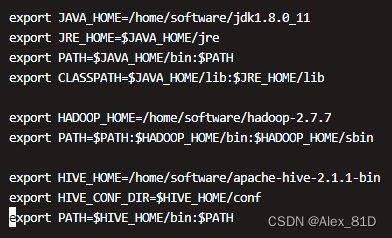
9. 打开/etc/profile 配置hive环境变量
10.初始化hive: schematool -dbType mysql -initSchema
11.启动hive
a、启动metastore服务:
b、启动hiveserver2服务:
此文章包含两部分,一部分是mysql的安装,一部分是hive的安装和启动,当然安装mysql是为了给hive做元信息存储,使用本文的前提是Hadoop已经安装
Hadoop安装参考博主的另一篇文章:
超详细的Hadoop集群部署_Alex_81D的博客-CSDN博客
mysql安装参考博主上一篇文章,非常方便:
超详细的yum方式安装mysql_Alex_81D的博客-CSDN博客
1.安装hadoop集群
2.安装mysql ,且配置mysql远程连接权限
3.cp hive-default.xml.template hive-site.xml
4.cp hive-env.sh.template hive-env.sh
5.配置hive-site.xml 配置mysql
		javax.jdo.option.ConnectionURL
		jdbc:mysql://10.1.1.1:3306/hivemetadata?createDatabaseIfNotExist=true&useSSL=false
		JDBC connect string for a JDBC metastore


		javax.jdo.option.ConnectionDriverName
		com.mysql.jdbc.Driver
		Driver class name for a JDBC metastore


		javax.jdo.option.ConnectionUserName
		root
		username to use against metastore database


		javax.jdo.option.ConnectionPassword
		P@ssw0rd
		password to use against metastore database


    	hive.metastore.warehouse.dir
	    /user/hive/warehouse


		hive.cli.print.current.db
		true


		hive.cli.print.header
		true


		hive.exec.mode.local.auto
		true
6.在mysql中建立 上面配置文件中指定的数据库(必须)
附mysql创数据库语句:
create database hivemetadata CHARACTER SET utf8; ;7.下载mysql的驱动包,放入hive 安装目录下的lib目录下
8.配置 hive-env.sh
# Set HADOOP_HOME to point to a specific hadoop install directory
# HADOOP_HOME=${bin}/../../hadoop
export HADOOP_HOME=/home/software/hadoop-2.7.7

# Hive Configuration Directory can be controlled by:
# export HIVE_CONF_DIR=
export HIVE_CONF_DIR=/home/software/apache-hive-2.1.1-bin/conf
9. 打开/etc/profile 配置hive环境变量
export HIVE_HOME=/home/software/apache-hive-2.1.1-bin
export HIVE_CONF_DIR=$HIVE_HOME/conf
export PATH=$HIVE_HOME/bin:$PATH
10.初始化hive: schematool -dbType mysql -initSchema
在bin目录下执行 : schematool -dbType mysql -initSchema
这一步骤会自动在刚才你手动建立的mysql数据库中,生成很多表格
11.启动hive
a、启动metastore服务:
# 后台启动 metastore 服务器端,默认使用 9083 端口
nohup hive --service metastore &
# 或者使用指定的端口号:
nohup hive --service metastore -p 9083 &
推荐使用这个 :nohup hive --service metastore &
看日志用:tail -f nohup.out
b、启动hiveserver2服务:
# 后台启动 metastore 服务器端,默认使用 10000 端口
nohup hive --service hiveserver2 &
# 或者使用指定的端口号:
nohup hive --service hiveserver2 --hiveconf hive.server2.thrift.port 10001  &
推荐使用这个 :nohup hive --service hiveserver2 &
看日志用:tail -f nohup.out
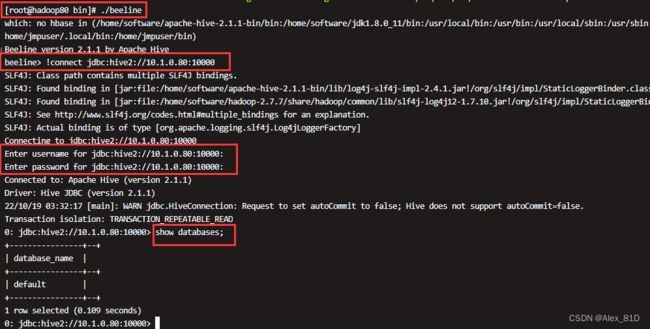
这样hive就搭建完成了,用客户端或者beeline测试,客户端就不说了,主要说一下beeline测试
bin/beeline
beeline> !connect jdbc:hive2://hadoop102:10000(回车)
Connecting to jdbc:hive2://hadoop102:10000
Enter username for jdbc:hive2://hadoop102:10000: kegc(回车)
Enter password for jdbc:hive2://hadoop102:10000: (直接回车)
Connected to: Apache Hive (version 1.2.1)
Driver: Hive JDBC (version 1.2.1)
Transaction isolation: TRANSACTION_REPEATABLE_READ
0: jdbc:hive2://hadoop102:10000> show databases;
至此结束!!!!!


