Jenkins笔记03-Jenkins构建Maven项目
Jenkins构建的项目类型介绍
Jenkins中自动构建类型有很多,常用的有以下三种:
- 自由风格软件项目(FreeStyle Project)
- Maven项目(Maven Project)
- 流水线项目(Pipeline Project)
每种类型都可以完成构建,只是在操作方式和灵活度上有所区别,实际使用的时候,根据需求和使用习惯选择,其中流水线项目的灵活度非常高。
自由风格项目构建
拉取代码
在Jenkins里,新建一个FreeStyle Project。Source Code Management选择从GitLab拉取代码,并指定Credentials。
编译打包
在Build里找到Add build step,选择“Execute shell”,并输入以下内容,Apply,Save。
echo "开始编译和打包"
mvn clean package
echo "编译和打包结束"
部署
需要安装Deploy to container插件,添加Tomcat用户凭证(用户名密码都是tomcat)。

再回到FreeStyle Project的配置里,找到Post-build Actions,选择“Deploy war/ear to a container”,填写Tomcat URL。
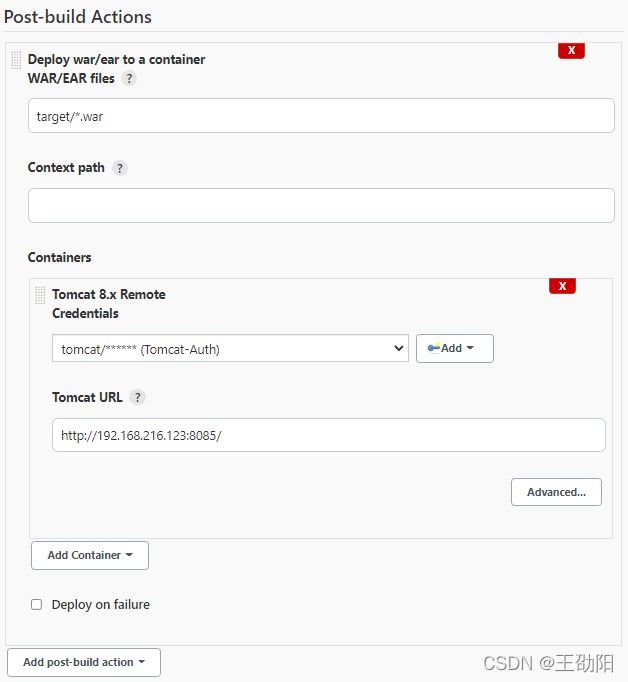
最后Apply,Save,点击Build Now,我的Jenkins在启动的时候报错了,错误原因看不出来,此时可以回到Tomcat的log里查看具体报错信息,我的报错信息是提示有个类找不到,最终,我加了一个pom坐标解决的,至于为什么要加这个,这里就不大清楚了,来到Tomcat的Manage页面,可以看到我们部署的程序,点击我们的应用程序,就可以查看结果了。
Maven项目构建
首先需要安装一个Maven Integration的插件,然后创建一个Maven项目。设置好Source Code Management,和FreeStyle Project不同的是,在Build里需要指定pom.xml并设置Maven命令,在Goals and options里输入clean package。在Post-build Actions里选择Deploy war/ear to a container,指定war和Context path,最后保存并开始构建,查看结果。

Pipeline流水线项目构建
Pipeline简介
Pipeline,简单来说,就是一套运行在Jenkins上的工作流框架,将原来独立运行于单个或者多个节点的任务连接起来,实现单个任务难以完成的复杂流程编排和可视化的工作。
- 代码:Pipeline以代码的形式实现,通常被检入源代码控制,使团队能够编辑,审查和迭代其传送流程
- 持久:无论是计划内的还是计划外的服务器重启,Pipeline都是可恢复的
- 可停止:Pipeline可接收交互式输入,以确定是否继续执行Pipeline
- 多功能:Pipeline支持现实世界中复杂的持续交付要求。它支持fork/join、循环执行,并行执行任务的功能
- 可扩展:Pipeline插件支持其DSL的自定义扩展 ,以及与其他插件集成的多个选项
Pipeline脚本是由Groovy语言实现的,但是我们没必要单独去学习Groovy
Pipeline支持两种语法:Declarative(声明式)和Scripted Pipeline(脚本式)语法
Pipeline也有两种创建方法:可以直接在Jenkins的Web UI界面中输入脚本;也可以通过创建一个Jenkinsfile脚本文件放入项目源码库中(一般我们都推荐在Jenkins中直接从源代码控制(SCM)中直接载入Jenkinsfile Pipeline这种方法)
安装Pipeline插件
要想体验Pipeline,就要先安装Jenkins的插件:Pipeline。安装插件后,在新建项目的时候,就会多一个Pipeline Project的选项。
Pipeline语法快速入门
Declarative声明式-Pipeline
创建一个Pipeline Project,Pipeline脚本里,选择Hello World模板。
pipeline {
    agent any

    stages {
        stage('Hello') {
            steps {
                echo 'Hello World'
            }
        }
    }
}
stages代表整个流水线所有的执行阶段,通常只有一个stages,里面包含了多个stage,每个stage代表流水线中的某个阶段,可能会有多个,比如:拉取代码,编译构建,部署等。steps代表一个阶段内需要执行的逻辑,steps里是shell脚本,比如:git拉取代码,ssh远程发布等。
一个简单的声明式Pipeline例子:
pipeline {
    agent any
    stages {
        stage('拉取代码') {
            steps {
                echo '拉取代码'
            }
        }
        stage('编译构建') {
            steps {
                echo '编译构建'
            }
        }
        stage('项目部署') {
            steps {
                echo '项目部署'
            }
        }
    }
}
点击Build Now,就完成了一个Pipeline项目的构建,要想看到Pipeline视图,还需要安装一个Pipeline: Stage View的插件。
Scripted Pipeline脚本式-Pipeline
创建一个Pipeline Project,Pipeline脚本里,这次选择“Scripted Pipeline”,这里的脚本就比较复杂了。
node {
    def mvnHome
    stage('Preparation') { // for display purposes
        // Get some code from a GitHub repository
        git 'https://github.com/jglick/simple-maven-project-with-tests.git'
        // Get the Maven tool.
        // ** NOTE: This 'M3' Maven tool must be configured
        // **       in the global configuration.
        mvnHome = tool 'M3'
    }
    stage('Build') {
        // Run the maven build
        withEnv(["MVN_HOME=$mvnHome"]) {
            if (isUnix()) {
                sh '"$MVN_HOME/bin/mvn" -Dmaven.test.failure.ignore clean package'
            } else {
                bat(/"%MVN_HOME%\bin\mvn" -Dmaven.test.failure.ignore clean package/)
            }
        }
    }
    stage('Results') {
        junit '**/target/surefire-reports/TEST-*.xml'
        archiveArtifacts 'target/*.jar'
    }
}
node代表一个Jenkins结点,Master或者是Agent,是执行Step的具体运行环境,后续Jenkins的Master-Slave架构会用到。
Stage代表一个阶段,Pipeline执行可以划分为多个Stage,每个Stage代表一组操作,比如:Build、Test、Deploy,Stage是一个逻辑分组的概念。
Step代表一个步骤,是最基本的操作单元,可以是一个Shell脚本命令。
在Pipeline项目里,有一个Pipeline语法的超链接,点击过去,可以看到有一些常用的Steps,我们可以选择对应的模板,填充上需要的参数,这个Step就生成了,对于不会Pipeline语法的人来说,还是比较方便的。
拉取代码

将脚本复制出来。放到Pipeline脚本里的steps里,应用,保存。
编译打包

将脚本复制出来。放到Pipeline脚本里的steps里,应用,保存。
部署
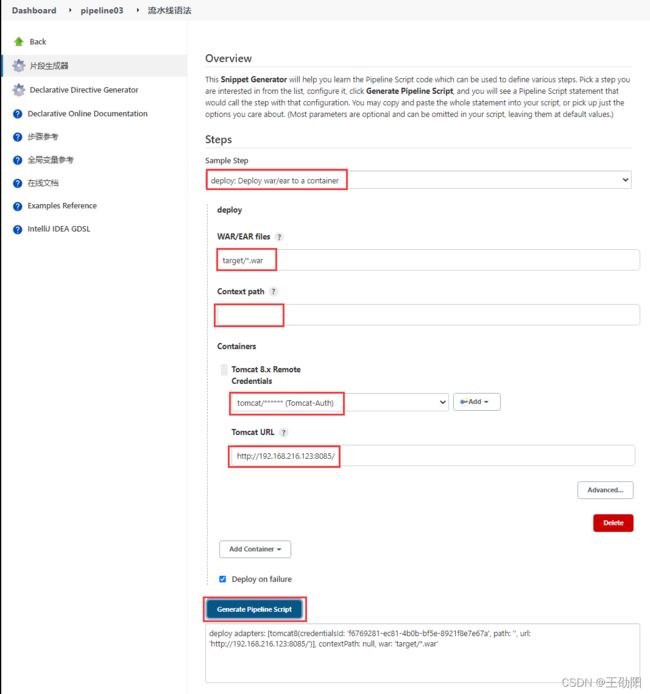
将脚本复制出来。放到Pipeline脚本里的steps里,应用,保存。
最终的脚本如下:
pipeline {
    agent any

    stages {
        stage('pull code') {
            steps {
                checkout([$class: 'GitSCM', branches: [[name: '*/master']], extensions: [], userRemoteConfigs: [[credentialsId: 'e689f397-c855-4783-9600-b990ea39ab83', url: '[email protected]:test1_group/test1_project.git']]])
            }
        }
        stage('build projct') {
            steps {
                sh 'mvn clean package'
            }
        }
        stage('deploy project') {
            steps {
                deploy adapters: [tomcat8(credentialsId: 'f6769281-ec81-4b0b-bf5e-8921f8e7e67a', path: '', url: 'http://192.168.216.123:8085/')], contextPath: null, war: 'target/*.war'
            }
        }
    }
}
最后,应用,保存,Build Now进行测试。
Pipeline Script from SCM
在Jenkins里编写脚本,不方便维护,有一种方式款已解决这个问题,那就是把Pipeline Script放到项目里,用版本控制来跟踪记录。
在项目根目录新建一个Jenkinsfile文件,文件名是Jenkinsfile,将刚才的内容复制进来,提交代码后,来到Jenkins。
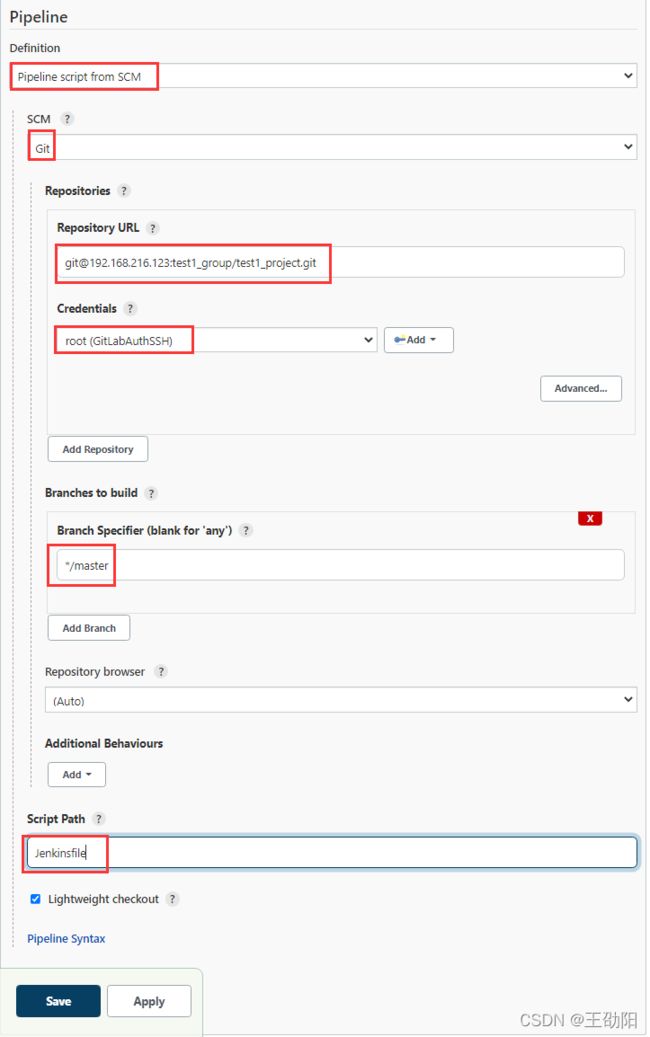
Apply,Save,Build Now,进行测试。
常用的构建触发器
Jenkins有4种构建触发器:
- 触发远程构建
- 其他工程构建后触发(Build after other projects are build)
- 定时构建(Build periodically)
- 轮询SCM(Poll SCM)
触发远程构建
打开一个项目的配置,找到Build Triggers,勾选“Trigger builds remotely”,并输入一个Authentication Token,也就是一个加密串,Apply,Save。

然后浏览器通过访问JENKINS_URL/job/pipeline01/build?token=TOKEN_NAME,注意把JENKINS_URL换成Jenkins的地址,把TOKEN_NAME换成刚才设置的加密串,把就可以发起一个Jenkins项目的构建。
其他工程构建后触发
找到Build Trigger,选择“Build after other projects are build”,输入其他项目的项目名,Apply,Save。

然后,将刚才设置的“其他项目”进行构建,其他项目构建成功后,观察当前项目是否也被构建了。
定时构建
定时构建,就需要我们配置一个表达式,Jenkins就会按照规则进行定时构建。找到Build Trigger,勾选“Build periodically”,这里以每分钟构建一次为例,Apply,Save。
这里的表达式类似Cron表达式,字符串从左向右依次代表:分、时、日、月、周,H代表的是形参。
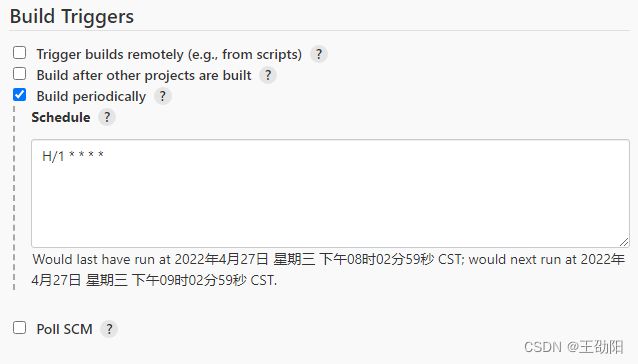
这时项目就会每分钟构建一次了,我这里只是为了举例,实际不可能每分钟构建的。
轮询SCM
意思是Jenkins定时扫描代码仓库是否有变更,如果有变更,自动触发一次构建,但是这种方式对系统的开销比较大,不建议使用。
找到Build Trigger,选择“Poll SCM”,输入表达式,Apply,Save,来到项目里,随便修改点东西提交到Git上。

回来观察Jenkins这边的构建情况。
Git hook自动触发构建
前面介绍的轮询SCM方式,对系统开销比较大,不建议使用,其实还有其他的方案,可以在push代码后,自动触发构建操作,那就是利用GitLab的webhook来实现。
它们的区别是:
轮询SCM:Jenkins每隔多久去问GitLab:你那边有没有代码变动
webhook:GitLab代码变更后,通知Jenkins:你该触发构建了
Jenkins安装插件
首先在Jenkins里安装GitLab插件(里面包含GitLab Hook)。
Jenkins设置自动构建
找到Build Triggers,勾选新出现的这个选项,其他默认就可以,这里需要记住webhook URL,Apply,Save。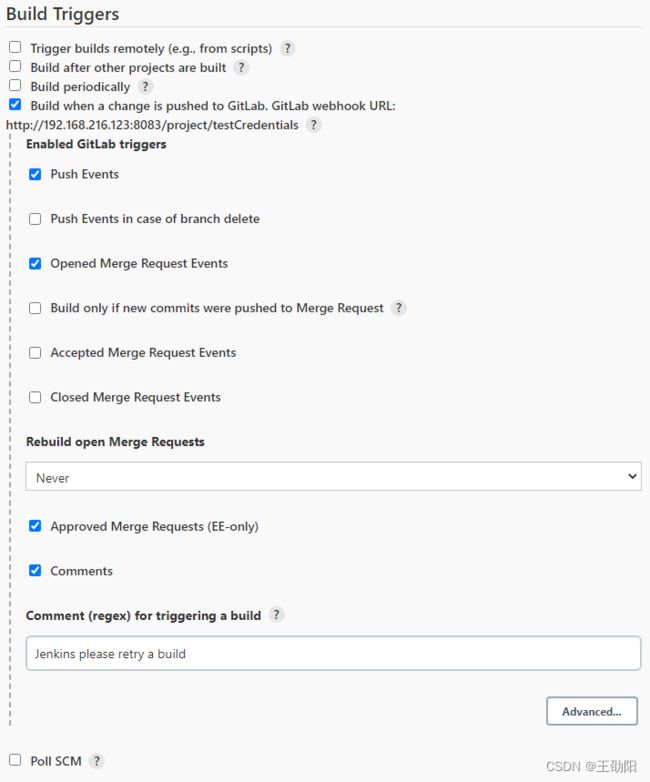
GitLab配置webhook
使用root登录GitLab,依次点击:Admin Area-Settings-Network,勾选“Allow requests to the local network from web hooks and services”,最后Save changes。
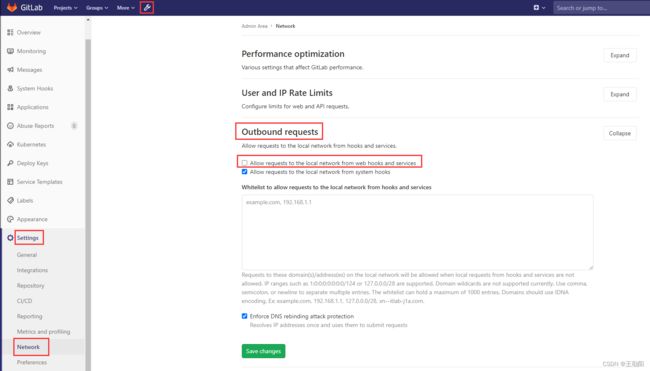
给项目添加webhook,依次点击项目-Settings-Integrations,输入刚才的webhook URL,最后Save changes。
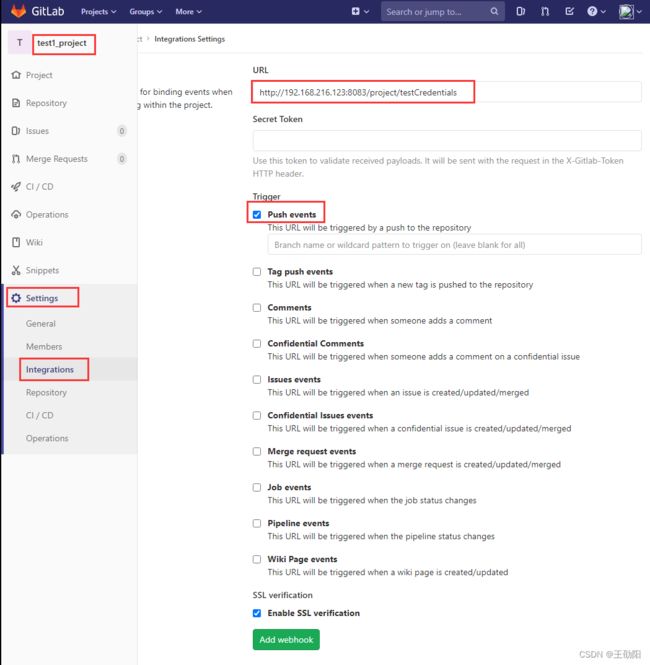
再来到Jenkins里,Manage Jenkins-Configure System,取消“Enable authentication for ‘/project’ end-point”的勾选,Apply,Save。

来到刚才GitLab添加webhook的地方,找到Test,模拟发送一个Push事件,此时Jenkins里的项目就可以构建了,说明配置成功。
Jenkins的参数化构建
在项目构建的时候,如果我们需要传入动态的参数,影响构建的结果,可以使用参数化构建的方式。
实际项目,会有多个分支。现在有一个需求,输入一个参数,动态指定这次构建哪个分支的代码。

这里添加一个字符串格式的参数,表示构建哪个分支。
来到IDEA里,新建一个分支v1,在master分支做一些改动,在v1分支上也做些改动,找到Pipeline Script,将'*/master'换成'*/${branch}',这里的${branch}就是动态的了,Apply,Save。
把两个分支的代码都推送到GitLab上,点击Build with Parameters,这时候,会提示输入branch的值,输入后点击Build。
分别输入master和v1,进行构建,并查看结果。
配置邮箱服务器发送构建结果
安装Email Extension和Email Extension Template插件。设置邮箱相关参数:Manage Jenkins-Configure System。
设置系统发件人:
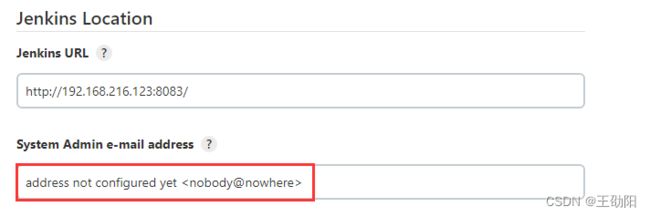
设置插件信息:

设置发件人的SMTP地址和密码等信息:

最下面有一个Test configuration,可以点一下试试,如果配置正确的话,可以成功发出邮件的。
在项目里添加一个email.html文件,并把文件push上去。关于这里面使用的变量,可以在Manage Jenkins-Configure System里找到“Content Token Reference”,点击右侧的“?”就可以看到更多信息了。
DOCTYPE html>
<html>
<head>
    <meta charset="UTF-8">
    <title>$PROJECT_NAME - Build # $BUILD_NUMBER title>
head>

<body leftmargin ="8" maginwidth="0" topmargin="8" marginheight="4"
      offset="0">
<div>
    <table width="100%" cellpadding="0" cellspacing="0"
           style="font-size: 11pt; font-family: Tahoma, Arial, Helvetica, sans-serif">
        <tr>
            <td>(本邮件是程序自动下发的,请勿回复!)td>
        tr>
        <tr>
            <td>
                <h2> <font color="#0000FF">构建结果 -${BUILD_STATUS}font> h2>td>
        tr>
        <tr>
            <td>
                <br /><b><font color="#0B610B">构建信息font>b>
                <hr size="2" width="100%" align="center" />
            td>
        tr>
        <tr>
            <td>
                <ul>

                    <li>项目名称 :系统检查li>
                    <li>构建编号 :第${BUILD_NUMBER}次构建li>
                    <li>触发原因 :${CAUSE}li>
                    <li>构建日志 :<a href="${BUILD_URL}console">${BUILD_URL}consolea>li>
                    <li>构建 Url :<a href="${BUILD_URL}">${BUILD_URL}a>li>
                    <li>工作目录 : <a href="${PROJECT_URL}ws">${PROJECT_URL}wsa>li>
                    <li>项目 Url :<a href="${PROJECT_URL}">${PROJECT_URL}a>li>
                    <li>历史变更记录 :<a href="${PROJECT_URL}changes">${PROJECT_URL}changesa>li>
                ul>
            td>
        tr>
        <tr>
            <td>
                <br /> <b><font color="#0B610B">详细报告请查阅附件(报告记录了接口的详细请求和响应)font>b>
            td>
        tr>
        <tr>
            <td>
                <br /> <b><font color="#0B610B">汇总报告如下:font>b>
                <hr size="4" width="100%" align="center" />
            td>
        tr>
        <tr>
            <td colspan="2" align="center">
                <div>${FILE,path="html/TestReport${BUILD_TIMESTAMP}.html"}div>
            td>
        tr>
    table>
div>
body>
html>
对应Pipeline Script,这里用到的是post标签,关于post,可以在Pipeline Syntax-Declarative Directive Generator,选择“post: Post Stage or Build Conditions”,可以根据一些条件生成post语法。
在Pipeline Syntax-片段生成器,选择“emailext: Extended Email”,可以生成一些脚本。
pipeline {
    agent any

    stages {
        stage('pull code') {
            steps {
                checkout([$class: 'GitSCM', branches: [[name: '*/master']], extensions: [], userRemoteConfigs: [[credentialsId: 'e689f397-c855-4783-9600-b990ea39ab83', url: '[email protected]:test1_group/test1_project.git']]])
            }
        }
        stage('build projct') {
            steps {
                sh 'mvn clean package'
            }
        }
        stage('deploy project') {
            steps {
                deploy adapters: [tomcat8(credentialsId: 'f6769281-ec81-4b0b-bf5e-8921f8e7e67a', path: '', url: 'http://192.168.216.123:8085/')], contextPath: null, war: 'target/*.war'
            }
        }
    }
    post {
        always {
            emailext(
                subject: '构建通知:${PROJECT_NAME} - Build # ${BUILD_NUMBER} - ${BUILD_STATUS}!',
                body: '${FILE,path="email.html"}',
                to: '收件人的邮箱'
            )
        }
    }
}
Apply,Save,Build,回到邮箱查看是否收到,此时发现收到的格式不对,修改Default Content Type为HTML即可。
安装SonarQube
SonarQube简介
SonarQube是一个用于管理代码质量的开放平台,可以快速的定位代码中潜在的或者明显的错误。目前支持Java,C#,C/C++,Python,PL/SQL,Cobol,JavaScrip,Groovy等二十几种编程语言的代码质量管理与检测。
环境要求
因为高版本(7.9版本后不再支持MySQL)不再支持MySQL,所以,MySQL使用5.7版本,SonarQube使用6.7.7版本。
安装MySQL
# 查看之前是否安装过MySQL,如果安装过,使用rpm -e 文件名将其删除
[root@localhost ~]# rpm -qa | grep mysql
# 查找MySQL相关文件,如果有,rm -rf 文件路径删除
[root@localhost ~]# find / -name mysql
# 下载MySQL
[root@localhost software]# wget https://dev.mysql.com/get/Downloads/MySQL-5.7/mysql-5.7.24-linux-glibc2.12-x86_64.tar.gz
# 解压安装MySQL
[root@localhost software]# tar -zxvf mysql-5.7.24-linux-glibc2.12-x86_64.tar.gz -C /opt/module/
# 重命名MySQL文件夹
[root@localhost module]# mv mysql-5.7.24-linux-glibc2.12-x86_64/ mysql
# 创建mysql用户组和用户
[root@localhost mysql]# groupadd mysql
[root@localhost mysql]# useradd -r -g mysql mysql
# 创建data目录
[root@localhost mysql]# mkdir -p /data/mysql
# 修改权限
[root@localhost mysql]# chown mysql:mysql -R /data/mysql
# 修改配置文件
[root@localhost mysql]# vim /etc/my.cnf
# 初始化数据库
[root@localhost ~]# cd /opt/module/mysql/bin/
[root@localhost mysql]# ./bin/mysqld --defaults-file=/etc/my.cnf --basedir=/opt/module/mysql --user=mysql --initialized
# 查看密码并记住,一会儿要用,在最后几个字符哪里
[root@localhost mysql]# cat mysql.err
# 注册MySQL服务
[root@localhost mysql]# cp /opt/module/mysql/support-files/mysql.server /etc/init.d/mysql
# 赋予执行权限
[root@localhost mysql]# chmod +x /etc/init.d/mysql
# 添加服务
[root@localhost mysql]# chkconfig --add mysql
# 启动MySQL
[root@localhost mysql]# service mysql start
# 登录MySQL,输入刚才的密码,之后就是改密码
[root@localhost mysql]# ./bin/mysql -u root -p
my.cnf,注意修改里面的basedir(安装路径)。
[mysqld]
bind-address=0.0.0.0
port=3306
user=mysql
basedir=/opt/module/mysql
datadir=/data/mysql
socket=/tmp/mysql.sock
log-error=/data/mysql/mysql.err
pid-file=/data/mysql/mysql.pid
#character config
character_set_server=utf8mb4
symbolic-links=0
explicit_defaults_for_timestamp=true
修改MySQL的root密码
SET PASSWORD = PASSWORD('root');
ALTER USER 'root'@'localhost' PASSWORD EXPIRE NEVER;
FLUSH PRIVILEGES;
# 然后用软件连接一下,如果提示“is not allowed to connect to this MySQL server”,还需要执行下面的命令,让任何host都可以用root访问
use mysql;
update user set host = '%' where user = 'root';
FLUSH PRIVILEGES;
至此,MySQL安装完成。
安装SonarQube
点击SonarQube下载链接,最下面会有旧版本下载地址。
# 安装unzip
[root@localhost software]# yum install -y unzip
# 将下载的zip解压缩
[root@localhost software]# unzip sonarqube-6.7.7.zip -d /opt/module/
# 添加用户
[root@localhost sonarqube-6.7.7]# useradd sonar
# 把安装目录下的所有文件权限改为sonar
[root@localhost sonarqube-6.7.7]# chown -R sonar.sonar /opt/module/sonarqube-6.7.7/
# 修改sonar配置文件,修改sonar.jdbc.username、sonar.jdbc.password、sonar.jdbc.url的值
[root@localhost sonarqube-6.7.7]# vim conf/sonar.propertie
进到MySQL中,创建一个sonar的数据库。
# 启动sonar(注意,这里不能用root来启动,要用sonar来启动)
# 切换sonar用户
[root@localhost sonarqube-6.7.7]# su sonar
[sonar@localhost sonarqube-6.7.7]# ./bin/linux-x86-64/sonar.sh start
# 查看状态
[sonar@localhost sonarqube-6.7.7]$ ./bin/linux-x86-64/sonar.sh status
# 查看日志
[sonar@localhost sonarqube-6.7.7]# tail -f logs/sonar.log
这里可能会有问题,导致启动失败,我们查看logs/es.log,提示我们无法用root启动elasticsearch。
浏览器访问sonar页面,点击Login登录,默认用户名和密码都是admin,输入一个key用于生成token,这个token要记住。
实现代码审查
Jenkins会主动调用Sonar-Scanner对代码进行审查,将审查结果提交给SonarQube,SonarQube会保存到MySQL数据库中。
安装SonarQube Scanner插件
搜索,安装即可。
添加SonarQube凭证
来到Manage Jenkins-Manage Credentials-Stores scoped to Jenkins-global,添加一条Secret text类型的凭证,把刚才的token放进去。
来到Manage Jenkins-Configure System-SonarQube servers,添加一个SonarQube,Apply,Save。

来到Manage Jenkins-Global Tool Configuration-SonarQube Scanner,添加一个SonarQube Scanner,我这里选的最新版本,Apply,Save。

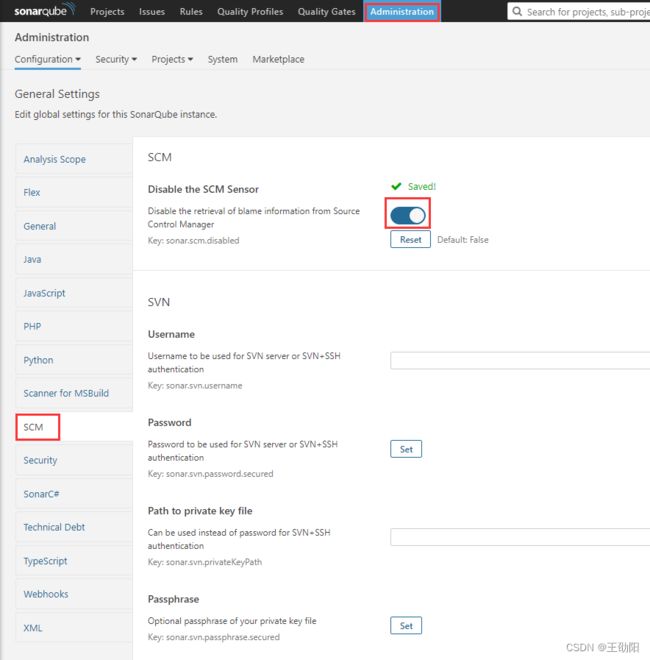
再来到SonarQube界面,Administration-SCM,打开Disable the SCM Sensor的开关,意思是关闭审查结果上传到SCM功能,保存。
回到项目,添加sonar-project.properties文件。
# must be unique in a given SonarQube instance
# 这里的web_demo需要换成自己的项目名
sonar.projectKey=web_demo
# this is the name and version displayed in the SonarQube UI. Was mandatory
prior to SonarQube 6.1.
# 这里的web_demo需要换成自己的项目名
sonar.projectName=web_demo
sonar.projectVersion=1.0
# Path is relative to the sonar-project.properties file. Replace "\" by "/" on
Windows.
# This property is optional if sonar.modules is set.
sonar.sources=.
sonar.exclusions=**/test/**,**/target/**
sonar.java.source=1.8
sonar.java.target=1.8
sonar.java.binaries=./target/classes
# Encoding of the source code. Default is default system encoding
sonar.sourceEncoding=UTF-8
非流水线项目
在Build里,会多一个Execute SonarQube Scanner的选项,scan是需要执行的命令。
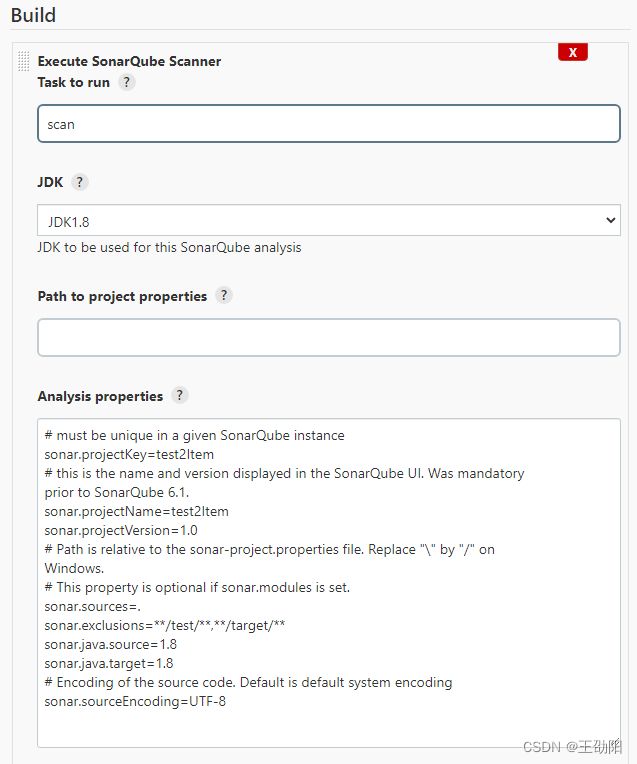
Save,Apply,Build Now,如果编译成功,来到SonarQube Scanner查看结果。
流水线项目
修改Jenkinsfile文件,加入SonarQube代码审查阶段,加在build之后,我用的这个版本,有一个必填的sonar.java.binaries=./target/classes值,在build之后才会有。
stage('SonarQube Code review') {
    steps{
        script {
        	// 这里的SonarQube Scanner要和Manage Jenkins-Global Tool Configuration-SonarQube Scanner里的名字保持一致
            scannerHome = tool 'SonarQube Scanner'
        }
        // 这里的SonarQube 6.7.7要和Manage Jenkins-Configure System-SonarQube servers里的名字保持一致
        withSonarQubeEnv('SonarQube 6.7.7') {
            sh "${scannerHome}/bin/sonar-scanner"
        }
    }
}
并把代码提交到GitLab,通过Jenkins进行构建,如果成功,来到SonarQube Scanner查看代码审查结果。