python实现d435i深度相机测量两点之间的距离
-
本文介绍python方法实现intel公司realsense系列d435i深度相机测量彩色图像上两点之间的距离。
原理很简单,就是将相机获得的彩色图像流与深度流对齐,这样彩色图像上的每个像素就会对应一个深度值,作为z坐标,然后通过相机内参获得该像素的x坐标和y坐标。我们获得的x、y、z就作为该像素点的相机坐标系下的三维坐标。求出所测两点的三维坐标,再用勾股定理就能求出这两点的距离。
求彩色图像上一点的三维坐标参考https://blog.csdn.net/gyxx1998/article/details/121611001
完整代码如下
# -*- coding: utf-8 -*-
import pyrealsense2 as rs
import numpy as np
import cv2
import math
import matplotlib.pyplot as plt

'''
设置
'''
pipeline = rs.pipeline()  # 定义流程pipeline,创建一个管道
config = rs.config()  # 定义配置config
config.enable_stream(rs.stream.depth, 1280, 720, rs.format.z16, 30)  # 配置depth流
config.enable_stream(rs.stream.color, 1280, 720, rs.format.bgr8, 30)  # 配置color流

pipe_profile = pipeline.start(config)  # streaming流开始

# 创建对齐对象与color流对齐
# align_to = rs.stream.color  # align_to 是计划对齐深度帧的流类型
# align = rs.align(align_to)  # rs.align 执行深度帧与其他帧的对齐
align = rs.align(rs.stream.color)  #将上两句合成一句,将深度与color对齐

'''
获取对齐图像帧与相机参数
'''


def get_aligned_images():
    frames = pipeline.wait_for_frames()  # 等待获取图像帧,获取颜色和深度的框架集
    aligned_frames = align.process(frames)  # 获取对齐帧,将深度框与颜色框对齐

    aligned_depth_frame = aligned_frames.get_depth_frame()  # 获取对齐帧中的的depth帧
    aligned_color_frame = aligned_frames.get_color_frame()  # 获取对齐帧中的的color帧

    #### 获取相机参数 ####
    depth_intrin = aligned_depth_frame.profile.as_video_stream_profile().intrinsics  # 获取深度参数(像素坐标系转相机坐标系会用到)
    color_intrin = aligned_color_frame.profile.as_video_stream_profile().intrinsics  # 获取相机内参

    #### 将images转为numpy arrays ####
    img_color = np.asanyarray(aligned_color_frame.get_data())  # RGB图
    img_depth = np.asanyarray(aligned_depth_frame.get_data())  # 深度图(默认16位)

    return color_intrin, depth_intrin, img_color, img_depth, aligned_depth_frame


'''
获取随机点三维坐标
'''


def get_3d_camera_coordinate(depth_pixel, aligned_depth_frame, depth_intrin):
    x = depth_pixel[0]
    y = depth_pixel[1]
    dis = aligned_depth_frame.get_distance(x, y)  # 获取该像素点对应的深度
    # print ('depth: ',dis)       # 深度单位是m
    camera_coordinate = rs.rs2_deproject_pixel_to_point(depth_intrin, depth_pixel, dis)
    # print ('camera_coordinate: ',camera_coordinate)
    return dis, camera_coordinate


if __name__ == "__main__":
    while True:
        '''
        获取对齐图像帧与相机参数
        '''
        color_intrin, depth_intrin, img_color, img_depth, aligned_depth_frame = get_aligned_images()  # 获取对齐图像与相机参数

        '''
        获取随机点三维坐标
        '''
        xx1=224
        yy1=308
        depth_pixel1 = [xx1, yy1]  # 设置随机点,以相机中心点为例320、240
        dis1, camera_coordinate1 = get_3d_camera_coordinate(depth_pixel1, aligned_depth_frame, depth_intrin)


        xx2=461
        yy2=310
        depth_pixel2 = [xx2, yy2]  # 设置随机点,以相机中心点为例320、240
        dis2, camera_coordinate2 = get_3d_camera_coordinate(depth_pixel2, aligned_depth_frame, depth_intrin)


        '''
        显示图像与标注
        '''
        #### 在图中标记随机点及其坐标 ####
        cv2.circle(img_color, (xx1, yy1), 3, [0, 255, 0], thickness=1)
        cv2.circle(img_color, (xx1, yy1), 6, [0, 255, 0], thickness=1)
        cv2.putText(img_color, "Dis1:" + str(dis1) + " m", (40, 40), cv2.FONT_HERSHEY_SIMPLEX,0.5, [0, 0, 255])
        cv2.putText(img_color, "X1:" + str(camera_coordinate1[0]) + " m", (40, 60), cv2.FONT_HERSHEY_SIMPLEX, 0.5,
                    [255, 0, 0])
        cv2.putText(img_color, "Y1:" + str(camera_coordinate1[1]) + " m", (40, 80), cv2.FONT_HERSHEY_SIMPLEX, 0.5,
                    [255, 0, 0])
        cv2.putText(img_color, "Z1:" + str(camera_coordinate1[2]) + " m", (40, 100), cv2.FONT_HERSHEY_SIMPLEX, 0.5,
                    [255, 0, 0])
        cv2.putText(img_color, "1", (xx1-5, yy1-9), cv2.FONT_HERSHEY_SIMPLEX, 0.5,[0, 255, 0])

        cv2.circle(img_color, (xx2, yy2), 3, [255, 0, 255], thickness=1)
        cv2.circle(img_color, (xx2, yy2), 6, [255, 0, 255], thickness=1)
        cv2.putText(img_color, "Dis2:" + str(dis2) + " m", (350, 40), cv2.FONT_HERSHEY_SIMPLEX,0.5, [0, 0, 255])
        cv2.putText(img_color, "X2:" + str(camera_coordinate2[0]) + " m", (350, 60), cv2.FONT_HERSHEY_SIMPLEX, 0.5,
                    [255, 0, 0])
        cv2.putText(img_color, "Y2:" + str(camera_coordinate2[1]) + " m", (350, 80), cv2.FONT_HERSHEY_SIMPLEX, 0.5,
                    [255, 0, 0])
        cv2.putText(img_color, "Z2:" + str(camera_coordinate2[2]) + " m", (350, 100), cv2.FONT_HERSHEY_SIMPLEX, 0.5,
                    [255, 0, 0])
        cv2.putText(img_color, "2", (xx2 - 5, yy2 - 9), cv2.FONT_HERSHEY_SIMPLEX, 0.5, [255, 0, 255])

        cv2.line(img_color, (xx1,yy1), (xx2,yy2), [0, 255, 255], 1)
        if camera_coordinate1[0]*camera_coordinate1[1]*camera_coordinate1[2]*camera_coordinate2[0]*camera_coordinate2[1]*camera_coordinate2[2]==0:
            cv2.putText(img_color, "Dis1to2:" + "Please select points with depth", (40, 150), cv2.FONT_HERSHEY_SIMPLEX, 1, [0, 255, 255])
        else:
            juli=math.sqrt((camera_coordinate2[0]-camera_coordinate1[0])**2+(camera_coordinate2[1]-camera_coordinate1[1])**2+(camera_coordinate2[2]-camera_coordinate1[2])**2)
            cv2.putText(img_color, "Dis1to2:" + str(juli) + " m", (40, 150), cv2.FONT_HERSHEY_SIMPLEX, 1, [0, 255, 255])

        ### 显示画面 ####
        cv2.imshow('RealSence', img_color)
        key = cv2.waitKey(1)
        if key & 0xFF == ord('q') or key == 27:
            cv2.destroyAllWindows()
            break
- 在代码中,我们只需要关注xx1、yy1、xx2、yy2这四个参数。xx1、yy1是第一个点的像素值,xx2、yy2是第二个点的像素值。下面演示一下代码的使用过程。比如我们要求这个盒子上标志两个尖端的距离
首先可以用相机保存图片,这个代码多的是,就不粘贴了。然后将图片放大到像素级别,win10自带的画图可以用。
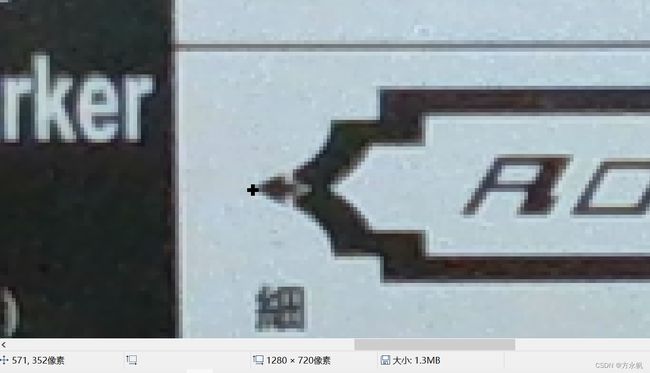
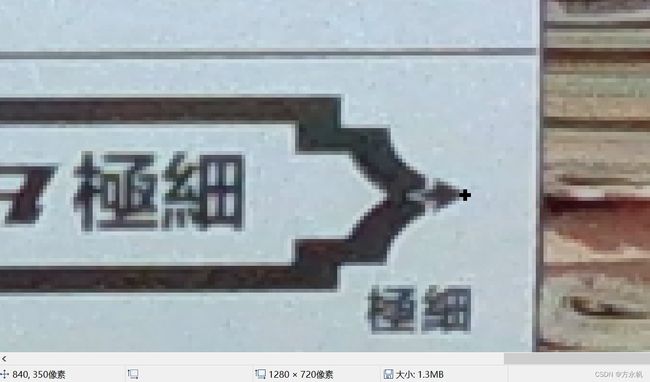
我们可以看到第一个点的像素值是571,352。第二个点的像素值是840,350。这样我们只需要把代码里面的xx1改成571,yy1改成352,xx2改成840,yy2改成350.然后运行就行了,结果如下
最后是一些注意事项:
我们在用相机保存完一张图片,要放大图片查看图片上两点的像素值,然后再运行该程序。这过程中要确保相机和所测物体静止不动。
如果某一像素点没有对应的深度值,即z坐标为0,就无法算出两点的距离,造成这个的原因主要是相机与物体太近了,可以放远一点。如果还是不行,就调一下相机的角度或者物体的位置。