YOLOv3 Pytorch代码及原理分析(一):跑通代码
目录
- 1. 前言
- 2. detect.py
- 3. 数据集处理
-
- 3.1 COCO2014、2017
- 3.2 VOC2007、2012
- 3.3 关于数据集的一些问题
- 3.4 一些目标检测论文对数据集的应用
- 4. train.py(COCO)
- 5. test.py(COCO)
- 6. train.py(VOC)
- 7. test.py(VOC)
- 8. 一些报错
1. 前言
YOLOv3 Pytorch代码及原理分析(一):跑通代码
YOLOv3 Pytorch代码及原理分析(二):网络结构和 Loss 计算
源码地址:https://github.com/ultralytics/yolov3
官方教程:https://github.com/ultralytics/yolov3/wiki/Train-Custom-Data
目标检测数据集
PASCAL Visual Object Classes官网:http://host.robots.ox.ac.uk/pascal/VOC/voc2012/index.html
COCO官网:https://cocodataset.org/
个人百度云:https://pan.baidu.com/s/1M2g0mmpivnfRG6-7zA0c6Q
提取码:agm1
更新日期:2020.7.22
网络参数
官方Google Drive:https://drive.google.com/open?id=1LezFG5g3BCW6iYaV89B2i64cqEUZD7e0
个人百度云:https://pan.baidu.com/s/1lS6LkbBE4DxAAWcCCsuY-A
提取码:sf18
更新日期:2020.7.27
系统:Win10
编辑器:Jupyter Notebook(安装教程)
环境和库:基本都是些常用的,运气比较好没有报 module 相关的错就没管,如有问题可以看下代码中提供的 requirements.txt,官网教程中有相关指引
本文先跑通 detect.py、test.py、train.py 三个文件,后续将基于代码分析网络,掌握更多细节
主要工作在于按要求处理数据集
跑COCO数据集基本不用改代码,VOC数据集需要一定的修改,相当于跑自定义数据集
2. detect.py
首先,将 yolov3-spp-ultralytics.pt 放置在 …/yolov3-master/weights 目录下;
其次,打开 …/yolov3-master/tutorial.ipynb,里面是官方的一些教程和运行结果,但不一定能直接跑通,建议在同目录下新建一个 .ipynb

运行代码
%run detect.py
即按照 detect.py 的默认参数运行
网络结构: …/yolov3-master/cfg/yolov3-spp.cfg
网络参数:…/yolov3-master/weights/yolov3-spp-ultralytics.pt
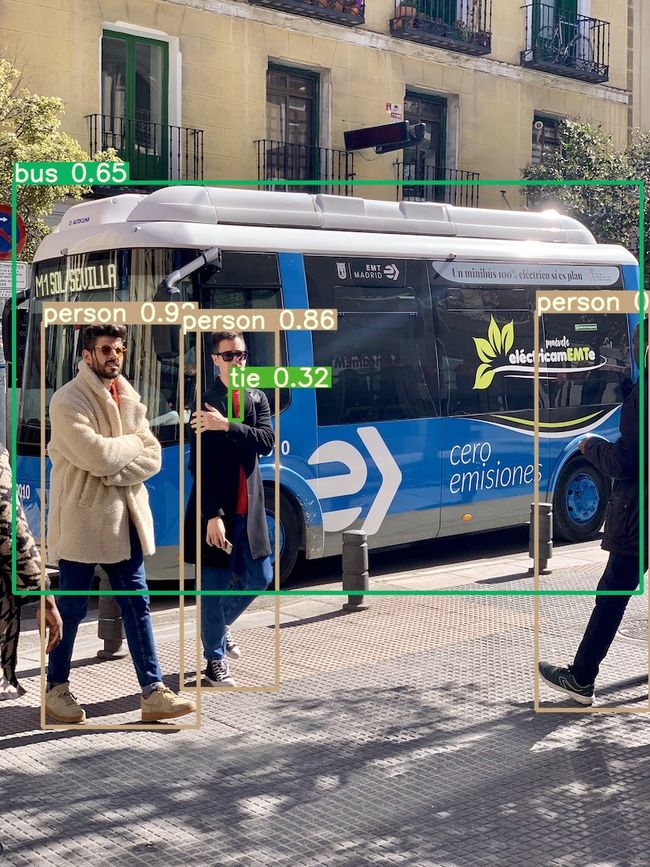
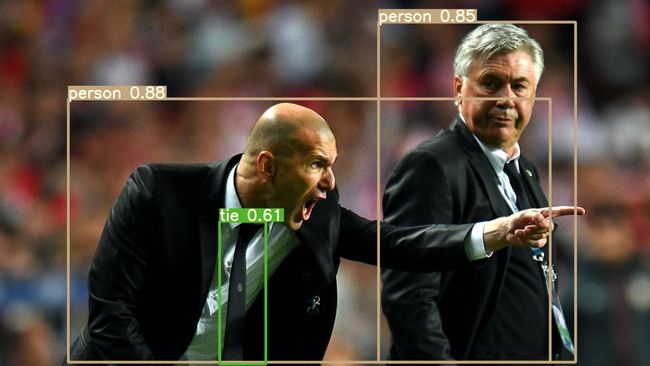
检测图像为 …/yolov3-master/data/samples 目录下的两张图像
输出结果保存在 …/yolov3-master/output 目录下


%run detect.py --source 0
将 source 设为0可以调用电脑摄像头进行实时检测
3. 数据集处理
图像和标签
下载的数据集并不能直接用于网络的训练与测试,在官方教程中有以下要求:
- 以 Darknet 格式标记数据
- 每一行一个目标
- 标记格式为 class x_center y_center width height
- 坐标 xywh 需要归一化
- class 的索引从0开始
- 图像标签的路径可以通过将图像路径中的 /images/*.jpg 替换为 /labels/*.txt 得到
例如:(由于数据没有放在代码路径下就用的绝对路径)
D:/learning/object detection/data/COCO2014/train2014/images/COCO_train2014_000000000009.jpg
D:/learning/object detection/data/COCO2014/train2014/labels/COCO_train2014_000000000009.txt
原因:
…/yolov3-master/utils/datasets.py 292行
        self.label_files = [x.replace('images', 'labels').replace(os.path.splitext(x)[-1], '.txt')
                            for x in self.img_files]
data和txt文件
在训练或测试网络时,所用数据的信息通过 data 文件传递,用记事本打开示例 …/yolov3-master/data/coco1.data
classes=80
train=data/coco1.txt
valid=data/coco1.txt
names=data/coco.names
classes 为类别数量,train 为训练数据,valid 为测试数据,names 为类别名称
继续打开 …/yolov3-master/data/coco1.txt
../coco/images/train2017/000000109622.jpg
可以得知 train 和 valid 路径下的 txt 中包含训练和测试所用图像的路径
总结一下数据集的要求
保证以下路径和文件的准确
(1)data 文件
(2)data 文件中 train、valid 和 names 路径下的 txt 和 names 文件
(3)train 和 valid 两个 txt 文件中的图像路径
(4)将图像路径中的 /images/*.jpg 替换为 /labels/*.txt 可以得到图像标签
3.1 COCO2014、2017
(1)根据COCO数据集的 json 标签文件生成符合要求的 txt 标签文件
from pycocotools.coco import COCO
import numpy as np
import tqdm
import argparse
import os

# /COCO2014/annotations/instances_train2014.json
# /COCO2014/annotations/instances_val2014.json
# /COCO2017/annotations/instances_train2017.json
# /COCO2017/annotations/instances_val2017.json
annotation_path = 'D:/learning/object detection/data/COCO2017/annotations/instances_val2017.json'
save_base_path = 'D:/learning/object detection/data/COCO2017/val2017/labels/'

data_source = COCO(annotation_file = annotation_path)
catIds = data_source.getCatIds()
categories = data_source.loadCats(catIds)
categories.sort(key = lambda x: x['id'])
classes = {}
coco_labels = {}
coco_labels_inverse = {}
for c in categories:
    coco_labels[len(classes)] = c['id']
    coco_labels_inverse[c['id']] = len(classes)
    classes[c['name']] = len(classes)

img_ids = data_source.getImgIds()
for index, img_id in tqdm.tqdm(enumerate(img_ids), desc='change .json file to .txt file'):
    img_info = data_source.loadImgs(img_id)[0]
    file_name = img_info['file_name'].split('.')[0]
    height = img_info['height']
    width = img_info['width']

    if not os.path.exists(save_base_path):
        os.makedirs(save_base_path)
    save_path = save_base_path + file_name + '.txt'
    with open(save_path, mode='w') as fp:
        annotation_id = data_source.getAnnIds(img_id)
        boxes = np.zeros((0, 5))
        if len(annotation_id) == 0:
            fp.write('')
            continue
        annotations = data_source.loadAnns(annotation_id)
        lines = ''
        for annotation in annotations:
            box = annotation['bbox']
            # some annotations have basically no width / height, skip them
            if box[2] < 1 or box[3] < 1:
                continue
            #top_x,top_y,width,height---->cen_x,cen_y,width,height
            box[0] = round((box[0] + box[2] / 2) / width, 6)
            box[1] = round((box[1] + box[3] / 2) / height, 6)
            box[2] = round(box[2] / width, 6)
            box[3] = round(box[3] / height, 6)
            label = coco_labels_inverse[annotation['category_id']]
            lines = lines + str(label)
            for i in box:
                lines += ' ' + str(i)
            lines += '\n'
        fp.writelines(lines)
print('finish')
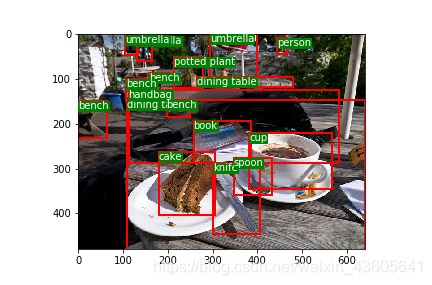
(2)可以根据下列代码验证一下生成的 txt 标签文件
这段代码有时候第一次运行图像闪一下就关了,再运行一下就正常了。
from PIL import Image
import matplotlib
import matplotlib.pyplot as plt
from  matplotlib import patches
matplotlib.use('Qt5Agg')

def load_classes(path):
    # Loads *.names file at 'path'
    with open(path, 'r') as f:
        names = f.read().split('\n')
    return list(filter(None, names))  # filter removes empty strings (such as last line)

class_path = 'D:/learning/object detection/data/COCO2017/coco.names'
class_list = load_classes(class_path)
img_path = 'D:/learning/object detection/data/COCO2017/train2017/images/000000000127.jpg'
img = np.array(Image.open(img_path))
H, W, C = img.shape
label_path = 'D:/learning/object detection/data/COCO2017/train2017/labels/000000000127.txt'
boxes = np.loadtxt(label_path, dtype=np.float).reshape(-1, 5)
# xywh to xxyy
boxes[:, 1] = (boxes[:, 1] - boxes[:, 3] / 2) * W
boxes[:, 2] = (boxes[:, 2] - boxes[:, 4] / 2) * H
boxes[:, 3] *= W
boxes[:, 4] *= H
fig = plt.figure()
ax = fig.subplots(1)
for box in boxes:
    bbox = patches.Rectangle((box[1], box[2]), box[3], box[4], linewidth=2,
                            edgecolor='r', facecolor="none")
    label = class_list[int(box[0])]
    # Add the bbox to the plot
    ax.add_patch(bbox)
    # Add label
    plt.text(box[1], box[2], s=label,
             color="white",
             verticalalignment="top",
             bbox={"color": 'g', "pad": 0},
            )
    ax.imshow(img)
plt.show()
我自己的 coco2014.data
classes=80
train=D:/learning/object detection/data/COCO2014/train.txt
valid=D:/learning/object detection/data/COCO2014/val.txt
names=D:/learning/object detection/data/COCO2014/coco.names
(4)生成 data 文件中的 train.txt 和 val.txt
import os

txtsavepath = 'D:/learning/object detection/data/COCO2014'
flist = ['train', 'val', 'test']
version = '2014'
for i in flist:
    total_f = os.listdir(txtsavepath + '/' + i + version + '/' + 'images')
    f = open(txtsavepath + '/' + i + '.txt', 'w')
    for j in total_f:
        name = txtsavepath + '/' + i + version + '/' + 'images' + '/' + j + '\n'
        f.write(name)
    f.close()
(5)列一下我的文件目录可能会更直观
- D:/learning/object detection
- data
- COCO2014
- annotations
- test2017
- train2017
- images
- COCO_train2014_000000000009.jpg
- labels
- COCO_train2014_000000000009.txt
- images
- val2017
- coco.names
- test.txt
- train.txt
- val.txt
- COCO2014
- yolov3-master
- data
- coco2014.data
- data
- data
3.2 VOC2007、2012
(1)根据VOC数据集的 xml 标签文件生成符合要求的 txt 标签文件
import os
import xml.etree.ElementTree as ET
import tqdm

annotation_path = 'D:/learning/object detection/data/VOC2012/VOC2012_test/Annotations/'
save_base_path = 'D:/learning/object detection/data/VOC2012/VOC2012_test/labels/'

classes = ['person','bird','cat','cow','dog','horse','sheep','aeroplane','bicycle','boat','bus','car',
           'motorbike','train','bottle','chair','diningtable','pottedplant','sofa','tvmonitor']

if not os.path.exists(save_base_path):
    os.makedirs(save_base_path)

xml_list = os.listdir(annotation_path)
for index, i in tqdm.tqdm(enumerate(xml_list), desc='change .xml file to .txt file'):
    xml_file = open(annotation_path+i)
    tree = ET.parse(xml_file)
    root = tree.getroot()
    size = root.find('size')
    w = int(size.find('width').text)
    h = int(size.find('height').text)
    lines = ''
    with open(save_base_path+i[:-3]+'txt', 'w') as fp:
        for obj in root.iter('object'):
            difficult = obj.find('difficult')
            cls = obj.find('name').text
            if difficult == None:
                difficult = '0'
            else:
                difficult = obj.find('difficult').text
            if cls not in classes or int(difficult) == 1:
                continue
            label = classes.index(cls)
            bndbox = obj.find('bndbox')
            xmin = float(bndbox.find('xmin').text)
            xmax = float(bndbox.find('xmax').text)
            ymin = float(bndbox.find('ymin').text)
            ymax = float(bndbox.find('ymax').text)
            box = [0]*4
            box[0] = round((xmax+xmin)/2/w, 6)
            box[1] = round((ymax+ymin)/2/h, 6)
            box[2] = round((xmax-xmin)/w, 6)
            box[3] = round((ymax-ymin)/h, 6)
            lines = lines + str(label)
            for j in box:
                lines += ' ' + str(j)
            lines += '\n'
        fp.writelines(lines)
print('finish')
(2)同样可以COCO第二步的代码验证一下生成的 txt 标签文件
(3)修改或创建自己的 data 文件
我自己的 VOC2012.data
classes=20
train=D:/learning/object detection/data/VOC2012/train.txt
valid=D:/learning/object detection/data/VOC2012/val.txt
names=D:/learning/object detection/data/VOC2012/voc2012.names
(4)根据数据集 ImageSets/Main/ 路径下 train.txt、val.txt、trainval.txt 或 test.txt 文件对数据的划分生成 data 中所用的文件
import os

imgpath = 'D:/learning/object detection/data/VOC2012/VOC2012_trainval/images/'
txtbasepath = 'D:/learning/object detection/data/VOC2012/VOC2012_trainval/ImageSets/Main/'
txtsavepath = 'D:/learning/object detection/data/VOC2012/'
# flist = ['test']
flist = ['train', 'val', 'trainval']
for i in flist:
    img_ids = open(txtbasepath+'%s.txt' %(i)).read().strip().split()
    f = open(txtsavepath + i + '.txt', 'w')
    for img_id in img_ids:
        name = imgpath + img_id + '.jpg' + '\n'
        f.write(name)
    f.close()
(5)列一下我的文件目录可能会更直观
- D:/learning/object detection
- data
- VOC2012
- VOC2012_test
- VOC2012_trainval
- Annotations
- 2007_000027.xml
- images
- 2007_000027.jpg
- labels
- 2007_000027.txt
- ImageSets
- Main
- train.txt
- trainval.txt
- val.txt
- Main
- Annotations
- test.txt
- train.txt
- trainval.txt
- val.txt
- voc2012.names
- VOC2012
- data
3.3 关于数据集的一些问题
| COCO2014 | COCO2017 | ||
|---|---|---|---|
| train | 标签 | 82783 | 118287 |
| 图像 | 82783 | 118287 | |
| val | 标签 | 40504 | 5000 |
| 图像 | 40504 | 5000 | |
| test | 标签 | / | / |
| 图像 | 40775 | 40670 |
| VOC2007 | VOC2012 | ||
|---|---|---|---|
| trainval | 标签 | 5011 | 17125 |
| 图像 | 5011 | 17125 | |
| train.txt | 2501 | 5717 | |
| val.txt | 2510 | 5823 | |
| trainval.txt | 5011 | 11540 | |
| test | 标签 | 4952 | 5138 |
| 图像 | 4952 | 16135 | |
| test.txt | 4952 | 10991 |
问题一:VOC2012的 trainval.txt 中所用的图像数量小于总图像和总标签数量。
问题二:VOC2012的 test.txt 中所用的图像数量大于标签数量,小于总图像数量。
问题三:在VOC的标签中有 difficult 一项,查询到代表检测难度,0代表简单,1代表难,由于参考的代码中把 difficult=1 的目标跳过了我也就跳过了,但是在 VOC2012_test 中的标签中有的目标又没有 difficult 这项指标,暂且把没有 difficult 的按 difficult=0 处理。
问题四:在验证 VOC2012_test 标签时,偶然发现图像 2012_004187.jpg 中明明有2个 person,但是标签中只有1个;另外发现 VOC2012_test 的 txt 标签中的 class 都是0,简单查看了几个 xml 标签 name 也都是 person,似乎 VOC2012 的测试集中提供的标签只有 person 一个类别。

<annotation>
	<filename>2012_004187.jpg</filename>
	<folder>VOC2012</folder>
	<object>
		<name>person</name>
		<bndbox>
			<xmax>483</xmax>
			<xmin>299</xmin>
			<ymax>375</ymax>
			<ymin>28</ymin>
		</bndbox>
		<difficult>0</difficult>
		<pose>Unspecified</pose>
		<point>
			<x>404</x>
			<y>227</y>
		</point>
	</object>
	<segmented>0</segmented>
	<size>
		<depth>3</depth>
		<height>375</height>
		<width>500</width>
	</size>
	<source>
		<annotation>PASCAL VOC2012</annotation>
		<database>The VOC2012 Database</database>
		<image>flickr</image>
	</source>
</annotation>
3.4 一些目标检测论文对数据集的应用
对于数据集的划分与数量,查询了许多经典的目标检测论文进行核实(R-CNN系列、YOLO系列、SSD、FPN、R-FCN等)
-
在 SSD 中:
3.1 On this dataset, we compare against Fast R-CNN [6] and Faster R-CNN [2] on VOC2007 test (4952 images).
3.3 We use the same settings as those used for our basic VOC2007 experiments above, except that we use VOC2012 trainval and VOC2007 trainval and test (21503 images) for training, and test on VOC2012 test (10991 images).
训练:VOC07 trainval+ test+VOC12 trainval(5011+4952+11540=21503)
测试:VOC2012 test (10991) -
在 FPN 中:(SSD也用到过 trainval35k)
5 We perform experiments on the 80 category COCO detection dataset [21]. We train using the union of 80k train images and a 35k subset of val images (trainval35k [2]), and report ablations on a 5k subset of val images (minival). We also report final results on the standard test set (test-std) [21] which has no disclosed labels.
训练:train 80k + val中35k的子集
验证:val中剩余的5k子集作为minival
测试:test-std -
在 Faster R-CNN、R-FCN中针对 MS COCO:
训练:train 80k
验证:val 40k
测试:test-dev 20k(在标签中有 image_info_test-dev2015.json 估计是这个)
4. train.py(COCO)
由于代码原本就是在COCO数据集上进行训练的,所以使用COCO数据集训练和测试时可以不对代码进行修改直接运行。
%run train.py --epochs 10 --batch-size 4 --data data/coco2014.data --img-size 416 --nosave
epochs、batch-size、img-size可根据需求和显存调整
网络结构用默认的 cfg/yolov3-spp.cfg
预训练模型用默认的 weights/yolov3-spp-ultralytics.pt
跑完以后会得到 :
yolov3-master/results.txt 记录每个 epoch 的输出
yolov3-master/results.png 训练过程中各种评价指标绘制的图像
yolov3-master/weights/last.pt 训练后的模型参数(应该还有个 best.pt 可能是我的 epochs 太小)
COCO数据集比较大训练10个epochs也很久就提前中断了,下图为部分结果

5. test.py(COCO)
这里还是用下载的参数测试 weights/yolov3-spp-ultralytics.pt
%run test.py --batch-size 4 --data data/coco2014.data --img-size 416
最后这个 warning 安装了1.17的 numpy 仍然有,暂时搞不太明白
6. train.py(VOC)
由于VOC数据集是20个类别,要对 cfg/yolov3-spp.cfg 进行修改
将 yolo 层中 classes 的80改为20
将 yolo 层的前一个 convolutional 层中 filters 的255改为75
255 = 3 ∗ ( 80 + 5 ) 255=3*(80+5) 255=3∗(80+5)
75 = 3 ∗ ( 20 + 5 ) 75=3*(20+5) 75=3∗(20+5)
共3个 yolo 层和 convolutional 层,修改位置分别在 636、643、722、729、809、816行

%run train.py --epochs 10 --batch-size 4 --data data/voc2012.data --img-size 416 --nosave
7. test.py(VOC)
%run test.py --batch-size 4 --data data/voc2012.data --img-size 416 --weights weights/last.pt
weights/yolov3-spp-ultralytics.pt 可以用作预训练但是不能进行测试,测试时只能用自己训练的参数了,或者能下载到基于 VOC 训练得到的参数文件
8. 一些报错
(1)module ‘main’ has no attribute ‘spec’
解决方案在执行文件的 if name == ‘main’: 下添加代码二选一,似乎都能解决报错,但是 jupyter notebook 在打印输出时(如进度条)可能会在新的一行输出(正常是覆盖原本的输出),导致输出很长。。。
另外这个报错时有时无,一般重启 jupyter notebook 也可以解决
if __name__ == '__main__':
    # __spec__ = "ModuleSpec(name='builtins', loader=)"
    # __spec__ = None
(2)Error(s) in loading state_dict for Darknet:
一般是测试时用的 weights 文件和 cfg 文件不一致,即模型参数和模型的结构不匹配
(3)CUDA out of memory
显存不够,钱不到位,调小 batch-size、img-size
也有可能是代码运行一半报了别的错,但是显存没释放,简单一点可以重启 kernel(现有变量会丢失)
(4)各种 size 相关
一般都是因为 data 文件、cfg 文件、weights 文件中因为 classes 数量变了以后 没有对相关参数进行修改统一


