德州仪器(Ti)平台嵌入式开发-01
这里写自定义目录标题
-
- 开发前的准备工作
- MCU+SDK 08.01.00
-
- Driver Porting Layer (DPL)
-
- Semaphore
- Task
- Clock
开发前的准备工作
- SDK与ccs等开发工具环境下载与安装
-
- 登录 https://www.ti.com.cn/,在搜索界面输入MCU微处理器型号,进入产品界面,你可以看到包括产品详情,技术文档,设计和开发,订购和质量以及支持与培训界面。找到设计与开发,点开软件开发,选择对应的SDK,例如MMWAVE-MCUPLUS-SDK,下载安装之后,默认就会在c盘ti文件夹下看到相应SDK目录。我们后边主要需要修改的是mcu_plus_sdk_am273x_08_与mmwave_mcuplus_sdk_04_00。相关SDK的使用指导文档在对应文件夹下边docs文件夹中。
MCU+SDK 08.01.00
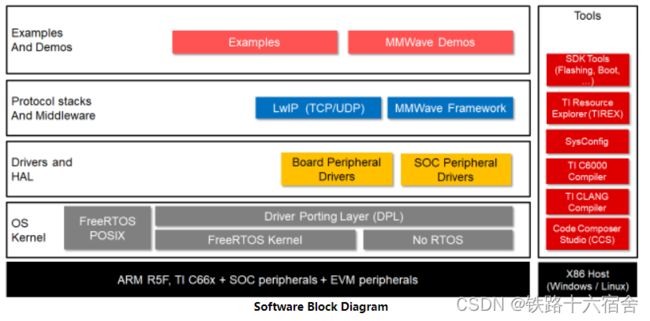
Ti的SDK大概分了四层,从硬件往上数起第一层为OS Kernel层,这一层一方面提供FreeRTOS的符合POSIX标准的OS接口,另一方面为上层提供所谓的Driver Porting Layer(DPL)接口,这一层后边我们会详述其中包含的各个模块。第二层是Drivers and HAL层,这一层主要包含板级外设以及片上外设的驱动代码。第三层包含一些实现TCP/UDP网络协议的LwIP和毫米波的中间件框架代码,最上层就是我们的毫米波Demos和一些针对不同驱动的Examples,而我们的主要工作就是利用这一层的代码,根据当前的硬件设计,集成一版固件,期间可能会修改到各个层的代码。期间用到Ti提供的工具如下图右侧。

Driver Porting Layer (DPL)
这一层的API我们会常用,主要的子模块如下:
- HW Interrupts
- Semaphore
- Task
- Clock
- Cycle Counter
- Cache
- MPU for ARMv7 (ARM R5, ARM M4)
- Region based Address Translate
- Heap
- Debug
- Event
今天我们主要几个别的平台也常见的子模块。
Semaphore
根据不同的用途我们创建一个信号量,如果涉及到中断里的任务间同步,使用二进制信号量,它的初始值是0。如果是用于串行化对critical section代码的访问,使用MutexSem,它的初始化为1。如果是连续的普通信号量,使用CountingSem。下边是各种信号量的初始化代码。
#include 针对二进制信号量,可以在各种外设挂接的中断处理函数中Post信号量,再在Task中统一处理外设报上来的这些中断,防止因为中断执行时间过长带来的问题。
void myISR(void *args)
{
    SemaphoreP_post(&gBinarySem);
}
void ISRHandleTask(void *args)
{
   int32_t status;
 	....
    SemaphoreP_constructBinary(&gBinarySem, 0);

    // initialize peripheral
    // register myISR
    // enable peripheral

    /* wait for 10ms for the semaphore to be post by the peripheral */
    status = SemaphoreP_pend(&gBinarySem, ClockP_usecToTicks(10*1000));
    if(status==SystemP_SUCCESS)
    {
        /* success */
    }
    else
    if(status==SystemP_TIMEOUT)
    {
        /* failed due to timeout */
    }
    else
    {
        /* other failure */
    }
    ....
}
互斥信号量则需要成对使用,保护代码代码不被重入,引发竞争问题。
    SemaphoreP_constructMutex(&gMutexSem);

    /* wait forever for the mutex to be available, lock or enter the critical section */
    SemaphoreP_pend(&gMutexSem, SystemP_WAIT_FOREVER);

    /* mutual exclusion, critical section */

    /* unlock the mutex, exit critical section */
    SemaphoreP_post(&gMutexSem);
普通连续的信号量使用如下,协调消费者与生产者之间的同步关系:
    uint32_t resourceId = 0;

    SemaphoreP_constructCounting(&gCountingSem, NUM_RESOURCES, NUM_RESOURCES);

    /* wait for a resource to be available */
    SemaphoreP_pend(&gCountingSem, SystemP_WAIT_FOREVER);

    /* access the resource */

    /* release resoource */
    resourceId = (resourceId+1)%NUM_RESOURCES;
    SemaphoreP_post(&gCountingSem);
Task
任务类似一个独立运行的线程,有自己独立的、私有的栈区,共享诸如全局变量等其他资源。下面是创建一个任务需要提前定义的资源,包括一个任务入口函数,Task建立完成之后,入口函数得以以一个线程的角色被调度执行。
#include 创建一个任务的代码如下:
    int32_t status;
    TaskP_Params myTaskParams; /* this need not be global variable */

    TaskP_Params_init(&myTaskParams);
    myTaskParams.name = "MY_TASK";
    myTaskParams.stackSize = MY_TASK_STACK_SIZE;
    myTaskParams.stack = gMyTaskStack;
    myTaskParams.priority = MY_TASK_PRI;
    myTaskParams.args = &gMyTask_args;
    myTaskParams.taskMain = myTaskMain;

    status = TaskP_construct(&gMyTask, &myTaskParams);
    DebugP_assert(status == SystemP_SUCCESS);
Task子模块还提供获取当前/其他任务的CPU使用率,相关代码如下:
    TaskP_Load taskLoad;
    uint32_t cpuLoad;

    cpuLoad = TaskP_loadGetTotalCpuLoad();
    DebugP_log(" LOAD: CPU  = %2d.%2d %%\r\n", cpuLoad/100, cpuLoad%100 );

    TaskP_loadGet(&gMyTask, &taskLoad);
    DebugP_log(" LOAD: %s = %2d.%2d %%\r\n", taskLoad.name, taskLoad.cpuLoad/100, taskLoad.cpuLoad%100 );
Clock
首先,这个子模块提供了ClockP_usleep和ClockP_sleep,用来Block调用接口的Task本身直到指定睡眠时间结束。常用于Task任务每次循环执行的最后,用于挂起自身线程,让出CPU供其他同或者低优先级任务调度。
其次,这个子模块实现了获取当前系统执行时间的接口,可用于获取一段代码的执行时间。
#include 最后,RTOS的情况下,他可以创建一个软Timer,在no-RTOS的情况下,回调函数执行在中断上下文中。如果要建立一个硬Timer,现需要在syscfg创建,并挂接到时执行的回调函数。

针对Clock子模块,Timer创建首先要准备Timer到时的回调函数。
uint32_t gOneShotCount = 0;
uint32_t gPeriodicCount = 0;

void myClockCallback(ClockP_Object *obj, void *arg)
{
    uint32_t *value = (uint32_t*)arg;

    (*value)++; /* increment number of time's this callback is called */
}
准备好之后进行Clock的参数初始化,下面的代码建立一个以10ms为周期,one shot mode的Timer。
    ClockP_Params clockParams;
    ClockP_Object clockObj;

    ClockP_Params_init(&clockParams);
    clockParams.timeout = ClockP_usecToTicks(10*1000);
    clockParams.start = 1;
    clockParams.callback = myClockCallback;
    clockParams.args = &gOneShotCount; /* pass address of counter which is incremented in the callback */

    ClockP_construct(&clockObj, &clockParams);


