Thymeleaf小功能总结
文章目录
-
-
- 一、Thymeleaf 文件上传
-
- 1. 上传之后对图片进行预览
- 2. 上传之后弹窗
- 二、Html 实现弹窗的实例
- 三、Html 实现流程图
-
一、Thymeleaf 文件上传
FileUploadController.java:
package com.hui.demo.controller;

import org.springframework.stereotype.Controller;
import org.springframework.ui.Model;
import org.springframework.ui.ModelMap;
import org.springframework.util.ResourceUtils;
import org.springframework.web.bind.annotation.RequestMapping;
import org.springframework.web.bind.annotation.RequestParam;

import org.springframework.web.multipart.MultipartFile;
import org.springframework.web.multipart.MultipartRequest;

import javax.servlet.http.HttpServletRequest;
import java.io.File;
import java.io.FileNotFoundException;
import java.io.IOException;
import java.nio.file.Files;
import java.nio.file.Path;
import java.nio.file.Paths;
import java.text.SimpleDateFormat;
import java.util.ArrayList;
import java.util.Date;
import java.util.List;
import java.util.UUID;

@Controller
public class FileUploadController {

    // 单一文件上传
    @RequestMapping("/upload")
    // @RequestParam 参数可去掉
    public String uploadFile(@RequestParam("file00") MultipartFile file, Model model){
        if(file.isEmpty()){
            model.addAttribute("msg","上传失败,请选择文件!");
        } else {
            try {
                String filename = file.getOriginalFilename();
                // 第一种存放的位置为D:/WorkSpace/Idea/SpringbootTest4/target/classes/static/
//            String filePath = ResourceUtils.getURL("classpath:").getPath()+"static/";
                // 第二种存放的位置为D://huiq/
                String filePath = "d://huiq/";

                //避免文件重复覆盖
                String uuid= UUID.randomUUID().toString().replaceAll("-", "");
                //时间戳分类文件
                String time =  new SimpleDateFormat("YYYY-MM").format(new Date());

                String realPath = filePath+time+"/"+uuid+filename;
                System.out.println("realPath-->"+realPath);
                File dest = new File(realPath);
                //检测是否存在目录,无,则创建
                if(!dest.getParentFile().exists()){
                    dest.getParentFile().mkdirs();//新建文件夹 多级目录
                }

                // 文件写入第一种方式
//            file.transferTo(dest);

                // 文件写入第二种方式
//            Path path= Paths.get(realPath.substring(1,realPath.length())); // 使用第一种存放位置的时候
                Path path= Paths.get(realPath); // 使用第二种存放位置的时候
                Files.write(path,file.getBytes());

                model.addAttribute("msg","文件上传成功!");
            } catch (IOException e) {
                e.printStackTrace();
                model.addAttribute("msg","文件上传失败!");
            }
        }
        return "thymeleaf/status";
    }

    //多文件上传
    @RequestMapping("/batch")
    public String uploadMoreFiles(HttpServletRequest request, Model model){
        MultipartRequest request1 = (MultipartRequest)request;
        //猜测 file为 input 类型为 file
        List<MultipartFile> fileList = request1.getFiles("file");
        List<String> msgList = new ArrayList<>();
        System.out.println(fileList.size());
        try {
            String filepath = ResourceUtils.getURL("classpath:").getPath()+"static/";
            for (int i=1;i<=fileList.size();i++){
                MultipartFile file = fileList.get(i-1);
                if (file.isEmpty()){
                    msgList.add("上传第"+i+"个文件失败");
                    model.addAttribute("msgList",msgList);
                    continue;
                }
                String filename = file.getOriginalFilename();
                //避免文件重复覆盖
                String uuid= UUID.randomUUID().toString().replaceAll("-", "");
                //时间戳分类文件
                String time =  new SimpleDateFormat("YYYY-MM").format(new Date());

                String realPath = filepath+time+"s/"+uuid+filename;
                File dest = new File(realPath);
                //System.out.println("realPath"+realPath);
                //检测是否存在目录,无,则创建
                if(!dest.getParentFile().exists()){
                    dest.getParentFile().mkdirs();//新建文件夹 多级目录
                }
                msgList.add("第"+i+"个文件,上传成功!");
                file.transferTo(dest);
            }
        } catch (FileNotFoundException e) {
            e.printStackTrace();
        } catch (IOException e) {
            e.printStackTrace();
        }
        model.addAttribute("msgList",msgList);
        return "thymeleaf/status";
    }

    @RequestMapping("/index")
    public String index(ModelMap map){
        return "thymeleaf/index";
    }
}
index.html:
DOCTYPE html>
<html lang="en" xmlns:th="http://www.thymeleaf.org">
<head>
    <meta charset="UTF-8">
    <title>文件上传title>
head>
<body>
<p>单文件上传p>
<form method="post" action="/upload" enctype="multipart/form-data">
    <p><input type="file" name="file00">p>
    <input type="submit" value="提交">
form>

<hr/>
<p>多文件上传p>
<form method="post" enctype="multipart/form-data" action="/batch">
    <p>文件1:<input type="file" name="file"/>p>
    <p>文件2:<input type="file" name="file"/>p>
    <p><input type="submit" value="上传"/>p>
form>

body>
html>
status.html:
DOCTYPE html>
<html lang="en" xmlns:th="http://www.thymeleaf.org">
<head>
    <meta charset="UTF-8">
    <title>Titletitle>
head>
<body>

<p>单文件上传p>
<p th:text="${msg}">p>
<hr>
<p>多文件上传p>
<ul>
    <li th:each="msg1:${msgList}" th:text="${msg1}">li>
ul>

body>
html>
可以在 application.properties 中设置对上传文件大小进行限制的参数:
spring.servlet.multipart.max-request-size=100MB
spring.servlet.multipart.max-file-size=100MB
- max-file-size:指定上传文件允许的最大大小。 默认值为1MB
- max-request-size:指定 multipart/form-data 请求允许的最大大小。 默认值为10MB。
注意:由于 springboot 具有几个版本,不同版本对于文件上传最大限制的配置也有所不同。所以要注意 springboot 本身的版本,不然会一直报错
# 在springboot1.3版本中:
multipart.maxFileSize

# 在springboot1.4与springboot1.5版本中:
spring.http.multipart.max-file-size

# 在springboot2.0版本中:
spring.servlet.multipart.max-file-size
1. 上传之后对图片进行预览
在 FileUploadController.java 文件的 uploadFile 方法中增加一行代码:model.addAttribute("src",time+"/"+uuid+filename);
方法一:
在 application.properties 中增加一行配置:spring.resources.static-locations=file:D:/huiq/
修改 status.html 文件中的 单文件上传 模块为:
<p>单文件上传p>
<p th:text="${msg}">p>
<div th:if="${msg == '文件上传成功!'}">
    <img th:src="@{${src}}" width=10%>


<hr>
方法二:
创建文件 TextThymeleaf.java:
import org.springframework.context.annotation.Configuration;
import org.springframework.web.servlet.config.annotation.ResourceHandlerRegistry;
import org.springframework.web.servlet.config.annotation.WebMvcConfigurer;

@Configuration
class TextThymeleaf implements WebMvcConfigurer {

    @Override
    public void addResourceHandlers(ResourceHandlerRegistry registry){
        registry.addResourceHandler("/upload/**").addResourceLocations("file:D:/huiq/");
    }
}
修改 status.html 文件中的 单文件上传 模块的写法为:
<p>单文件上传p>
<p th:text="${msg}">p>
<div th:if="${msg == '文件上传成功!'}">
     <img th:src="|upload/${src}|" width=10%>
<hr>
2. 上传之后弹窗
在 FileUploadController.java 文件的 uploadFile 方法中修改返回值为:return "thymeleaf/index";
修改 index.html 文件中的 单文件上传 模块为:
<p>单文件上传p>
<form method="post" action="/upload" enctype="multipart/form-data">
    <p><input type="file" name="file00">p>
    <input type="submit" value="提交">
form>
<div th:if="${msg == '文件上传成功!'}">
    <script>
        alert("文件上传成功!")
    script>
div>
<div th:if="${msg == '上传失败,请选择文件!'}">
    <script>
        alert("上传失败,请选择文件!")
    script>
div>
<div th:if="${msg == '文件上传失败!'}">
    <script>
        alert("文件上传失败!")
    script>
div>
二、Html 实现弹窗的实例
DOCTYPE html>
<html>
<head>
    <meta charset="utf-8" />
    <title>title>
    <style type="text/css">
        body{
            margin: 0px;
        }
        .zhezhao{
            position: fixed;
            left: 0px;
            top: 0px;
            background: #000;
            width: 100%;
            height: 100%;
            opacity: 0.5;
        }
        .tankuang{
            position: relative;
            background: #fff;
            width: 50%;
            height: 80%;
            border-radius: 5px;
            margin: 5% auto;
        }
        #header{
            height: 40px;
        }
        #header-right{
            position: absolute;
            width: 25px;
            height: 25px;
            border-radius: 5px;
            background: red;
            color: #fff;
            right: 5px;
            top: 5px;
            text-align: center;
        }
    style>
head>
<body>
<button type="button" onclick="dianwo()">点我button>
<div class="zhezhao" id='zhezhao'>
    <div class="tankuang">
        <div id="header">
            <span>我是弹窗span>
            <div id="header-right" onclick="hidder()">xdiv>
        div>
    div>
div>
<script type="text/javascript">
    document.getElementById('zhezhao').style.display="none";
    function dianwo(){
        document.getElementById('zhezhao').style.display="";
    }
    function hidder(){
        document.getElementById('zhezhao').style.display="none";
    }
script>
body>
html>
三、Html 实现流程图
示例1:来自 html实现简单审批流程图
DOCTYPE html>
<html lang="en">
<head>
<title>Bootstrap 实例title>
<meta charset="utf-8">
<script src="https://cdn.staticfile.org/jquery/2.1.1/jquery.min.js">script>
<style>
ul li{
font-size: small;
}
ul li::marker{
font-size: 20px;
}
.line{
padding-left: 10px;
font-size:small;
}
.dynamica{
list-style: none;
}
style>
head>
<body>
<div><ul id="checkStatus" style="margin-left: 50px;margin-top: 20px" >ul>div>
<script>
var data={
status:[
{
des:'STEP1',
date:'2021-6-20',
isStatus: false,
},
{
des:'STEP2',
date:'2021-6-21',
isStatus: false,
},
{
des:'STEP3',
date:'2021-6-22',
isStatus: false,
},
{
des:'请根据相关规定完善信息',
date:'2021-6-23',
isStatus: true,
},
{
des:'STEP4',
date:'2021-6-24',
isStatus: false,
},
{
des:'请根据相关规定完善信息',
date:'2021-6-25',
isStatus: true,
},
{
des:'STEP5',
date:'2021-6-26',
isStatus: false,
},
]
};
$(function (){
var status = data.status;
var dynamicUl = document.getElementById("checkStatus");
var htmlliElement = document.createElement('li');
htmlliElement.innerHTML='' +status[0].des+''+status[0].date+'';
dynamicUl.appendChild(htmlliElement);
for (let i = 1; i < status.length; i++) {
if(!status[i].isStatus){
let htmlaElement = document.createElement('li');
htmlaElement.className='dynamica'
htmlaElement.innerHTML='I
I
I
';
dynamicUl.appendChild(htmlaElement);
let htmlliElement=document.createElement('li');
htmlliElement.innerHTML='' +status[i].des+''+status[i].date+''
dynamicUl.appendChild(htmlliElement);
}else{
let htmlaElement = document.createElement('li');
htmlaElement.className='dynamica'
htmlaElement.innerHTML='I
I
I
I'+status[i].des+''+status[i].date+'';
dynamicUl.appendChild(htmlaElement);
}
}
});
script>
body>
html>

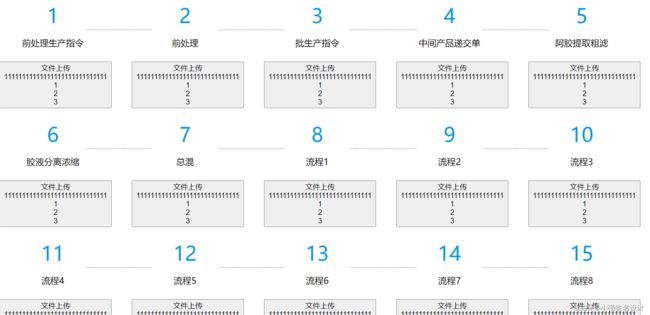
示例2:来自 用html+css+jQuery制作一个简单的流程图/步骤图
DOCTYPE html>
<html lang="en">
<head>
<title>Bootstrap 实例title>
<meta charset="utf-8">
<script src="https://cdn.staticfile.org/jquery/2.1.1/jquery.min.js">script>
<style>
ul {
display: flex;
}
li {
display: flex;
list-style: none;
position: relative;
}
.item {
width: 120px;
height: 100px;
text-align: center;
position: relative;
margin: 0 auto;
}
.line {
border-bottom: 1px dashed rgba(3, 2, 2, 0.7);
width: 120px;
align-self: center;
position: relative;
top: -50px;
}
.shell {
height: 200px;
position: relative;
}
.content {
width: 200px;
height: 100px;
text-align: center;
position: absolute;
left: -50%;
margin-left: 25px;
display: flex;
align-items: center;
justify-content: center;
}
style>
head>
<body>
<body>
<div class="container">div>
body>
<script>
$(function () {
// 数据
var arr = ["前处理生产指令", "前处理", "批生产指令", "中间产品递交单", "阿胶提取粗滤", "胶液分离浓缩", "总混", "流程1", "流程2", "流程3", "流程4", "流程5", "流程6", "流程7", "流程8", "流程9", "流程10", "流程11"];
// 循环生成步骤项
$(arr).each(function (index, item) {
// 第一个或者每循环6个,在尾部生成一行新的ul标签,也就是每5个一行
if (index == 0 || index % 5 == 0) {
$(".container").append("
");
}
// 生成固定的html片段$new
var $new = $(`
${index + 1}
${item}
`);
// 每遍历一次,就往当前文档中最后一个ul下的尾部添加进去一个$new
$(`ul:last-of-type`).append($new);
// 创建一条虚线
var $line = $(``);
// 判断:如果是当前行第一个元素,元素前不加虚线,如果不是第一个,在元素前加虚线
if (index % 5 != 0 && index > 0) {
$new.before($line);
}
});
});
script>
body>
html>
注意:如果想引入本地的 jquery.min.js 文件需要这样写:


