yolov5 .yaml文件模型读取部分
文章目录
-
- 前言
- 一、相关文件和读取参数
- 二、 不使用预训练模型(__init__部分)
-
- 1.Model类得到cfg,ch,nc,anchors 4个参数
- 2.通过参数加载模型(★★★★★)
- 3.这个循环每一句都分解一下
- 三、返回到Model类后续处理内容
前言
理解yolov5如何解析.yaml文件成为模型
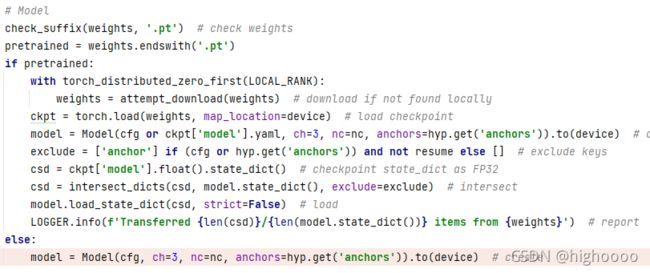
model = Model(cfg, ch=3, nc=nc, anchors=hyp.get(‘anchors’)).to(device)
代码分别在train.py,models/common.py,utils/yolo.py中可找到,所有流程按照debug顺序描述,请按照源代码阅读
一、相关文件和读取参数
如果需要用预训练模型,下载后 --weights改为’~.pt’ --cfg为空,直接训练–weights为空 --cfg为’~.yaml’
二、 不使用预训练模型(__init__部分)
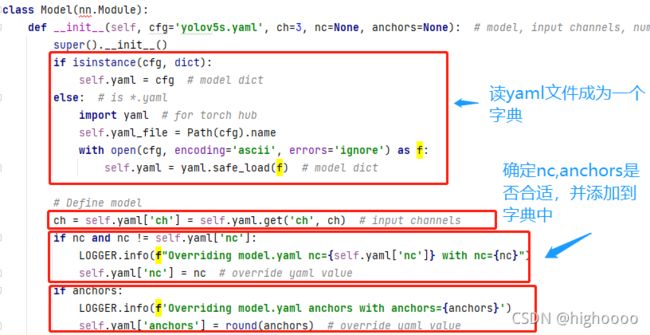
1.Model类得到cfg,ch,nc,anchors 4个参数
2.通过参数加载模型(★★★★★)
![]()
def parse_model(d, ch):  # model_dict, input_channels(3)
    LOGGER.info(f"\n{'':>3}{'from':>18}{'n':>3}{'params':>10}  {'module':<40}{'arguments':<30}")
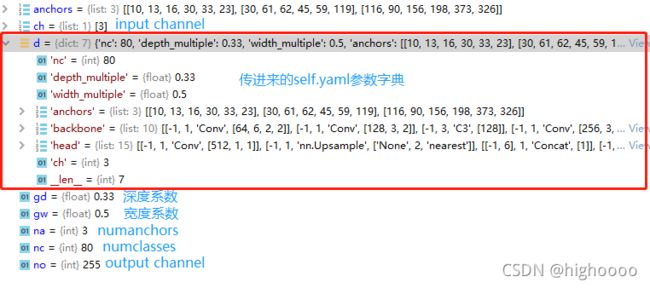
    anchors, nc, gd, gw = d['anchors'], d['nc'], d['depth_multiple'], d['width_multiple']
    na = (len(anchors[0]) // 2) if isinstance(anchors, list) else anchors  # number of anchors
    no = na * (nc + 5)  # number of outputs = anchors * (classes + 5)

    layers, save, c2 = [], [], ch[-1]  # layers, savelist, ch out
3.这个循环每一句都分解一下
for i, (f, n, m, args) in enumerate(d['backbone'] + d['head']): # from, number, module, args
f - from:表示当前模块的输入来自那一层的输出,-1表示来自上一层的输出。
n - number: 表示当前模块的理论重复次数,实际的重复次数还要由上面的参数depth_multiple共同决定,决定网络模型的深度。
m - module:模块类名,通过这个类名去common.py中寻找相应的类,进行模块化的搭建网络。
args: 是一个list,模块搭建所需参数,channel,kernel_size,stride,padding,bias等。会在网络搭建过程中根据不同层进行改变
m = eval(m) if isinstance(m, str) else m # eval strings
        for j, a in enumerate(args):
            try:
                args[j] = eval(a) if isinstance(a, str) else a  # eval strings
            except NameError:
                pass
args里面存储的每一层的模块搭建所需参数,channel,kernel_size,stride,padding,bias等
n = n_ = max(round(n * gd), 1) if n > 1 else n # depth gain
变量n通过参数gd来控制深度 最大为1
        if m in [Conv, GhostConv, Bottleneck, GhostBottleneck, SPP, SPPF, DWConv, MixConv2d, Focus, CrossConv,
                 BottleneckCSP, C3, C3TR, C3SPP, C3Ghost]:
            c1, c2 = ch[f], args[0]
            if c2 != no:  # if not output
                c2 = make_divisible(c2 * gw, 8)
c1 = ch[f] : f为args第一个参数,若为-1 代表当前输入通道是等于上一层输出通道数的
c2 = args[0] : 如果f不是output,那么取一下整?(不确定)
            args = [c1, c2, *args[1:]]
            if m in [BottleneckCSP, C3, C3TR, C3Ghost]:
                args.insert(2, n)  # number of repeats
                n = 1
如果m是这四类 args 返回 [c1,c2,n,?]
       elif m is nn.BatchNorm2d:
           args = [ch[f]]
如果是BN层, args = [ch[f]] 上一层的输出层数
       elif m is Concat:
           c2 = sum(ch[x] for x in f)
如果是concat
        elif m is Detect:
            args.append([ch[x] for x in f])
            if isinstance(args[1], int):  # number of anchors
                args[1] = [list(range(args[1] * 2))] * len(f)
如果是detect
        elif m is Contract:
            c2 = ch[f] * args[0] ** 2
如果是contract
        elif m is Expand:
            c2 = ch[f] // args[0] ** 2
如果是Expand
        else:
            c2 = ch[f]
将m转换到nn.sequential
t是module type
np是 number params
后面三句是打印用于看结构的
layers.append(m_)如下图
        m_ = nn.Sequential(*(m(*args) for _ in range(n))) if n > 1 else m(*args)  # module
        t = str(m)[8:-2].replace('__main__.', '')  # module type
        np = sum(x.numel() for x in m_.parameters())  # number params
        m_.i, m_.f, m_.type, m_.np = i, f, t, np  # attach index, 'from' index, type, number params
        LOGGER.info(f'{i:>3}{str(f):>18}{n_:>3}{np:10.0f}  {t:<40}{str(args):<30}')  # print
        save.extend(x % i for x in ([f] if isinstance(f, int) else f) if x != -1)  # append to savelist
        layers.append(m_)
        if i == 0:
            ch = []
        ch.append(c2)
![]()
输入每一个layer连成的模型(*符号和nn.sequential自行学习)和savelist(应该是保存结构的字符串list用于后续查看和输出)
return nn.Sequential(*layers), sorted(save)
三、返回到Model类后续处理内容
获取name(输出labels),inplace(?)
得到model的最后一层,设定一些东西
现在还不知道inplace,s是干什么的
但是通过 s和foward函数可以得到一个m.stride
通过m.stride可以得到缩放后的anchors
然后初始化参数
		self.names = [str(i) for i in range(self.yaml['nc'])]  # default names
		self.inplace = self.yaml.get('inplace', True)

        # Build strides, anchors
        m = self.model[-1]  # Detect()
        if isinstance(m, Detect):
            s = 256  # 2x min stride
            m.inplace = self.inplace
            ★★★★★★这一句要单独理解一下
            m.stride = torch.tensor([s / x.shape[-2] for x in self.forward(torch.zeros(1, ch, s, s))])  # forward
            m.anchors /= m.stride.view(-1, 1, 1)
            check_anchor_order(m)
            self.stride = m.stride
            self._initialize_biases()  # only run once

        # Init weights, biases
        initialize_weights(self)
        self.info()
        LOGGER.info('')


