三维重建工具——pclpy教程之点云分割
本教程代码开源:GitHub 欢迎star
文章目录
- 一、平面模型分割
-
- 1. 代码
- 2. 说明
- 3. 运行
- 二、圆柱模型分割
-
- 1. 代码
- 2. 说明
- 3. 运行
- 三、欧几里得聚类提取
-
- 1. 代码
- 2. 说明
- 3. 运行
- 四、区域生长分割
-
- 1. 代码
- 2. 说明
- 3. 运行
- 五、基于最小切割的分割
-
- 1. 代码
- 2. 说明
- 3. 运行
- 六、使用 ProgressiveMorphologicalFilter 分割地面
-
- 1. 代码
- 2. 说明
- 3. 运行
一、平面模型分割
在本教程中,我们将学习如何对一组点进行简单的平面分割,即找到支持平面模型的点云中的所有点。
1. 代码
见01_planar_segmentation.py
import pclpy
from pclpy import pcl
import numpy as np

if __name__ == '__main__':
    # 生成点云
    cloud_size = 15
    a = np.zeros((cloud_size, 3))
    cloud = pcl.PointCloud.PointXYZ().from_array(a)
    for point in cloud.points:
        point.x = np.random.ranf() * 1024
        point.y = np.random.ranf() * 1024
        point.z = 1.0
    # 设置一些外点
    cloud.points[0].z = 2.0
    cloud.points[3].z = -2.0
    cloud.points[6].z = -4.0

    print('Point cloud data:', cloud.size(), 'points')
    for point in cloud.points:
        print(point.x, ' ', point.y, ' ', point.z)

    coefficients = pcl.ModelCoefficients()
    inliers = pcl.PointIndices()

    # 分割类实例化
    seg = pcl.segmentation.SACSegmentation.PointXYZ()
    # 可选项
    seg.setOptimizeCoefficients(True)
    # 必须要指定的参数
    seg.setModelType(0)  # 0为pcl::SACMODEL_PLANE
    seg.setMethodType(0)  # 0为pcl::SAC_RANSAC
    seg.setDistanceThreshold(0.01)

    seg.setInputCloud(cloud)
    seg.segment(inliers, coefficients)

    if len(inliers.indices) == 0:
        print('Could not estimate a planar model for the given dataset.')
        exit()

    print('Model coefficients:',
          coefficients.values[0], ' ',
          coefficients.values[1], ' ',
          coefficients.values[2], ' ',
          coefficients.values[2])

    print('Model inliers: ', len(inliers.indices))
    for idx in inliers.indices:
        print(idx, '    ',
              cloud.points[idx].x, ' ',
              cloud.points[idx].y, ' ',
              cloud.points[idx].z)

    # 可视化内点和外点
    viewer = pcl.visualization.PCLVisualizer("3D viewer")
    viewer.setBackgroundColor(0, 0, 0)
    # 内点
    inliers_cloud = pcl.PointCloud.PointXYZ(cloud, inliers.indices)
    single_color = pcl.visualization.PointCloudColorHandlerCustom.PointXYZ(inliers_cloud, 0.0, 255.0, 0.0)  # 内点设为绿色
    viewer.addPointCloud(inliers_cloud, single_color, "inliers cloud")
    # 外点
    outliers_cloud = pcl.PointCloud.PointXYZ()
    extract = pcl.filters.ExtractIndices.PointXYZ()
    extract.setInputCloud(cloud)
    extract.setIndices(inliers)
    extract.setNegative(True)  # 提取出来外点点云
    extract.filter(outliers_cloud)

    single_color = pcl.visualization.PointCloudColorHandlerCustom.PointXYZ(outliers_cloud, 255.0, 0.0, 0.0)  # 外点设为红色
    viewer.addPointCloud(outliers_cloud, single_color, "outliers cloud")

    viewer.setPointCloudRenderingProperties(0, 3, "inliers cloud")
    viewer.setPointCloudRenderingProperties(0, 3, "outliers cloud")
    viewer.addCoordinateSystem(1)
    viewer.initCameraParameters()

    while not viewer.wasStopped():
        viewer.spinOnce(10)
2. 说明
首先是构建点云,并加入若干外点:
# 生成点云
cloud_size = 15
a = np.zeros((cloud_size, 3))
cloud = pcl.PointCloud.PointXYZ().from_array(a)
for point in cloud.points:
point.x = np.random.ranf() * 1024
point.y = np.random.ranf() * 1024
point.z = 1.0
# 设置一些外点
cloud.points[0].z = 2.0
cloud.points[3].z = -2.0
cloud.points[6].z = -4.0

print('Point cloud data:', cloud.size(), 'points')
for point in cloud.points:
print(point.x, ' ', point.y, ' ', point.z)
然后创建 pcl.segmentation.SACSegmentation.PointXYZ()对象并设置模型和方法类型。这也是我们指定“距离阈值”的地方,它决定了一个点必须离模型多近才能被视为内点。在本教程中,我们将使用 RANSAC 方法 (pcl::SAC_RANSAC) 作为选择的稳健估计器。我们的决定是出于 RANSAC 的简单性(其他稳健的估计器将其用作基础并添加其他更复杂的概念)。有关 RANSAC 的更多信息,请查看其维基百科页面。
其次是输出显示内点集的内容,以及估计的平面参数 a x + b y + c z + d = 0 ax+by+cz+d=0 ax+by+cz+d=0.
coefficients = pcl.ModelCoefficients()
inliers = pcl.PointIndices()

# 分割类实例化
seg = pcl.segmentation.SACSegmentation.PointXYZ()
# 可选项
seg.setOptimizeCoefficients(True)
# 必须要指定的参数
seg.setModelType(0)  # 0为pcl::SACMODEL_PLANE
seg.setMethodType(0)  # 0为pcl::SAC_RANSAC
seg.setDistanceThreshold(0.01)

seg.setInputCloud(cloud)
seg.segment(inliers, coefficients)

if len(inliers.indices) == 0:
    print('Could not estimate a planar model for the given dataset.')
    exit()

print('Model coefficients:',
      coefficients.values[0], ' ',
      coefficients.values[1], ' ',
      coefficients.values[2], ' ',
      coefficients.values[2])

print('Model inliers: ', len(inliers.indices))
for idx in inliers.indices:
    print(idx, '    ',
          cloud.points[idx].x, ' ',
          cloud.points[idx].y, ' ',
          cloud.points[idx].z)
最后就是可视化内点和外点,比较简单,不再赘述。
3. 运行
运行代码:
python 01_planar_segmentation.py
结果:
Point cloud data: 15 points
221.09796142578125 190.82125854492188 2.0
700.376708984375 306.92431640625 1.0
693.7754516601562 924.7059936523438 1.0
360.8123474121094 1020.7657470703125 -2.0
682.8381958007812 857.310791015625 1.0
485.5827941894531 444.12451171875 1.0
201.10165405273438 526.590087890625 -4.0
742.3724975585938 685.0823974609375 1.0
706.4700317382812 705.3656616210938 1.0
800.8279418945312 639.457275390625 1.0
621.3114624023438 461.4114074707031 1.0
105.48615264892578 940.4956665039062 1.0
79.97904205322266 933.0923461914062 1.0
819.8399047851562 434.0813293457031 1.0
333.2424621582031 279.7982482910156 1.0
Model coefficients: -0.0 -0.0 1.0 1.0
Model inliers: 12
1 700.376708984375 306.92431640625 1.0
2 693.7754516601562 924.7059936523438 1.0
4 682.8381958007812 857.310791015625 1.0
5 485.5827941894531 444.12451171875 1.0
7 742.3724975585938 685.0823974609375 1.0
8 706.4700317382812 705.3656616210938 1.0
9 800.8279418945312 639.457275390625 1.0
10 621.3114624023438 461.4114074707031 1.0
11 105.48615264892578 940.4956665039062 1.0
12 79.97904205322266 933.0923461914062 1.0
13 819.8399047851562 434.0813293457031 1.0
14 333.2424621582031 279.7982482910156 1.0
可视化结果:

注意,为了内点和外点区别更明显,这里其实我增大了外点的偏离程度。实际情况中偏离点可能没有这么明显。
二、圆柱模型分割
本教程举例说明了如何使用圆柱模型进行点云分割。按如下步骤进行(按顺序):
- 过滤掉 1.5 米以外的数据点
- 估计每个点的表面法线
- 平面模型(描述我们演示数据集中的表)被分割并保存到磁盘
- 圆柱模型(描述我们演示数据集中的杯子)被分割并保存到磁盘
由于数据中存在噪声,圆柱模型并不完美。
1. 代码
见02_cylinder_segmentation.py
import pclpy
from pclpy import pcl
import numpy as np

if __name__ == '__main__':
    # 所有需要的类实例化
    reader = pcl.io.PCDReader()
    ps = pcl.filters.PassThrough.PointXYZRGBA()
    ne = pcl.features.NormalEstimation.PointXYZRGBA_Normal()
    seg = pcl.segmentation.SACSegmentationFromNormals.PointXYZRGBA_Normal()
    writer = pcl.io.PCDWriter()
    extract = pcl.filters.ExtractIndices.PointXYZRGBA()
    extract_normals = pcl.filters.ExtractIndices.Normal()
    tree = pcl.search.KdTree.PointXYZRGBA()

    #  Datasets
    cloud = pcl.PointCloud.PointXYZRGBA()
    cloud_filtered = pcl.PointCloud.PointXYZRGBA()
    cloud_normals = pcl.PointCloud.Normal()
    cloud_filtered2 = pcl.PointCloud.PointXYZRGBA()
    cloud_normals2 = pcl.PointCloud.Normal()
    coefficients_plane = pcl.ModelCoefficients()
    coefficients_cylinder = pcl.ModelCoefficients()
    inliers_plane = pcl.PointIndices()
    inliers_cylinder = pcl.PointIndices()

    # 加载点云
    reader.read("../../data/table_scene_mug_stereo_textured.pcd", cloud)
    print('PointCloud has: ', cloud.size(), 'data points.')

    # 使用带通滤波器去除无效点(外点和无穷点)
    ps.setInputCloud(cloud)
    ps.setFilterFieldName('z')
    ps.setFilterLimits(0, 1.5)
    ps.filter(cloud_filtered)
    print('PointCloud after filtering has: ', cloud_filtered.size(), 'data points.')

    # 估计法线
    ne.setInputCloud(cloud_filtered)
    ne.setSearchMethod(tree)
    ne.setKSearch(50)
    ne.compute(cloud_normals)

    # 实例化平面分割类并设置参数
    seg.setOptimizeCoefficients(True)
    seg.setModelType(0)  # 0为pcl::SACMODEL_PLANE
    seg.setMethodType(0)  # 0为pcl::SAC_RANSAC
    seg.setNormalDistanceWeight(0.1)
    seg.setMaxIterations(100)
    seg.setDistanceThreshold(0.03)
    seg.setInputCloud(cloud_filtered)
    seg.setInputNormals(cloud_normals)
    # 获取平面内点和系数
    seg.segment(inliers_plane, coefficients_plane)
    print('Plane coefficients:', coefficients_plane.values)

    # 提取平面内点
    extract.setInputCloud(cloud_filtered)
    extract.setIndices(inliers_plane)
    extract.setNegative(False)
    # 将内点存入磁盘
    cloud_plane = pcl.PointCloud.PointXYZRGBA()
    extract.filter(cloud_plane)
    print('PointCloud representing the planar component: ', cloud_plane.size(), ' data points.')
    writer.write('table_scene_mug_stereo_textured_plane.pcd', cloud_plane, False)

    # 去除平面内点,提取剩余点
    extract.setNegative(True)
    extract.filter(cloud_filtered2)

    extract_normals.setInputCloud(cloud_normals)
    extract_normals.setNegative(True)
    extract_normals.setIndices(inliers_plane)
    extract_normals.filter(cloud_normals2)

    # 实例化圆柱分割类并设置参数
    seg.setOptimizeCoefficients(True)
    seg.setModelType(5)     # 5代表SACMODEL_CYLINDER
    seg.setMethodType(0)    # 0代表SAC_RANSAC
    seg.setNormalDistanceWeight(0.1)
    seg.setMaxIterations(10000)
    seg.setDistanceThreshold(0.05)
    seg.setRadiusLimits(0, 0.1)
    seg.setInputCloud(cloud_filtered2)
    seg.setInputNormals(cloud_normals2)

    # 获取椭圆内点和参数
    seg.segment(inliers_cylinder, coefficients_cylinder)
    print('Cylinder coefficients: ', coefficients_cylinder.values)

    # 将椭圆点云写入磁盘
    extract.setInputCloud(cloud_filtered2)
    extract.setIndices(inliers_cylinder)
    extract.setNegative(False)
    cloud_cylinder = pcl.PointCloud.PointXYZRGBA()
    extract.filter(cloud_cylinder)

    if cloud_cylinder.size() == 0:
        print('Can not find the cylindrical component.')
    else:
        print('PointCloud representing the cylindrical component: ', cloud_cylinder.size())
        writer.write('table_scene_mug_stereo_textured_cylinder.pcd', cloud_cylinder, False)

    # 可视化
    viewer = pcl.visualization.PCLVisualizer("viewer")
    v0 = 1
    viewer.createViewPort(0.0, 0.0, 0.5, 1.0, v0)
    viewer.setBackgroundColor(0.0, 0.0, 0.0, v0)
    viewer.addText("plane", 10, 10, "v1 text", v0)
    viewer.addPointCloud(cloud_plane, "plane cloud", v0)

    v1 = 2
    viewer.createViewPort(0.5, 0.0, 1.0, 1.0, v1)
    viewer.setBackgroundColor(0.3, 0.3, 0.3, v1)
    viewer.addText("cylinder", 10, 10, "v2 text", v1)
    viewer.addPointCloud(cloud_cylinder, "cylinder cloud", v1)

    viewer.setPointCloudRenderingProperties(0, 1, "plane cloud", v0)
    viewer.setPointCloudRenderingProperties(0, 1, "cylinder cloud", v1)
    viewer.addCoordinateSystem(1.0)

    while not viewer.wasStopped():
        viewer.spinOnce(10)
2. 说明
这里只说明一下椭圆分割这一块儿,其他的跟前面大同小异,不再赘述。
# 实例化圆柱分割类并设置参数
seg.setOptimizeCoefficients(True)
seg.setModelType(5)     # 5代表SACMODEL_CYLINDER
seg.setMethodType(0)    # 0代表SAC_RANSAC
seg.setNormalDistanceWeight(0.1)
seg.setMaxIterations(10000)
seg.setDistanceThreshold(0.05)
seg.setRadiusLimits(0, 0.1)
正如所见,我们使用 RANSAC 鲁棒估计器来获得圆柱系数,并且我们对每个内点到模型的距离阈值不超过 5 厘米。此外,我们将表面法线影响设置为 0.1 的权重,并将圆柱模型的半径限制为小于 10 厘米。
3. 运行
运行代码:
python 01_planar_segmentation.py
结果:
PointCloud has: 307200 data points.
PointCloud after filtering has: 139897 data points.
Plane coefficients: Float[0.015758, -0.838789, -0.544229, 0.527018]
PointCloud representing the planar component: 126168 data points.
Cylinder coefficients: Float[0.0585808, 0.279481, 0.900414, -0.0129607, -0.843949, -0.536267, 0.0387611]
PointCloud representing the cylindrical component: 9271
可视化:

也可以使用PCL bin/下面的可视化工具pcl_viewer_release可视化本地的pcd文件:
比如可视化原始点云。
pcl_viewer_release table_scene_mug_stereo_textured.pcd
注意:PCL1.8.1是pcl_viewer_release,PCL1.11.1是pcl_viewer
结果:
同样可以可视化分割出来的平面和圆柱,在此不再赘述。
三、欧几里得聚类提取
理论部分请参阅:欧几里得聚类提取
本文不再赘述。
1. 代码
见03_cluster_extraction.py
import pclpy
from pclpy import pcl
import numpy as np


def compareCloudShow(cloud, cloud_filtered):
    # Open 3D viewer and add point cloud and normals
    viewer = pcl.visualization.PCLVisualizer("viewer")
    v0 = 1
    viewer.createViewPort(0.0, 0.0, 0.5, 1.0, v0)
    viewer.setBackgroundColor(0.0, 0.0, 0.0, v0)
    single_color = pcl.visualization.PointCloudColorHandlerCustom.PointXYZ(cloud, 0.0, 255.0, 0.0)
    viewer.addPointCloud(cloud, single_color, "sample cloud1", v0)

    v1 = 2
    viewer.createViewPort(0.5, 0.0, 1.0, 1.0, v1)
    viewer.setBackgroundColor(0.0, 0.0, 0.0, v1)
    single_color = pcl.visualization.PointCloudColorHandlerCustom.PointXYZ(cloud_filtered, 0.0, 255.0, 0.0)
    viewer.addPointCloud(cloud_filtered, single_color, "sample cloud2", v1)

    viewer.setPointCloudRenderingProperties(0, 1, "sample cloud1", v0)
    viewer.setPointCloudRenderingProperties(0, 1, "sample cloud2", v1)
    viewer.addCoordinateSystem(1.0)
    while not viewer.wasStopped():
        viewer.spinOnce(10)


if __name__ == '__main__':
    reader = pcl.io.PCDReader()
    cloud = pcl.PointCloud.PointXYZ()
    cloud_f = pcl.PointCloud.PointXYZ()
    reader.read('../../data/table_scene_lms400.pcd', cloud)
    print('PointCloud before filtering has: ', cloud.size(), ' data points.')

    # 下采样 使用leaf size为1cm
    vg = pcl.filters.VoxelGrid.PointXYZ()
    cloud_filtered = pcl.PointCloud.PointXYZ()
    vg.setInputCloud(cloud)
    vg.setLeafSize(0.01, 0.01, 0.01)
    vg.filter(cloud_filtered)
    print('PointCloud after filtering has: ', cloud_filtered.size(), ' data points.')

    # 平面分割
    seg = pcl.segmentation.SACSegmentation.PointXYZ()
    inliers = pcl.PointIndices()
    coefficients = pcl.ModelCoefficients()
    cloud_plane = pcl.PointCloud.PointXYZ()
    writer = pcl.io.PCDWriter()
    seg.setOptimizeCoefficients(True)
    seg.setModelType(0)
    seg.setMethodType(0)
    seg.setMaxIterations(100)
    seg.setDistanceThreshold(0.02)

    nr_points = cloud_filtered.size()
    while cloud_filtered.size() > 0.3 * nr_points:
        # 在剩余的点云中分割出最大的平面成分
        seg.setInputCloud(cloud_filtered)
        seg.segment(inliers, coefficients)
        if len(inliers.indices) == 0:
            print('Could not estimate a planar model for the given dataset.')
            break

        # 提取平面内点
        extract = pcl.filters.ExtractIndices.PointXYZ()
        extract.setInputCloud(cloud_filtered)
        extract.setIndices(inliers)
        extract.setNegative(False)

        extract.filter(cloud_plane)
        # 可视化提取出来的平面
        compareCloudShow(cloud_filtered, cloud_plane)
        print('PointCloud representing the planar component: ', cloud_plane.size(), ' data points.')

        # 去除上面提取到的平面内点,得到剩余点
        extract.setNegative(True)
        extract.filter(cloud_f)
        cloud_filtered = cloud_f

    writer.write('cloud_cluster_source.pcd', cloud_filtered, False)
    # 创建KdTree
    tree = pcl.search.KdTree.PointXYZ()
    tree.setInputCloud(cloud_filtered)

    cluster_indices = pcl.vectors.PointIndices()
    ec = pcl.segmentation.EuclideanClusterExtraction.PointXYZ()
    ec.setClusterTolerance(0.02)  # 2cm
    ec.setMinClusterSize(100)
    ec.setMaxClusterSize(25000)
    ec.setSearchMethod(tree)
    ec.setInputCloud(cloud_filtered)
    ec.extract(cluster_indices)

    j = 0
    for it in cluster_indices:
        cloud_cluster = pcl.PointCloud.PointXYZ()
        for pit in it.indices:
            cloud_cluster.push_back(cloud_filtered.at(pit))
        cloud_cluster.width = cloud_cluster.size()
        cloud_cluster.height = 1
        cloud_cluster.is_dense = True

        print('PointCloud representing the Cluster: ', cloud_cluster.size(), ' data points.')

        ss = 'cloud_cluster_' + str(j) + '.pcd'
        writer.write(ss, cloud_cluster, False)
        j = j + 1
2. 说明
现在,让我们一块一块地分解代码,跳过显而易见的部分。
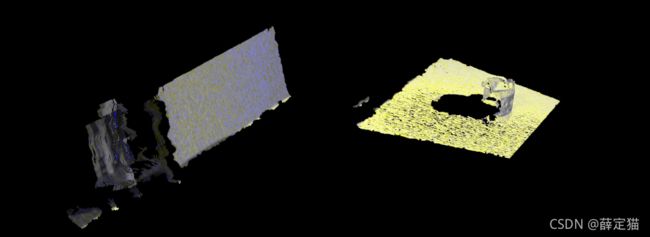
平面分割部分不再赘述,分割结果如下:
左图为分割对象,右图为分割结果
分割1

分割2

可见,两次平面分割把地面和桌面两个平面分割了出来。
后面对剩余点云进行欧几里得聚类分割,剩余点云如下:

# 创建KdTree
tree = pcl.search.KdTree.PointXYZ()
tree.setInputCloud(cloud_filtered)
我们正在为我们的提取算法的搜索方法创建一个 KdTree 对象。
cluster_indices = pcl.vectors.PointIndices()
这里我们创建了一个PointIndices向量,它包含vector 中的实际索引信息。每个检测到的集群的索引都保存在这里 - 请注意,cluster_indices是一个向量,其中包含每个检测到的集群的一个 PointIndices 实例。因此 cluster_indices[0]包含我们点云中第一个集群的所有索引。
ec = pcl.segmentation.EuclideanClusterExtraction.PointXYZ()
ec.setClusterTolerance(0.02)  # 2cm
ec.setMinClusterSize(100)
ec.setMaxClusterSize(25000)
ec.setSearchMethod(tree)
ec.setInputCloud(cloud_filtered)
ec.extract(cluster_indices)
这里我们创建了一个点类型为 PointXYZ 的 EuclideanClusterExtraction 对象,因为我们的点云是 PointXYZ 类型。我们也在设置提取的参数和变量。请小心为**setClusterTolerance()**设置正确的值。如果你取一个非常小的值,则可能会将实际对象视为多个集群。另一方面,如果你将该值设置得太高,则可能会发生多个对象 被视为一个集群的情况。所以我们的建议是测试并尝试哪个值适合你的数据集。
我们约束发现的集群必须至少有setMinClusterSize() 点和最大**setMaxClusterSize()**点。
现在我们从点云中提取集群并将索引保存在 cluster_indices 中。为了将每个簇从vector 中分离出来, 我们必须遍历cluster_indices,为每个条目创建一个新的PointCloud并将当前簇的所有点写入PointCloud。
j = 0
for it in cluster_indices:
    cloud_cluster = pcl.PointCloud.PointXYZ()
    for pit in it.indices:
        cloud_cluster.push_back(cloud_filtered.at(pit))
    cloud_cluster.width = cloud_cluster.size()
    cloud_cluster.height = 1
    cloud_cluster.is_dense = True

    print('PointCloud representing the Cluster: ', cloud_cluster.size(), ' data points.')

    ss = 'cloud_cluster_' + str(j) + '.pcd'
    writer.write(ss, cloud_cluster, False)
    j = j + 1
3. 运行
运行代码:
python 03_cluster_extraction.py
结果:
PointCloud before filtering has: 460400 data points.
PointCloud after filtering has: 41049 data points.
PointCloud representing the planar component: 20536 data points.
PointCloud representing the planar component: 12442 data points.
PointCloud representing the Cluster: 4857 data points.
PointCloud representing the Cluster: 1386 data points.
PointCloud representing the Cluster: 321 data points.
PointCloud representing the Cluster: 291 data points.
PointCloud representing the Cluster: 123 data points.
也可以使用PCL bin/下面的可视化工具pcl_viewer_release可视化本地的pcd文件:
比如可视化原始点云。
pcl_viewer_release cloud_cluster_0.pcd cloud_cluster_1.pcd cloud_cluster_2.pcd cloud_cluster_3.pcd cloud_cluster_4.pcd
注意:PCL1.8.1是pcl_viewer_release,PCL1.11.1是pcl_viewer
结果:
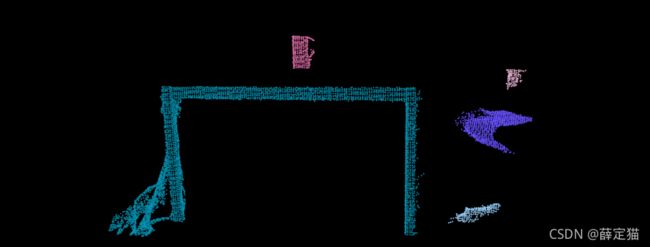
可以看到,点云被分割为5类。
四、区域生长分割
理论部分请参阅:区域生长分割
本文不再赘述。
1. 代码
见04_region_growing_segmentation.py
import pclpy
from pclpy import pcl
import numpy as np

if __name__ == '__main__':
    # 加载点云
    cloud = pcl.PointCloud.PointXYZ()
    if pcl.io.loadPCDFile('../../data/region_growing_tutorial.pcd', cloud) == -1:
        print('Cloud reading failed.')
        exit(-1)
	# 计算法线
    tree = pcl.search.KdTree.PointXYZ()
    normals = pcl.PointCloud.Normal()
    ne = pcl.features.NormalEstimation.PointXYZ_Normal()
    ne.setInputCloud(cloud)
    ne.setSearchMethod(tree)
    ne.setKSearch(50)
    ne.compute(normals)
	# PassThrough滤波器降采样
    indices = pcl.vectors.Int()
    ps = pcl.filters.PassThrough.PointXYZ()
    ps.setInputCloud(cloud)
    ps.setFilterFieldName('z')
    ps.setFilterLimits(13000.0, 15000.0)
    ps.filter(indices)
	# 区域生长算法分割
    reg = pcl.segmentation.RegionGrowing.PointXYZ_Normal()
    reg.setInputCloud(cloud)
    reg.setMinClusterSize(50)
    reg.setMaxClusterSize(1000000)
    reg.setSearchMethod(tree)
    reg.setNumberOfNeighbours(30)
    # reg.setIndices(indices)
    reg.setInputNormals(normals)
    reg.setSmoothnessThreshold(3.0 / 180.0 * np.pi)
    reg.setCurvatureThreshold(1.0)

    clusters = pcl.vectors.PointIndices()
    reg.extract(clusters)
	# 输出部分结果
    print('Number of clusters is equal to ', len(clusters))
    print('First cluster has ', len(clusters[0].indices), ' points.')
    print('These are the indices of the points of the initial')
    print('cloud that belong to the first cluster:')
    counter = 0
    while counter < len(clusters[0].indices):
        print(clusters[0].indices[counter], ' ', end='')
        counter = counter + 1
        if counter % 10 == 0:
            print('')
    # 可视化
    colored_cloud = reg.getColoredCloud()
    viewer = pcl.visualization.CloudViewer('Cluster viewer')
    viewer.showCloud(colored_cloud)
    while not viewer.wasStopped(10):
        pass
2. 说明
这里只挑重要区域生长算法说一下,法线计算、带通滤波不再赘述。
# 区域生长算法分割
reg = pcl.segmentation.RegionGrowing.PointXYZ_Normal()
pcl::RegionGrowing是一个模板类,有两个参数:
- PointT - 要使用的点类型(在给定的示例中是
pcl::PointXYZ) - NormalT - 要使用的法线类型(在给定的示例中是
pcl::Normal)
reg.setInputCloud(cloud)
reg.setMinClusterSize(50)
reg.setMaxClusterSize(1000000)
reg.setSearchMethod(tree)
reg.setNumberOfNeighbours(30)
# reg.setIndices(indices)
reg.setInputNormals(normals)
之后设置最小和最大簇大小。这意味着在分割完成后,所有点数少于最小值(或多于最大值)的簇都将被丢弃。最小值和最大值的默认值分别为 1 和“尽可能多”。
该算法在其内部结构中需要K个最近搜索,所以这里是提供搜索方法和设置邻居数。之后,它接收需要分割的云、点索引和法线。
reg.setSmoothnessThreshold(3.0 / 180.0 * np.pi)
reg.setCurvatureThreshold(1.0)
这两行是算法初始化中最重要的部分,因为它们负责提到的平滑约束。第一种方法以弧度为单位设置角度,该角度将用作法线偏差的允许范围。如果点法线之间的偏差小于平滑度阈值,则建议它们在同一集群中(新点 - 测试的点 - 将添加到集群中)。第二个负责曲率阈值。如果两个点的法线偏差很小,则测试它们的曲率之间的差异。如果该值小于曲率阈值,则算法将使用新添加的点继续集群的增长。
clusters = pcl.vectors.PointIndices()
reg.extract(clusters)
启动分割算法。完成工作后,它将返回集群数组。
后面就是输出第一个簇中的点索引,并且可视化。
# 输出部分结果
print('Number of clusters is equal to ', len(clusters))
print('First cluster has ', len(clusters[0].indices), ' points.')
print('These are the indices of the points of the initial')
print('cloud that belong to the first cluster:')
counter = 0
while counter < len(clusters[0].indices):
    print(clusters[0].indices[counter], ' ', end='')
    counter = counter + 1
    if counter % 10 == 0:
        print('')
# 可视化
colored_cloud = reg.getColoredCloud()
viewer = pcl.visualization.CloudViewer('Cluster viewer')
viewer.showCloud(colored_cloud)
while not viewer.wasStopped(10):
    pass
pcl::RegionGrowing类提供一个返回的着色云,其中每个集群具各自的颜色。所以在这部分代码中,pcl::visualization::CloudViewer用于查看分割结果。您可以在CloudViewer教程中了解有关云可视化的更多信息。
3. 运行
运行代码:
python 04_region_growing_segmentation.py
结果:

在图片中,可以看到彩色点云有许多红点。这意味着这些点属于被拒绝的集群,因为它们有太多/太少的点。
五、基于最小切割的分割
理论部分请参阅:基于最小切割的分割
本文不再赘述。
1. 代码
见06_min_cut_segmentation.py
import pclpy
from pclpy import pcl
import numpy as np

if __name__ == '__main__':
    # 加载点云
    cloud = pcl.PointCloud.PointXYZ()
    if pcl.io.loadPCDFile('../../data/min_cut_segmentation_tutorial.pcd', cloud) == -1:
        print('Cloud reading failed.')
        exit(-1)

    # 滤波
    indices = pcl.vectors.Int()
    ps = pcl.filters.PassThrough.PointXYZ()
    ps.setInputCloud(cloud)
    ps.setFilterFieldName('z')
    ps.setFilterLimits(0.0, 1.0)
    ps.filter(indices)

    # 使用最小切割分割
    seg = pcl.segmentation.MinCutSegmentation.PointXYZ()
    seg.setInputCloud(cloud)
    seg.setIndices(indices)

    foreground_points = pcl.PointCloud.PointXYZ()
    point = pcl.point_types.PointXYZ()
    point.x = 68.97
    point.y = -18.55
    point.z = 0.57
    foreground_points.push_back(point)
    seg.setForegroundPoints(foreground_points)  # 对象中心点

    seg.setSigma(0.25)  # σ
    seg.setRadius(3.0433856)    # 平滑代价计算所需的对象半径
    seg.setNumberOfNeighbours(14)   # 构建图时要找到的邻居数
    seg.setSourceWeight(0.8)    # 设置前景惩罚

    clusters = pcl.vectors.PointIndices()
    seg.extract(clusters)

    print('Maximum flow is ', seg.getMaxFlow())

    # 可视化
    colored_cloud = seg.getColoredCloud()
    viewer = pcl.visualization.CloudViewer('Cluster viewer')
    viewer.showCloud(colored_cloud)
    while not viewer.wasStopped(10):
        pass
2. 说明
下面一行一行的解释代码。
cloud = pcl.PointCloud.PointXYZ()
if pcl.io.loadPCDFile('../../data/min_cut_segmentation_tutorial.pcd', cloud) == -1:
    print('Cloud reading failed.')
    exit(-1)
首先从 .pcd 文件加载点云
indices = pcl.vectors.Int()
ps = pcl.filters.PassThrough.PointXYZ()
ps.setInputCloud(cloud)
ps.setFilterFieldName('z')
ps.setFilterLimits(0.0, 1.0)
ps.filter(indices)
这几行不是必需的。它们的唯一目的是表明pcl::MinCutSegmentation该类可以使用索引。
seg = pcl.segmentation.MinCutSegmentation.PointXYZ()
pcl::MinCutSegmentation类实例化。
pclpy中将模板类的参数以属性的方式给出。如MinCutSegmentation.PointXYZ()表示,MinCutSegmentation的参数为PointXYZ,表示使用PointXYZ类型的点。
seg.setInputCloud(cloud)
seg.setIndices(indices)
这几行为算法提供需要分割的点云和索引。
foreground_points.push_back(point)
seg.setForegroundPoints(foreground_points)	# 已知为对象中心的点
seg.setSigma(0.25)	# σ
seg.setRadius(3.0433856)	# 平滑代价计算所需的对象半径
seg.setNumberOfNeighbours(14)	# 构建图时要找到的邻居数
seg.setSourceWeight(0.8)	# 设置前景惩罚
设置算法需要已知为对象中心的点、 σ \sigma σ 、平滑代价计算所需的对象半径、构建图时要找到的邻居数(设置的邻居越多,它包含的边数就越多)、前景惩罚。
clusters = pcl.vectors.PointIndices()
seg.extract(clusters)
启动算法。分割后的簇将包含结果。
print('Maximum flow is ', seg.getMaxFlow())
在图形切割期间计算的流量值。
# 可视化
colored_cloud = seg.getColoredCloud()
viewer = pcl.visualization.CloudViewer('Cluster viewer')
viewer.showCloud(colored_cloud)
while not viewer.wasStopped(10):
    pass
可视化分割结果。
3. 运行
运行代码:
python 06_min_cut_segmentation.py
结果:
Maximum flow is 5050.420105487853

六、使用 ProgressiveMorphologicalFilter 分割地面
该算法的完整描述可以在K. Zhang、S. Chen、D. Whitman、M. Shyu、J. Yan 和 C.的文章“A Progressive Morphological Filter for Removing Nonground Measurements from Airborne LIDAR Data”中找到。
1. 代码
代码中需要用到的点云文件:samp11-utm.pcd 在data文件夹一下已经下载好了。
源码见08_bare_earth.py
](./08_bare_earth.py)
import pclpy
from pclpy import pcl
import numpy as np

if __name__ == '__main__':
    cloud = pcl.PointCloud.PointXYZ()
    cloud_filtered = pcl.PointCloud.PointXYZ()
    ground = pcl.PointIndices()

    # 加载点云数据
    reader = pcl.io.PCDReader()
    reader.read('../../data/samp11-utm.pcd', cloud)
    print('Cloud before filtering:')
    print(cloud.size())

    # 开始分割
    pmf = pcl.segmentation.ProgressiveMorphologicalFilter.PointXYZ()
    pmf.setInputCloud(cloud)
    pmf.setMaxWindowSize(20)
    pmf.setSlope(1.0)
    pmf.setInitialDistance(0.5)
    pmf.setMaxDistance(3.0)
    pmf.extract(ground.indices)

    extract = pcl.filters.ExtractIndices.PointXYZ()
    extract.setInputCloud(cloud)
    extract.setIndices(ground)
    extract.filter(cloud_filtered)

    print('Object cloud after filtering:')
    print(cloud_filtered.size())

    # 保存地面点云
    writer = pcl.io.PCDWriter()
    writer.write('samp11-utm_ground.pcd', cloud_filtered)

    # 保存非地面点云
    cloud_filtered2= pcl.PointCloud.PointXYZ()
    extract.setNegative(True)
    extract.filter(cloud_filtered2)
    writer.write('samp11-utm_object.pcd', cloud_filtered2)

# 可视化
    viewer = pcl.visualization.PCLVisualizer("viewer")
    viewer.setBackgroundColor(0.0, 0.0, 0.0)
    green = pcl.visualization.PointCloudColorHandlerCustom.PointXYZ(cloud_filtered, 0.0, 255.0, 0.0)
    viewer.addPointCloud(cloud_filtered, green, "ground")

    viewer.setBackgroundColor(0.0, 0.0, 0.0)
    blue = pcl.visualization.PointCloudColorHandlerCustom.PointXYZ(cloud_filtered2, 0.0, 0.0, 255.0)
    viewer.addPointCloud(cloud_filtered2, blue, "object")

    viewer.setPointCloudRenderingProperties(0, 1, "ground")
    viewer.setPointCloudRenderingProperties(0, 1, "object")
    while not viewer.wasStopped():
        viewer.spinOnce(10)
2. 说明
现在,让我们一块一块地分解代码。
以下代码行将从磁盘读取点云数据。
# 加载点云数据
reader = pcl.io.PCDReader()
reader.read('../../data/samp11-utm.pcd', cloud)
print('Cloud before filtering:')
print(cloud.size())
然后,创建一个pcl::ProgressiveMorphologicalFilter过滤器。计算输出(地面的索引)并存储在ground 中。
# 开始分割
pmf = pcl.segmentation.ProgressiveMorphologicalFilter.PointXYZ()
pmf.setInputCloud(cloud)
pmf.setMaxWindowSize(20)
pmf.setSlope(1.0)
pmf.setInitialDistance(0.5)
pmf.setMaxDistance(3.0)
pmf.extract(ground.indices)
为了提取地面点,地面索引被传递到 pcl::ExtractIndices过滤器。
extract = pcl.filters.ExtractIndices.PointXYZ()
extract.setInputCloud(cloud)
extract.setIndices(ground)
extract.filter(cloud_filtered)
保存地面点云和非地面点云:
# 保存地面点云
writer = pcl.io.PCDWriter()
writer.write('samp11-utm_ground.pcd', cloud_filtered)

# 保存非地面点云
cloud_filtered2= pcl.PointCloud.PointXYZ()
extract.setNegative(True)
extract.filter(cloud_filtered2)
writer.write('samp11-utm_object.pcd', cloud_filtered2)
后面是可视化地面点云和非地面点云,不再赘述。
3. 运行
运行代码:
python 08_bare_earth.py
结果:
Cloud before filtering:
38010
Object cloud after filtering:
18667

其中绿色部分为ground,蓝色点云为object。
参考:https://pcl.readthedocs.io/projects/tutorials/en/latest/index.html#segmentation