SpringCloud-2020.0.3版本简单入门
文章目录
- Eureka服务注册与发现
-
- 一、概述
-
- 1、CAP原则
- 2、Eureka介绍
- 二、服务构建
-
- 1、建立父子聚合项目
- 2、建立Eureka注册中心
- 3、建立Provider服务
- 4、建立Consumer消费端
- 5、优化与提高
- OpenFeign负载均衡
-
- 一、概述
- 二、服务构建
-
- 1、多模块负载均衡搭建
- 2、优化与提高
- Spring Cloud Gateway网关
-
- 一、概述
- 二、服务构建
-
- 1、Gateway网关搭建
- 2、Gateway网关配置详解
- 3、优化与提高
Spring Cloud 2020.0.0版本北京时间2020.12.22发布,彻底删除掉了Netflix除Eureka外的所有组件,支持SpringBoot2.4.x
Netflix 组件替代方案(Feign依旧是可以使用的,OpenFiegn,做REST客户端)
| Netflix | 推荐替代品 | 说明 |
|---|---|---|
| Hystrix | Resilience4j | Hystrix自己也推荐你使用它代替自己 |
| Hystrix Dashboard / Turbine | Micrometer + Monitoring System | 监控这件事交给更专业的组件去做 |
| Ribbon | Spring Cloud Loadbalancer | Spring终究亲自出手 |
| Zuul 1 | Spring Cloud Gateway | Spring终究亲自出手 |
| Archaius 1 | Spring Boot外部化配置 + Spring Cloud配置 | 比Netflix实现的更好、更强大 |
这里我简单记录了一下SpringCloud2020.0.3版本的情况,作为学习供以后参考,以后SpringCloud会使用SpringCloud Alibaba的。
Eureka服务注册与发现
一、概述
Eureka官网
Eureka中文网
1、CAP原则
CAP原则又称CAP定理,指的是在一个分布式系统中一致性(Consistency)、可用性(Availability)、分区容错性(Partition tolerance)。但这三个要素最多只能同时实现两点,不可能三者兼顾,一般来说是AP和CP。
2、Eureka介绍
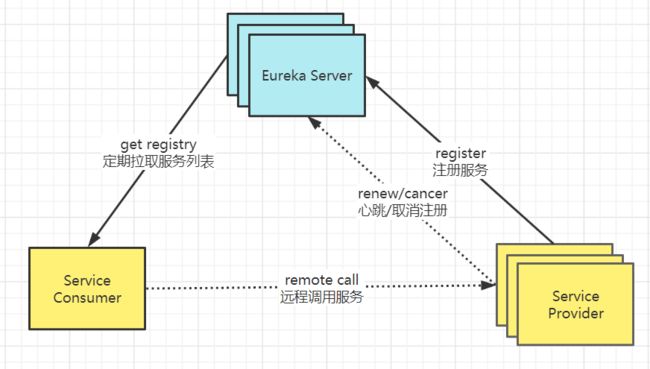
Eureka是一个基于REST的服务,用于定位服务,以达到负载均衡和中间层服务故障转移的目的。SpringCloud将它集成在其子项目spring-cloud-netflix中,以实现SpringCloud的服务注册与发现功能。功能类似于Dubbo的注册中心,比如Zookeeper。Eureka 包含两个组件:Eureka Server和Eureka Client。

- Eureka Server:服务注册中心(可以是一个集群),对外暴露自己的地址
- Service Provider:微服务(可以是java程序,也可以python),启动后向Eureka注册自己信息(地址等)
- Service Consumer:向Eureka订阅服务,Eureka会将对应服务的所有提供者地址列表发送给消费者,并且定期更新
- 心跳(续约):提供者定期通过http方式向Eureka刷新自己的状态
- Eureka默认在90秒后还未收到服务提供者发来的心跳时,那么它就会认定该服务已经死亡就会注销这个服务。这里注销并不是立即注销,而是会在60秒以后对在这个之间段内“死亡”的服务集中注销,如果立即注销,势必会对Eureka造成极大的负担。这些时间参数都可以自定义配置
- 自我保护机制,如果在15分钟内超过85%的节点都没有正常的心跳,那么Eureka就认为客户端与注册中心出现了网络故障,所以不会再接收心跳,也不会删除服务。
二、服务构建
1、建立父子聚合项目
在父工程pom.xml导入依赖
<spring-cloud.version>2.5.2eureka.version>
<spring-cloud.version>2020.0.3spring-cloud.version>

<dependencyManagement>
    <dependencies>
        <dependency>
            <groupId>org.springframework.bootgroupId>
            <artifactId>spring-boot-starter-webartifactId>
            <version>${spring-boot.version}version>
        dependency>

        <dependency>
            <groupId>org.springframework.cloudgroupId>
            <artifactId>spring-cloud-dependenciesartifactId>
            <version>${spring-cloud.version}version>
            <type>pomtype>
            <scope>importscope>
        dependency>
    dependencies>
dependencyManagement>
2、建立Eureka注册中心
创建springboot模块,引入服务注册服务
<dependency>
    <groupId>org.springframework.cloudgroupId>
    <artifactId>spring-cloud-starter-netflix-eureka-serverartifactId>

dependency>
进入application.yml文件修改配置
server:
  port: 8088
spring:
  application:
    name: eureka-server
# eureka配置
eureka:
  #eureka服务端的实例名称
  instance:
    hostname: localhost
  server:
    ## 开启自我保护模式(开启状态下服务停掉eureka不会立即清除掉宕掉的服务,所以false)
    enable-self-preservation: false
    # 清理无效节点,默认60*1000毫秒,即60秒
    eviction-interval-timer-in-ms: 5000
  client:
    #是否将自己注册到Eureka服务器中,本身是服务器,无需注册
    register-with-eureka: false
    #false表示自己端就是注册中心,我的职责就是维护服务实例,并不需要去检索服务
    fetch-registry: false
    service-url:
      #设置与Eureka server交互的地址查询服务和注册服务都需要依赖这个defaultzone地址,如果是集群,需要加上其它Server的地址。
      defaultZone: http://${eureka.instance.hostname}:${server.port}/eureka/
最后在启动类上添加@EnableEurekaServer注解
@SpringBootApplication
@EnableEurekaServer
public class EurekaServerApplication {
	public static void main(String[] args) {
		SpringApplication.run(EurekaServerApplication.class, args);
	}
}
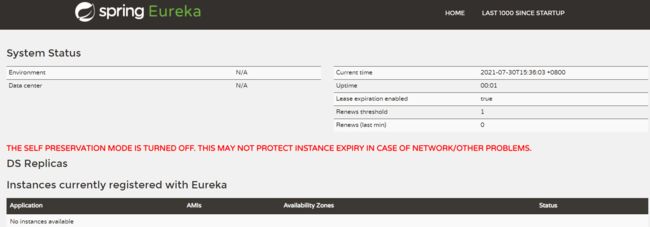
- System Status:系统信息
- DS Replicas:服务器副本
- Instances currently registered with Eureka:已注册的微服务列表
- General Info:一般信息
- Instance Info:实例信息
3、建立Provider服务
创建新的springboot模块,引入依赖
<dependency>
    <groupId>org.springframework.cloudgroupId>
    <artifactId>spring-cloud-starter-netflix-eureka-clientartifactId>
dependency>
<dependency>
    <groupId>org.springframework.bootgroupId>
    <artifactId>spring-boot-starter-webartifactId>
dependency>
进入application.yml文件修改配置
server:
  port: 8080
spring:
  # 应用名称,不要加下划线,否则会找不到服务
  application:
    name: student
eureka:
  client:
    #EurekaServer地址
    service-url:
      #集群配置多个
      defaultZone: http://localhost:8088/eureka
    #服务注册,是否向服务端注册,默认是true
    register-with-eureka: true
  instance:
    #服务提供实例的构成信息
    instance-id: ${spring.application.name}:${server.port}
    # 当调用getHostname获取实例的hostname时,返回ip而不是host名称
    prefer-ip-address: true
    # 指定自己的ip信息,不指定的话会自己寻找
    # ip-address: 127.0.0.1
    #Eureka服务端在收到最后一次心跳之后等待的时间上限,单位为秒,超过则剔除(客户端告诉服务端按照此规则等待自己),默认90
    lease-expiration-duration-in-seconds: 20
    #心跳包,默认30
    lease-renewal-interval-in-seconds: 10
创建服务端服务
@RestController
public class HelloController {

    @GetMapping("/")
    public String hello() {
        return "hello,world!s";
    }
}
最后在启动类上加上@EnableEurekaClient,启动即可加入注册中心
对于python开发的web程序,也可以注册到Eureka注册中心,这里我就举例Flask框架
from flask import Flask
from py_eureka_client import eureka_client
from flask_cors import *

def setEureka():
    server_host = "localhost"
    server_port = 5000
    eureka_client.init(eureka_server="http://localhost:8088/eureka",
                       #不能出现下划线
                       app_name="flaskServer",
                       # 当前组件的主机名,可选参数,如果不填写会自动计算一个,如果服务和 eureka 服务器部署在同一台机器,请必须填写,否则会计算出 127.0.0.1
                       instance_host=server_host,
                       instance_port=server_port,
                       # 调用其他服务时的高可用策略,可选,默认为随机
                       ha_strategy=eureka_client.HA_STRATEGY_RANDOM)

setEureka()
# 跨域配置
CORS(app, supports_credentials=True)

@app.route('/')
def index():
    return 'hello world'

if __name__ == '__main__':
    app.debug = True
    app.run()
启动访问localhost:5000可正常访问,这里作为Provider
4、建立Consumer消费端
这里Ribbon替换成Spring Cloud Loadbalancer,可以自定义负载均衡算法,这里默认是轮询。通过@LoadBalanced,程序底层会默认通过ribbon将注册的服务名解析成具体的ip和端口,最后进行访问请求。
参考文档。
创建springboot模块,引入依赖
<dependency>
    <groupId>org.springframework.cloudgroupId>
    <artifactId>spring-cloud-starter-netflix-eureka-clientartifactId>
dependency>
<dependency>
    <groupId>org.springframework.bootgroupId>
    <artifactId>spring-boot-starter-webartifactId>
dependency>
进入application.yml文件修改配置
server:
  port: 8081
spring:
  application:
    name: Consumer
eureka:
  client:
    service-url:
      # EurekaServer地址,多个地址以','隔开
      defaultZone: http://localhost:8088/eureka
    #服务注册,是否向服务端注册,默认是true
    register-with-eureka: false
在启动类添加注解
@SpringBootApplication
// 启动即会被注册到注册中心
@EnableEurekaClient
@EnableDiscoveryClient
public class ConsumerApplication {

	public static void main(String[] args) {
		SpringApplication.run(ApiApplication.class, args);
	}

	   @Bean
    // 启用负载均衡机制,必须
    @LoadBalanced
    public RestTemplate restTemplate(RestTemplateBuilder builder) {
        //可以自定义
        return builder
                .setConnectTimeout(Duration.ofMillis(100))
                .setReadTimeout(Duration.ofMillis(500))
                .build();
    }
}
最后创建Cntroller,远程调用服务
@RestController
@Slf4j
public class ApiController {

    @Autowired
    RestTemplate restTemplate;

    //这里引的包为org.springframework.cloud.client.discovery.DiscoveryClient
    @Autowired
    DiscoveryClient discoveryClient;

    @GetMapping("/")
    public Object discory(){
        Object template = restTemplate.getForObject("http://STUDENT/",Object.class);
        return template;
    }

    @GetMapping("/py")
    public String discory1(){
        String template = restTemplate.getForObject("http://FLASKSERVER/",String.class);
        return template;
    }
    @GetMapping("/test")
    public String discory2(){
        log.info("尝试获取注册中心信息");
        log.info("getApplications"+discoveryClient.getServices());
        log.info("getInstancesById"+discoveryClient.getInstances("STUDENT"));
        return "成功";
    }

}
启动后,此时通过8081端口访问即可获取8080以及flask服务端提供的服务

5、优化与提高
对于Eureka,info、还有集群、zone、region等
OpenFeign负载均衡
一、概述
相对于Ribbon+RestTemplate,其操作过于繁琐,在上面一节中已经简单写明,其通过OpenFeign可以简化开发。
OpenFeign是一个声明式的http客户端,让编写web服务客户端变的非常容易,只需要创建一个接口并在接口上添加注解即可。在底层,OpenFeign集成了Ribbon,利用Ribbon维护了springcloud-Dept的服务列表信息,接口会自动进行http请求相应的服务,其作用的替代RestTemplate,性能比较低,但是可以使代码可读性很强。
OpenFeign的前身是Feign,后者目前已经停更了,OpenFeign是SpringCloud在Feign的基础上支持了Spring MVC的注解,并通过动态代理的方式产生实现类来做负载均衡并进行调用其他服务。
springcloud官方文档
二、服务构建
1、多模块负载均衡搭建
在consumer模块的pom.xml添加依赖
<dependency>
    <groupId>org.springframework.cloudgroupId>
    <artifactId>spring-cloud-starter-openfeignartifactId>
dependency>
在student模块中存在一个接口
@GetMapping("/")
public String hello() {
    System.out.println("调用成功");
    return "hello,world!s";
}
在consumer模块打开Feign注解
@SpringBootApplication
@EnableDiscoveryClient
@EnableEurekaClient
@EnableFeignClients(basePackages = "com.zstu.consumer")
public class ConsumerApplication {

    public static void main(String[] args) {
        SpringApplication.run(ConsumerApplication.class, args);
    }

    @Bean
    // 启用负载均衡机制,必须
    @LoadBalanced
    public RestTemplate restTemplate(){
    	return new RestTemplate();
    }
}
新建Feign接口类,在类上添加需要远程访问的服务名,方法则是该服务暴露的接口
@FeignClient(value = "student")
public interface FeignService {
    //这里调用的是student的helloworld方法
    @GetMapping("/")
    String hello();
}
最后在controller新增方法,调用该方法,启动项目即可内部远程调用
@Autowired
private FeignService feignService;

@GetMapping("/test111")
public String test(){
    feignService.hello();
    return "success";
}
2、优化与提高
服务熔断、降级可以用resilience4j,不过网上实用资料好像不是很多,打算下次直接上sentinel了。
Spring Cloud Gateway网关
一、概述
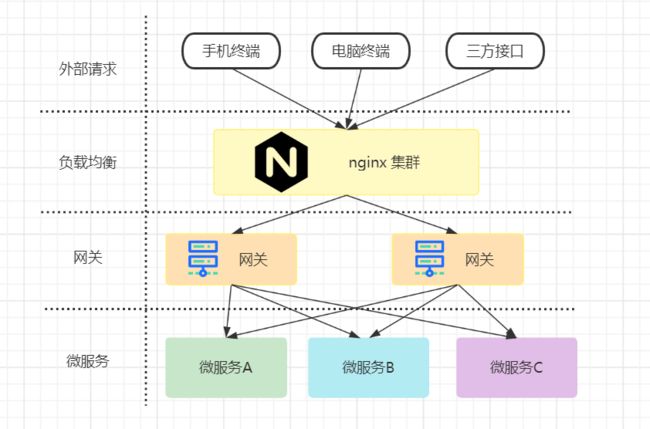
API Gateway(APIGW / API 网关),顾名思义,是出现在系统边界上的一个面向 API 的、串行集中式的强管控服务,这里的边界是企业 IT 系统的边界,可以理解为企业级应用防火墙,主要起到隔离外部访问与内部系统的作用。
SpringCloudGateway中文网
SpringCloudGateway官网
Spring Cloud Gateway是Spring Cloud官方推出的第二代网关框架,取代Zuul网关。网关作为流量的,在微服务系统中有着非常作用,网关常见的功能有路由转发、权限校验、限流控制等作用。同时有以下特点:
- 基于Spring 5,Reactor(模式) 和 SpringBoot 2.0
- 能够在任何请求属性上匹配路由
- 断言和过滤器是特定于路由的
- Hystrix断路器集成
- SpringCloud DiscoveryClient集成
- 易于编写断言和过滤器
- 请求速率限制
- 路径重写

二、服务构建
1、Gateway网关搭建
继承Eureka配置
新建springboot模块,我这里取名为api,引入依赖
<dependency>
    <groupId>org.springframework.cloudgroupId>
    <artifactId>spring-cloud-starter-gatewayartifactId>
dependency>
<dependency>
    <groupId>org.springframework.cloudgroupId>
    <artifactId>spring-cloud-starter-netflix-eureka-clientartifactId>
dependency>
SpringCloud中Gateway与SpringBoot Web有jar包冲突,因此这里我没引入SpringBoot Web依赖
配置application.yml配置文件
server:
  port: 8081
spring:
  application:
    name: Api
  cloud:
    gateway:
      discovery:
        locator:
          enabled: true  #开启根据微服务名称自动转发
          lower-case-service-id: true  #微服务名称以小写形式呈现

      routes:
      - id: student           # 路由id,没有固定规则,建议配合服务名
        uri: lb://STUDENT
        predicates:
        - Path=/**    # 断言:路径相匹配的进行路由
      - id: flaskserver           # 路由id,没有固定规则,建议配合服务名
        uri: http://localhost:5000  # 匹配后提供服务的路由地址
        predicates:
            - Path=/**    # 断言:路径相匹配的进行路由

eureka:
  client:
    service-url:
      # EurekaServer地址,多个地址以','隔开
      defaultZone: http://localhost:8088/eureka
    #服务注册,是否向服务端注册,默认是true
	#register-with-eureka: false
  instance:
    #服务提供实例的构成信息
    instance-id: ${spring.application.name}:${server.port}
在启动类上添加注解@EnableEurekaClient,最后启动服务,访问http://localhost:8081/student/,http://localhost:8081/flaskserver,可以发现网关配置成功
2、Gateway网关配置详解
server:
  port: 8081
spring:
  application:
    name: Api
  cloud:
    gateway:
      discovery:
        locator:
          enabled: true  #开启根据微服务名称自动转发
          lower-case-service-id: true  #微服务名称以小写形式呈现


      #  在gateway中配置uri配置有三种方式,包括
      #第一种:ws(websocket)方式: uri: ws://localhost:9000
      #第二种:http方式: uri: http://localhost:8130/
      #第三种:lb(注册中心中服务名字)方式: uri: lb://brilliance-consumer
      #规则:配置由筛选器名称、等号(=)和用逗号(,)分隔的参数值识别。
      routes:
      - id: student           # 路由id:payment_route,没有固定规则,建议配合服务名
        uri: lb://STUDENT
        predicates:
        - Path=/**    # 断言:路径相匹配的进行路由
        - Method=GET,POST
        #当请求头携带key为X-Request-Id的,值包含数字的情况下转发
        #- Header=X-Request-Id, \d+
        #接受远程资源集合
        #- RemoteAddr=192.168.1.1/24
        #- Cookie=mycookie,mycookievalue
        #接收一个java ZonedDateTime类的时间参数。After表示在这个时间之后的请求才能正确匹配路由,同理还有Before、Between
        #- After=2021-07-31T17:42:47.789-07:00[Asia/Shanghai]
        #- Weight=group1, 2 #做负载均衡
        #- Query=token, abc.       # 匹配请求参数中包含 token 并且其参数值满足正则表达式 abc. 的请求

        #filters:
          # 将 /1 重写为 /product/1
          #- PrefixPath=/product
          # 将 /api/123/product/1 重写为 /product/1
          #- StripPrefix=2
eureka:
  client:
    service-url:
      # EurekaServer地址,多个地址以','隔开
      defaultZone: http://localhost:8088/eureka
    #服务注册,是否向服务端注册,默认是true
    register-with-eureka: true
  instance:
    #服务提供实例的构成信息
    instance-id: ${spring.application.name}:${server.port}
3、优化与提高
Gateway还可以自定义配置过滤、鉴权等
