SpringCloud - 服务调用
文章目录
- 1. LB负载均衡(Load Balance)
- 2. Ribbon负载均衡服务调用
-
- 2.1 Ribbon负载均衡演示
-
- 2.1.1 架构
- 2.1.2 POM
- 2.1.3 RestTemplate操作
- 2.2 Ribbon核心组件IRule
- 2.3 负载均衡规则替换
- 2.4 Ribbon负载均衡算法
-
- 2.4.1 原理
- 2.4.2 手动实现负载均衡
- 3. OpenFeign服务调用
-
- 3.1 OpenFeign使用步骤
-
- 3.1.1 创建项目
- 3.1.2 POM文件
- 3.1.3 YML文件
- 3.1.4 主启动类
- 3.1.5 业务类
- 3.1.6 测试
- 3.2 OpenFeign超时控制
- 3.3 OpenFeign日志打印功能
1. LB负载均衡(Load Balance)
简单的说就是将用户的请求平摊的分配到多个服务上,从而达到系统的HA(高可用)。常见的负载均衡有软件Nginx,LVS,硬件F5等。
集中式Load Balance:即在服务的消费方和提供方之间使用独立的LB设施(可以是硬件,如F5,也可以是软件,如nginx)由该设施负责把访问请求通过某种策略转发至服务的提供方;
进程内Load Balance:将LB逻辑集成到消费方,消费方从服务注册中心获知有哪些地址可用,然后自己再从这些地址中选择出一个合适的服务器。
Ribbon就属于进程内LB,它只是一个类库,集成于消费方进程**,消费方通过它来获取到服务提供方的地址。
Nginx是服务器负载均衡,客户端所有请求都会交给nginx,然后由nginx实现转发请求。即负载均衡是由服务端实现的。(集中式LB)
Ribbon本地负载均衡,在调用微服务接口时候,会在注册中心上获取注册信息服务列表之后缓存到VM本地,从而在本地实现RPCG远程服务调用技术。( 进程内LB)
2. Ribbon负载均衡服务调用
Spring Cloud Ribbon是一个基于HTTP和TCP的客户端负载均衡工具,它基于Netflix Ribbon实现。通过Spring Cloud的封装,可以让我们轻松地将面向服务的REST模版请求自动转换成客户端负载均衡的服务调用。Spring Cloud Ribbon虽然只是一个工具类框架,它不像服务注册中心、配置中心、API网关那样需要独立部署,但是它几乎存在于每一个Spring Cloud构建的微服务和基础设施中。因为微服务间的调用,API网关的请求转发等内容,实际上都是通过Ribbon来实现的,包括后续我们将要介绍的Feign,它也是基于Ribbon实现的工具。所以,对Spring Cloud Ribbon的理解和使用,对于我们使用Spring Cloud来构建微服务非常重要。
Spring Cloud Ribbon是基于Netflix Ribbon 实现的一套客户端 负载均衡工具
简单的说,Ribbon是Netflix发布的开源项目,主要功能是提供客户端的软件负载均衡算法和服务调用,Ribbon客户端组件提供一系列完善的配置项如连接超时工具,重试等,简单的说,就是在配置文件中列出Load Balancer(简称LB) 后面所有的机器,Ribbon会自动的帮助你基于某种规则(如简单查询,随机连接等),去连接这些机器,我们容易使用Ribbon实现自定义的负载均衡算法。
GitHub:https://github.com/Netflix/ribbon/wiki/Getting-Started Ribbon目前进入了维护模式
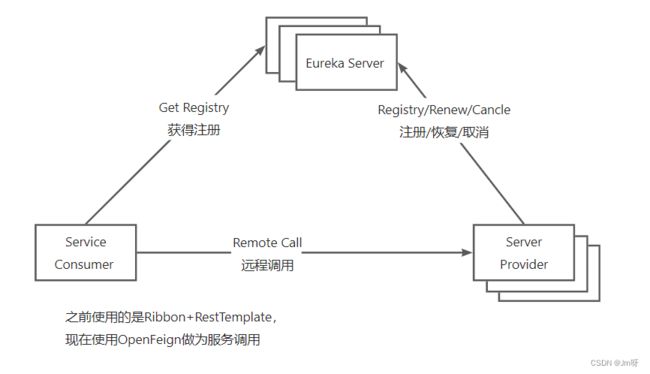
在之前的服务中我们使用RestTemolate中的@LoadBalance注解来实现轮询的负载均衡
而Ribbon如何使用?:
负载均衡规则+RestTemplate+@LoadBalance调用
2.1 Ribbon负载均衡演示
2.1.1 架构
架构说明:Ribbon其实是一个软负载均衡的客户端组件,它可以和其他所需请求的客户端结合使用,和eureka结合只是启动一个实例
注意:本次演示需要服务器的集群状态,所以将使用Eureka中的集群环境进行演示。
架构图:
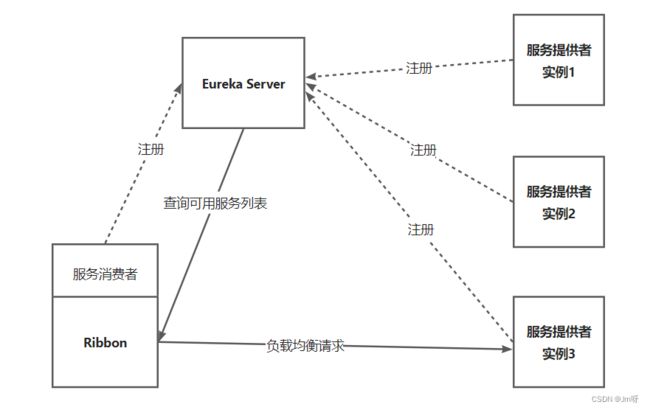
Ribbon在工作是分两步:
第一步先选择EurekaServer,它优先选择在同一个区域内负载较少的Server
第二步在根据用户指定的策略,在从server取到的服务注册列表中选取一个地址
2.1.2 POM
<dependency>
    <groupId>org.springframework.cloudgroupId>
    <artifactId>spring-cloud-starter-netflix-ribbonartifactId>
dependency>
在之前写的实例时候没有引入spring-cloud-starter-ribbon也可以使用ribbon。
原因是在引入spring-cloud-starter-netflix-eureka-client中以及携带了spring-cloud-starter-netflix-ribbon的依赖
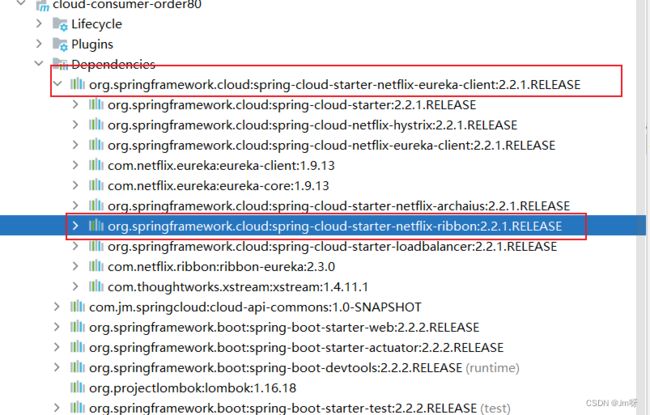
故此如果引入了spring-cloud-starter-netflix-eureka-client就无需再次引入Ribbon的依赖
2.1.3 RestTemplate操作
RestTemplate配置:
@Configuration
public class ApplicationContextConfig {
    @LoadBalanced // 赋予RestTemplate负载均衡的能力
    @Bean
    public RestTemplate getRestTemplate() {
        return new RestTemplate();
    }
}
业务类:
@RestController
@Slf4j
@RequestMapping("/consumer")
public class OrderController {
    public static final String URL = "http://CLOUD-PAYMENT-SERVICE"; // 使用的是EurekaServer中注册中心的服务名称

    @Resource
    private RestTemplate restTemplate;

    @GetMapping("/payment/{id}")
    public CommonResult<Payment> getPayment(@PathVariable("id") Long id) {
        return restTemplate.getForObject(URL + "/payment/" + id, CommonResult.class);
    }

    @GetMapping("/payment/getForEntity/{id}")
    public CommonResult<Payment> getPayment2(@PathVariable("id") Long id) {
        ResponseEntity<CommonResult> forEntity = restTemplate.getForEntity(URL + "/payment/" + id, CommonResult.class);
        if (forEntity.getStatusCode().is2xxSuccessful()){
            return forEntity.getBody();
        }
        return new CommonResult<>(400,"操作失败");
    }
}
getForObject:返回对象为响应体中数据转化成的对象,基本上可以理解为Json
    @GetMapping("/payment/{id}")
    public CommonResult<Payment> getPayment(@PathVariable("id") Long id) {
        return restTemplate.getForObject(URL + "/payment/" + id, CommonResult.class);
    }
getForEntity:返回对象为ResponseEntity对象,包含了响应中的一些重要信息,比如响应头、响应状态码、响应体等
    @GetMapping("/payment/getForEntity/{id}")
    public CommonResult<Payment> getPayment2(@PathVariable("id") Long id) {
        ResponseEntity<CommonResult> forEntity = restTemplate.getForEntity(URL + "/payment/" + id, CommonResult.class);
        if (forEntity.getStatusCode().is2xxSuccessful()){
            return forEntity.getBody();
        }
        return new CommonResult<>(400,"操作失败");
    }
2.2 Ribbon核心组件IRule
IRULE:根据特定算法从服务列表中选取一个要访问的服务
public interface IRule {
    /* 根据键从lb.allServers或lb.upServers中选择一个活动服务器 */
    // 选择
    Server choose(Object var1);
    // 设置 负载均衡
    void setLoadBalancer(ILoadBalancer var1);
    // 获取 负载均衡
    ILoadBalancer getLoadBalancer();
}
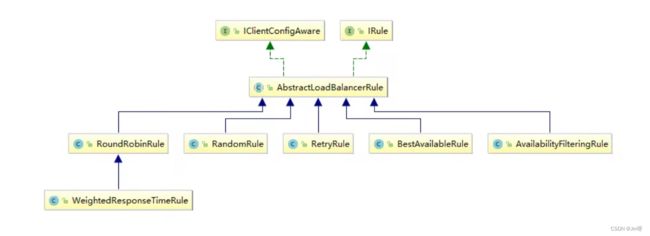
Ribbon常用的负载均衡 算法类:
| 类 | 方式 |
|---|---|
| com.netflix.loadbalancer.RoundRobinRule | 轮询 |
| com.netflix.loadbalancer.RandomRule | 随机 |
| com.netflix.loadbalancer.RetryRule | 先按照RoundRobinRule的策略获取服务,如果获取服务失败则在指定时间内会重试 |
| com.netflix.loadbalancer.WeightedResponseTimeRule | 对RoundRobinRule的扩展,响应速度越快的实例选择权重越大,越容易被选择 |
| com.netflix.loadbalancer.BestAvailableRule | 会先过滤由于多次访问故障而处于断路器跳闸状态的服务,如何选择一个并发量最小的服务。 |
| com.netflix.loadbalancer.AvailabilityFilteringRule | 先过滤故障实例,再选择并发较小的实例 |
| com.netflix.loadbalancer.ZoneAvoidanceRule | 默认规则,复合判断server所在区域的性能和server的可用性选择服务器 |
2.3 负载均衡规则替换
对客户端服务(80)进行修改
修改 cloud-consumer-order80服务进行修改:
注意配置细节:
官方文档明确给出了警告:
这个自定义配置类不能放在@ComponentScan所扫描的当前包下以及子包,否则我们自定义的这个配置类就会被所有的Ribbon客户端所共享,达不到特殊化定制的目的了。
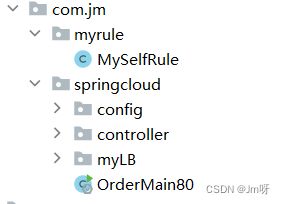
所以新创建包:cn.jm.myrule,在该包中创建规则类:MySelfRule.class
MySelfRule.class内容:
@Configuration
public class MySelfRule {

    @Bean
    public IRule myRule(){
        return new RandomRule(); // 定义为随机
    }

}
主启动类:
在启动类上添加:@RibbonClient注解
在启动该微服务的时候能去加载我们的自定义Ribbon配置类,从而使配置生效
- name: 表示使用那一组服务使用该 配置的负载均衡规则
- configuration:配置的负载均衡规则配置类
@SpringBootApplication
@RibbonClient(name = "CLOUD-PAYMENT-SERVICE", configuration = MySelfRule.class)
@EnableEurekaClient // 表示自己是Eureka 的客户端
public class OrderApplication80 {
    public static void main(String[] args) {
        SpringApplication.run(OrderApplication80.class, args);
    }
}
测试:在多次访问消费者端口就会发现负载均衡规则从轮询被替换成了随机规则。
2.4 Ribbon负载均衡算法
2.4.1 原理
轮询负载均衡算法原理:
rest接口第几次请求数%服务器集群总数量=实际调用服务器位置下标,每次服务重启动后rest接口计数从1开始。
List instances = discoveryClient,getInstances("CLOUD-PAYMENT-SERVICE");
如:
List[0] instances = 127.0.0.1:80001
List[1] instances = 127.0.0.1:80002

8001+ 8002组合成为集群,它们共计2台机器,集群总数为2,按照轮询算法原理:

当总请求数为1时: 1 % 2 = 1对应下标位置为1,则获得服务地址为127.0.0.1:8001
当总请求数位2时:	2 % 2 = 0对应下标位置为0,则获得服务地址为127.0.0.1:8002
当总请求数位3时: 3 % 2 = 1对应下标位置为1,则获得服务地址为127.0.0.1:8001
当总请求数位4时:	4 % 2 = 0对应下标位置为0,则获得服务地址为127.0.0.1:8002
如此类推......
2.4.2 手动实现负载均衡
1)EurekaServer7001、7002启动
2)修改 payment8001、8002,而外添加一个接口
   // 测试手写负载均衡
   @GetMapping("/lb/loadBalancer")
   public String getPaymentLb() {
       return port;
   }
3)修改consumer80服务
- ApplicationContextBean中的RestTemplate 去掉 @LoadBalance注解
- 自定义实现一个LoadBalancer规则
LoadBalancer接口:
public interface LoadBalancer {

    ServiceInstance instances(List<ServiceInstance> serviceInstances);

}
实现类:
@Component
public class MySelfLB implements LoadBalancer{
    private AtomicInteger atomicInteger=new AtomicInteger(0);

    public final int getAndIncrement(){
        int current;
        int next;
        do{
            current=this.atomicInteger.get();
            next = current>=2147483647?0:current+1;
        }while (!this.atomicInteger.compareAndSet(current,next));
        System.out.println("****next:"+next);
        return next;
    }

    @Override
    public ServiceInstance instances(List<ServiceInstance> serviceInstances) {
        int index=getAndIncrement()%serviceInstances.size();
        return serviceInstances.get(index);
    }
}
Controller类:
@RestController
@Slf4j
public class OrderController {
    @Resource
    private RestTemplate restTemplate;

    @Resource
    private DiscoveryClient discoveryClient;

	// 自己实现的负载均衡规则
    @Resource
    private LoadBalancer loadBalancer;


    @GetMapping("/consumer/payment/lb")
    public String getPaymentLB()
    {
        List<ServiceInstance> instances = discoveryClient.getInstances("CLOUD-PAYMENT-SERVICE");
        if (instances==null||instances.size()<=0){
            return null;
        }
        ServiceInstance  serviceInstances = loadBalancer.instances(instances);
        URI uri = serviceInstances.getUri();

        return restTemplate.getForObject(uri+"/payment/lb", String.class);
    }

}
访问http://localhost/consumer/payment/lb发现以及成功的做到了服务的轮询
3. OpenFeign服务调用
官网解释:
Feign是一个声明式WebService客户端。使用Feign能让编写Web Service客户端更加简单。
它的使用方法是定义一个服务接口然后在上面添加注解。Feign也支持可拔插式的编码器和解码器。Spring Cloud对Feign进行了封装,使其支持了Spring MVC标准注解和HttpMesEageConverters。Feign可以与Eureka和Ribbon组合使用以支持负载均衡
github地址:https://github.com/spring-cloud/spring-cloud-openfeign
3.1 OpenFeign使用步骤
总体而言就是: 微服务调用接口+@FeignClient
3.1.1 创建项目
![]()
3.1.2 POM文件
添加 OpenFeign 的依赖
<project xmlns="http://maven.apache.org/POM/4.0.0"
         xmlns:xsi="http://www.w3.org/2001/XMLSchema-instance"
         xsi:schemaLocation="http://maven.apache.org/POM/4.0.0 http://maven.apache.org/xsd/maven-4.0.0.xsd">
    <parent>
        <artifactId>cloud2022artifactId>
        <groupId>com.jm.springcloudgroupId>
        <version>1.0-SNAPSHOTversion>
    parent>
    <modelVersion>4.0.0modelVersion>

    <artifactId>cloud-consumer-feign-order80artifactId>

    <dependencies>

        <dependency>
            <groupId>org.springframework.cloudgroupId>
            <artifactId>spring-cloud-starter-openfeignartifactId>
        dependency>

        <dependency>
            <groupId>org.springframework.cloudgroupId>
            <artifactId>spring-cloud-starter-netflix-eureka-clientartifactId>
        dependency>

        <dependency>
            <groupId>com.jm.springcloudgroupId>
            <artifactId>cloud-api-commonsartifactId>
            <version>${project.version}version>
        dependency>

        <dependency>
            <groupId>org.springframework.bootgroupId>
            <artifactId>spring-boot-starter-webartifactId>
        dependency>
        <dependency>
            <groupId>org.springframework.bootgroupId>
            <artifactId>spring-boot-starter-actuatorartifactId>
        dependency>

        <dependency>
            <groupId>org.springframework.bootgroupId>
            <artifactId>spring-boot-devtoolsartifactId>
            <scope>runtimescope>
            <optional>trueoptional>
        dependency>
        <dependency>
            <groupId>org.projectlombokgroupId>
            <artifactId>lombokartifactId>
            <optional>trueoptional>
        dependency>
        <dependency>
            <groupId>org.springframework.bootgroupId>
            <artifactId>spring-boot-starter-testartifactId>
            <scope>testscope>
        dependency>
    dependencies>

project>
3.1.3 YML文件
server:
  port: 80

eureka:
  client:
    register-with-eureka: false
    service-url:
      defaultZone: http://eureka7001.com:7001/eureka/,http://eureka7002.com:7002/eureka/
3.1.4 主启动类
添加注解:@EnableFeignClients 开启 OpenFeign
@SpringBootApplication
@EnableFeignClients
public class OrderFeignMain80 {
     public static void main(String[] args) {
           SpringApplication.run(OrderFeignMain80.class, args);
     }
}
3.1.5 业务类
业务逻辑接口+@FeignClient 配置调用Provider服务
1)新建PaymentFeignService接口并新增注解@FeignClient
@Component
@FeignClient("CLOUD-PAYMENT-SERVICE") // 服务名称
public interface PaymentService {

    @GetMapping("/payment/{id}") // 相当于调用 http://CLOUD-PAYMENT-SERVICE/payment/{id}
    CommonResult<Payment> getPaymentById(@PathVariable("id") Long id);

}
2)控制层Controller
@RestController
public class OrderFeignController {
    @Resource
    private PaymentService paymentService;
    @GetMapping("/consumerpayment/{id}")
    CommonResult<Payment> getPaymentById(@PathVariable("id") Long id) {
        // 调用 paymentService 服务
        return paymentService.getPaymentById(id);
    }
}
3.1.6 测试
- 启动2个eureka集群7001、7002
- 启动2个微服务生产者8001、8002
- 启动OpenFeign 消费者
- 访问地址:http://localhost/consumer/payment/31
Feign自带负载均衡配置项
3.2 OpenFeign超时控制
openfeign-ribbon 客户端一般默认等待1秒钟, 如果超时将引发java.net.SocketTimeoutException: Read timed out
测试:
在provider8001和privider8002服务新增接口:
    @GetMapping("/payment/feign/timeout")
    public String paymentFeignTimeout(){
        try{
            //暂停3秒线程
            TimeUnit.SECONDS.sleep(3);
        }catch (Exception e){
            e.printStackTrace();
        }
        return serverPort;
    }
消费者端:
Service:
@Component
@FeignClient("CLOUD-PAYMENT-SERVICE")
public interface PaymentFeignService {
    @GetMapping("/payment/feign/timeout")
    public String paymentFeignTimeout();
}
Controller:
@GetMapping("/consumer/payment/feign/timeout")
public String paymentFeignTimeout(){
    //openfeign-ribbon,客户端默认等待1s 之后超时
    return paymentFeignService.paymentFeignTimeout();
}
访问:http://localhost/consumer/payment/feign/timeout
默认Feign客户端只等待一秒钟,但是服务端处理需要超过1秒钟,导致Feign客户端不想等待了,直接返回报错。为了避免这样的情况,有时候我们需要设置Feign客户端的超时控制。
YML文件中开启配置:
因为Feign底层使用的是Ribbon来进行负载均衡的服务调用,所以超时控制也由Ribbon进行控制
server:
  port: 80

eureka:
  client:
    register-with-eureka: false
    service-url:
      defaultZone: http://eureka7001.com:7001/eureka/,http://eureka7002.com:7002/eureka/

#设置feign客户端超时时间(OpenFeign默认支持ribbon)
ribbon:
  #指的是建立连接后从服务器读取到可用资源所用的时间
  ReadTimeout: 5000
  #指的是建立连接所用的时间,适用于网络状况正常的情况下,两端连接所用的时间
  ConnectTimeout: 5000
再次访问:http://localhost/consumer/payment/feign/timeout 发现等待3秒后正常访问
3.3 OpenFeign日志打印功能
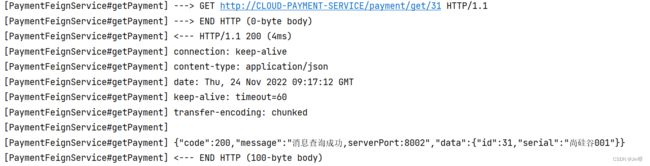
Feign提供了日志打印功能,我们可以通过配置来调整日志级别,从而了解 Feign 中 HTTP请求的细节。说白了就是对Feign接口的调用情况进行监控和输出。
OpenFeign的日志级别:
- NONE : 默认的,不显示日志;
- BASIC : 仅记录请求方法、URL、响应状态码及执行时间;
- HEADERS : 除了BASIC中定义的信息之外,还有请求和响应头信息;
- FULL :除了HEADERS 中定义的信息之外,还有请求和响应的正文以及元数据
配置过程:
配置日志Bean:
@Configuration
public class FeignConfig
{
    @Bean
    Logger.Level feignLoggerLevel()
    {
        return Logger.Level.FULL;
    }
}
YML文件里需要开启日志的Feign客户端:
logging:
  level:
    # feign日志以什么级别监控哪个接口
    com.jm.springcloud.service.PaymentFeignService: debug
测试:调用http://localhost/consumer/payment/31,并查看控制台打印情况: