旭日x3派初探
旭日x3派初探
非常幸运拿到旭日x3派的首发体验,在拿到sunrise x3后对x3进行的简单的测试,以及对使用x3派进行开发时的环境进行简单搭设。
1.板子简介
板子如下图所示,其中由一个USB3.0,两个usb2.0接口,一个网线接口,一个hdmi,一个MIPI CSI接口。
2.烧写系统
使用balenaEtcher工具烧写系统,在地平线 AI 社区 (horizon.ai)下载ubuntu系统镜像
系统镜像目录
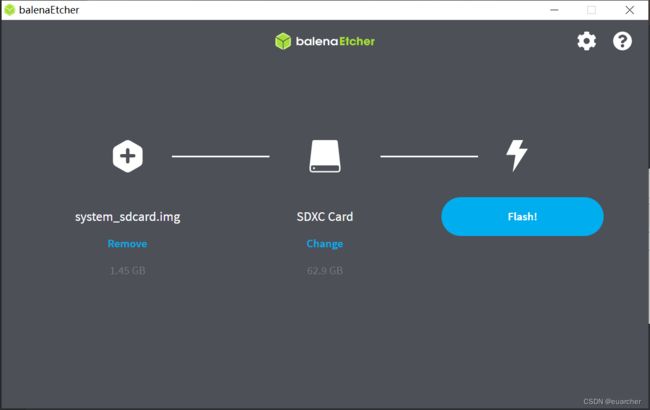
在balena工具上按下图选择,点击flash烧录
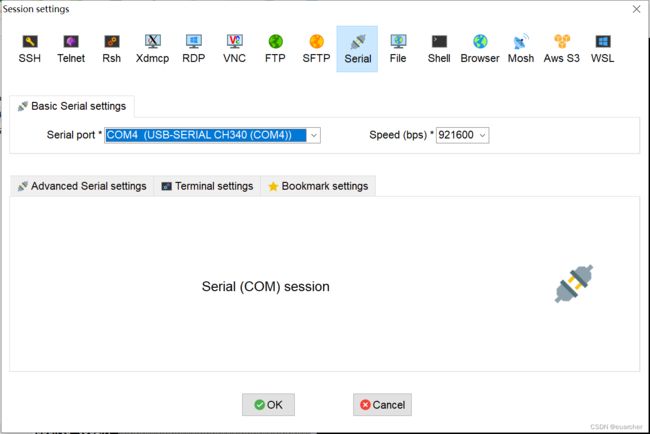
烧录成功上连接串口,开启电源,我这里使用mobaxterm的串口,使用波特率961200
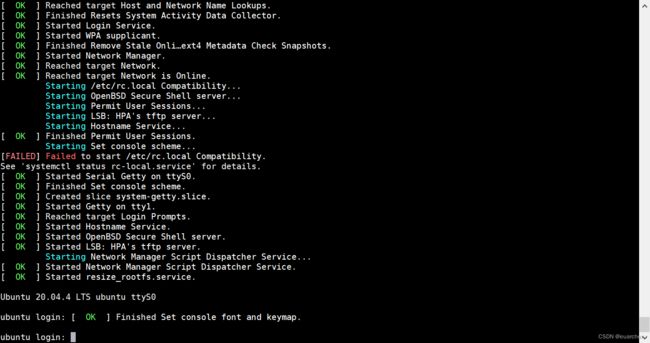
第一次点亮板子
启动时出现了FAILED信息,错误log reboot.log 如下,系统自动重启,重启后正常使用,在烧完时系统时第一次开机会遇到这个问题,查看etc/rc.local属于系统自启动配置。
在反馈后说明这里是第一次上电重启的时候需要安装依赖,所以进行了一次重启,并非报错。
3.设置wifi与远程登录
通常为了避免连线,会首先连接wifi,扫描热点
sudo nmcli device wifi rescan
sudo nmcli device wifi list
sudo nmcli device wifi connect 账号 password 密码
使用ifconfig查看ip,其中wlan0为无线,记录其ip,使用ssh连接
wlan0: flags=4163  mtu 1500
        inet 192.168.31.246  netmask 255.255.255.0  broadcast 192.168.31.255
        inet6 fe80::de9c:9bda:b3f9:67a3  prefixlen 64  scopeid 0x20
        ether 08:e9:f6:af:07:ce  txqueuelen 1000  (Ethernet)
        RX packets 12  bytes 1460 (1.4 KB)
        RX errors 0  dropped 0  overruns 0  frame 0
        TX packets 15  bytes 1994 (1.9 KB)
        TX errors 0  dropped 0 overruns 0  carrier 0  collisions 0
4.在windows中图形化界面
为了方便server的调试,我们使用X11-forwarding构建图形化界面,这样在windows中可以方便的进行界面展示
使用mobaxterm通过ssh连接板子,其中ip在3中已经得到。
在mobaxterm中展示如下,如果x11-forwarding √,如下所示,表明功能正常使用,使用xclock命令验证即可
而在新的板子中往往没有安装,x11-forwarding ×,解决方法如下:
sudo apt-get install xorg
touch /root/.Xauthority
xauth add /root/unix:10 MIT-MAGIC-COOKIE-1 $(mcookie)
export DISPLAY=192.168.31.254:0.0 #这里192.168.31.254时自己的DISPLAY显示的ip,是本机的ip
修改 /etc/ssh/sshd_config
AllowTcpForwarding yes
X11Forwarding yes
X11DisplayOffset 10
X11UseLocalhost yes
然后重新进行ssh连接,使用xclock验证
5.USB摄像头AI推理
手头有USB摄像头,测试一下该功能,根据该测试程序读取USB摄像头的图像诗句,运行视觉检测算法,通过HDMI输出
连接:1)连接奥比中光的USB摄像头。
sunrise@ubuntu:~$ ls /dev/video*
/dev/video0  /dev/video1  /dev/video2  /dev/video3  /dev/video4  /dev/video5  /dev/video6  /dev/video7  /dev/video8
2)连接HDMI的屏幕,这里使用的server的系统镜像,hdmi输出了地平线的log
运行
cd /app/ai_inference/02_usb_camera_sample/
python3 ./usb_camera_fcos.py
出现以下错误信息
sunrise@ubuntu:/app/ai_inference/02_usb_camera_sample$ python3 ./usb_camera_fcos.py
[C][2943][05-14][11:08:12:804][configuration.cpp:51][EasyDNN]EasyDNN version: 0.3.5
[BPU_PLAT]Open BPU Group Ctrl File failed!
[BPU_PLAT]Open bpu core[2] error(-1)
[BPU_PLAT]Open BPU Chief Core Failed
[HBRT] set log level as 0. version = 3.13.27
[BPU_PLAT]Invalid core fd[0]!
[000:000] (configuration.cpp:159): Unsupport platform!
[DNN] Runtime version = 1.8.4_(3.13.27 HBRT)
[HorizonRT] The model builder version = 1.5.2
[000:206] (packed_model.cpp:232): HR:ERROR: The model's march is bernoulli2, please run on X/J3 board!
[000:207] (packed_model.cpp:128): Invalid model, model file:../models/fcos_512x512_nv12.bin
Traceback (most recent call last):
File "./usb_camera_fcos.py", line 242, in
models = dnn.load(' ../models/fcos_512x512_nv12.bin')
RuntimeError: Load model failed!
该信息是因为没有权限,加入sudo或者进入root。
正确显示如下,可以看到摄像头正确的识别出了苹果和杯子,但在实际使用过程中,能识别出常见的一些物品比如苹果、杯子的识别,且在特征明显时准确度很高,但图像的延迟很高,这是对体验的最大的影响,这里应该是模型推理使用的时间较长,图像的显示应该不需要耗费很多的时间。
在这里发现代码对摄像头的图像大小要求为1920*1090,换用其他摄像头如1280x960时会报错,导致无法输出图像
错误log如下:
Open usb camera successfully
[ERROR]["vot"][vot/hb_vot.c:2306] [3403.474956]HB_VOT_SendFrame[2306]: hbvo: HB_VOT_SendFrame: invalid frame size 1843200, resolution is 1920x1080.

laptop is in the picture with confidence:0.5162
laptop is in the picture with confidence:0.5782
mouse is in the picture with confidence:0.5181
[ERROR]["vot"][vot/hb_vot.c:2306] [3403.683081]HB_VOT_SendFrame[2306]: hbvo: HB_VOT_SendFrame: invalid frame size 1843200, resolution is 1920x1080.

laptop is in the picture with confidence:0.5386
[ERROR]["vot"][vot/hb_vot.c:2306] [3403.880800]HB_VOT_SendFrame[2306]: hbvo: HB_VOT_SendFrame: invalid frame size 1843200, resolution is 1920x1080.
这是因为在python中设定了图像的大小,更换摄像头或者修改图像大小即可
6.频率测试
使用该代码,测试一下CPU超频,在python中加入时间,发现检测一次需要的时间在0.27左右
apple is in the picture with confidence:0.8048
time: 0.27510786056518555
apple is in the picture with confidence:0.8036
time: 0.2725057601928711
apple is in the picture with confidence:0.8061
time: 0.2746434211730957
apple is in the picture with confidence:0.8061
time: 0.2742950916290283
apple is in the picture with confidence:0.7967
time: 0.28714489936828613
使用下列命令将cpu频率固定在1.2Ghz下,发现时间基本保持不变
sudo bash -c 'echo performance > /sys/devices/system/cpu/cpufreq/policy0/scaling_governor'
可将CPU最高频率从1.2GHz提升到1.5GHz
sudo bash -c 'echo 1 > /sys/devices/system/cpu/cpufreq/boost'
再次运行代码,发现时间有所减少,大概减少了0.06左右
apple is in the picture with confidence:0.7830
time: 0.22371220588684082
apple is in the picture with confidence:0.7832
time: 0.22039031982421875
apple is in the picture with confidence:0.7883
time: 0.21980547904968262
apple is in the picture with confidence:0.7862
time: 0.21799993515014648
apple is in the picture with confidence:0.7984
time: 0.22039437294006348
apple is in the picture with confidence:0.7837
time: 0.22038507461547852
apple is in the picture with confidence:0.7868
7.频率测试
到这里旭日派的初步测试和环境搭建就结束了,但旭日派最大的亮点还是AI加速部分,专门做了yolov5的AI推理部分。


