5. torchvision中VGG的实现详解
一、torchvision中的VGG的观察
下面是torchvision中VGG16的实现,我提出来了,并且把加载参数的代码注释掉了:
# @file name : VGG.py
# @brief :
# @author : liupc
# @date : 2021/7/15
import torch
import torch.nn as nn
class VGG(nn.Module):
def __init__(self, features, num_classes=1000, init_weights=True):
super(VGG, self).__init__()
self.features = features
self.avgpool = nn.AdaptiveAvgPool2d((7, 7))
self.classifier = nn.Sequential(
nn.Linear(512 * 7 * 7, 4096),
nn.ReLU(True),
nn.Dropout(),
nn.Linear(4096, 4096),
nn.ReLU(True),
nn.Dropout(),
nn.Linear(4096, num_classes),
)
if init_weights:
self._initialize_weights()
def forward(self, x):
x = self.features(x)
x = self.avgpool(x)
x = torch.flatten(x, 1)
x = self.classifier(x)
return x
def _initialize_weights(self):
for m in self.modules():
if isinstance(m, nn.Conv2d):
nn.init.kaiming_normal_(m.weight, mode='fan_out', nonlinearity='relu')
if m.bias is not None:
nn.init.constant_(m.bias, 0)
elif isinstance(m, nn.BatchNorm2d):
nn.init.constant_(m.weight, 1)
nn.init.constant_(m.bias, 0)
elif isinstance(m, nn.Linear):
nn.init.normal_(m.weight, 0, 0.01)
nn.init.constant_(m.bias, 0)
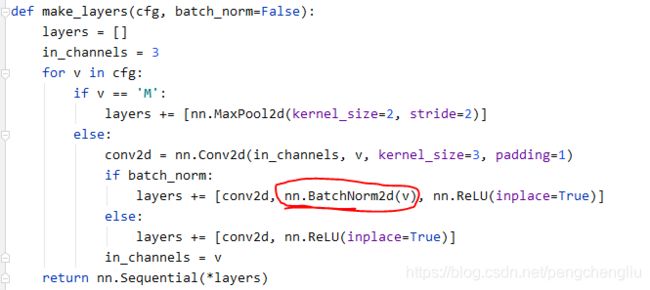
def make_layers(cfg, batch_norm=False):
layers = []
in_channels = 3
for v in cfg:
if v == 'M':
layers += [nn.MaxPool2d(kernel_size=2, stride=2)]
else:
conv2d = nn.Conv2d(in_channels, v, kernel_size=3, padding=1)
if batch_norm:
layers += [conv2d, nn.BatchNorm2d(v), nn.ReLU(inplace=True)]
else:
layers += [conv2d, nn.ReLU(inplace=True)]
in_channels = v
return nn.Sequential(*layers)
cfgs = {
'A': [64, 'M', 128, 'M', 256, 256, 'M', 512, 512, 'M', 512, 512, 'M'],
'B': [64, 64, 'M', 128, 128, 'M', 256, 256, 'M', 512, 512, 'M', 512, 512, 'M'],
'D': [64, 64, 'M', 128, 128, 'M', 256, 256, 256, 'M', 512, 512, 512, 'M', 512, 512, 512, 'M'],
'E': [64, 64, 'M', 128, 128, 'M', 256, 256, 256, 256, 'M', 512, 512, 512, 512, 'M', 512, 512, 512, 512, 'M'],
}
def _vgg(arch, cfg, batch_norm, pretrained, progress, **kwargs):
if pretrained:
kwargs['init_weights'] = False
model = VGG(make_layers(cfgs[cfg], batch_norm=batch_norm), **kwargs)
# if pretrained:
# state_dict = load_state_dict_from_url(model_urls[arch], progress=progress)
# model.load_state_dict(state_dict)
return model
def vgg16(pretrained=False, progress=True, **kwargs):
return _vgg('vgg16', 'D', False, pretrained, progress, **kwargs)
if __name__ == "__main__":
data = torch.randn(2, 3, 224, 224) # batch_size, channel,h, w
model = vgg16()
print(model)
res = model(data)
print(res.shape)
运行结果:
D:\Anaconda3\envs\pytorch_env\python.exe D:/pythonCodes/深度学习实验/经典分类网络/2:VGG/VGGNet/VGG.py
VGG(
  (features): Sequential(
    (0): Conv2d(3, 64, kernel_size=(3, 3), stride=(1, 1), padding=(1, 1))
    (1): ReLU(inplace=True)
    (2): Conv2d(64, 64, kernel_size=(3, 3), stride=(1, 1), padding=(1, 1))
    (3): ReLU(inplace=True)
    (4): MaxPool2d(kernel_size=2, stride=2, padding=0, dilation=1, ceil_mode=False)
    (5): Conv2d(64, 128, kernel_size=(3, 3), stride=(1, 1), padding=(1, 1))
    (6): ReLU(inplace=True)
    (7): Conv2d(128, 128, kernel_size=(3, 3), stride=(1, 1), padding=(1, 1))
    (8): ReLU(inplace=True)
    (9): MaxPool2d(kernel_size=2, stride=2, padding=0, dilation=1, ceil_mode=False)
    (10): Conv2d(128, 256, kernel_size=(3, 3), stride=(1, 1), padding=(1, 1))
    (11): ReLU(inplace=True)
    (12): Conv2d(256, 256, kernel_size=(3, 3), stride=(1, 1), padding=(1, 1))
    (13): ReLU(inplace=True)
    (14): Conv2d(256, 256, kernel_size=(3, 3), stride=(1, 1), padding=(1, 1))
    (15): ReLU(inplace=True)
    (16): MaxPool2d(kernel_size=2, stride=2, padding=0, dilation=1, ceil_mode=False)
    (17): Conv2d(256, 512, kernel_size=(3, 3), stride=(1, 1), padding=(1, 1))
    (18): ReLU(inplace=True)
    (19): Conv2d(512, 512, kernel_size=(3, 3), stride=(1, 1), padding=(1, 1))
    (20): ReLU(inplace=True)
    (21): Conv2d(512, 512, kernel_size=(3, 3), stride=(1, 1), padding=(1, 1))
    (22): ReLU(inplace=True)
    (23): MaxPool2d(kernel_size=2, stride=2, padding=0, dilation=1, ceil_mode=False)
    (24): Conv2d(512, 512, kernel_size=(3, 3), stride=(1, 1), padding=(1, 1))
    (25): ReLU(inplace=True)
    (26): Conv2d(512, 512, kernel_size=(3, 3), stride=(1, 1), padding=(1, 1))
    (27): ReLU(inplace=True)
    (28): Conv2d(512, 512, kernel_size=(3, 3), stride=(1, 1), padding=(1, 1))
    (29): ReLU(inplace=True)
    (30): MaxPool2d(kernel_size=2, stride=2, padding=0, dilation=1, ceil_mode=False)
  )
  (avgpool): AdaptiveAvgPool2d(output_size=(7, 7))
  (classifier): Sequential(
    (0): Linear(in_features=25088, out_features=4096, bias=True)
    (1): ReLU(inplace=True)
    (2): Dropout(p=0.5, inplace=False)
    (3): Linear(in_features=4096, out_features=4096, bias=True)
    (4): ReLU(inplace=True)
    (5): Dropout(p=0.5, inplace=False)
    (6): Linear(in_features=4096, out_features=1000, bias=True)
  )
)
torch.Size([2, 1000])
二、torchvision中的VGG16模型结构
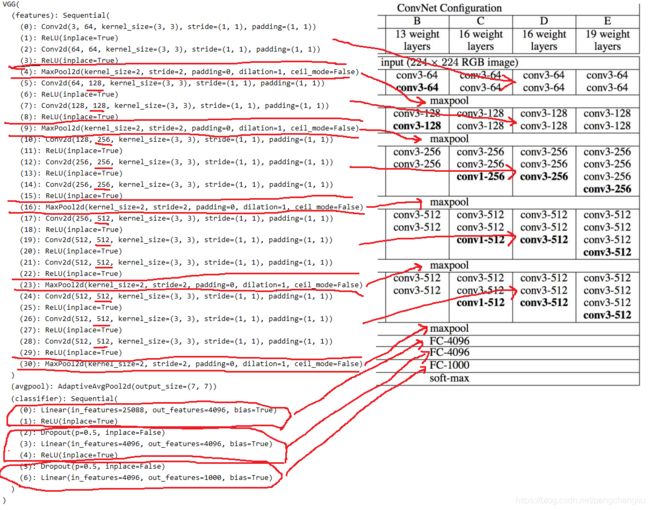
可以看到torchvision中的VGG16模型与论文中的模型结构几乎完全相同。
有以下几点地方要注意:
(1)每个卷积层之后接了一个ReLU()。前两个FC层后面也接了ReLU,最后一个FC层之后没有接ReLU。
(2)第一个FC没有用Dropout,第二三个FC层用到了Dropout。这与AlexNet模型是有区别的,见观察torchvision自带的alexnet模型。AlexNet的网络结构最后为:
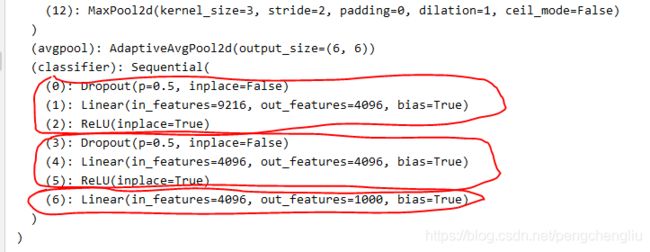
AlexNet是前两个FC层有Dropout,第三个FC没有用Dropout。可能是因为没啥区别吧。
总之Dropout的使用呢,就是在Linear()之前增加一条语句。
(3)与AlexNet一样,在FC层之前使用了AdaptiveAvgPool2d这个trick。自适应的池化。
三、torchvision中的VGG的实现代码分析
实现的代码值得学习,用一个代码可以实现VGG A、B、D、E多个模型。体现了代码的复用性。
代码并不难。
首先vgg16()调用_vgg(),_vgg()调用VGG()生成模型。

VGG的第一个参数是调用make_layers()函数来产生特征提取的层。make_layers()是vgg代码中最关键的。
make_layer()传入的参数cfgs['D'] ,就是以下的列表,用来创建vgg16的各层。
![]()
其代码如下:

首先初始化一个空列表[],然后不断地往里面增加各个层。
列表的"+="运算,结果就是把各个元素合成同一个列表。比如:
x = [1,2,3]
a = [4,5,6]
x += a
print(x)
结果为:

遍历完成后,layers中的元素就是各个层了。list变量前加一个星号*,就可以将该list变量拆解开多个独立的参数,传入函数中。nn.Sequetial是顺序包装成一组网络层了。
传入VGG后,就是一般的操作了:

四、torchvision中的vgg_bn的实现
根据三中的代码,可以看到增加了BN之后的VGG网络的实现。就是在每个卷积操作之后增加了一个BN的操作。其他完全不变。