MediaPipe在Ubuntu中的配置环境1
MediaPipe在Ubuntu中的配置环境1mediapipe在Ubuntu中配置。https://blog.csdn.net/gong0585/article/details/122949537MediaPipe在Ubuntu中的配置环境2 https://blog.csdn.net/gong0585/article/details/123292622
软件环境
Oracle VM VirtualBox
Ubuntu20.04
MediaPipe 0.8
使用虚拟机安装ubuntu20.04来开发mediapipe
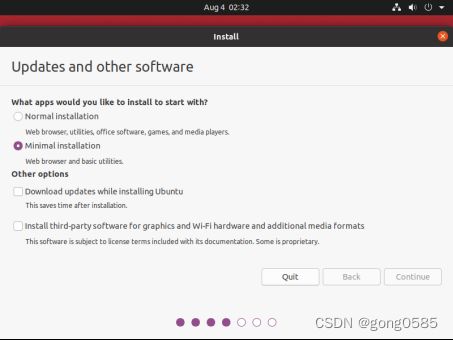
Ubuntu20最小安装,50G硬盘空间,4核CPU,4G内存。
修改ubuntu的镜像源
Ubuntu默认安装的Vim是最小版本vim-tiny,更新为完全版本的解决办法
1.卸载vim-tiny
#apt-get remove vim-common
2.安装vim-full
#apt-get install vim
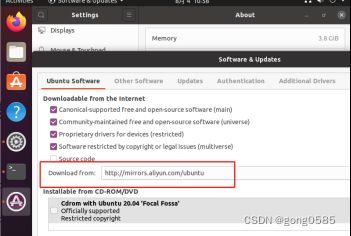
选项1.界面修改下载源
http://mirrors.aliyun.com
选项2.命令修改下载源
#sudo cp /etc/apt/sources.list /etc/apt/sources.list.backup
#sudo vi /etc/apt/sources.list
#默认注释了源码镜像以提高 apt update 速度,如有需要可自行取消注释
deb http://mirrors.aliyun.com/ubuntu/ focal multiverse
deb http://mirrors.aliyun.com/ubuntu/ focal-security main restricted universe multiverse
deb http://mirrors.aliyun.com/ubuntu/ focal-updates multiverse
deb http://mirrors.aliyun.com/ubuntu/ focal-proposed main restricted universe multiverse
deb http://mirrors.aliyun.com/ubuntu/ focal-backports main restricted universe multiverse
deb Index of /ubuntu xenial-security main
#deb-src http://mirrors.aliyun.com/ubuntu/ bionic main restricted universe multiverse
#deb-src http://mirrors.aliyun.com/ubuntu/ bionic-security main restricted universe multiverse
#deb-src http://mirrors.aliyun.com/ubuntu/ bionic-updates main restricted universe multiverse
#deb-src http://mirrors.aliyun.com/ubuntu/ bionic-proposed main restricted universe multiverse
#deb-src http://mirrors.aliyun.com/ubuntu/ bionic-backports main restricted universe multiverse
#sudo apt-get update
#sudo apt-get upgrade
增加下面的下载源,防止出错。
#sudo add-apt-repository "deb http://security.ubuntu.com/ubuntu xenial-security main"
#sudo apt update
github加速
首先通过下面的URL确认那个ip最快。
GitHub: Where the world builds software · GitHub
Windows
C:\Windows\System32\drivers\etc\hosts文件
Linux
/etc/hosts
内容如下:
140.82.112.3 github.com
185.199.108.153 assets-cdn.github.com
199.232.69.194 github.global.ssl.fastly.net
Windows窗口执行下面的,刷新dns命令
>ipconfig /flushdns
linux执行下面的命令,刷新DNS。
#/etc/init.d/network restart #ubuntu老版本
#sudo /etc/init.d/networking restart #ubuntu老版本
#systemctl restart NetworkManager.service #ubuntu新版本
使得hosts生效
启动SSH
Ubuntu安装OpenSSH
#sudo apt-get install openssh-server
切换root
#sudo su
删除锁定
#sudo rm /var/cache/apt/archives/lock
#sudo rm /var/lib/dpkg/lock
查看版本
#ssh -V
查看状态
#ps -e | grep ssh
启动
#/etc/init.d/ssh start
重启
#sudo /etc/init.d/ssh restart
#sudo service ssh restart
修改root密码
#sudo passwd root
让root登录SSH
#vi /etc/ssh/sshd_config
#PermitRootLogin without-password 注释掉
新增下面两行
PermitRootLogin yes
StrictModes yes
保存重启后可以登录
错误提示:
ssh permission denied please try again
#vi /etc/ssh/sshd_config
设置
PermitRootLogin yes
登录成功后,提示:
Your account is locked. Maximum amount of failed attempts was reached.
Last login: Mon Nov 13 16:55:04 2017 from 210.100.10.2
原因为:
多次连续错误输入密码,触发系统 PAM 认证模块策略限制,导致用户被锁定。
#vi /etc/pam.d/system-auth
注释掉,但我现在的系统上没有。
#auth requeired pam_tally2.so deny=5 lock_time=30 even_deny_root root_unlock_time=30
安装ifconfig
#sudo apt install net-tools //使用apt源安装net-tools工具包
安装git
#sudo apt-get install git
清空历史缓存
#rm -rf /root/.cache/bazelisk
#rm -rf /root/.cache/bazel
安装Bazel
简介
Bazel是Google开源的编译构建工具,以Monolithic Repository为理念。
与makefile & CMake不同,Bazel另起炉灶,采用client/server运行模式,为云编译而生。
Bazel优点:
多语言支持
client/server模式,云编译
非常方便的处理依赖:用户可声明依赖的地址、版本、构建规则,Bazel自动下载对应版本的依赖,并根据规则构建对应依赖的target。
优秀的缓存:增量编译非常快速
缺点:
开源社区资源匮乏(目前搜索bazel编译c++相关问题,大多跟tensorflow相关)
工具庞大,用户上手难度高
工具灵活性较低,对用户约束较多。比如:
target使用的所有头文件都需要显式地声明(尽管支持glob)
gen_rule(调用自定义功能:shell等)所有输入和输出文件都需要显式声明
对其他模块的依赖,只能以其整个库为形式,不能直接将其源码作为本模块target的源码使用
对IDE很不友好,其下载的依赖模块以及编译的中间产出,会存放到./bazel-module/和~/.cache(/root/.cache/bazelisk)(/root/.cache/bazel),而且目录层次很深
依赖git仓库时,其git信息会被bazel删除。用户难以实现保存依赖的git信息
选项1.Installing Bazel using Bazelisk
推荐用这个Bazelisk启动器,他安装后,会自动根据项目下载对应的bazel版本,来编译项目。
Bazelisk这是基于Go语言编写的Bazel启动器,它会为你的工作区下载最适合的Bazel,并且透明的将命令转发给该Bazel。
由于Bazellisk提供了和Bazel一样的接口,因此通常直接将其命名为bazel:
#sudo wget -O /usr/local/bin/bazel https://github.com/bazelbuild/bazelisk/releases/download/v1.11.0/bazelisk-linux-amd64
#sudo chmod +x /usr/local/bin/bazel
或者
下载https://github.com/bazelbuild/bazelisk/releases/download/v1.11.0/bazelisk-linux-amd64
拷贝到/usr/local/bin
#sudo chmod +x /usr/local/bin/bazel
bazelisk历史版本列表
https://github.com/bazelbuild/bazelisk/tags
Python
这步可以不管,在下一步会安装。
Ubuntu20.04 已经默认安装了 Python 3.8.2
#sudo apt-get install python-dev python-numpy
#python3 --version
#whereis python
#sudo ln -s /usr/bin/python3.8 /usr/bin/python 方便输入python命令
安装pip
#sudo apt-get install python3-pip
查看pip版本
#pip3 --version
修改pip下载源
#mkdir ~/.pip/
#sudo gedit ~/.pip/pip.conf
将下列内容加入到pip.conf文件中:
[global]
index-url=http://mirrors.aliyun.com/pypi/simple/
[install]
trusted-host=mirrors.aliyun.com
接着是安装numpy
直接输入命令
sudo pip install numpy
NumPy(Numerical Python)是Python的一种开源的数值计算扩展。这种工具可用来存储和处理大型矩阵,比Python自身的嵌套列表(nested list structure)结构要高效的多(该结构也可以用来表示矩阵(matrix)),支持大量的维度数组与矩阵运算,此外也针对数组运算提供大量的数学函数库
Installing MediaPipe on Debian and Ubuntu
Checkout MediaPipe repository.
$ cd $HOME
$ git clone GitHub - google/mediapipe: Cross-platform, customizable ML solutions for live and streaming media. 国外的镜像
#git clone https://gitee.com/mirrors/mediapipe.git 国内的镜像,然后,进入mediapipe目录,国内镜像有可能不是最新的。
# Change directory into MediaPipe root directory
$ cd mediapipe
修改工作空间
#cd mediapipe
#vi WORKSPACE
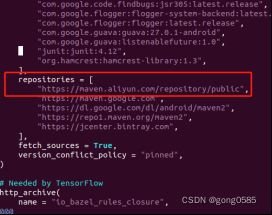
增加一个国内的镜像仓库,不增加此仓库。文件很难下载。
https://maven.aliyun.com/repository/public
Install OpenCV and FFmpeg.
选项1.从源代码开始编译
推荐用这个,批处理文件,安装openCV3
Mediapipe里面有个setup_opencv.sh批处理文件。
Option 2. Run setup_opencv.shto automatically build OpenCV from source and modify MediaPipe’s OpenCV config.
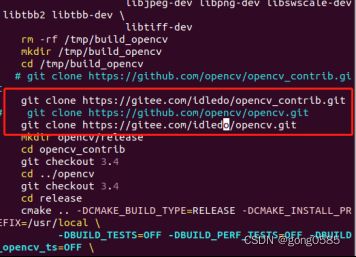
修改setup_opencv.sh使用国内镜像替代github.国外服务器,(修改dns后就不需要。)
虚拟机需要配置为4核CPU,4G内存,否则容易死机。
#vi setup_opencv.sh
将github.com替换为gitee.com的连接,速度快,效果一样。
https://gitee.com/idledo/opencv_contrib.git![]() https://gitee.com/idledo/opencv_contrib.git
https://gitee.com/idledo/opencv_contrib.git
https://gitee.com/idledo/opencv.git![]() https://gitee.com/idledo/opencv.git
https://gitee.com/idledo/opencv.git
#./setup_opencv.sh 全安装
#./setup_opencv.sh config_only 仅仅修改mediapipe配置为opencv
选项2.使用package管理工具,安装预编译好的OpenCV库。
Option 1. Use package manager tool to install the pre-compiled OpenCV libraries. FFmpeg will be installed via libopencv-video-dev.
Note: Debian 9 and Ubuntu 16.04 provide OpenCV 2.4.9. You may want to take option 2 or 3 to install OpenCV 3 or above.
$ sudo apt-get install libopencv-core-dev libopencv-highgui-dev \
libopencv-calib3d-dev libopencv-features2d-dev \
libopencv-imgproc-dev libopencv-video-dev
Debian 9 and Ubuntu 18.04 install the packages in /usr/lib/x86_64-linux-gnu. MediaPipe’s opencv_linux.BUILD and ffmpeg_linux.BUILD are configured for this library path.
Ubuntu 20.04 may install the OpenCV and FFmpeg packages in /usr/local, Please follow the option 3 below to modify the WORKSPACE, opencv_linux.BUILD and ffmpeg_linux.BUILD files accordingly.
Moreover此外, for Nvidia Jetson and Raspberry Pi devices with ARM Ubuntu, the library path needs to be modified like the following:
sed -i "s/x86_64-linux-gnu/aarch64-linux-gnu/g" third_party/opencv_linux.BUILD
运行桌面例子
Run the Hello World! in C++ example.
运行hello world
export GLOG_logtostderr=1
# if you are running on Linux desktop with CPU only
使用CPU,不使用GPU的命令
$ bazel run --define MEDIAPIPE_DISABLE_GPU=1 \
mediapipe/examples/desktop/hello_world:hello_world
# If you are running on Linux desktop with GPU support enabled (via mesa drivers)
启用GPU的命令
$ bazel run --copt -DMESA_EGL_NO_X11_HEADERS --copt -DEGL_NO_X11 \ mediapipe/examples/desktop/hello_world:hello_world
# Should print:# Hello World!# Hello World!# Hello World!# Hello World!# Hello World!# Hello World!# Hello World!# Hello World!# Hello World!# Hello World!
错误列表
PKIX path building failed
WARNING: Download from https://github.com/protocolbuffers/protobuf/archive/v3.11.4.tar.gz failed: class javax.net.ssl.SSLHandshakeException PKIX path building failed: sun.security.provider.certpath.SunCertPathBuilderException: unable to find valid certification path to requested target
ERROR: An error occurred during the fetch of repository 'com_google_protobuf':
Traceback (most recent call last):
File "/root/.cache/bazel/_bazel_root/6c11c387a04fa8f17c87a5c6db6ee555/external/bazel_tools/tools/build_defs/repo/http.bzl", line 111, column 45, in _http_archive_impl
download_info = ctx.download_and_extract(
Error in download_and_extract: java.io.IOException: Error downloading [https://github.com/protocolbuffers/protobuf/archive/v3.11.4.tar.gz] to /root/.cache/bazel/_bazel_root/6c11c387a04fa8f17c87a5c6db6ee555/external/com_google_protobuf/temp3638731568751802983/v3.11.4.tar.gz: PKIX path building failed: sun.security.provider.certpath.SunCertPathBuilderException: unable to find valid certification path to requested target
Ubuntu需要上网认证,没法连接外网的情况下报此错误。
#sudo vi /etc/apt/sources.list 增加下面一行。
deb Index of /ubuntu xenial-security main


