Node.js使用jwt或session实现前后端身份认证
黑马程序员Node.js全套入门教程,nodejs最新教程含es6模块化+npm+express+webpack+promise等_Nodejs实战案例详解_哔哩哔哩_bilibili本套课程作为框架前置课,重点为学生铺垫 npm、包、模块化、身份认证、CORS 跨域等主要知识点,为学习后面的 Vue 课程夯实基础。同时,本课程涵盖了 MySQL 数据库、API 接口项目开发等后端内容,拓宽了学生的知识面,为前端学生构建了前后端完整的知识体系,助力学生更好地发展。 https://www.bilibili.com/video/BV1a34y167AZ?p=76&spm_id_from=333.1007.top_right_bar_window_history.content.click八. 前后端身份认证
1. Web开发模式
(1)基于服务端渲染的传统Web开发模式:
- 服务器发送给客户端的HTML页面,是在服务器通过字符串的拼接动态生成的。因此,客户端不需要使用Ajax这样的技术额外请求页面的数据。
- 优点:前端耗时少、有利于SEO。
- 缺点:占用服务器端资源;不利于前后端分离,开发效率低。
(2)基于前后端分离的新兴Web开发模式:
- 后端只负责提供API接口,前端使用Ajax调用接口的开发模式。
- 优点:开发体验好、用户体验好、减轻了服务器端的渲染压力。
- 缺点:不利于SEO(解决方案:Vue、React提供的SSR技术)
2. 身份认证
通过一定的手段,完成对用户身份的确认。
- 身份认证的目的:确认当前声称为某种身份的用户,确实是该用户。
- 不同开发模式下的身份认证:
- (1)服务器端渲染推荐用Session认证机制
- (2)前后端分离推荐用JWT认证机制
3. Session认证机制
(1)Http协议的无状态性:
- 客户端的每次HTTP请求都是独立的,连续多个请求之间没有直接的关系,服务器不会主动保留每次HTTP请求的状态。
- 如何突破HTTP无状态的限制:Cookie
(2)Cokkie:
- Cookie是存储在用户浏览器中一段不超过4KB的字符串,由一个名称(Name)、一个值(Value)和其它几个用于控制Cookie有效期、安全性、使用范围的可选属性组成。
- 不同域名下的Cookie各自独立,每当客户端发起请求时,会自动把当前域名下所有未过期的Cookie一同发送到服务器。
- Cookie的特性:(1)自动发送(2)域名独立(3)过期时限(4)4KB限制
- Cookie在身份认证中的作用:
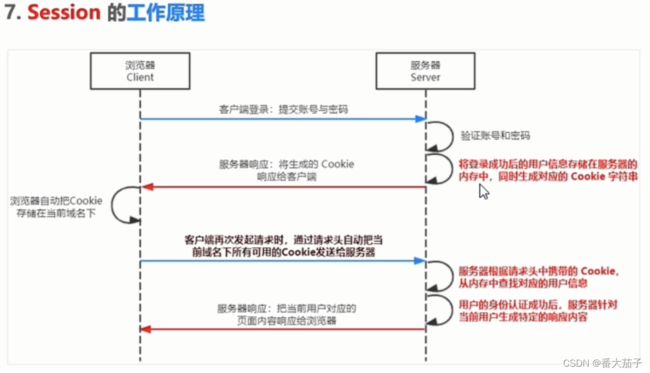
- 客户端第一次请求服务器时,服务器通过响应头的形式,向客户端发送一个身份认证的Cookie,客户端会自动将Cookie保存在浏览器中。
- 随后,当客户端浏览器每次请求服务器时,浏览器会自动将身份认证相关的Cookie通过请求头的形式发送给服务器,服务器即可验明客户端的身份。
- Cookie不具有安全性:
- 由于Cookie存储在浏览器中,浏览器也提供了读写Cookie的API,因此Cookie很容易被伪造,不具有安全性。
- 因此不建议服务器将重要的隐私数据通过Cookie形式发送给浏览器。
(3)Session:
- Session:主要存放在服务器端,相对安全。结合cookie使用,灵活、兼容性好。
- sessionStorage:仅在当前会话下有效,关闭页面或浏览器后被清除。
- localStorage:永久保存,除非被主动清除。
(4)在Express中使用Session认证 :
# 安装express-session中间件
npm install express-session
const express = require('express')
const app = express()
//1、导入session中间件
const session = require('express-session')
//2、配置session中间件
app.use(
session({
secret: 'song', //secret属性的值可以为任意字符
resave: false, //固定写法
saveUninitialized: true, //固定写法
})
)
app.use(express.static('./pages'))
app.use(express.urlencoded({ extended: false }))
//3、向session中存数据
// 登录的 API 接口
app.post('/api/login', (req, res) => {
// 判断用户提交的登录信息是否正确
if (req.body.username !== 'admin' || req.body.password !== '000000') {
return res.send({ status: 1, msg: '登录失败' })
}
//express-session中间件配置成功后,可以通过req.session访问和使用session对象
req.session.user = req.body // 将用户信息存储到session中
req.session.islogin = true // 将用户的登录状态存储到session中
res.send({ status: 0, msg: '登录成功' })
})
//4、从session中取数据
// 获取用户姓名的接口
app.get('/api/username', (req, res) => {
//判断用户是否登录
if (!req.session.islogin) {
return res.send({ status: 1, msg: 'fail' })
}
res.send({status: 0,msg: 'success',username: req.session.user.username})
})
//5、清空session
// 退出登录的接口
app.post('/api/logout', (req, res) => {
//清空当前客户端对应的session信息
req.session.destroy()
res.send({status: 0,msg: '退出登录成功'})
})
app.listen(80, ()=>{console.log('Express server running at http://127.0.0.1:80')})<!-- index.html -->
<!-- login.html -->
- (5)Session认证的局限性:
- Session认证机制需要配合Cookie才能实现,由于Cookie默认不支持跨域访问,所以当涉及到前端跨域请求后端接口时,需要做很多额外的配置。
- 当前端请求接口不存在跨域问题的时候,推荐使用Session身份认证机制。
- 当前端需要跨域申请后端接口的时候,不推荐使用Seesion身份认证机制,推荐使用JWT认证机制。
- 若服务器为分布式部署,需要做多机共享session机制,比较麻烦。
- 使用session的时候往往会进行数据库查询操作,消耗算力。
4. JWT认证机制
-
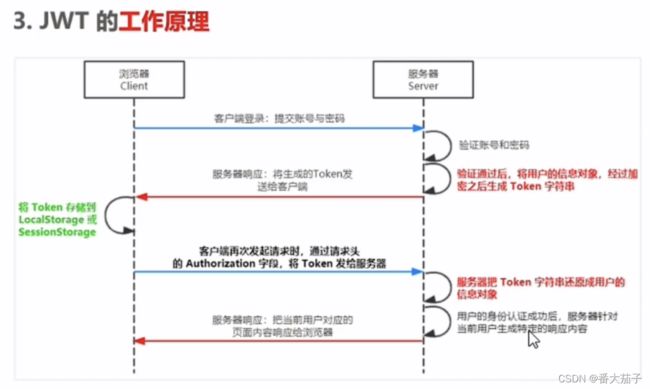
JWT(JSON Web Token):目前最流行的跨域认证解决方案,可以将各方信息作为JSON对象进行安全传输,信息经过数字签名可以被验证和信任。
- 工作原理:用户的信息通过Token字符串的形式,保存在客户端浏览器中。服务器通过还原Token字符串的形式来认证用户的身份。
- 组成部分:Header(头部)、Payload(有效荷载)、Signature(签名),三者之间使用英文的"."分隔。
- Payload部分才是真正的用户信息,它是用户信息经过加密之后生成的字符串。
- Header和Signature是安全性相关的部分,只是为了保证Token的安全性。
- 在 Express 中使用JWT:Nodejs中利用Express创建Web服务器、编写接口_番大茄子的博客-CSDN博客
- 为了保证JWT字符串的安全性,防止JWT字符串在网络传输过程中被别人破解,我们需要专门定义一个用于加密和解密的secret密钥:
- 当生成JWT字符串的时候,需要用secret密钥对用户的信息进行加密,最终得到加密好的JWT字符串。
- 当把JWT字符串解析还原成JSON对象的时候,需要使用secret密钥进行解密。
- 为了保证JWT字符串的安全性,防止JWT字符串在网络传输过程中被别人破解,我们需要专门定义一个用于加密和解密的secret密钥:
# 安装JWT相关的包:jsonwebtoken用于生成JWT字符串,express-jwt用于将JWT字符串解析还原成JSON对象
npm install jsonwebtoken express-jwt
const express=require('express');
const app=express();
// 允许跨域资源共享
const cors = require('cors')
app.use(cors())
// 解析 post 表单数据
app.use(express.urlencoded({ extended: false }))
//1、导入JWT相关包
const jwt=require('jsonwebtoken');
const expressJWT=require('express-JWT');
//2、定义secret密钥,建议将密钥命名为secretKey
const secretKey='songsong HaHa ^_^';
//3、注册将JWT字符串解析还原成JSON对象的中间件
//注意:只要配置成功了express-jwt这个中间件,就可以把解析出来的用户信息挂载到req.user属性上
app.use(expressJWT({secret:secretKey,algorithms:['HS256']}).unless({path:[/^\/api\//]}));
//登录接口
app.post('/api/login',function(req,res){
const userinfo=req.body;
//登录失败
if(userinfo.username!=='admin'||userinfo.password!=='000000'){
return res.send({status:400,message:'登录失败!'});
}
//登录成功:调用jwt.sign()方法生成JWT字符串,并通过token属性发送给客户端
//参数1:用户的信息对象,参数2:加密的密钥,参数3:配置对象,可以配置当前token的有效期
//记住:千万不要把密码加密到token字符串中!
const tokenStr=jwt.sign({username:userinfo.username},secretKey,{expiresIn:'30s'});
res.send({
status:200,
message:'登录成功!',
token:tokenStr //要发送给客户端的token字符串
})
})
//这是一个有权限的API接口
app.get('/admin/getinfo',function(req,res){
//使用req.user获取用户信息,并使用data属性将用户信息发送给客户端
res.send({
status:200,
message:'获取用户信息成功!',
data:req.user //要发送给客户端的用户信息
})
})
//使用全局错误处理中间件,捕获解析 JWT 失败后产生的错误
app.use((err, req, res, next) => {
if (err.name === 'UnauthorizedError') {//错误是由token解析失败导致的
return res.send({status: 401,message: '无效的token'});
}
//错误是由其他原因导致的
res.send({status: 500,message: '未知的错误'});
})
app.listen(8888, function () {
console.log('Express server running at http://127.0.0.1:8888')
})- 在 Koa 中使用JWT:
- Node.js中利用Koa创建Web服务器、编写接口_番大茄子的博客-CSDN博客
# 安装JWT相关的包:安装jsonwebtoken用于生成JWT字符串,安装koa-jwt实现各种高级功能
npm install jsonwebtoken koa-jwt
// index.js
const Koa = require('koa')
const app = new Koa()
const Router = require('koa-router')
const router = new Router()
const usersRouter = new Router({ prefix: '/users'})
// MongoDB数据库User模型
const User = require('/models/users.js')
// 解析请求体
const bodyparser = require('koa-bodyparser')
app.use(bodyparser())
// 1、导入jsonwebtoken包
const jsonwebtoken = require('jsonwebtoken')
// 导入koa-jwt包
const jwt = require('koa-jwt')
// 2、定义jwt密钥
const secret='koa-jwt-secret'
// 4、koa-jwt身份验证中间件
const auth=jwt({secret})
// 4、自己编写的jwt身份验证中间件
//const auth = async(ctx,next)=>{
// const {authorization=''}=ctx.request.header
// const token=authorization.replace('Bearer ','')
// try {
// // jwt身份验证
// const user=jsonwebtoken.verify(token,secret)
// ctx.state.user=user
// } catch (error) {
// ctx.throw(401,error.message)
// }
// await next()
//}
// 5、自己编写的jwt授权中间件:是否为自己本人(本人才可以修改和删除自己的信息)
const checkOwner = async(ctx,next){
if(ctx.params.id!==ctx.state.user._id){
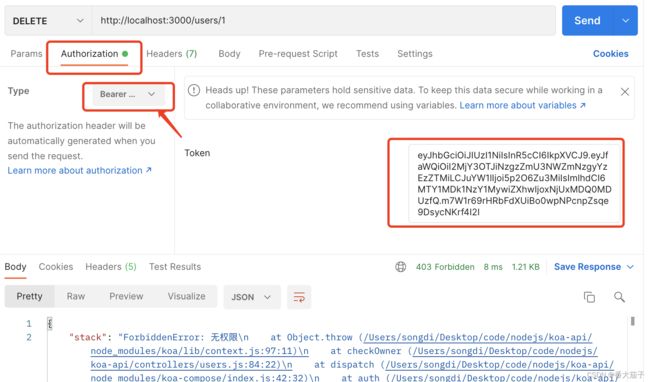
ctx.throw(403,'无权限')
}
await next()
}
// 首页
router.get('/', (ctx) => {
ctx.body = 'Home Page
'
})
// 用户列表
usersRouter.get('/', auth, (ctx) => {
ctx.body = await User.find()
})
// 查询某一用户
usersRouter.get('/:id', (ctx) => {
const user = await User.findById(ctx.params.id)
if (!user) {
ctx.throw(404, '用户不存在')
}
ctx.body = user
})
// 注册:添加一用户,用户名不能重复
usersRouter.post('/', (ctx) => {
// 参数校验
ctx.verifyParams({
name: {
type: 'string',
required: true
},
password: {
type: 'string',
required: true
}
})
// 唯一性检验
const { name } = ctx.request.body
const repeatedUser = await User.findOne({ name })
// 409表示冲突
if (repeatedUser) {
ctx.throw(409, '用户名已存在')
}
const user = await new User(ctx.request.body).save()
ctx.body = user
})
// 修改一用户
usersRouter.patch('/:id', auth, checkOwner, (ctx) => {
// 参数校验
ctx.verifyParams({
name: {
type: 'string',
required: false
},
password: {
type: 'string',
required: false
}
})
const user = await User.findByIdAndUpdate(ctx.params.id, ctx.request.body)
if (!user) {
ctx.throw(404, '用户不存在')
}
ctx.body = user
})
// 删除一用户
usersRouter.delete('/:id', auth, checkOwner, (ctx) => {
const user = await User.findByIdAndRemove(ctx.params.id, ctx.request.body)
if (!user) {
ctx.throw(404, '用户不存在')
}
ctx.status = 204 // No content
})
// 登录:将用户信息存入token中
usersRouter.post('/login', (ctx) => {
ctx.verifyParams({
name: {
type: 'string',
required: true
},
password: {
type: 'string',
required: true
}
})
const user=await User.findOne(ctx.request.body)
if(!user){ctx.throw(401,'用户名或密码不正确')}
// 3、jwt身份认证,获取token
const { _id, name } = user
// {_id, name}为要传输的内容
// secret是jwt加密使用的密钥
// {expiresIn:'1d'}表示过期时间为一天
const token=jsonwebtoken.sign({_id, name},secret,{expiresIn:'1d'})
ctx.body={token}
})
// 注册路由中间件
app.use(router.routes())
app.use(usersRouter.routes())
app.use(usersRouter.allowedMethods())
app.listen(3000)


