opencv c++ 图像梯度、边缘、锐化
图像梯度的目的:
获取图像上沿着某一方向或多个方向上,像素值的突变图像。
即:
对满足 之间相互独立的函数,
![]()
求![]() ,
,
1、预备知识
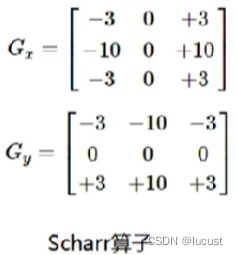
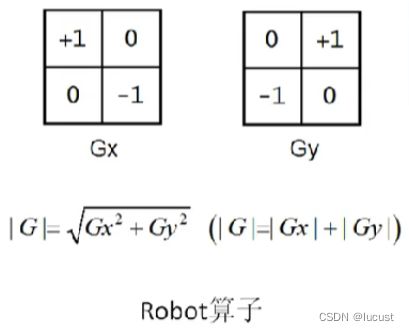
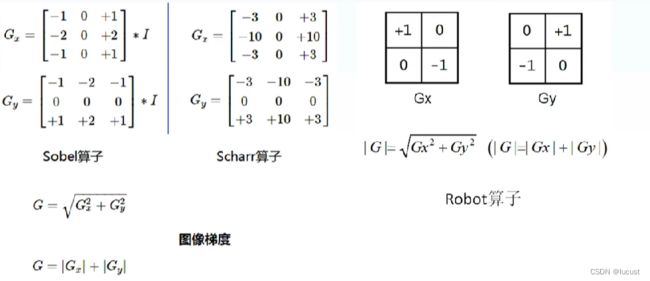
1.1、常见的梯度计算算子

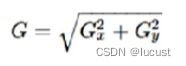
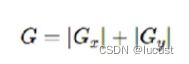
1.2、梯度计算方法
L2法:
L1法:
1.3如何获取梯度图像
分别使用x、y方向的算子来获取Gx,Gy,然后选用梯度计算方法来获取对应像素点的梯度值。
2、代码示例
2.1robot算子
void self_conv(Mat& image)
{
	//robot 梯度计算
	Mat robot_x = (Mat_(2, 2) << 1, 0, 0, -1);//自定义Mat核
	Mat robot_y = (Mat_(2, 2) << 0, 1, -1, 0);
	Mat grad_x,grad_y;
	filter2D(image, grad_x, CV_32F, robot_x, Point(-1, -1), 0, BORDER_DEFAULT);
	filter2D(image, grad_y, CV_32F, robot_y, Point(-1, -1), 0, BORDER_DEFAULT);
	convertScaleAbs(grad_x, grad_x);//该API将图像格式转为CV_8U格式,并将所有像素值置为正。
	convertScaleAbs(grad_y, grad_y);
	Mat result;
	add(grad_x, grad_y, result);
	namedWindow("robot img", WINDOW_FREERATIO);
	imshow("robot img", result);
}
2.2sobel算子
注:也可仿照robot算子示例输入3×3的卷积核,并赋予对应的sobel值进行梯度图像获取 。
opencvAPI调用示例:
void self_conv(Mat& image)
{

	Mat grad_x,grad_y;
	Sobel(image, grad_x, CV_32F, 1, 0);
	Sobel(image, grad_y, CV_32F, 0, 1);
	convertScaleAbs(grad_x, grad_x);//该API将图像格式转为CV_8U格式,并将所有像素值置为正。
	convertScaleAbs(grad_y, grad_y);
	Mat result2;
	//add(grad_x, grad_y, result2);
	addWeighted(grad_x, 0.5, grad_y, 0.5, 0, result2);
	namedWindow("sobel img", WINDOW_FREERATIO);
	imshow("sobel img", result2);
}
2.3Scharr算子
void self_conv(Mat& image)
{

	Mat grad_x,grad_y;
	Scharr(image, grad_x, CV_32F, 1, 0);
	Scharr(image, grad_y, CV_32F, 0, 1);
	convertScaleAbs(grad_x, grad_x);//该API将图像格式转为CV_8U格式,并将所有像素值置为正。
	convertScaleAbs(grad_y, grad_y);
	Mat result3;
	//add(grad_x, grad_y, result2);
	addWeighted(grad_x, 0.5, grad_y, 0.5, 0, result3);
	namedWindow("Scharr img", WINDOW_FREERATIO);
	imshow("Scharr img", result3);
}
结果:
3、拉普拉斯算子进行边缘获取、锐化
即二阶导数的图像应用。
3.1、拉普拉斯算子与锐化算子
拉普拉斯算子:
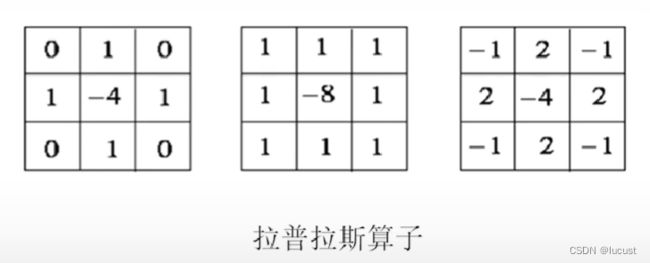
分别为: 四邻域算子、八邻域算子、变种算子。
拉普拉斯算子缺点:当图像细节较多时,难以去除这些细节的影响,需要与图像阈值化进行搭配使用。
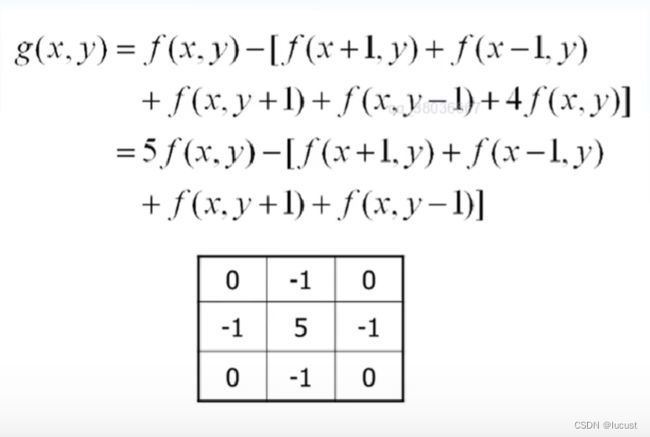
锐化算子:原图加上拉普拉斯算子的结果,本质为图像增强。
3.2、代码示例
拉普拉斯:
void Laplacian_demo(Mat& image)
{
	Mat dst;
	Laplacian(image, dst, -1, 3, 1.0, 0, BORDER_DEFAULT);
	namedWindow("Laplacian", WINDOW_FREERATIO);
	imshow("Laplacian", dst);
}
锐化:
由于没有现有的API,下列代码由filter2D加上自定义Mat方法实现。
void QuickDemo::image_descent(Mat& image)
{
	//定义锐化算子
	Mat sharp = (Mat_(3, 3) << 0, -1, 0,
									-1, 5, -1,
									0, -1, 0);
	Mat result;
	filter2D(image, result, -1, sharp, Point(-1, -1), 0, BORDER_DEFAULT);
	convertScaleAbs(result, result);
	namedWindow("sharp img", WINDOW_FREERATIO);
	imshow("sharp img", result);
}
4、USM(unsharp mask)锐化
权重化减法锐化公式:
sharp_img = α×blur - β×laplacian
优点:忽视细小细节着重对有用部分边缘进行锐化。
void usm_sharp(Mat& image)
{
	Mat blur_img, lap_img;
	GaussianBlur(image, blur_img, Size(3, 3), 0, 0, BORDER_DEFAULT);
	Laplacian(image, lap_img, -1, 1, 1.0, 0, BORDER_DEFAULT);
	Mat usm_img;
	addWeighted(blur_img, 1, lap_img, -0.7, 0, usm_img, -1);
	namedWindow("usm_sharp img", WINDOW_FREERATIO);
	imshow("usm_sharp img", usm_img);

}