构筑 Web 服务器集群的负载均衡(nginx)
构筑 Web 服务器集群的负载均衡
nginx 配置反向代理
配置 nginx 作为反向代理和负载均衡,同时利用其缓存功能,将静态页面在 nginx 缓存,以 达到降低后端服务器连接数的目的并检查后端 web 服务器的健康状况。

环境:
nginx:192.168.1.10
web1:192.168.1.11
web2:192.168.1.12
源码编译安装Nginx
1.关防火墙和selinux
2.安装nginx
安装 zlib-devel、pcre-devel 等依赖包
[root@nginx ~]# yum -y install gcc gcc-c++ make libtool zlib zlib-devel pcre pcre-devel openssl openssl-devel
3.把nginx和缓存包解压到/usr/src/
[root@nginx ~]# ls
anaconda-ks.cfg      nginx-goodies-nginx-sticky-module-ng-08a395c66e42.tar.gz
nginx-1.12.0.tar.gz  ngx_cache_purge-2.3.tar.gz
[root@nginx ~]# tar zxf nginx-1.12.0.tar.gz -C /usr/src/
[root@nginx ~]# tar zxf ngx_cache_purge-2.3.tar.gz -C /usr/src/
[root@nginx ~]# tar zxf nginx-goodies-nginx-sticky-module-ng-08a395c66e42.tar.gz  -C /usr/src/
[root@nginx ~]# cd /usr/src/
[root@nginx src]# ls
debug    nginx-1.12.0                                       ngx_cache_purge-2.3
kernels  nginx-goodies-nginx-sticky-module-ng-08a395c66e42
4.编译安装nginx
[root@nginx src]# cd nginx-1.12.0/
[root@nginx nginx-1.12.0]# ./configure --prefix=/usr/local/nginx --user=nginx --group=nginx \
> --with-http_stub_status_module --with-http_realip_module --with-http_ssl_module \
> --with-http_gzip_static_module --http-client-body-temp-path=/var/tmp/nginx/client \
> --http-proxy-temp-path=/var/tmp/nginx/proxy --http-fastcgi-temp-path=/var/tmp/nginx/fcgi \
> --with-pcre --add-module=../ngx_cache_purge-2.3 --with-http_flv_module \
> --add-module=../nginx-goodies-nginx-sticky-module-ng-08a395c66e42 \
> && make && make install
5.添加nginx系统服务并启动
[root@nginx ~]# ln -s /usr/local/nginx/sbin/nginx /usr/local/sbin/
[root@nginx ~]# mkdir -p /var/tmp/nginx/client
[root@nginx ~]# useradd -s /sbin/nologin nginx  //创建 Nginx用户 并且不允许直接登录系统
[root@nginx ~]# chown -R nginx:nginx /var/tmp/nginx
[root@nginx ~]# vim /etc/init.d/nginx
#!/bin/bash
# chkconfig: 2345 99 20
# description: Nginx Service Control Script
PROG="/usr/local/nginx/sbin/nginx"
PIDF="/usr/local/nginx/logs/nginx.pid"
case "$1" in
 start)
 netstat -anplt |grep ":80" &> /dev/null && pgrep "nginx" &> /dev/null
 if [ $? -eq 0 ]
 then
 echo "Nginx service already running."
 else
 $PROG -t &> /dev/null
 if [ $? -eq 0 ] ; then
 $PROG
 echo "Nginx service start success."
 else
 $PROG -t
 fi
 fi
 ;;
 stop)
 netstat -anplt |grep ":80" &> /dev/null && pgrep "nginx" &> /dev/null
 if [ $? -eq 0 ]
 then
 kill -s QUIT $(cat $PIDF)
 echo "Nginx service stop success."
 else
 echo "Nginx service already stop"
 fi
 ;;
 restart)
 $0 stop
 $0 start
 ;;
 status)
 netstat -anplt |grep ":80" &> /dev/null && pgrep "nginx" &> /dev/null
 if [ $? -eq 0 ]
 then
 echo "Nginx service is running."
 else
 echo "Nginx is stop."
 fi
 ;;
 reload)
 netstat -anplt |grep ":80" &> /dev/null && pgrep "nginx" &> /dev/null
 if [ $? -eq 0 ]
 then
 $PROG -t &> /dev/null
 if [ $? -eq 0 ] ; then
 kill -s HUP $(cat $PIDF)
 echo "reload Nginx config success."
 else
 $PROG -t
 fi
 else
 echo "Nginx service is not run."
 fi
 ;;
 *)
 echo "Usage: $0 {start|stop|restart|reload}"
 exit 1
esac
6.设置相应权限
[root@nginx ~]# chmod  +x /etc/init.d/nginx
[root@nginx ~]# chkconfig --add nginx
[root@nginx ~]# chkconfig nginx on
[root@nginx ~]# service nginx start
Nginx service start success.
[root@nginx ~]# systemctl start nginx.service
[root@nginx ~]# systemctl status nginx.service
● nginx.service - SYSV: Nginx Service Control Script
   Loaded: loaded (/etc/rc.d/init.d/nginx; bad; vendor preset: disabled)
   Active: active (exited) since Mon 2020-06-15 16:36:55 CST; 1s ago
     Docs: man:systemd-sysv-generator(8)
  Process: 10333 ExecStart=/etc/rc.d/init.d/nginx start (code=exited, status=0/SUCCESS)

Jun 15 16:36:54 nginx systemd[1]: Starting SYSV: Nginx Service Control Script...
Jun 15 16:36:55 nginx nginx[10333]: Nginx service already running.
Jun 15 16:36:55 nginx systemd[1]: Started SYSV: Nginx Service Control Script.
7.1)查看nginx版本
[root@nginx ~]# nginx -v   //小写v
nginx version: nginx/1.12.0
2)查看nginx模块
[root@nginx ~]# nginx -V   //大写V
nginx version: nginx/1.12.0
built by gcc 4.8.5 20150623 (Red Hat 4.8.5-39) (GCC)
built with OpenSSL 1.0.2k-fips  26 Jan 2017
TLS SNI support enabled
configure arguments: --prefix=/usr/local/nginx --user=nginx --group=nginx --with-http_stub_status_module --with-http_realip_module --with-http_ssl_module --with-http_gzip_static_module --http-client-body-temp-path=/var/tmp/nginx/client --http-proxy-temp-path=/var/tmp/nginx/proxy --http-fastcgi-temp-path=/var/tmp/nginx/fcgi --with-pcre --add-module=../ngx_cache_purge-2.3 --with-http_flv_module --add-module=../nginx-goodies-nginx-sticky-module-ng-08a395c66e42
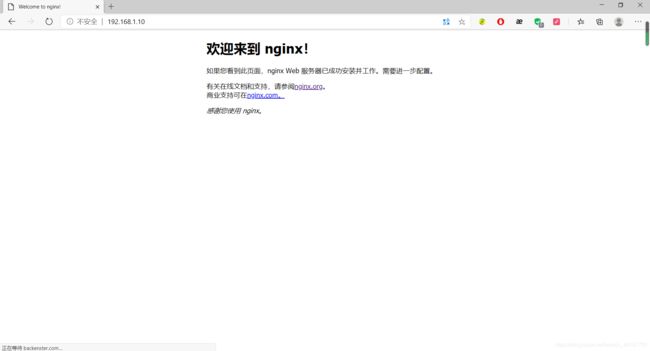
8.访问以下nginx网页
安装节点
1.yum方式安装Nginx
[root@Web-1 ~]# vim /etc/yum.repos.d/nginx.repo
[nginx-stable]
name=nginx stable repo
baseurl=http://nginx.org/packages/centos/$releasever/$basearch/
gpgcheck=0
enabled=1
gpgkey=https://nginx.org/keys/nginx_signing.key
module_hotfixes=true
[root@Web-1 ~]# yum -y install nginx
[root@Web-1 ~]# echo www.WEB-1 accp >  /usr/share/nginx/html/index.html
[root@Web-1 ~]# systemctl start nginx
[root@Web-1 ~]# netstat -anpt | grep  nginx
tcp        0      0 0.0.0.0:80              0.0.0.0:*               LISTEN      7463/nginx: master
[root@Web-2 ~]#  web2 步骤同上
服务优化
1.负载均衡与健康检查
[root@nginx ~]# vim /usr/local/nginx/conf/nginx.conf
......
http   {
.....
upstream backend {
        server 192.168.1.20:80 weight=1 max_fails=2 fail_timeout=10s;   //weight:轮询权值;  max_fails:允许请求失败的次数
        server 192.168.1.30:80 weight=1 max_fails=2 fail_timeout=10s;    //fail_timeout:在10s内最多容许2次失败;在经历了2次失败以后,10s内不分配请求到这台服务器
        sticky;
}
......
server {
......
location / {
            root   html;
            index  index.html index.htm;
            proxy_pass http://backend;
            }
......
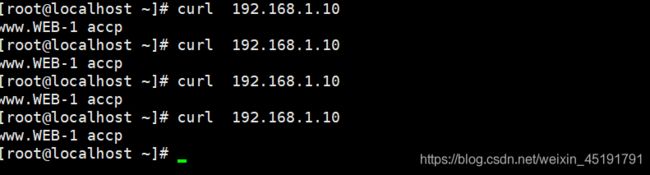
测试访问(1.10)

关闭web1的nginx节点服务,实现负载均衡

2.proxy缓存使用
[root@nginx ~]# vim /usr/local/nginx/conf/nginx.conf
......
......
    #access_log  logs/access.log  main;
    client_max_body_size 10m;          //允许客户端请求的最大单文件字节数
    client_body_buffer_size 128k;          //缓冲区代理缓冲用户端请求的最大字节数
    proxy_connect_timeout 75;          //nginx跟后端服务器连接超时时间(代理连接超时)
    proxy_send_timeout 75;          //后端服务器数据回传时间(代理发送超时)
    proxy_read_timeout 75;          //连接成功后,后端服务器响应时间(代理接收超时)
    proxy_buffer_size 4k;          //设置代理服务器(nginx)保存用户头信息的缓冲区大小
    proxy_buffers 4 32k;          //proxy_buffers缓冲区
    proxy_busy_buffers_size 64k;          //高负荷下缓冲大小
    proxy_temp_file_write_size 64k;          //设定缓存文件夹大小
    proxy_buffering on;          //代理时开启或关闭缓冲后端服务器的响应
    proxy_temp_path /usr/local/nginx/proxy_temp;
    proxy_cache_path /usr/local/nginx/proxy_cache levels=1:2 keys_zone=my-cache:100m inactive=600m max_size=2g;
......
 location / {
            root   html;
            index  index.html index.htm;
            proxy_pass http://backend;
            proxy_redirect off;          //后端的Web服务器可以通过获取用户真实IP
            proxy_set_header Host $host;
            proxy_set_header X-Real-IP $remote_addr;
            proxy_set_header X-Forwarded-For $proxy_add_x_forwarded_for;
            proxy_next_upstream error timeout invalid_header http_500 http_502 http_503 http_504;
            proxy_cache my-cache;  //引用前面定义的缓存区 my-cache
            add_header Nginx-Cache $upstream_cache_status; //来设置 response header, 语法: add_header name value;
            proxy_cache_valid 200 304 301 302 8h;
            proxy_cache_valid 404 1m;
            proxy_cache_valid any 1d; //为不同的响应状态码设置不同的缓存时间,比如200、302 等正常结果可以缓存的时间长点,而 404、500 等缓存时间设置短一些,这个时间到了文件就会过期,而不论是否刚被访问过。
            proxy_cache_key $host$uri$is_args$args;  //定义如何生成缓存的键,设置web 缓存的 key 值,nginx 根据 key 值 md5哈希存储缓存
            expires 30d;
        }
......
完成上端命令之后,Client访问会显示自己的IP
[root@Web-1 nginx]# tail -f access.log
......
192.168.1.10 - - [15/Jun/2020:18:00:56 +0800] "GET / HTTP/1.0" 200 15 "-" "curl/7.29.0" "192.168.1.100"
192.168.1.10 - - [15/Jun/2020:18:00:58 +0800] "GET / HTTP/1.0" 200 15 "-" "curl/7.29.0" "192.168.1.100"
192.168.1.10 - - [15/Jun/2020:18:00:58 +0800] "GET / HTTP/1.0" 200 15 "-" "curl/7.29.0" "192.168.1.100"