【ToTensor() Normalize()替代】不使用torchvision.transforms 对图片预处理python实现
文章目录
- 1 问题介绍
- 2 PIL.Image实现
- 3 python-opencv实现
- 4 整体代码示例
1 问题介绍
在一些场景,无法使用torchvision,自然也无法使用一些集成在transforms里的图像处理操作,在这里记录一下其中部分处理的替代实现。
如下方代码所示,pytorch中常见的图像处理过程有,对图像resize,图像数据归一化,并将数据格式从HWC变为CHW,使用ImageNet数据集预训练的话,还得减去均值,除以方差。
from torchvision import transforms

def main():
    data_transform = transforms.Compose(
        [transforms.Resize(224),
        # ToTensor():数据归一化 + 图像从HWC变为CHW
         transforms.ToTensor(),
         # 这是Imagenet数据集上,图片 RGB 的均值方差,注意顺序
         transforms.Normalize([0.485, 0.456, 0.406], [0.229, 0.224, 0.225])])
2 PIL.Image实现
注意均值方差的通道顺序,上方是RGB,PIL读取的图片也是RGB,故顺序一致。
from PIL import Image

img_path = "./data/rose.jpg"
img = Image.open(img_path)
img = img.convert('RGB')
img_resize = img.resize((224,224), Image.BICUBIC)   # PIL.Image类型
# PIL.Image类型无法直接除以255,需要先转成array
img_resize = np.array(img_resize, dtype='float32') / 255.0
img_resize -= [0.485, 0.456, 0.406]
img_resize /= [0.229, 0.224, 0.225]
img_CHW = np.transpose(img_resize, (2, 0, 1))

# 下面这行看着玩即可,上面已经完成了变换
img = torch.unsqueeze(torch.from_numpy(img_CHW), dim=0)	# expand batch dimension
...
3 python-opencv实现
注意均值方差的通道顺序,上方是RGB,opencv读取的图片也是BGR,故顺序要变一下。
import cv2

# load image
img_path = "./data/rose.jpg"
img = cv2.imread(img_path)
img = cv2.resize(np.array(img), (224, 224), interpolation=cv2.INTER_CUBIC).astype(np.float32)
img /= 255.0        # 要在减均值,除方差之前
#   opencv读的图片,对应的是BGR,均值方差要注意对应
img -= [0.406, 0.456, 0.485]
img /= [0.225, 0.224, 0.229]
# 从HWC,变为CHW
img = img.transpose(2, 0, 1)
# ---------------------------------------#
#   可先转成RGB,再减均值,除方差,但没必要
# ---------------------------------------#
# img = cv2.cvtColor(img, cv2.COLOR_BGR2RGB)	# 要是用plt.imshow(img),需要这一步
# img -= [0.485, 0.456, 0.406]
# img /= [0.229, 0.224, 0.225]


# 下面这行看着玩即可,上面已经完成了变换
img = torch.unsqueeze(torch.from_numpy(img), dim=0)	# expand batch dimension
...
4 整体代码示例
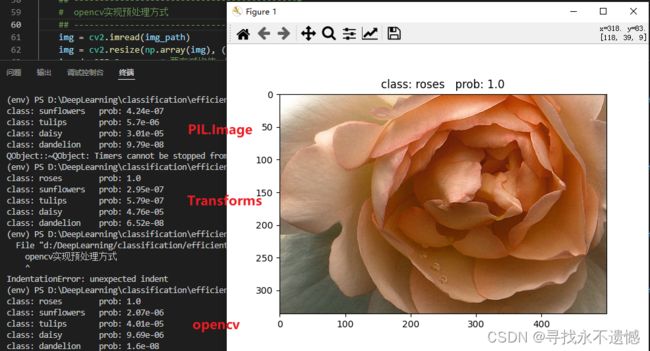
以Efficientnet-b0在花分类数据集上的预测为例,也就是EfficientNet训练自定义分类数据集中的predict.py。
import os
import json
import cv2
import torch
from PIL import Image
from torchvision import transforms
import matplotlib.pyplot as plt

from model import efficientnet_b0 as create_model

import numpy as np

def main():
    device = torch.device("cuda:0" if torch.cuda.is_available() else "cpu")

    img_size = {"B0": 224,
                "B1": 240,
                "B2": 260,
                "B3": 300,
                "B4": 380,
                "B5": 456,
                "B6": 528,
                "B7": 600}
    num_model = "B0"

    data_transform = transforms.Compose(
        [transforms.Resize(img_size[num_model]),
         transforms.CenterCrop(img_size[num_model]),
         transforms.ToTensor(),     # 数据归一化、图像从HWC变为CHW
         transforms.Normalize([0.485, 0.456, 0.406], [0.229, 0.224, 0.225])])       # 这是RGB的均值方差

    # load image
    img_path = "./data/rose.jpg"
    assert os.path.exists(img_path), "file: '{}' dose not exist.".format(img_path)
    img = Image.open(img_path)
    plt.imshow(img)

    ## --------------------------------------------#
    ##   PIL.Image实现预处理方式
    ## --------------------------------------------#
    # img = img.convert('RGB')
    # img_resize = img.resize((224,224), Image.BICUBIC)   # PIL.Image类型
    # # PIL.Image类型无法直接除以255,需要先转成array
    # img_resize = np.array(img_resize, dtype='float32') / 255.0
    # img_resize -= [0.485, 0.456, 0.406]
    # img_resize /= [0.229, 0.224, 0.225]
    # img_CHW = np.transpose(img_resize, (2, 0, 1))
    # img = torch.unsqueeze(torch.from_numpy(img_CHW), dim=0)

    ## --------------------------------------------#
    ##   torchvision.transforms实现预处理方式
    ## --------------------------------------------#
    # ## [C, H, W]
    # img = data_transform(img)
    # ## expand batch dimension
    # img = torch.unsqueeze(img, dim=0)

    ## --------------------------------------------#
    #  opencv实现预处理方式
    ## --------------------------------------------#
    img = cv2.imread(img_path)
    img = cv2.resize(np.array(img), (224, 224), interpolation=cv2.INTER_CUBIC).astype(np.float32)
    img /= 255.0        # 要在减均值,除方差之前
    #   opencv读的图片,对应的是BGR,均值方差要注意对应
    img -= [0.406, 0.456, 0.485]
    img /= [0.225, 0.224, 0.229]
    img = img.transpose(2, 0, 1)        # 从HWC,变为CHW
    img = torch.unsqueeze(torch.from_numpy(img), dim=0)


    # read class_indict
    json_path = './class_indices.json'
    assert os.path.exists(json_path), "file: '{}' dose not exist.".format(json_path)

    with open(json_path, "r") as f:
        class_indict = json.load(f)

    # create model
    model = create_model(num_classes=5).to(device)
    # load model weights
    model_weight_path = "./output/model-25.pth"
    model.load_state_dict(torch.load(model_weight_path, map_location=device))
    model.eval()
    with torch.no_grad():
        # predict class
        output = torch.squeeze(model(img.to(device))).cpu()     # 模型输出,score
        predict = torch.softmax(output, dim=0)                  # 经过softmax转化为概率
        predict_cla = torch.argmax(predict).numpy()             # 得到最大概率索引

    print_res = "class: {}   prob: {:.3}".format(class_indict[str(predict_cla)],
                                                 predict[predict_cla].numpy())
    plt.title(print_res)
    for i in range(len(predict)):
        print("class: {:10}   prob: {:.3}".format(class_indict[str(i)],
                                                  predict[i].numpy()))
    plt.show()


if __name__ == '__main__':
    main()
