云原生之K8S------k8s资源限制及探针检查
目录
一,资源现象
1,资源限制的使用
2,reuqest资源(请求)和limit资源(约束)
3,pod和容器的资源请求和限制
4,官方文档示例
5,资源限制实操
5.1 编写yaml资源配置清单
5.2 是否内存(node节点,以node1为例)
5.3 创建资源
5.4 跟踪查看pod状态
5.5 查看容器日志
5.6 删除pod
5.7 修改yaml配置资源清单,提高mysql资源限制
5.8 再次创建资源
5.9 跟踪查看pod状态
5.10 查看pod详细信息
5.11 查看node资源使用
二,重启策略
三,健康检查
1,健康检查的定义
2,探针的三种规则
3,prode支持的三种检查方法
4,探测结果
5,exec方式
6,httpget方式
7,tcpsocket方式
四,总结
1,探针
2,检查方式
3,常用的探针可选参数
4,重启策略
一,资源现象
1,资源限制的使用
当定义pod时可以选择性的为每个容器设定所需要的资源数量,最常见的可设定资源是CPU和内存大小,以及其他类型的资源。
2,reuqest资源(请求)和limit资源(约束)
- 当为Pod中的容器指定了request资源时,调度器就使用该信息来决定将Pod调度到哪个节点上。当还为容器指定了limit资源时,kubelet就会确保运行的容器不会使用超出所设的limit资源量。kubelet还会为容器预留所设的request资源量,供该容器使用。
- 如果Pod所在的节点具有足够的可用资源,容器可以使用超过所设置的request资源量。不过,容器不可以使用超出所设置的limit资源量。
- 如果给容器设置了内存的limit值,但未设置内存的request值,Kubernetes会自动为其设置与内存limit相匹配的request值。类似的,如果给容器设置了CPU的limit值但未设置CPU的request值,则Kubernetes自动为其设置CPU的request值,并使之与CPU的limit值匹配
3,pod和容器的资源请求和限制
定义创建容器时预分配的CPU资源
spec.containers[].resources.requests.cpu
定义创建容器时预分配的内存资源
spec.containers[].resources.requests.memory
定义创建容器时预分配的巨页资源
spec.containers[].resources.requests.hugepages-
定义cpu的资源上限
spec.containers[].resources.limits.cpu
定义内存的资源上限
spec.containers[].resources.limits.memory
定义巨页的资源上限
spec.containers[].resources.limits.hugepages-
4,官方文档示例
apiVersion: v1
kind: Pod
metadata:
  name: frontend
spec:
  containers:
  - name: app
    image: images.my-company.example/app:v4
    env:
    - name: MYSQL_ROOT_PASSWORD
      value: "password"
    resources:
      requests:
        memory: "64Mi"
        cpu: "250m"
      limits:
        memory: "128Mi"
        cpu: "500m"
  - name: log-aggregator
    image: images.my-company.example/log-aggregator:v6
    resources:
      requests:
        memory: "64Mi"
        cpu: "250m"
      limits:
        memory: "128Mi"
        cpu: "500m"
此例子中Pod有两个Container。每个Container 的请求为 0.25 cpu 和 64MiB(226 字节)内存, 每个容器的资源约束为 0.5 cpu 和 128MiB 内存。 你可以认为该 Pod 的资源请求为 0.5 cpu 和 128 MiB 内存,资源限制为 1 cpu 和 256MiB 内存
5,资源限制实操
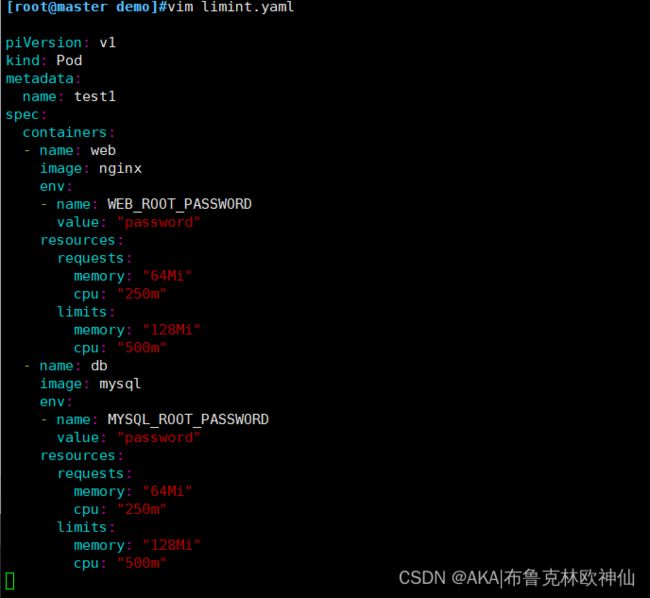
5.1 编写yaml资源配置清单
apiVersion: v1
kind: Pod
metadata:
  name: test1
spec:
  containers:
  - name: web
    image: nginx
    env:
    - name: WEB_ROOT_PASSWORD
      value: "password"
    resources:
      requests:
        memory: "64Mi"
        cpu: "250m"
      limits:
        memory: "128Mi"
        cpu: "500m"
  - name: db
    image: mysql
    env:
    - name: MYSQL_ROOT_PASSWORD
      value: "password"
    resources:
      requests:
        memory: "64Mi"
        cpu: "250m"
      limits:
        memory: "128Mi"
        cpu: "500m"
5.2 是否内存(node节点,以node1为例)
由于mysql对于内存的使用要求比较高,因此需要先检查内存的可用空间是否能够满足mysql的正常运行,若剩余内存不够,可对其进行释放操作。
[root@node01 ~]# free -mh
              total        used        free      shared  buff/cache   available
Mem:           1.9G        1.0G         86M         26M        870M        663M
Swap:            0B          0B          0B
5.3 创建资源
kubectl apply -f tets1.yaml
[root@master test]# kubectl apply -f test1.yaml
pod/test1 created
5.4 跟踪查看pod状态
kubectl get pod -o wide -w
[root@master test]# kubectl get pod -o wide -w
NAME    READY   STATUS              RESTARTS   AGE   IP       NODE     NOMINATED NODE   READINESS GATES
test1   0/2     ContainerCreating   0          4s       node01
test1   2/2     Running             0          18s   10.244.1.55   node01
test1   1/2     OOMKilled           0          21s   10.244.1.55   node01
test1   2/2     Running             1          37s   10.244.1.55   node01
test1   1/2     OOMKilled           1          40s   10.244.1.55   node01
......
OOM(OverOfMemory)表示服务的运行超过了我们所设定的约束值。
Ready:2/2,status:Running说明该pod已成功创建并运行,但运行过程中发生OOM问题被kubelet杀死并重新拉起新的pod。
5.5 查看容器日志
kubectl logs test1 -c web[root@master test]# kubectl logs test1 -c web
/docker-entrypoint.sh: /docker-entrypoint.d/ is not empty, will attempt to perform configuration
/docker-entrypoint.sh: Looking for shell scripts in /docker-entrypoint.d/
/docker-entrypoint.sh: Launching /docker-entrypoint.d/10-listen-on-ipv6-by-default.sh
10-listen-on-ipv6-by-default.sh: info: Getting the checksum of /etc/nginx/conf.d/default.conf
10-listen-on-ipv6-by-default.sh: info: Enabled listen on IPv6 in /etc/nginx/conf.d/default.conf
/docker-entrypoint.sh: Launching /docker-entrypoint.d/20-envsubst-on-templates.sh
/docker-entrypoint.sh: Launching /docker-entrypoint.d/30-tune-worker-processes.sh
/docker-entrypoint.sh: Configuration complete; ready for start up
2021/11/06 08:31:23 [notice] 1#1: using the "epoll" event method
2021/11/06 08:31:23 [notice] 1#1: nginx/1.21.3
2021/11/06 08:31:23 [notice] 1#1: built by gcc 8.3.0 (Debian 8.3.0-6)
2021/11/06 08:31:23 [notice] 1#1: OS: Linux 3.10.0-693.el7.x86_64
2021/11/06 08:31:23 [notice] 1#1: getrlimit(RLIMIT_NOFILE): 1048576:1048576
2021/11/06 08:31:23 [notice] 1#1: start worker processes
2021/11/06 08:31:23 [notice] 1#1: start worker process 31
2021/11/06 08:31:23 [notice] 1#1: start worker process 32nginx启动正常,接下来查看mysql日志
kubectl logs test1 -c mysql
[root@master test]# kubectl logs test1 -c db2021-11-06 08:38:44+00:00 [Note] [Entrypoint]: Entrypoint script for MySQL Server 8.0.27-1debian10 started.2021-11-06 08:38:44+00:00 [Note] [Entrypoint]: Switching to dedicated user 'mysql'2021-11-06 08:38:44+00:00 [Note] [Entrypoint]: Entrypoint script for MySQL Server 8.0.27-1debian10 started.2021-11-06 08:38:44+00:00 [Note] [Entrypoint]: Initializing database files2021-11-06T08:38:44.274783Z 0 [System] [MY-013169] [Server] /usr/sbin/mysqld (mysqld 8.0.27) initializing of server in progress as process 412021-11-06T08:38:44.279965Z 1 [System] [MY-013576] [InnoDB] InnoDB initialization has started.2021-11-06T08:38:44.711420Z 1 [System] [MY-013577] [InnoDB] InnoDB initialization has ended.2021-11-06T08:38:45.777355Z 0 [Warning] [MY-013746] [Server] A deprecated TLS version TLSv1 is enabled for channel mysql_main2021-11-06T08:38:45.777389Z 0 [Warning] [MY-013746] [Server] A deprecated TLS version TLSv1.1 is enabled for channel mysql_main2021-11-06T08:38:45.898121Z 6 [Warning] [MY-010453] [Server] root@localhost is created with an empty password ! Please consider switching off the --initialize-insecure option./usr/local/bin/docker-entrypoint.sh: line 191: 41 Killed "$@" --initialize-insecure --default-time-zone=SYSTEM
锁定问题容器为mysql
5.6 删除pod
[root@master test]# kubectl delete -f test1.yaml5.7 修改yaml配置资源清单,提高mysql资源限制
[root@master test]# vim test1.yaml

apiVersion: v1
kind: Pod
metadata:
  name: test1
spec:
  containers:
  - name: web
    image: nginx
    env:
    - name: WEB_ROOT_PASSWORD
      value: "password"
    resources:
    requests:
      memory: "64Mi"
      cpu: "250m"
    limits:
      memory: "128Mi"
      cpu: "500m"
  - name: db
    image: mysql
    env:
    - name: MYSQL_ROOT_PASSWORD
      value: "password"
    resources:
    requests:
      memory: "512Mi"
      cpu: "0.5"
    limits:
      memory: "1024Mi"
      cpu: "1"
5.8 再次创建资源
[root@master test]# kubectl apply -f test1.yaml pod/test1 created
5.9 跟踪查看pod状态
[root@master test]# kubectl get pod -o wide -w
5.10 查看pod详细信息
[root@master test]# kubectl describe pod test1
5.11 查看node资源使用
[root@master test]# kubectl describe node node01node01的配置为2C2G。
CPU Requests分析:
nginx的requests为250m,mysql的requests为500m,因此node01的CPU Requests为750m,在node01的两个核中使用占比为37%。
CPU Limits分析:
nginx到的limit为500m,mysql的limit为1,因此node01到的CPU Limits为1500m,在node01的两个核中使用占比为75%。
Memory Requests分析:
nginx的requests为64Mi,mysql的requests为512Mi,因此node01的内存Requests为576Mi,在node01的2G内存中使用占比为30%。
Memory Limits分析:
nginx的limits为128Mi,mysql的limit为1Gi,因此node01的1152Mi,在node01的2G内存中使用占比为61%。
二,重启策略
当pod中的容器退出时通过节点上的kubelet重启容器,适用于pod中的所以容器。
1,Always:当容器终止退出后,总是重启容器,默认策略
2,OnFailure:当容器异常退出后(退出状态码非0)时,重启容器:正常退出则不重启容器
3,Never:当容器终止退出,从不重启容器
注意:K8S中不支持重启,pod资源,只有删除重建
三,健康检查
1,健康检查的定义
健康检查又称为探针,是由kubelet对容器的定期诊断。
2,探针的三种规则
2.1:livenessprobe存活探针
判断容器是否正在运行,如果探测失败,则kubelet会杀死容器,并且容器将根据restartpolicy来设置pod状态,如果容器不提供存活探针,则默认状态为success。
2.2 readinessprobe就绪探针
判断容器是否准备好接受请求,如果探针失败,端口控制器将从pod匹配的所以service endpoints中剔除删除该pod的ip地址,初始延迟之前的就绪状态默认为failure,如果不提供就绪探针,则默认状态为success。
2.3 startupprobe启动探针(1.17新增)
判断容器内的应用程序是否已启动,主要针对于不能确定具体启动时间的应用。如果匹配了startupProbe探测,则在startupProbe状态为Success之前,其他所有探针都处于无效状态,直到它成功后其他探针才起作用。如果startupProbe失败,kubelet将杀死容器,容器将根据restartPolicy来重启。如果容器没有配置startupProbe,则默认状态为Success
2.4 同时定义
以上三种规则可同时定义,在readinessprobe检查成功之前,pod的running状态是不会变成ready状态的。
3,prode支持的三种检查方法
3.1 exec
在容器内部执行命令,如果容器退出时返回码为0则认为诊断成功
3.2 tcpsocket
对指定端口上的容器的ip地址进行tcp检查(三层握手),如果端口打开,则诊断被认为是成功的
3.3 httpget
对指定端口和路径上的容器的ip地址执行httpget请求,如果响应的状态码大于等于200且小于400,则诊断被认为是成功的。
4,探测结果
每次探测都会获得以下三种结果之一:
- 成功:容器通过了诊断
- 失败:容器未通过诊断
- 未知:诊断失败,因此不会采取如何措施。
5,exec方式
vim exec.yaml

apiVersion: v1
kind: Pod
metadata:
  labels:
    test: liveness				#为了健康检查定义的标签
  name: liveness-exec
spec:						#定义了Pod中containers的属性
  containers:
  - name: liveness
    image: busybox
    args:						#传入的命令
    - /bin/sh
    - -c
    - touch /tmp/healthy; sleep 30; rm -rf /tmp/healthy;sleep 600
    livenessProbe:
      exec:
        command:
        - cat
        - /tmp/healthy
      initialDelaySeconds: 5			#表示pod中容器启动成功后,多少秒后进行健康检查
      periodSeconds: 5				#在首次健康检查后,下一次健康检查的间隔时间 5s
在配置文件中,可以看到Pod具有单个Container。该perioSeconds字段指定kubelet应该每5秒执行一次活动性探测。该initiaDelaySeconds字段告诉kubelet在执行第一个探测之前应该等待5秒。为了执行探测,kubelet cat /tmp/healthy在容器中执行命令。如果命令成功执行,则返回0,并且kubelet认为Container仍然重要。如果命令返回非0值,则kubelet将杀死Container并重启它。
- 在这个配置文件中,可以看到Pod只有一个容器。
- 容器中的command字段表示创建一个/tmp/live文件后休眠30秒,休眠结束后删除该文件,并休眠10分钟。
- 仅使用livenessProbe存活探针,并使用exec检查方式,对/tmp/live文件进行存活检测。
- initialDelaySeconds字段表示kubelet在执行第一次探测前应该等待5秒。
- periodSeconds字段表示kubelet每隔5秒执行一次存活探测。
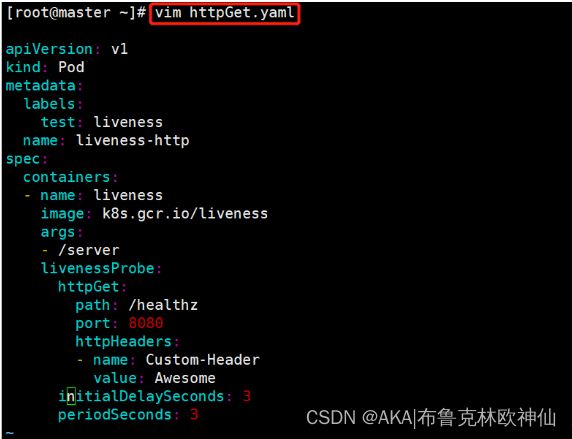
6,httpget方式
apiVersion: v1
kind: Pod
metadata:
  labels:
    test: liveness
  name: liveness-http
spec:
  containers:
  - name: liveness
    image: k8s.gcr.io/liveness
    args:
    - /server
    livenessProbe:
      httpGet:
        path: /healthz
        port: 8080
        httpHeaders:
        - name: Custom-Header
          value: Awesome
      initialDelaySeconds: 3
      periodSeconds: 3
在配置文件中,可以看到Pod具有单个Container。该periodSeconds字段指定kubectl应该每3秒执行一次活动性探测。该initiaDelaySeconds字段告诉kubelet在执行第一个探测之前应等待3秒。为了执行探测,kubectl将HTTP GET请求发送到Container中运行并在端口8080上侦听的服务器。如果服务器/healthz路径的处理程序返回成功代码,则kubectl会认为任何大于或等于400的代码均表示成功,其他代码都表示失败。
7,tcpsocket方式
定义TCP活动度探针
第三种类型的活动性探针使用TCP套接字,使用此配置,kubelet将尝试在指定端口上打开容器的套接字。如果可以建立连接,则认为该让其运行状况良好,如果不能,则认为该容器是故障容器。
apiVersion: v1
kind: Pod
metadata:
  name: goproxy
  labels:
    app: goproxy
spec:
  containers:
  - name: goproxy
    image: k8s.gcr.io/goproxy:0.1
    ports:
    - containerPort: 8080
    readinessProbe:
      tcpSocket:
        port: 8080
      initialDelaySeconds: 5
      periodSeconds: 10
    livenessProbe:
      tcpSocket:
        port: 8080
      initialDelaySeconds: 15
      periodSeconds: 20
如图所示,TCP检查的配置与HTTP检查非常相似,此示例同时使用就绪和活跃度探针,容器启动5秒后,kubelet将发送第一个就绪探测器。这些尝试连接到goproxy端口8080上的容器。如果探测成功,则容器将标记为就绪,kubelet将继续每10秒运行一次检查。
除了就绪探针之外,此配置还包括活动探针。容器启动后15秒钟,kubelet将运行第一个活动谈着,就像就绪探针一样,这些尝试goproxy在端口8080上连接到容器。如果活动探针失败,则容器将重新启动。
四,总结
1,探针
探针分为3种
1,livenessprobe(存活探针):判断容器是否正常运行,如果失败则杀掉容器(不是pod),再根据重启策略是否重新启动容器
2,readinessprobe(就绪探针):判断容器是否能够进入ready状态,探针失败则进入noready状态,并从service的endpoints中剔除此容器
3,startuprobe:判断容器内的应用是否启动成功,在success状态之前,其他探针都处于无效状态。
2,检查方式
检查方式分为3种
1,exec:使用command字段设置命令,在容器中执行次命令,如果命令返回状态码为0,则认为探针成功,
2,httpget:通过访问指定端口和url路径执行http get 访问,如果返回的http状态码为大于等于200且小于400则认为成功
3,tacsocket:通过tcp连接pod(ip)和指定端口,如果端口无误且tcp连接成功,则认为探测成功。
3,常用的探针可选参数
常用的探针可选参数有4个
- initialDelaySeconds∶ 容器启动多少秒后开始执行探测
- periodSeconds∶探测的周期频率,每多少秒执行一次探测
- failureThreshold∶探测失败后,允许再试几次
- timeoutSeconds ∶ 探测等待超时的时间
4,重启策略
Pod在遇到故障之后“重启”的动作Pod在遇到故障之后“重启”的动作
Always:当容器终止退出后,总是“重启”容器,默认策略
OnFailure:当容器异常退出(退出状态码非0)时,重启容器
Never:当容器终止退出,从不“重启”容器。
(注意:k8s中不支持重启Pod资源,只有删除重建,重建)


