SpringBoot整合Redis、Mybatis、Druid、Mybatis-plus、Shiro等配置建议收藏
文章目录
- SpringBoot整合文档
- 一、整合Reids
-
- 1.1pom导入依赖
- 1.2配置文件配置
- 1.3Config配置
- 二、整合Mybatis和Druid
-
- 2.1pom导入依赖
- 2.2配置文件配置
- 2.2.3Config配置
- 三、整合Mybatis-plus和Druid
-
- 3.1pom导入依赖
- 3.2配置文件配置
- 2.2.4Config配置
-
- `分页插件配置`
- `代码生成器配置`
- `Druid配置`
- 四、SpringBoot热部署
-
- 4.1pom导入依赖
- 4.2配置文件配置
- 4.3IDEA设置
- 五、整合Shiro
-
- 5.1pom带入依赖
- 5.2Config配置
- 六、整合Thymeleaf
-
- 5.1pom导入依赖
- 5.2配置文件配置
SpringBoot整合文档
一、整合Reids
1.1pom导入依赖
<dependency>
     <groupId>org.springframework.bootgroupId>
     <artifactId>spring-boot-starter-data-redisartifactId>
dependency>

<dependency>
    <groupId>org.apache.commonsgroupId>
    <artifactId>commons-pool2artifactId>
    <version>2.9.0version>
dependency>
1.2配置文件配置
#########
#
#      所有的配置都可以从  RedisAutoConfiguration类注解中引入的RedisProperties中看到
#
#########
#Redis服务器地址
spring.redis.host=106.15.224.189
#Redis服务器连接端口
spring.redis.port=6379
#Redis的密码
spring.redis.password=*****
#Redis数据库索引(默认为0)
spring.redis.database= 0
#连接超时时间(毫秒)
spring.redis.timeout=1800000
#连接池最大连接数(使用负值表示没有限制)
spring.redis.lettuce.pool.max-active=20
#最大阻塞等待时间(负数表示没限制)
spring.redis.lettuce.pool.max-wait=-1
#连接池中的最大空闲连接
spring.redis.lettuce.pool.max-idle=5
#连接池中的最小空闲连接
spring.redis.lettuce.pool.min-idle=0
1.3Config配置
@EnableCaching
@Configuration
public class RedisConfig extends CachingConfigurerSupport {

    @Bean
    public RedisTemplate<String, Object> redisTemplate(RedisConnectionFactory factory) {
        RedisTemplate<String, Object> template = new RedisTemplate<>();
        RedisSerializer<String> redisSerializer = new StringRedisSerializer();
        Jackson2JsonRedisSerializer jackson2JsonRedisSerializer = new Jackson2JsonRedisSerializer(Object.class);
        ObjectMapper om = new ObjectMapper();
        om.setVisibility(PropertyAccessor.ALL, JsonAutoDetect.Visibility.ANY);
        om.enableDefaultTyping(ObjectMapper.DefaultTyping.NON_FINAL);
        jackson2JsonRedisSerializer.setObjectMapper(om);
        template.setConnectionFactory(factory);
//key序列化方式
        template.setKeySerializer(redisSerializer);
//value序列化
        template.setValueSerializer(jackson2JsonRedisSerializer);
//value hashmap序列化
        template.setHashValueSerializer(jackson2JsonRedisSerializer);
        return template;
    }

    @Bean
    public CacheManager cacheManager(RedisConnectionFactory factory) {
        RedisSerializer<String> redisSerializer = new StringRedisSerializer();
        Jackson2JsonRedisSerializer jackson2JsonRedisSerializer = new Jackson2JsonRedisSerializer(Object.class);
//解决查询缓存转换异常的问题
        ObjectMapper om = new ObjectMapper();
        om.setVisibility(PropertyAccessor.ALL, JsonAutoDetect.Visibility.ANY);
        om.enableDefaultTyping(ObjectMapper.DefaultTyping.NON_FINAL);
        jackson2JsonRedisSerializer.setObjectMapper(om);
// 配置序列化(解决乱码的问题),过期时间600秒
        RedisCacheConfiguration config = RedisCacheConfiguration.defaultCacheConfig()
                .entryTtl(Duration.ofSeconds(600))
                .serializeKeysWith(RedisSerializationContext.SerializationPair.fromSerializer(redisSerializer))
                .serializeValuesWith(RedisSerializationContext.SerializationPair.fromSerializer(jackson2JsonRedisSerializer))
                .disableCachingNullValues();
        RedisCacheManager cacheManager = RedisCacheManager.builder(factory)
                .cacheDefaults(config)
                .build();
        return cacheManager;
    }
}
二、整合Mybatis和Druid
2.1pom导入依赖
<dependency>
    <groupId>mysqlgroupId>
    <artifactId>mysql-connector-javaartifactId>
    <scope>runtimescope>
dependency>

<dependency>
    <groupId>org.mybatis.spring.bootgroupId>
    <artifactId>mybatis-spring-boot-starterartifactId>
    <version>2.1.1version>
dependency>

<dependency>
    <groupId>com.alibabagroupId>
    <artifactId>druidartifactId>
    <version>1.1.21version>
dependency>

<dependency>
    <groupId>log4jgroupId>
    <artifactId>log4jartifactId>
    <version>1.2.17version>
dependency>
2.2配置文件配置
spring:
  datasource:
    username: root        #用户名
    password: 131661      #密码
    url: jdbc:mysql://localhost:3306/test?serverTimezone=UTC&useUnicode=true&characterEncoding=utf-8   #数据库链接URL
    driver-class-name: com.mysql.cj.jdbc.Driver     #数据库驱动
    type: com.alibaba.druid.pool.DruidDataSource    #配置数据库链接池为druid连接池
    #Spring Boot 默认是不注入这些属性值的,需要自己绑定
    #druid 数据源专有配置
    initialSize: 5
    minIdle: 5
    maxActive: 20
    maxWait: 60000
    timeBetweenEvictionRunsMillis: 60000
    minEvictableIdleTimeMillis: 300000
    validationQuery: SELECT 1 FROM DUAL
    testWhileIdle: true
    testOnBorrow: false
    testOnReturn: false
    # 打开PSCache
    poolPreparedStatements: true
    #配置监控统计拦截的filters,stat:监控统计、log4j:日志记录、wall:防御sql注入
    #如果运行时报错  java.lang.ClassNotFoundException: org.apache.log4j.Priority
    #则导入 log4j 依赖即可,Maven 地址: https://mvnrepository.com/artifact/log4j/log4j
    filters: stat,wall,log4j,config
    #指定每个连接上PSCache的大小
    maxPoolPreparedStatementPerConnectionSize: 20
    #合并多个DruidDataSource的监控数据
    useGlobalDataSourceStat: true
    #通过connectProperties属性来打开mergeSql功能;慢SQL记录
    connectionProperties: druid.stat.mergeSql=true;druid.stat.slowSqlMillis=5000


  #jackson的配置
  jackson:
    date-format: yyyy-MM-dd HH:mm:ss  # 全局设置@JsonFormat的格式pattern
    time-zone: GMT+8   # 设置全局时区


  #thymeleaf的配置
  thymeleaf:
    cache: false   # 清空缓存
    enabled: true
    prefix: classpath:/templates/
    suffix: .html


# MyBatis
mybatis:
  # 配置mapper的扫描,找到所有的mapper.xml映射文件
  mapperLocations: classpath:mybatis/mapper/*.xml
  # 搜索指定包别名
  typeAliasesPackage: com.chenyun.pojo

注意:
- 配置文件里面mapper扫描的文件文件位置和创建的xml要对应
- 配置文件里面包别名扫描的包也要对应起来
2.2.3Config配置
/**
 * @Author: chenyun
 * @Date: 2021/09/04/15:14
 * @Description:
 */
@Configuration
public class DruidConfig {
    @ConfigurationProperties(prefix = "spring.datasource")
    @Bean
    public DataSource druidDataSource(){
        return new DruidDataSource();
    }


    //因为Springboot内置了servlet容器,所以没有web.xml,替代方法就是将ServletRegistrationBean注册进去
    //加入后台监控
    @Bean  //这里其实就相当于servlet的web.xml
    public ServletRegistrationBean statViewServlet(){
        ServletRegistrationBean<StatViewServlet> bean =
                new ServletRegistrationBean<StatViewServlet>(new StatViewServlet(),"/druid/*");

        //后台需要有人登录,进行配置
        //bean.addUrlMappings(); 这个可以添加映射,我们在构造里已经写了
        //设置一些初始化参数
        Map<String,String> initParas = new HashMap<String,String>();
        initParas.put("loginUsername","admin");//它这个账户密码是固定的
        initParas.put("loginPassword","123456");
        //允许谁能防伪
        initParas.put("allow","");//这个值为空或没有就允许所有人访问,ip白名单
        //initParas.put("allow","localhost");//只允许本机访问,多个ip用逗号,隔开
        //initParas.put("deny","");//ip黑名单,拒绝谁访问 deny和allow同时存在优先deny
        initParas.put("resetEnable","false");//禁用HTML页面的Reset按钮
        bean.setInitParameters(initParas);
        return bean;
    }

    //再配置一个过滤器,Servlet按上面的方式注册Filter也只能这样
    @Bean
    public FilterRegistrationBean webStatFilter(){
        FilterRegistrationBean bean = new FilterRegistrationBean();
        //可以设置也可以获取,设置一个阿里巴巴的过滤器
        bean.setFilter(new WebStatFilter());
        bean.addUrlPatterns("/*");
        //可以过滤和排除哪些东西
        Map<String,String> initParams = new HashMap<String,String>();
        //把不需要监控的过滤掉,这些不进行统计
        initParams.put("exclusions","*.js,*.css,/druid/*");
        bean.setInitParameters(initParams);
        return bean;
}
}
提醒:定义的mapper里面不要忘了加@Mappper注解或者启动类上面加@MapperScan("com.chenyun.mapper")注解
三、整合Mybatis-plus和Druid
3.1pom导入依赖
<dependency>
    <groupId>com.baomidougroupId>
    <artifactId>mybatis-plus-boot-starterartifactId>
    <version>3.4.3.1version>
dependency>

<dependency>
    <groupId>com.baomidougroupId>
    <artifactId>mybatis-plus-generatorartifactId>
    <version>3.4.1version>
dependency>

<dependency>
    <groupId>org.freemarkergroupId>
    <artifactId>freemarkerartifactId>
    <version>2.3.31version>
dependency>

<dependency>
    <groupId>mysqlgroupId>
    <artifactId>mysql-connector-javaartifactId>
    <scope>runtimescope>
dependency>

<dependency>
    <groupId>com.alibabagroupId>
    <artifactId>druidartifactId>
    <version>1.1.21version>
dependency>

<dependency>
    <groupId>log4jgroupId>
    <artifactId>log4jartifactId>
    <version>1.2.17version>
dependency>
3.2配置文件配置
# 服务器配置
server:
  port: 9000

spring:
  datasource:
    username: root        #用户名
    password: 131661      #密码
    url: jdbc:mysql://localhost:3306/test?serverTimezone=UTC&useUnicode=true&characterEncoding=utf-8   #数据库链接URL
    driver-class-name: com.mysql.cj.jdbc.Driver     #数据库驱动
    type: com.alibaba.druid.pool.DruidDataSource    #配置数据库链接池为druid连接池
    #Spring Boot 默认是不注入这些属性值的,需要自己绑定
    #druid 数据源专有配置
    initialSize: 5
    minIdle: 5
    maxActive: 20
    maxWait: 60000
    timeBetweenEvictionRunsMillis: 60000
    minEvictableIdleTimeMillis: 300000
    validationQuery: SELECT 1 FROM DUAL
    testWhileIdle: true
    testOnBorrow: false
    testOnReturn: false
    # 打开PSCache
    poolPreparedStatements: true
    #配置监控统计拦截的filters,stat:监控统计、log4j:日志记录、wall:防御sql注入
    #如果运行时报错  java.lang.ClassNotFoundException: org.apache.log4j.Priority
    #则导入 log4j 依赖即可,Maven 地址: https://mvnrepository.com/artifact/log4j/log4j
    filters: stat,wall,log4j,config
    #指定每个连接上PSCache的大小
    maxPoolPreparedStatementPerConnectionSize: 20
    #合并多个DruidDataSource的监控数据
    useGlobalDataSourceStat: true
    #通过connectProperties属性来打开mergeSql功能;慢SQL记录
    connectionProperties: druid.stat.mergeSql=true;druid.stat.slowSqlMillis=5000


  #jackson的配置
  jackson:
    date-format: yyyy-MM-dd HH:mm:ss  # 全局设置@JsonFormat的格式pattern
    time-zone: GMT+8   # 设置全局时区


 #thymeleaf的配置
  thymeleaf:
    cache: false   # 清空缓存
    enabled: true
    prefix: classpath:/templates/
    suffix: .html

    devtools:
      restart:
        enabled: true  #设置开启热部署
    freemarker:
      cache: false   #页面不加载缓存,修改即时生效

mybatis-plus:
  mapper-locations: classpath*:/mapper/**/*.xml
2.2.4Config配置
分页插件配置
@Configuration
@MapperScan("com.cy.mapper")
public class MybatisPlusConfig {

    // 最新版
    @Bean
    public MybatisPlusInterceptor mybatisPlusInterceptor() {
        MybatisPlusInterceptor interceptor = new MybatisPlusInterceptor();
        //分页插件
        interceptor.addInnerInterceptor(new PaginationInnerInterceptor(DbType.MYSQL));

        //乐观锁插件
        interceptor.addInnerInterceptor(new OptimisticLockerInnerInterceptor());
        return interceptor;
    }

}
代码生成器配置
// 演示例子,执行 main 方法控制台输入模块表名回车自动生成对应项目目录中
public class CodeGenerator {

    /**
     *
     * 读取控制台内容
     *
     */
    public static String scanner(String tip) {
        Scanner scanner = new Scanner(System.in);
        StringBuilder help = new StringBuilder();
        help.append("请输入" + tip + ":");
        System.out.println(help.toString());
        if (scanner.hasNext()) {
            String ipt = scanner.next();
            if (StringUtils.isNotBlank(ipt)) {
                return ipt;
            }
        }
        throw new MybatisPlusException("请输入正确的" + tip + "!");
    }

    public static void main(String[] args) {
        // 代码生成器
        AutoGenerator mpg = new AutoGenerator();

        // 全局配置
        GlobalConfig gc = new GlobalConfig();
        // 获取当前项目的路径
        String projectPath = System.getProperty("user.dir");
        // 设置代码生成路径
        gc.setOutputDir(projectPath + "/src/main/java");
        // 设置作者信息
        gc.setAuthor("cy");

        // 同文件生成覆盖
        gc.setFileOverride(true);

		// 代码生成是不是打开所在文件夹
        gc.setOpen(false);
        // gc.setSwagger2(true); 实体属性 Swagger2 注解

        // 设置生成的service文件名字  同理mapper和dao,controller都可以设置名字
        // %s代表的是数据库表的名字
        gc.setServiceName("%sService");
        // 将全局配置设置到 AutoGenerator中
        mpg.setGlobalConfig(gc);


        // 数据源配置
        DataSourceConfig dsc = new DataSourceConfig();
        dsc.setUrl("jdbc:mysql://localhost:3306/vueblog?useUnicode=true&useSSL=false&characterEncoding=utf8&serverTimezone=UTC");
        // dsc.setSchemaName("public");
        dsc.setDriverName("com.mysql.cj.jdbc.Driver");
        dsc.setUsername("root");
        dsc.setPassword("***");
        mpg.setDataSource(dsc);


        // 包配置
        PackageConfig pc = new PackageConfig();
        // 模块名
        pc.setModuleName(null);
        // 包名
        pc.setParent("com.cy");
        // 完整的包名就是:com.cy.模块名
        mpg.setPackageInfo(pc);


        // 自定义配置
        InjectionConfig cfg = new InjectionConfig() {
            @Override
            public void initMap() {
                // to do nothing
            }
        };
        // 如果模板引擎是 freemarker
        String templatePath = "/templates/mapper.xml.ftl";
        // 如果模板引擎是 velocity
        // String templatePath = "/templates/mapper.xml.vm";

        // 自定义输出配置
        List<FileOutConfig> focList = new ArrayList<>();
        // 自定义配置会被优先输出
        focList.add(new FileOutConfig(templatePath) {
            @Override
            public String outputFile(TableInfo tableInfo) {
                // 自定义输出文件名 , 如果你 Entity 设置了前后缀、此处注意 xml 的名称会跟着发生变化!!
                return projectPath + "/src/main/resources/mapper/"
                        + "/" + tableInfo.getEntityName() + "Mapper" + StringPool.DOT_XML;
            }
        });

        cfg.setFileOutConfigList(focList);
        mpg.setCfg(cfg);


        // 配置模板
        TemplateConfig templateConfig = new TemplateConfig();
		// 将已有的xml生成策略失效  按照 自定义配置会被优先输出 里面配置的生成策略进行生成
        templateConfig.setXml(null);
        mpg.setTemplate(templateConfig);


        // 策略配置
        StrategyConfig strategy = new StrategyConfig();
        // 表名生成策略:下划线转驼峰
        strategy.setNaming(NamingStrategy.underline_to_camel);
		// 列名生成策略:下划线转驼峰
        strategy.setColumnNaming(NamingStrategy.underline_to_camel);
        // 设置实体类是否支持Lombok
        strategy.setEntityLombokModel(true);
        // 在controller类上面是否生成@RestController
        strategy.setRestControllerStyle(true);
        // 要生成的表名,多个表之间使用都号分割
        strategy.setInclude(scanner("表名,多个英文逗号分割").split(","));

        // 一次性生成多张表  按照前缀生成表
        // strategy.setLikeTable(new LikeTable("m_"));

        // 驼峰转链接字符 比如m_user ->controller  @RequestMapping("/m/user")
        // 注意如果加了前缀替换  生成的@RequestMapping就不会带上前缀
        strategy.setControllerMappingHyphenStyle(true);

       	// 设置表替换前缀 比如表名m_user  生成后的类名字就是user 不会带上m_
        strategy.setTablePrefix("m_");
        mpg.setStrategy(strategy);
        mpg.setTemplateEngine(new FreemarkerTemplateEngine());
        // 进行生成
        mpg.execute();
    }
}
注意不要忘了根据具体项目改东西
- 数据库账号、密码、链接的数据库名
- 包配置里面的包名字
- 策略配置里面的前缀替换
- 代码生成器配置里面的模板的引擎,也要和我们pom里面带入的模板引擎保持一致,我们这里用的是freemarker模板引擎
Druid配置
/**
 * @Author: chenyun
 * @Date: 2021/09/04/15:14
 * @Description:
 */
@Configuration
public class DruidConfig {
    @ConfigurationProperties(prefix = "spring.datasource")
    @Bean
    public DataSource druidDataSource(){
        return new DruidDataSource();
    }


    //因为Springboot内置了servlet容器,所以没有web.xml,替代方法就是将ServletRegistrationBean注册进去
    //加入后台监控
    @Bean  //这里其实就相当于servlet的web.xml
    public ServletRegistrationBean statViewServlet(){
        ServletRegistrationBean<StatViewServlet> bean =
                new ServletRegistrationBean<StatViewServlet>(new StatViewServlet(),"/druid/*");

        //后台需要有人登录,进行配置
        //bean.addUrlMappings(); 这个可以添加映射,我们在构造里已经写了
        //设置一些初始化参数
        Map<String,String> initParas = new HashMap<String,String>();
        initParas.put("loginUsername","admin");//它这个账户密码是固定的
        initParas.put("loginPassword","123456");
        //允许谁能防伪
        initParas.put("allow","");//这个值为空或没有就允许所有人访问,ip白名单
        //initParas.put("allow","localhost");//只允许本机访问,多个ip用逗号,隔开
        //initParas.put("deny","");//ip黑名单,拒绝谁访问 deny和allow同时存在优先deny
        initParas.put("resetEnable","false");//禁用HTML页面的Reset按钮
        bean.setInitParameters(initParas);
        return bean;
    }

    //再配置一个过滤器,Servlet按上面的方式注册Filter也只能这样
    @Bean
    public FilterRegistrationBean webStatFilter(){
        FilterRegistrationBean bean = new FilterRegistrationBean();
        //可以设置也可以获取,设置一个阿里巴巴的过滤器
        bean.setFilter(new WebStatFilter());
        bean.addUrlPatterns("/*");
        //可以过滤和排除哪些东西
        Map<String,String> initParams = new HashMap<String,String>();
        //把不需要监控的过滤掉,这些不进行统计
        initParams.put("exclusions","*.js,*.css,/druid/*");
        bean.setInitParameters(initParams);
        return bean;
}
}
四、SpringBoot热部署
4.1pom导入依赖
<dependency>
    <groupId>org.springframework.bootgroupId>
    <artifactId>spring-boot-devtoolsartifactId>
    <optional>trueoptional>
dependency>
4.2配置文件配置
spring:
  devtools:
    restart:
      enabled: true  #设置开启热部署
  freemarker:
    cache: false    #页面不加载缓存,修改即时生效
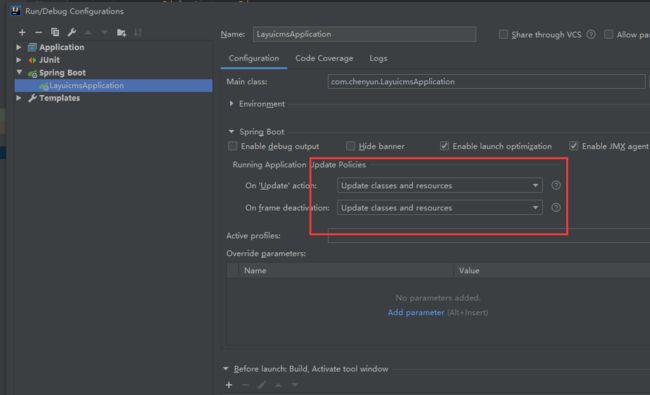
4.3IDEA设置

五、整合Shiro
5.1pom带入依赖
<dependency>
    <groupId>org.apache.shirogroupId>
    <artifactId>shiro-springartifactId>
    <version>1.4.1version>
dependency>


<dependency>
    <groupId>com.github.theborakompanionigroupId>
    <artifactId>thymeleaf-extras-shiroartifactId>
    <version>2.0.0version>
dependency>
5.2Config配置
// 声明为配置类
@Configuration
public class ShiroConfig {

    // 创建realm对象,需要自定义类  第一步
    @Bean
    public UserRealm userRealm(){
        return new UserRealm();
    }


    // DefaultWebSessionManager 第二步
    @Bean(name = "securityManager")
    public DefaultWebSecurityManager getDefaultWebSecurityManager(@Qualifier("userRealm") UserRealm userRealm){
        DefaultWebSecurityManager securityManager = new DefaultWebSecurityManager();
        //关联Realm
        securityManager.setRealm(userRealm);
        return securityManager;
    }

    //创建 ShiroFilterFactoryBean 第三步
    @Bean
    public ShiroFilterFactoryBean shiroFilterFactoryBean(@Qualifier("securityManager") DefaultWebSecurityManager defaultWebSecurityManager){
        ShiroFilterFactoryBean bean = new ShiroFilterFactoryBean();
        // 关联securityManager
        bean.setSecurityManager(defaultWebSecurityManager);
        /*
            添加Shiro内置过滤器,常用的有如下过滤器:
            anon: 无需认证就可以访问
            authc: 必须认证才可以访问
            user: 如果使用了记住我功能就可以直接访问
            perms: 拥有某个资源权限才可以访问
            role: 拥有某个角色权限才可以访问
        */
        Map<String, String> filterMap = new LinkedHashMap<String, String>();
//        filterMap.put("/user/add", "authc");
//        filterMap.put("/user/update", "authc");
        filterMap.put("/user/add","perms[user:add]");
        filterMap.put("/user/update","perms[user:update]");

        bean.setFilterChainDefinitionMap(filterMap);


        bean.setLoginUrl("/login");   // 自定义登录页面 如果验证不通过返回登录页面

        return bean;
    }


    //配置ShiroDialect:方言,用于 thymeleaf 和 shiro 标签配合使用
    @Bean
    public ShiroDialect getShiroDialect()
    {
        return new ShiroDialect();
    }

}
public class UserRealm extends AuthorizingRealm {

    @Autowired
    UserServiceImpl userService;


    // 执行授权逻辑
    @Override
    protected AuthorizationInfo doGetAuthorizationInfo(PrincipalCollection principalCollection) {
        System.out.println("执行了=>授权逻辑PrincipalCollection");
        //给资源进行授权
        SimpleAuthorizationInfo info = new SimpleAuthorizationInfo();
        //添加资源的授权字符串// info.addStringPermission("user:add");
        Subject subject = SecurityUtils.getSubject();
        //获得当前对象
        User currentUser = (User) subject.getPrincipal();
        //拿到User对象
        info.addStringPermission(currentUser.getPerms());
        //设置权限
        return info;

    }

    // 执行认证逻辑
    @Override
    protected AuthenticationInfo doGetAuthenticationInfo(AuthenticationToken Token) throws AuthenticationException {
        System.out.println("执行了=>认证逻辑AuthenticationToken");

        //UsernamePasswordToken是我们从controller传过来的 这里强制类型转换只是方便我们认识
        UsernamePasswordToken userToken = (UsernamePasswordToken) Token;

        User user = userService.queryUserByName(userToken.getUsername());
        if(user==null){
            //用户名不存在
            return null; //shiro底层就会抛出 UnknownAccountException
        }

        Subject currentSubject = SecurityUtils.getSubject();
        Session session = currentSubject.getSession();
        session.setAttribute("loginUser",user);

        return new SimpleAuthenticationInfo(user, user.getPassword(), "UserRealm");
    }
}
六、整合Thymeleaf
5.1pom导入依赖
<dependency>
    <groupId>org.springframework.bootgroupId>
    <artifactId>spring-boot-starter-thymeleafartifactId>
dependency>
5.2配置文件配置
###ThymeLeaf配置
spring:
  thymeleaf:
    #模板的模式,支持 HTML, XML TEXT JAVASCRIPT
    mode: HTML5
    #编码 可不用配置
    encoding: UTF-8
    #内容类别,可不用配置
    content-type: text/html
    #开发配置为false,避免修改模板还要重启服务器
    cache: false
    #配置模板路径前缀,默认是templates,可以不用配置
    prefix: classpath:/templates/
    #配置模板路径后缀
    suffix: .html