【玩转PointPillars】Ubuntu18.04上部署nutonomy/second.pytorch
【系统环境】
Ubuntu18.04
cuda10.2
GeForce GTX 1650
今天部署的项目虽然名称上叫做second.pytorch,实际上是PointPillars的作者fork自SECOND项目,并作了改动之后形成的PointPillars项目代码。
创建虚拟环境
(base) ➜ ~ conda create -n second.pytorch python=3.6 anaconda
(base) ➜ ~ conda activate second.pytorch
安装依赖软件
(second.pytorch) ➜ ~ conda install shapely pybind11 protobuf scikit-image numba pillow
安装Pytorch,我们习惯上不会去指定cudatoolkit版本,像下面这样。
(second.pytorch) ➜  ~ conda install pytorch torchvision -c pytorch
Collecting package metadata (current_repodata.json): done
Solving environment: done

## Package Plan ##

  environment location: /home/zw/.conda/envs/second.pytorch

  added / updated specs:
    - pytorch
    - torchvision


The following packages will be downloaded:

    package                    |            build
    ---------------------------|-----------------
    ffmpeg-4.3                 |       hf484d3e_0         9.9 MB  pytorch
    gnutls-3.6.15              |       he1e5248_0         1.0 MB
    lame-3.100                 |       h7b6447c_0         323 KB
    libiconv-1.15              |       h63c8f33_5         721 KB
    libidn2-2.3.1              |       h27cfd23_0          85 KB
    libtasn1-4.16.0            |       h27cfd23_0          58 KB
    libunistring-0.9.10        |       h27cfd23_0         536 KB
    nettle-3.7.3               |       hbbd107a_1         809 KB
    openh264-2.1.0             |       hd408876_0         722 KB
    pytorch-1.9.0              |py3.6_cuda10.2_cudnn7.6.5_0       705.1 MB  pytorch
    torchvision-0.10.0         |       py36_cu102        28.7 MB  pytorch
    ------------------------------------------------------------
                                           Total:       748.0 MB

The following NEW packages will be INSTALLED:

  cudatoolkit        pkgs/main/linux-64::cudatoolkit-10.2.89-hfd86e86_1
  dataclasses        pkgs/main/noarch::dataclasses-0.8-pyh4f3eec9_6
  ffmpeg             pytorch/linux-64::ffmpeg-4.3-hf484d3e_0
  gnutls             pkgs/main/linux-64::gnutls-3.6.15-he1e5248_0
  lame               pkgs/main/linux-64::lame-3.100-h7b6447c_0
  libiconv           pkgs/main/linux-64::libiconv-1.15-h63c8f33_5
  libidn2            pkgs/main/linux-64::libidn2-2.3.1-h27cfd23_0
  libtasn1           pkgs/main/linux-64::libtasn1-4.16.0-h27cfd23_0
  libunistring       pkgs/main/linux-64::libunistring-0.9.10-h27cfd23_0
  libuv              pkgs/main/linux-64::libuv-1.40.0-h7b6447c_0
  nettle             pkgs/main/linux-64::nettle-3.7.3-hbbd107a_1
  ninja              pkgs/main/linux-64::ninja-1.10.2-hff7bd54_1
  openh264           pkgs/main/linux-64::openh264-2.1.0-hd408876_0
  pytorch            pytorch/linux-64::pytorch-1.9.0-py3.6_cuda10.2_cudnn7.6.5_0
  torchvision        pytorch/linux-64::torchvision-0.10.0-py36_cu102


Proceed ([y]/n)?
我这里指定了cudatoolkit的版本为10.0,不然后面会遇到更多莫名其妙的错误。
(second.pytorch) ➜  ~ conda install pytorch torchvision cudatoolkit=10.0 -c pytorch
Collecting package metadata (current_repodata.json): done
Solving environment: done

## Package Plan ##

  environment location: /home/zw/.conda/envs/second.pytorch

  added / updated specs:
    - cudatoolkit=10.0
    - pytorch
    - torchvision


The following NEW packages will be INSTALLED:

  cudatoolkit        pkgs/main/linux-64::cudatoolkit-10.0.130-0
  ninja              pkgs/main/linux-64::ninja-1.10.2-hff7bd54_1
  pytorch            pytorch/linux-64::pytorch-1.4.0-py3.6_cuda10.0.130_cudnn7.6.3_0
  torchvision        pytorch/linux-64::torchvision-0.5.0-py36_cu100


Proceed ([y]/n)?
验证一下Pytorch对cuda的支持。
(second.pytorch) ➜ ~ python
Python 3.6.10 |Anaconda, Inc.| (default, May 8 2020, 02:54:21)
[GCC 7.3.0] on linux
Type "help", "copyright", "credits" or "license" for more information.
>>> import torch
>>> torch.cuda.is_available()
True
(second.pytorch) ➜ ~ conda install google-sparsehash -c bioconda
安装tensorboardX,方便训练的时候查看个指标曲线。
(second.pytorch) ➜ ~ pip install --upgrade pip
(second.pytorch) ➜ ~ pip install fire tensorboardX
克隆second.pytorch项目到本地。
(second.pytorch) ➜ nutonomy git clone https://github.com/nutonomy/second.pytorch.git
安装SparseConvNet
这个并不是PointPillars需要的,因为PointPillars里面没有用到稀疏卷积,而是second环境用到了。而作者是基于second的代码修改的,所以需要。我后面发现,这里你就算安装成功了SparseConvNet,到后面我训练的时候会提示需要spconv,而不是SparseConvNet。我方正SparseConvNet和spconv两个都装上了。
(second.pytorch) ➜ nutonomy git:(master) git clone https://github.com/LeftThink/SparseConvNet.git
(second.pytorch) ➜ nutonomy cd SparseConvNet
(second.pytorch) ➜ SparseConvNet git:(master) bash build.sh
Traceback (most recent call last):
File "setup.py", line 12, in
assert torch.matmul(torch.ones(2097153,2).cuda(),torch.ones(2,2).cuda()).min().item()==2, 'Please upgrade from CUDA 9.0 to CUDA 10.0+'
RuntimeError: CUDA error: all CUDA-capable devices are busy or unavailable
显示pytorch不支持cuda!!!!!!奇怪!!!!!,检查一下。
(second.pytorch) ➜ SparseConvNet git:(master) python -c 'from torch.utils.collect_env import main; main()'
Collecting environment information...
PyTorch version: 1.4.0
Is debug build: No
CUDA used to build PyTorch: 10.0
OS: Ubuntu 18.04.4 LTS
GCC version: (Ubuntu 8.4.0-1ubuntu1~18.04) 8.4.0
CMake version: version 3.16.8
Python version: 3.6
Is CUDA available: No
注意到在我刚刚安装完pytorch后我是测试了对gpu的支持的,当时是true,现在变成false了。
以我的经验,重启服务器就好了。但这只是限于pytorch确实是装的支持cuda的版本。
重启完,带torch支持cuda再重新bash build.sh安装sparseconvnet包。
(second.pytorch) ➜ SparseConvNet git:(master) bash build.sh
Processing dependencies for sparseconvnet==0.2
Finished processing dependencies for sparseconvnet==0.2
Traceback (most recent call last):
File "examples/hello-world.py", line 12, in
use_cuda = torch.cuda.is_available() and scn.SCN.is_cuda_build()
AttributeError: module 'sparseconvnet.SCN' has no attribute 'is_cuda_build'
又有问题,还好作者提示使用bash develop.sh。
(second.pytorch) ➜ SparseConvNet git:(master) bash develop.sh
这次ok了!!!
安装spconv
https://github.com/traveller59/spconv
已经有个SparseConvNet了,怎么又冒出个spconv?且看spconv作者怎么说。
This is a spatially sparse convolution library like SparseConvNet but faster and easy to read. This library provide sparse convolution/transposed, submanifold convolution, inverse convolution and sparse maxpool.
2020-5-2, we add ConcatTable, JoinTable, AddTable, and Identity function to build ResNet and Unet in this version of spconv.
在python setup.py bdist_wheel的时候很可能遇到如下报错:
.....
-- Found cuDNN: v? (include: /usr/local/cuda-10.2/include, library: /usr/local/cuda-10.2/lib64/libcudnn.so)
CMake Error at /home/anaconda3/envs/FR1/lib/python3.7/site-packages/torch/share/cmake/Caffe2/public/cuda.cmake:172 (message):
PyTorch requires cuDNN 7 and above.
.....
raise CalledProcessError(retcode, cmd)
subprocess.CalledProcessError: Command '['cmake', '/users_1/tianchi_1/3_openPCDet/spconv', '-DCMAKE_PREFIX_PATH=/home/anaconda3/envs/FR1/lib/python3.7/site-packages/torch', '-DPYBIND11_PYTHON_VERSION=3.7', '-DSPCONV_BuildTests=OFF', '-DPYTORCH_VERSION=10400', '-DCMAKE_CUDA_FLAGS="--expt-relaxed-constexpr" -D__CUDA_NO_HALF_OPERATORS__ -D__CUDA_NO_HALF_CONVERSIONS__', '-DCMAKE_LIBRARY_OUTPUT_DIRECTORY=/users_1/tianchi_1/3_openPCDet/spconv/build/lib.linux-x86_64-3.7/spconv', '-DCMAKE_BUILD_TYPE=Release']' returned non-zero exit status 1.
这个主要是cudnn版本没有找对的问题,可以参考如下方式解决。
为numba设置cuda
export NUMBAPRO_CUDA_DRIVER=/usr/lib/x86_64-linux-gnu/libcuda.so
export NUMBAPRO_NVVM=/usr/local/cuda/nvvm/lib64/libnvvm.so
export NUMBAPRO_LIBDEVICE=/usr/local/cuda/nvvm/libdevice
注:什么是numba?numba是一款可以将python函数编译为机器代码的JIT编译器,经过numba编译的python代码(仅限数组运算),其运行速度可以接近C或FORTRAN语言。
设置PYTHONPATH
export PYTHONPATH=$PYTHONPATH:/your/second.pytorch/path #根据自己的环境来
准备数据
下载KITTI数据,我将其放置在/data/sets/kitti_second路径下。
/data/sets/kitti_second/
├── data_object_calib
│   ├── testing
│   └── training
├── gt_database
│   ├── 0_Pedestrian_0.bin
│   ├── 1000_Car_0.bin
│   ├── 1000_Car_1.bin
|   |.................
├── ImageSets
│   ├── test.txt
│   ├── train.txt
│   └── val.txt
├── testing
│   ├── calib
│   ├── image_2
│   ├── label_2
│   ├── velodyne
│   └── velodyne_reduced
└── training
    ├── calib
    ├── image_2
    ├── label_2
    ├── velodyne
    └── velodyne_reduced
创建kitti infos文件
python create_data.py create_kitti_info_file --data_path=${KITTI_DATASET_ROOT}
创建reduced point cloud文件
python create_data.py create_reduced_point_cloud --data_path=${KITTI_DATASET_ROOT}
创建groundtruth-dataset文件
python create_data.py create_groundtruth_database --data_path=${KITTI_DATASET_ROOT}
修改训练用配置文件
train_input_reader: {
  ...
  database_sampler {
    database_info_path: "/path/to/kitti_dbinfos_train.pkl"
    ...
  }
  kitti_info_path: "/path/to/kitti_infos_train.pkl"
  kitti_root_path: "KITTI_DATASET_ROOT"
}
...
eval_input_reader: {
  ...
  kitti_info_path: "/path/to/kitti_infos_val.pkl"
  kitti_root_path: "KITTI_DATASET_ROOT"
}
训练
(second.pytorch) ➜ second git:(master) ✗ python ./pytorch/train.py train --config_path=./configs/pointpillars/car/xyres_16.proto --model_dir=./models
....
middle_class_name PointPillarsScatter
num_trainable parameters: 66
{'Car': 5}
[-1]
load 14357 Car database infos
load 2207 Pedestrian database infos
load 734 Cyclist database infos
load 1297 Van database infos
load 56 Person_sitting database infos
load 488 Truck database infos
load 224 Tram database infos
load 337 Misc database infos
After filter database:
load 10520 Car database infos
load 2104 Pedestrian database infos
load 594 Cyclist database infos
load 826 Van database infos
load 53 Person_sitting database infos
load 321 Truck database infos
load 199 Tram database infos
load 259 Misc database infos
remain number of infos: 3712
remain number of infos: 3769
WORKER 0 seed: 1624062270
WORKER 1 seed: 1624062271
.....
/home/zw/.conda/envs/second.pytorch/lib/python3.6/site-packages/torch/nn/_reduction.py:43: UserWarning: size_average and reduce args will be deprecated, please use reduction='none' instead.
warnings.warn(warning.format(ret))
Traceback (most recent call last):
File "./pytorch/train.py", line 659, in
fire.Fire()
File "/home/zw/.conda/envs/second.pytorch/lib/python3.6/site-packages/fire/core.py", line 141, in Fire
component_trace = _Fire(component, args, parsed_flag_args, context, name)
File "/home/zw/.conda/envs/second.pytorch/lib/python3.6/site-packages/fire/core.py", line 471, in _Fire
target=component.__name__)
File "/home/zw/.conda/envs/second.pytorch/lib/python3.6/site-packages/fire/core.py", line 681, in _CallAndUpdateTrace
component = fn(*varargs, **kwargs)
File "./pytorch/train.py", line 414, in train
raise e
File "./pytorch/train.py", line 263, in train
loss.backward()
File "/home/zw/.conda/envs/second.pytorch/lib/python3.6/site-packages/torch/tensor.py", line 195, in backward
torch.autograd.backward(self, gradient, retain_graph, create_graph)
File "/home/zw/.conda/envs/second.pytorch/lib/python3.6/site-packages/torch/autograd/__init__.py", line 99, in backward
allow_unreachable=True) # allow_unreachable flag
RuntimeError: CUDA out of memory. Tried to allocate 158.00 MiB (GPU 0; 3.82 GiB total capacity; 2.41 GiB already allocated; 98.88 MiB free; 2.60 GiB reserved in total by PyTorch)
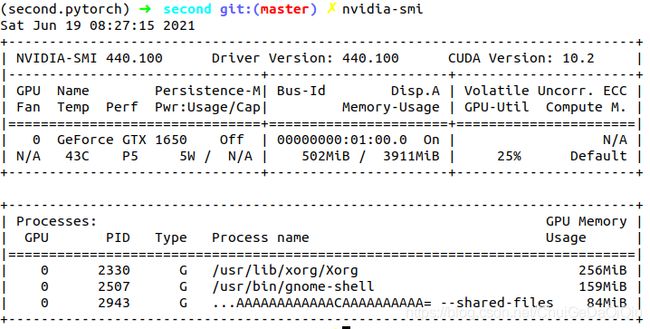
我这个gpu现存小了,只有4个G,这就尴尬了,换到服务器上去。
这个基本上没有问题了!
【参考】
https://github.com/nutonomy/second.pytorch
https://github.com/traveller59/spconv


