clojure 项目构建 boot
我们知道,c和c++程序是使用makefile来构建的;java程序使用ant,maven等构建;那么基于java的函数式编程clojure要怎么构建大型应用程序的呢?当然,也可以基于maven,本文主要先讲述clojure基于Leiningen的构建方式,然后会着重讲述clojure基于boot的构建方式。
构建程序相关的基本概念
构建是一个统称,包括我们写完代码之后到代码发布之前越来越多的东西;
编译;
依赖管理,可以系统地使用外部函数库;
把编译结果和项目资源打包成构件;
在依赖管理的情况下分发这些构件;
创建新的工程
工程之间的依赖关系?
测试?
运行?
部署?
发布库?
Leiningen
Leiningen is the easiest way to use Clojure. With a focus on project automation and declarative configuration, it gets out of your way and lets you focus on your code.
1.lein
lein重用了maven许多的基础设施;maven,gradle,ant都有插件帮助clojure的构建;
那么lein的使用方式是怎样的?
lein通过lein help获取一个任务列表,通过lein help $TASK获取到具体的任务信息。
比如说:
$ lein help uberjar
Package up the project files and all dependencies into a jar file.

Includes the contents of each of the dependency jars. Suitable for standalone distribution.

With an argument, the uberjar will be built with an alternate main.

The namespace you choose as main should have :gen-class in its ns form as well as defining a -main function.

Note: The :uberjar profile is implicitly activated for this task, and cannot be deactivated.

Arguments: ([main] [])
这里的profile的解;;; Profiles
;; Each active profile gets merged into the project map. The :dev
;; and :user profiles are active by default, but the latter should be
;; looked up in ~/.lein/profiles.clj rather than set in project.clj.
;; Use the with-profiles higher-order task to run a task with a
;; different set of active profiles.
;; See lein help profiles for a detailed explanation.
:profiles {:debug {:debug true
:injections [(prn (into {} (System/getProperties)))]}
:1.4 {:dependencies [[org.clojure/clojure “1.4.0”]]}
:1.5 {:dependencies [[org.clojure/clojure “1.5.0”]]}
;; activated by default
:dev {:resource-paths [“dummy-data”]
:dependencies [[clj-stacktrace “0.2.4”]]}
;; activated automatically during uberjar
:uberjar {:aot :all}
;; activated automatically in repl task
active的profile对应的map会并合并到project的map中去。比如说运行lein uberjar 的时候,{:aot :all}就会被合并到project的map中;运行:debug 的时候,{:debug true :injections [(prn (into {} (System/getProperties)))]}就会被合并。
lein works with projects。一个项目就是一个包含一组clojure源文件的目录,当然也包括员数据metadata.metadata存在一个叫做project.clj的root目录中,这个目录会告诉leiningen一些事情:
项目名字 版本信息 描述 依靠 clojure版本 怎么找源文件 以及main所在的名字空间等。
(defproject my-stuff "0.1.0-SNAPSHOT"
 :description "FIXME: write description"
 :url "http://example.com/FIXME"
 :license {:name "Eclipse Public License"
 :url "http://www.eclipse.org/legal/epl-v10.html"}
 :dependencies [[org.clojure/clojure "1.8.0"]]
 :main ^:skip-aot my-stuff.core
 :target-path "target/%s"
 :profiles {:uberjar {:aot :all}})
名字:my-stuff
版本信息:是一个字符串”0.1.0-SNAPSHOT”
描述:是一个字符串 “FIXME: write description”
url是一个字符串:”http://example.com/FIXME”
clojure版本:[org.clojure/clojure “1.8.0”]
依赖信息:是一个以[]包裹的vector
整个project.clj符合clojure语法,是一个以defproject开头的form。
依赖 Dependencies
clojure是一个hosted language(托管),clojure的各种lib像jvm语言一样都被打包为jar文件发布,jar文件基本上就是简单的.zip文件,还有额外的JVM特定的元数据metadata。一个jar文件通常包括.class文件和clj源代码,通常也包括其他的一些文件,比如javascript和text文件。发布的JVM库一般都有标识符(artifact group和artifact id)和版本号。
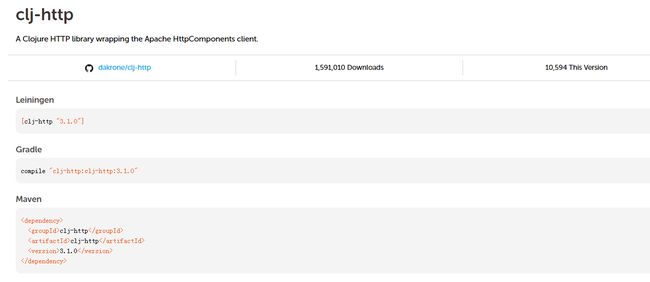
那么在clojars上面是怎么搜索lib库的?通过artifact group就可以搜索到很多jar包,比如

lein添加依赖的方法: [clj-http "3.1.0"] 直接将这个拷贝进:dependencies的vector就可以了,lein会自动下载clj-http jar包,并且保证把它放在classpath上面。这里clj-http是 artifact id,“3.1.0”是版本号,有些lib还会有group id,比如:
[erp.gramel/gramel-clj-libs "1.0.0"]这里的group id就是erp.gramel。
这里还有两个概念需要介绍,snapshot版本和repositories(托管)。
snapshot版本
版本号以-SNAPSHOT 结尾的版本就是snapshot版本,也就是说这不是官方版本而是一个开发中的版本。一般来说,你依赖的包不要依赖于这样的版本,万一有什么bug还真的不敢保证。不过,添加snapshot的依赖,会让你的lein总是去找最新的开发中的版本。
repositories
依赖被存放在的repo中。lein重用了JVM的repo 底层设施。有几个非常流行的开源repo。lein默认使用两个repo,clojars.org和maven central。clojars是clojure社区的中央maven仓库。而maven central是更加宽范围的JVM社区。你当然也可以在clojures.clj通过:repositories关键字设置第三方仓库(这里的用法后续再讨论)。
如果要写的更加通透一些,目前只能读lein-core的源代码了。
介绍完lein,有关构建的基础知识基本已经介绍完了,下面会深入讲述boot的构建方式以及一些编程,比如boot实现代码热加载的方式。
boot
boot概述
Boot is a Clojure build framework and ad-hoc Clojure script evaluator. Boot provides a runtime environment that includes all of the tools needed to build Clojure projects from scripts written in Clojure that run in the context of the project。
也就是说,boot是一个构建工具,也是特定的clojure解释器;boot提供了一个clojure工程运行时的环境。
那么boot作为一个构建工具有什么特别的特点呢?
非常灵活,那么灵活到什么程度呢?
boot提供的运行时环境都可以在运行时运行用clojure写的构建脚本(一种Turing-complete图灵完备(所有的可计算问题?)的构建脚本)。
The more complex the build process becomes, the more flexible the build tool needs to be. Static build specifications become less and less useful as the project moves toward completion. Being Lispers we know what to do: Lambda is the ultimate declarative.?
为什么说匿名函数是最终的描述方法?(因为真的 是非常灵活,可以无限的嵌套。。。描述能力灵活至极,写clojure代码的时候渐渐的领会到。)
base tasks
$ boot -h 显示任务
Usage: boot OPTS …
task有哪些呢?比如,
add-repoAdd all files in project git repo to
fileset.aotPerform AOT compilation of
Clojure namespaces,也就是说预编译clojure的名字空间。checkout
Checkout dependencies task,也就是说检查包的依赖性。install
Install project jar to local Maven repository,将项目jar文件放入到本地的maven库。
jarBuild a jar file for the project,创建项目jar文件
javacCompile java sources,编译java源文件。
push将jar文件部署到maven库.
replStart a REPL session for the current project,开启一个本地project的repl
showPrint project/build info (e.g. dependency graph, etc),打印项目的信息。比如依赖图,文件集合.
targetWrites output files to the given directory on the filesystem,将输出文件写入给定的目录.
uberAdd jar entries from dependencies to fileset,将依赖包的jar入口放入fileset中.
watchCall the next handler when source files
change,监听源文件的变化,当检测到原文件改变的时候,会调用下一个处理器.
boot有很多基本的任务,比如下面这一段代码
(let [run [(prep)
                    (tasks/repl :server true)
                    (if run? (console-run) (reloader))
                    (when (seq dependencies)
                      (comp (tasks/watch) (tasks/checkout :dependencies dependencies)))]]
(apply comp (remove nil? run)))如果输入有依赖的话,这里执行的任务依次是checkout(加入新的依赖,并检查依赖的dependency),然后执行watch任务(检查源代码是否变化,如果没有就一直阻塞),如果有代码变化,并且run?为true,则执行(console-run)任务,否则执行reloader任务。
不过checkout一般不推荐使用,checkout的一般用法和实现:
This task facilitates working on a project and its dependencies at the same
time, by extracting the dependency jar contents into the fileset. Transitive
dependencies will be added to the class path automatically
例子:
      $ boot watch pom -p foo/bar -v 1.2.3-SNAPSHOT jar install
  to build the dependency jar, and
$ boot repl -s watch checkout -d foo/bar:1.2.3-SNAPSHOT也就是一般要有两个boot实例来进行实验。一个boot将jar文件写入本地依赖库,比如foo/bar:1.2.3-SNAPSHOT,比如说我们开发这样一个lib,在开发的过程中需要使用另外一个用到这个lib的boot项目来测试。这个项目不想在每次新的bar.1.2.3-SNAPSHOT发布的时候都重启,于是就可以使用checkout任务:checkout -d foo/bar:1.2.3-SNAPSHOT,这样再使用watch任务监控源代码的变化,repl是下一个handler。
boot一般用法
这里基本上是翻译https://github.com/boot-clj/boot,但是会有更加详细的解释。
这里,
boot -r src -d me.raynes/conch:0.8.0 -- pom -p my-project -v 0.1.0 -- jar -M Foo=bar -- install-r指定项目源代码,-d指定依赖包,– pom是一个task,-p my-project -v 0.1.0是这个pom的task参数,– jar也是task 最后执行install 任务,这些任务的具体做法就像我上面解释的那样。
用命令行的方式构建项目太不方便,也太不灵活了,boot.core提供了一些帮助工具。
set-env! ,设置boot的options,相当于命令行的-
boot.user=> (set-env!
       #_=>   :resource-paths #{"src"}
       #_=>   :dependencies '[[me.raynes/conch "0.8.0"]])
set-env!用指定的map改变了boot环境变量。
boot 执行给定的任务

boot.user=> (boot (pom :project 'my-project :version "0.1.0")
       #_=>       (jar :manifest {"Foo" "bar"})
       #_=>       (install))
那么要单独设置task的options改怎么做?
task-options!
boot.user=> (task-options!
       #_=>   pom {:project 'my-project
       #_=>        :version "0.1.0"}
       #_=>   jar {:manifest {"Foo" "bar"}})
task-options!可以改变task的root绑定值。
那么怎么写boot构建的脚本呢?
在project的根目录下创建一个叫build.boot的文件,内容如下
(set-env!
  :resource-paths #{"src"}
  :dependencies '[[me.raynes/conch "0.8.0"]])

(task-options!
  pom {:project 'my-project
       :version "0.1.0"}
  jar {:manifest {"Foo" "bar"}})
然后在project的根目录下面,执行命令
boot pom jar install这样就更加优雅的达到上面的目的了。
buil.boot是boot环境默认的配置文件,
BOOT_FILE Build script name (build.boot).
boot还有下面的一些环境变量
BOOT_HOME Directory where boot stores global state
(~/.boot). BOOT_JAVA_COMMAND Specify the Java executable
(java).
BOOT_LOCAL_REPO The local Maven repo path (~/.m2/repository).
boot会去读取的一些文件,包含:
./boot.properties Specify boot options for this
project.
BOOT_HOME/boot.properties Specify global boot options.
BOOT_HOME/profile.boot A script to run before running the build script.
比如BOOT_HOME/boot.properties可以设置:
BOOT_CLOJURE_NAME=org.clojure/clojure
BOOT_CLOJURE_VERSION=1.8.0
BOOT_VERSION=2.5.5
而BOOT_HOME/profile.boot 可以做一些
(set-env!
  :source-paths #{"src/clj" "src/java"}
  :resource-paths #{"src/clj" "resources"}
  :repositories [company-repo])
自定义任务
看完上面基本上boot环境搭建和写boot脚本都没有问题了,但是要构建自定义的任务还不可以做到。这里会详细讲述怎么创建boot的自定义任务,比如怎么设置任务发布? 开发环境的?
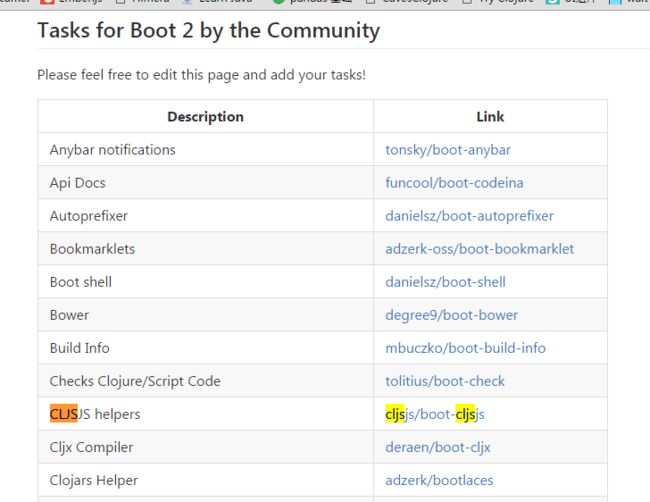
先看看boot社区都有哪些开源的tasks。
boot社区:

这里的task各有各的作用,比如说boot-check,这里提供的task会去检查clojure或者clojureScript的源代码。
比如,kibit 是一个clojure,ClojureScript, cljx 和其他的 Clojure代码的静态检查器。
比如说一个有问题的代码如下:
(defn when-vs-if []
  (if 42 42 nil))

(defn vec-vs-into []
  (into [] 42))
那么运行kibit之后会怎样呢?
$ boot check/with-kibit
At ../.boot/cache/tmp/../fun/boot-check/yeg/-grrwi1/test/with_kibit.clj:4:
Consider using:
  (when 42 42)
instead of:
  (if 42 42 nil)

At ../.boot/cache/tmp/../fun/boot-check/yeg/-grrwi1/test/with_kibit.clj:7:
Consider using:
  (vec 42)
instead of:
  (into [] 42)

WARN: kibit found some problems:

{:problems #{{:expr (if 42 42 nil), :line 4, :column 3, :alt (when 42 42)}
             {:expr (into [] 42), :line 7, :column 3, :alt (vec 42)}}}
kibit就给出了自己的编码意见。。boot-check还提供了很多这类似的工具,编码的时候很值得用用。
比如说,在开发环境打包发布的一个任务,可以这么创建:
(deftask uberjar
  "构建包含依赖的jar文件,输出到target目录"
  []
  (comp
    (tasks/aot)
    (tasks/pom)
    (tasks/javac)
    (tasks/uber)
    (tasks/jar)
(tasks/target)))这个任务只是预编译,生成pom文件,然后将文件编译为二进制的class文件,并且自依赖的打包成jar文件,并输出到target目录。然后运行boot uberjar 就可以创建可以发布到运营环境的jar文件,在运营环境中设置好配置文件,运行就可以了。
开发环境同理,不过推荐在开发环境使用boot-check来检查代码:)
使用自定义的boot任务
上面讲了怎么怎么自创建task,但是这个生命周期并么有讲清楚。那么整个创建的过程是怎样的,或者使用第三方boot任务要怎么做?
比如说,构建的lib build的任务:
(ns demo.boot-build
  (:require [boot.core :as core]
            [boot.task.built-in :as task]))

(core/deftask build
  "Build my project."
  []
  (comp (task/pom) (task/jar) (task/install)))
你把这个demo.boot-build打包成jar文件放入本地maven库中,就可以在你得clojure项目中来使用boot-build中的任务了。
在你项目的根目录中编辑build.boot:
(set-env!
  :resource-paths #{"src"}
  :dependencies '[[me.raynes/conch "0.8.0" ]])

(task-options!
  pom {:project 'my-project
       :version "0.1.0"}
  jar {:manifest {"Foo" "bar"}})

(require '[demo.boot-build :refer :all])
这样就可以用boot执行build任务了。
如果你还想使用上面的boot-check中的所有任务呢?
那么这么做:
(set-env!
  :resource-paths #{"src"}
  :dependencies '[[me.raynes/conch "0.8.0" ]
            [tolitius/boot-check "0.1.3" `:scope test`]])

(task-options!
  pom {:project 'my-project
       :version "0.1.0"}
  jar {:manifest {"Foo" "bar"}})

(require '[demo.boot-build :refer :all]
        '[tolitius/boot-check :refer :all])
这里的 :scope test 表示boot-check这个依赖作用于项目测试的过程,不会随项目发布。
clojureScript和boot
虽然使用lein也可以构建clojureScript程序,但是boot提供了cljs任务。
boot的任务可以使得clojureScript编程异常灵活有用。
比如:
boot serve -d target watch reload cljs-repl cljs target -d target然后cljs也有repl环境。。
总结:程序构建并没有那么难,boot编程构建更是容易、美观and strong
—updating—
