将视频 YUV 格式编码成 H264
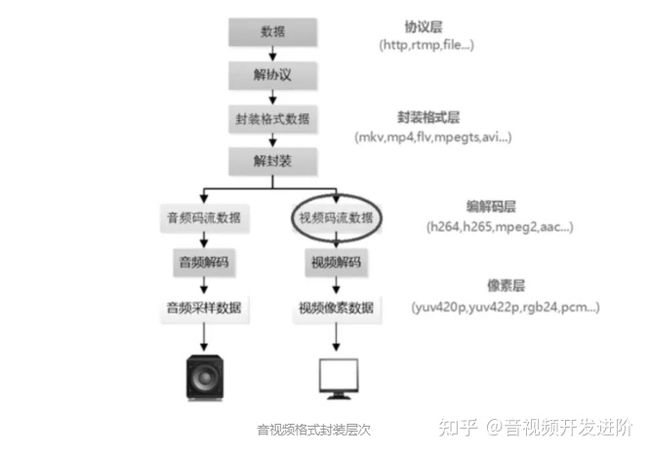
首先开始的时候我们借用一张雷神的图帮助大家理解一下我们今天的操作究竟属于那一步。
从上图可以看出我们要做的,就是将像素层的 YUV 格式,编码出编码层的 h264数据。
首先熟悉一下今天我们要用到的 ffmpeg 中的函数和结构体
- AVFormatContext: 数据文件操作者,主要是用于存储音视频封装格式中包含的信息, 在工程当中占着具足轻重的地位,因为很多函数都要用到它作为参数。同时,它也是我们进行解封装的功能结构体。
- AVOutputFormat: 输出的格式,包括音频封装格式、视频装格式、字幕封装格式,所有封装格式都在
AVCodecID这个枚举类型上面了 - AVStream: 一个装载着视频/音频流信息的结构体,包括音视频流的长度,元数据信息,其中 index 属性用于标识视频/音频流。
- AVCodecContext: 这个结构体十分庞大,但它的主要是用于编码使用的,结构体中的的
AVCodec *codec就是编码所采用的编码器器, 当然,这个结构体中要存入视频的基本参数,例如宽高等,存入音频的基本参数,声道,采样率等。 - AVCodec:编码器,设置编码类型,像素格式,视频宽高,fps(每秒帧数), 用于编解码音视频编码层使用。
- AVIOContext:用于管理输入输出结构体。例如解码的情况下,将一个视频文件中的数据先从硬盘中读入到结构体中的 buffer 中,然后送给解码器用于解码,后面我们会用到。
- AVFrame: 结构体一般用于存储原始数据(即非压缩数据,例如对视频来说是YUV,RGB,对音频来说是PCM),此外还包含了一些相关的信息。比如说,解码的时候存储了宏块类型表,QP表,运动矢量表等数据。编码的时候也存储了相关的数据。因此在使用FFMPEG进行码流分析的时候,AVFrame是一个很重要的结构体。
好了,上面就是我们这次解封装用到的结构体的大概解析,那么我们就上代码,好好分析一番。
1、先取个霸气点的函数名,通过输入一个 yuv 文件路径,然后将文件数据进行编码,输出 H264文件。
2、打开输入的 yuv 文件, 并设置我们 h264 文件的输出路径
3、获取 yuv 视频中的信息
// 注册 ffmpeg 中的所有的封装、解封装 和 协议等,当然,你也可用以下两个函数代替
// * @see av_register_input_format()
// * @see av_register_output_format()
av_register_all();
// 用作之后写入视频帧并编码成 h264,贯穿整个工程当中
AVFormatContext* pFormatCtx;
pFormatCtx = avformat_alloc_context();
// 通过这个函数可以获取输出文件的编码格式, 那么这里我们的 fmt 为 h264 格式(AVOutputFormat *)
fmt = av_guess_format(NULL, out_file, NULL);
pFormatCtx->oformat = fmt;4、将输出文件中的数据读入到程序的 buffer 当中,方便之后的数据写入,也可以说缓存数据写入
// 打开文件的缓冲区输入输出,flags 标识为  AVIO_FLAG_READ_WRITE ,可读写
if (avio_open(&pFormatCtx->pb,out_file, AVIO_FLAG_READ_WRITE) < 0){
  printf("Failed to open output file! \n");
  return;
}
5、创建流媒体数据,规范流媒体的编码格式,设置视频流的 fps
AVStream* video_st;
// 通过媒体文件控制者获取输出文件的流媒体数据,这里 AVCodec * 写 0 , 默认会为我们计算出合适的编码格式
video_st = avformat_new_stream(pFormatCtx, 0);
// 设置 25 帧每秒 ,也就是 fps 为 25
video_st->time_base.num = 1;
video_st->time_base.den = 25;
if (video_st==NULL){
return ;
}6、为输出文件设置编码所需要的参数和格式
// 用户存储编码所需的参数格式等等
AVCodecContext* pCodecCtx;
// 从媒体流中获取到编码结构体,他们是一一对应的关系,一个 AVStream 对应一个 AVCodecContext
pCodecCtx = video_st->codec;
// 设置编码器的 id,每一个编码器都对应着自己的 id,例如 h264 的编码 id 就是 AV_CODEC_ID_H264
pCodecCtx->codec_id = fmt->video_codec;
// 设置编码类型为 视频编码
pCodecCtx->codec_type = AVMEDIA_TYPE_VIDEO;
// 设置像素格式为 yuv 格式
pCodecCtx->pix_fmt = AV_PIX_FMT_YUV420P;
// 设置视频的宽高
pCodecCtx->width = 480;
pCodecCtx->height = 720;
// 设置比特率,每秒传输多少比特数 bit,比特率越高,传送速度越快,也可以称作码率,
// 视频中的比特是指由模拟信号转换为数字信号后,单位时间内的二进制数据量。
pCodecCtx->bit_rate = 400000;
// 设置图像组层的大小。
// 图像组层是在 MPEG 编码器中存在的概念,图像组包 若干幅图像, 组头包 起始码、GOP 标志等,如视频磁带记录器时间、控制码、B 帧处理码等;
pCodecCtx->gop_size=250;
// 设置 25 帧每秒 ,也就是 fps 为 25
pCodecCtx->time_base.num = 1;
pCodecCtx->time_base.den = 25;
//设置 H264 中相关的参数
//pCodecCtx->me_range = 16;
//pCodecCtx->max_qdiff = 4;
//pCodecCtx->qcompress = 0.6;
pCodecCtx->qmin = 10;
pCodecCtx->qmax = 51;
// 设置 B 帧最大的数量,B帧为视频图片空间的前后预测帧, B 帧相对于 I、P 帧来说,压缩率比较大,也就是说相同码率的情况下,
// 越多 B 帧的视频,越清晰,现在很多打视频网站的高清视频,就是采用多编码 B 帧去提高清晰度,
// 但同时对于编解码的复杂度比较高,比较消耗性能与时间
pCodecCtx->max_b_frames=3;
// 可选设置
AVDictionary *param = 0;
//H.264
if(pCodecCtx->codec_id == AV_CODEC_ID_H264) {
// 通过--preset的参数调节编码速度和质量的平衡。
av_dict_set(¶m, "preset", "slow", 0);
// 通过--tune的参数值指定片子的类型,是和视觉优化的参数,或有特别的情况。
// zerolatency: 零延迟,用在需要非常低的延迟的情况下,比如电视电话会议的编码
av_dict_set(¶m, "tune", "zerolatency", 0);顺便说一下h264 当中有片组的概念,其中编码片分为5种,I 片、P 片、B 片、SP 片和 SI 片。
CSDN后台私信或文末卡片加入免费领取最新最全C++/音视频开发学习提升资料,内容包括(C/C++,Linux 服务器开发,FFmpeg ,webRTC ,rtmp ,hls ,rtsp ,ffplay ,srs)以及音视频学习路线图等等。
ES 码流是 MPEG 码流中的基本流,由视频压缩编码后的视频基 码流(Video ES)和音频压缩编码后的音频基 码流(Audio ES)组成。
ES 码流采用图像序列(PS)、图像组(GOP)、图像(P)、片(slice)、宏块(MB)、块(B)六层结构。
(1)图像序列层,图像序列包括若干 GOP,序列头包 起始码和序列参数,如档次、级别、彩色图像格式、帧场选择等等;
(2)图像组层,图像组包 若干幅图像,组头包 起始码、GOP 标志等,如视频磁带记录器时间、控制码、B 帧处理码等;
(3)图像层,一幅图像包 若干片,头信息中有起始码、P 标志,如时间、参考帧号、图像类型、MV、分级等;
(4)片层,片是最小的同步单位,包 若干宏块,片头中有起始码、片地址、量化步长等;
(5)宏块层,宏块由 4 个 8×8 亮度块和 2 个色度块组成,宏块头包括宏块地址、宏块类型、运动矢量等。
7、printf(输出) 一些关于输出格式的详细数据,例如时间,比特率,数据流,容器,元数据,辅助数据,编码,时间戳等等
av_dump_format(pFormatCtx, 0, out_file, 1);8、设置编码器
// 通过 codec_id 找到对应的编码器
pCodec = avcodec_find_encoder(pCodecCtx->codec_id);
if (!pCodec){
printf("Can not find encoder! \n");
return;
}
// 打开编码器,并设置参数 param
if (avcodec_open2(pCodecCtx, pCodec,¶m) < 0){
printf("Failed to open encoder! \n");
return;
}9、设置原始数据 AVFrame
AVFrame *pFrame = av_frame_alloc();
// 通过像素格式(这里为 YUV)获取图片的真实大小,例如将 480 * 720 转换成 int 类型
int picture_size = avpicture_get_size(pCodecCtx->pix_fmt, pCodecCtx->width, pCodecCtx->height);
// 将 picture_size 转换成字节数据,byte
unsigned char *picture_buf = (uint8_t *)av_malloc(picture_size);
// 设置原始数据 AVFrame 的每一个frame 的图片大小,AVFrame 这里存储着 YUV 非压缩数据
avpicture_fill((AVPicture *)pFrame, picture_buf, pCodecCtx->pix_fmt, pCodecCtx->width, pCodecCtx->height);
10、准备写入数据之前,当然要先写编码的头部了
// 编写 h264 封装格式的文件头部,基本上每种编码都有着自己的格式的头部,想看具体实现的同学可以看看 h264 的具体实现
int ret = avformat_write_header(pFormatCtx,NULL);
if (ret < 0) {
printf("write header is failed");
return;
}
这里顺便记录一下, h264 原始码流,又称为原始码流,都是由一个一个的 NALU 组成的,结构体如下
enum nal_unit_type_e
{
NAL_UNKNOWN = 0, // 未使用
NAL_SLICE = 1, // 不分区、非 IDR 图像的片
NAL_SLICE_DPA = 2, // 片分区 A
NAL_SLICE_DPB = 3, // 片分区 B
NAL_SLICE_DPC = 4, // 片分区 C
NAL_SLICE_IDR = 5, /* ref_idc != 0 / // 序列参数集
NAL_SEI = 6, / ref_idc == 0 / // 图像参数集
NAL_SPS = 7, // 分界符
NAL_PPS = 8, // 序列结束
NAL_AUD = 9, // 码流结束
NAL_FILLER = 12, // 填充
/ ref_idc == 0 for 6,9,10,11,12 */
};
enum nal_priority_e // 优先级
{
NAL_PRIORITY_DISPOSABLE = 0,
NAL_PRIORITY_LOW = 1,
NAL_PRIORITY_HIGH = 2,
NAL_PRIORITY_HIGHEST = 3,
};

typedef struct
{
int startcodeprefix_len; //! 4 for parameter sets and first slice in picture, 3 for everything else (suggested)
unsigned len; //! Length of the NAL unit (Excluding the start code, which does not belong to the NALU)
unsigned max_size; //! Nal Unit Buffer size
int forbidden_bit; //! should be always FALSE
int nal_reference_idc; //! NALU_PRIORITY_xxxx
int nal_unit_type; //! NALU_TYPE_xxxx
char *buf; //! contains the first byte followed by the EBSP
} NALU_t;
11、创建编码后的数据 AVPacket 结构体来存储 AVFrame 编码后生成的数据
AVCodec* pCodec;
av_new_packet(&pkt,picture_size);
>其实从这里看出 AVPacket 跟 AVFrame 的关系如下
编码前:AVFrame
编码后:AVPacket
12、写入 yuv 数据到 AVFrame 结构体中
// 设置 yuv 数据中 y 图的宽高
int y_size = pCodecCtx->width * pCodecCtx->height;

for (int i=0; idata[0] = picture_buf; // Y
pFrame->data[1] = picture_buf+ y_size; // U
pFrame->data[2] = picture_buf+ y_size5/4; // V
//PTS
//pFrame->pts=i;
// 设置这一帧的显示时间
pFrame->pts=i(video_st->time_base.den)/((video_st->time_base.num)25);
int got_picture=0;
// 利用编码器进行编码,将 pFrame 编码后的数据传入 pkt 中
int ret = avcodec_encode_video2(pCodecCtx, &pkt,pFrame, &got_picture);
if(ret < 0){
printf("Failed to encode! \n");
return ;
}

// 编码成功后写入 AVPacket 到 输入输出数据操作着 pFormatCtx 中,当然,记得释放内存
if (got_picture==1){
printf("Succeed to encode frame: %5d\tsize:%5d\n",framecnt,pkt.size);
framecnt++;
pkt.stream_index = video_st->index;
ret = av_write_frame(pFormatCtx, &pkt);
av_free_packet(&pkt);
}
}
13、flush 编码
int flush_encoder(AVFormatContext *fmt_ctx,unsigned int stream_index){
int ret;
int got_frame;
AVPacket enc_pkt;

// 确认如果
if (!(fmt_ctx->streams[stream_index]->codec->codec->capabilities &
      CODEC_CAP_DELAY))
    return 0;
while (1) {
    enc_pkt.data = NULL;
    enc_pkt.size = 0;
    av_init_packet(&enc_pkt);
    ret = avcodec_encode_video2 (fmt_ctx->streams[stream_index]->codec, &enc_pkt,
                                 NULL, &got_frame);
    av_frame_free(NULL);
    if (ret < 0)
        break;
    if (!got_frame){
        ret=0;
        break;
    }
    printf("Flush Encoder: Succeed to encode 1 frame!\tsize:%5d\n",enc_pkt.size);
    /* mux encoded frame */
    ret = av_write_frame(fmt_ctx, &enc_pkt);
    if (ret < 0)
        break;
}
return ret;
}

int ret2 = flush_encoder(pFormatCtx,0);
if (ret2 < 0) {
printf("Flushing encoder failed\n");
return;
}
14、我们上面写完了编码头、编码数据,当然也要写入编码的尾部表示结束了啦,这样才是一个完整的编码格式嘛
// 写入数据流尾部到输出文件当中,并释放文件的私有数据
av_write_trailer(pFormatCtx);
15、释放我们之前创建的内存
if (video_st){
// 关闭编码器
avcodec_close(video_st->codec);
// 释放 AVFrame
av_free(pFrame);
// 释放图片 buf,就是 free() 函数,硬要改名字,当然这是跟适应编译环境有关系的
av_free(picture_buf);
}
// 关闭输入数据的缓存
avio_close(pFormatCtx->pb);
// 释放 AVFromatContext 结构体
avformat_free_context(pFormatCtx);
// 关闭输入文件
fclose(in_file);----
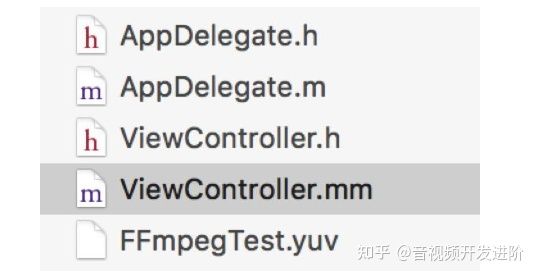
好了,写到这里,我们首先要做的就是利用就把下面这个 .yuv 文件放到工程当中,如下图
然后在 - (void)viewDidLoad方法中使用如下代码
const char *input_file = [[[NSBundle mainBundle] pathForResource:@"FFmpegTest" ofType:@"yuv"] cStringUsingEncoding:NSUTF8StringEncoding];
yuvCodecToVideoH264(input_file);然后运行,瞬间, 利用同步推打开我们工程的系统,看到我们就得到我们想要的东西了
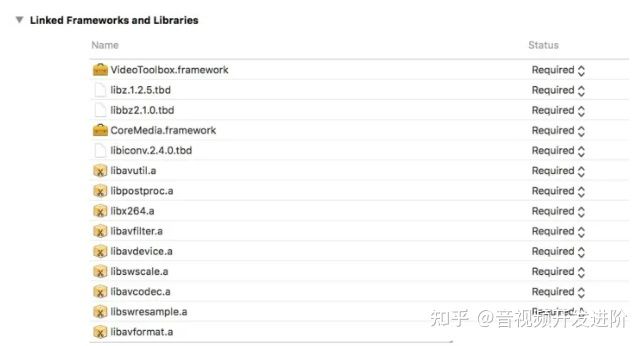
有些小伙伴可能在编译的时候遇到错误,那是因为函数当中一些用到的工程库并没有链接到工程中,可以在工程的 General->Linked Frameworks and Libraries 检查如下图


