ZABBIX环境部署全攻略
1. 环境部署
1.1 基础环境说明
系统:CentOS7.3
Zabbix-3.2.3
Php-5.6.13
Mysql-5.6.28
libmcrypt-2.5.8
Nginx-1.10.8
192.168.2.141  server
192.168.2.143  agent
1.2 修改时间格式
mv /etc/localtime /etc/localtime.bak
ln -s /usr/share/zoneinfo/Asia/Shanghai  /etc/localtime
1.3 安装nginx环境,并安装依赖包
[root@localhost~]#  yum install -y gcc gcc-c++ autoconf automake zlib zlib-devel openssl openssl-devel pcre-devel
[root@localhost zabbix]# tar xvf nginx-1.10.3.tar.gz -C /usr/local/src/ ; cd /usr/local/src/nginx-1.10.3
1.3.1 编译安装nginx
# cd /usr/local/src/nginx-1.10.3
# ./configure --prefix=/usr/local/nginx --with-http_dav_module --with-http_stub_status_module --with-http_addition_module --with-http_sub_module --with-http_flv_module --with-http_mp4_module
# make && make install
1.3.2 添加nginx用户
# useradd -u 8001 -M -s /sbin/nologin nginx
1.3.3 修改nginx 配置文件
1.3.4 修改nginx 快捷方式并关闭防火墙
# echo "/usr/local/nginx/sbin/nginx" >> /etc/rc.local
# setenforce 0
# systemctl disable firewalld
# systemctl stop firewalld
#  /usr/local/nginx/sbin/nginx -s reload
1.3.5 访问nginx web页面
1.4 安装mysql
1.4.1 删除旧数据库
yum remove -y mysql mysql-devel mysql-server
1.4.2 编译安装mysql
# cd /opt/zabbix/
# tar xvf mysql-5.6.38.tar.gz -C /usr/local/src/
# cd /usr/local/src/mysql-5.6.38
# yum install -y cmake
# yum -y install ncurses-devel
# cmake -DCMAKE_INSTALL_PREFIX=/usr/local/mysql -DMYSQL_UNIX_ADDR=/tmp/mysql.sock -DDEFAULT_CHARSET=utf8 -DDEFAULT_COLLATION=utf8_general_ci -DWITH_EXTRA_CHARSETS=all -DWITH_MYISAM_STORAGE_ENGINE=1 -DWITH_INNOBASE_STORAGE_ENGINE=1 -DWITH_MEMORY_STORAGE_ENGINE=1 -DWITH_READLINE=1 -DENABLED_LOCAL_INFILE=1 -DMYSQL_DATADIR=/usr/local/mysql/data -DMYSQL_USER=mysql
# make -j 4
# make install
1.4.3 添加mysql用户
useradd -u 8003 -M -s /sbin/nologin mysql
1.4.4 赋予mysql权限
# chown -R mysql:mysql /usr/local/mysql/
# cp /usr/local/mysql/support-files/my-default.cnf /etc/my.cnf
# cp /usr/local/mysql/support-files/mysql.server /etc/init.d/
1.4.5 修改启动mysql配置文件
# vim /etc/init.d/mysql.server
basedir=/usr/local/mysql
datadir=/usr/local/mysql/data
1.4.6 初始化mysql
# /usr/local/mysql/scripts/mysql_install_db --defaults-file=/etc/my.cnf --basedir=/usr/local/mysql --datadir=/usr/local/mysql/data --user=mysql
#ln -s /usr/local/mysql/bin/mysql /usr/bin/mysql
# service mysql.server restart
# mkdir -p /var/lib/mysql/
#  ln -s /tmp/mysql.sock /var/lib/mysql/
 ERROR! MySQL server PID file could not be found!
Starting MySQL. ERROR! The server quit without updating PID file (/usr/local/mysql/xuegod64.com.pid).
解决方法:
# mv /etc/my.cnf /etc/my.cnf.backup
# service mysql.server restart
 ERROR! MySQL server PID file could not be found!
Starting MySQL. SUCCESS!
# /usr/local/mysql/bin/mysql_secure_installation
1.4.7 启动设置root密码,修改远程访问权限
# mysql
mysql> set PASSWORD = PASSWORD('vrv123456.');
mysql> grant all on *.* to root@'%' identified by 'vrv123456.';
mysql> flush privileges;
mysql> exit;
1.5 安装php
1.5.1 解压libmcrypt
# cd /opt/zabbix/
# tar xvf libmcrypt-2.5.8.tar.gz -C /usr/local/src/
# cd /usr/local/src/libmcrypt-2.5.8/
1.5.2 编译安装libmcrypt
# cd /usr/local/src/libmcrypt-2.5.8/
# ./configure --prefix=/usr/local/libmcrypt
# make
# make install
1.5.3 解压php
# tar zxvf php-5.6.13.tar.gz -C /usr/local/src/
# cd /usr/local/src/php-5.6.13/
1.5.4 编译安装php
# yum install -y php-pear libjpeg-devel libxml2 libxml2-devel curl curl-devel libpng-devel freetype-devel
# echo "/usr/local/mysql/lib/" >> /etc/ld.so.conf
# echo "/usr/local/libmcrypt/lib" >> /etc/ld.so.conf
# ldconfig
# echo "ldconfig" >> /etc/rc.local
# ./configure --prefix=/usr/local/php -with-config-file-path=/usr/local/php \
--with-mysql=/usr/local/mysql --with-mysqli=/usr/local/mysql/bin/mysql_config --with-iconv-dir --with-freetype-dir \
--with-jpeg-dir --with-png-dir --with-zlib --with-libxml-dir=/usr --enable-xml --disable-rpath --enable-bcmath \
--enable-shmop --enable-sysvsem --enable-inline-optimization --with-curl --enable-mbregex --enable-fpm \
--enable-mbstring --with-gd --enable-gd-native-ttf --with-openssl --with-mhash --enable-pcntl --enable-sockets \
--with-xmlrpc --enable-zip --enable-soap --with-mcrypt=/usr/local/libmcrypt --with-gettext
# make && make install
1.5.5 开启php
# cp /usr/local/src/php-5.6.13/php.ini-production /usr/local/php/php.ini
# cp /usr/local/php/etc/php-fpm.conf.default /usr/local/php/etc/php-fpm.conf
# cp /usr/local/src/php-5.6.13/sapi/fpm/init.d.php-fpm /etc/init.d/php-fpm
# chmod +x /etc/init.d/php-fpm ; cd
# chkconfig --add php-fpm
# chkconfig php-fpm on
# echo "" > /usr/local/nginx/html/index.php
# service php-fpm start
2. zabbix部署
2.1 创建zabbix使用数据库
mysql -uroot -pvrv123456.
mysql> create database zabbix;
mysql> grant all on zabbix.* to zabbix@localhost identified by 'zabbix';
mysql> grant all on zabbix.* to zabbix@192.168.110.101 identified by 'zabbix';
mysql> flush privileges;
mysql> exit
2.2 Zabbix 源安装
# cd /opt/zabbix
# tar xvf zabbix-3.2.3.tar.gz -C /usr/local/src/ ;cd /usr/local/src/zabbix-3.2.3
# mysql -uzabbix -pzabbix zabbix < database/mysql/schema.sql
# mysql -uzabbix -pzabbix zabbix < database/mysql/images.sql
# mysql -uzabbix -pzabbix zabbix < database/mysql/data.sql
# yum install -y net-snmp-devel
同步时间
# /usr/sbin/ntpdate ntp1.aliyun.com
#  ./configure --prefix=/usr/local/zabbix --enable-server --enable-agent
--with-mysql=/usr/local/mysql/bin/mysql_config --with-net-snmp --with-libcurl
#make
#make Install
2.3 Zabbix配置文件修改
# vi  /usr/local/zabbix/etc/zabbix_server.conf
DBHost=localhost
DBName=zabbix
DBUser=zabbix
DBPassword=zabbix
2.4 启动zabbix 并添加service
# useradd -u 8005 -M -s /sbin/nologin zabbix
# /usr/local/zabbix/sbin/zabbix_server
# echo /usr/local/zabbix/sbin/zabbix_server >> /etc/rc.local
#添加service
vim /etc/services
zabbix-agent 10050/tcp       # Zabbix Agent
zabbix-agent 10050/udp      # Zabbix Agent
zabbix-trapper 10051/tcp     # Zabbix Trapper
zabbix-trapper 10051/udp    # Zabbix Trapper
2.5 修改脚本自启动
# cd /usr/local/src/zabbix-3.2.3/misc/init.d/
# cp fedora/core/zabbix_server /etc/init.d/
# cp fedora/core/zabbix_agentd /etc/init.d/
# vim /etc/init.d/zabbix_server
BASEDIR=/usr/local/zabbix  #找到此行,并修改
# vim /etc/init.d/zabbix_agentd
BASEDIR=/usr/local/zabbix  #找到此行,并修改
# chkconfig --add zabbix_agentd
# chkconfig zabbix_agentd on
# chkconfig --add zabbix_server
# chkconfig zabbix_server on
# service zabbix_agentd start
# service zabbix_server start
2.6 修改php文件
vim /usr/local/php/php.ini
post_max_size = 16M
max_execution_time = 300
max_input_time = 300
date.timezone = "Asia/Shanghai"
always_populate_raw_post_data = -1
2.7 添加zabbix网页
# rm -rf /usr/local/nginx/html/*
# cp -r /usr/local/src/zabbix-3.2.3/frontends/php/* /usr/local/nginx/html/
2.8 修改nginx文件
vim /usr/local/nginx/conf/nginx.conf
修改里面配置的这一段
location / {
root html;
index index.php index.html index.htm; #找到此行内容,添加index.php
}
3. Zabbix web页面安装
http://192.168.2.141/setup.php


下载文件拷贝到相应目录

用户名:admin 密码:zabbix

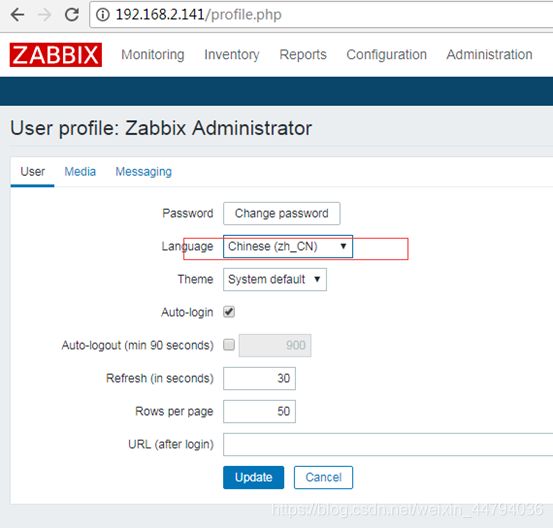
点设置修改成中文
4. Zabbix agent安装
4.1 安装zabbix agent前提条件
# yum install -y curl curl-devel net-snmp net-snmp-devel perl-DBI
4.2 编译安装zabbix agent
# useradd -u 8002 -M -s /sbin/nologin zabbix
# tar -zxvf zabbix-3.2.3.tar.gz -C /usr/local/src/
# cd /usr/local/src/zabbix-3.2.3

# ./configure --prefix=/usr/local/zabbix --enable-agent
# make install
# grep "chkconfig" /usr/local/src/zabbix-3.2.3/ -R --color
/usr/local/src/zabbix-3.2.3/misc/init.d/fedora/core/zabbix_agentd:# chkconfig: - 90 10
/usr/local/src/zabbix-3.2.3/misc/init.d/fedora/core/zabbix_agentd:# description:  Starts and stops Zabbix Agent using chkconfig
/usr/local/src/zabbix-3.2.3/misc/init.d/fedora/core/zabbix_server:# chkconfig: - 90 10
/usr/local/src/zabbix-3.2.3/misc/init.d/fedora/core/zabbix_server:# description:  Starts and stops Zabbix Server using chkconfig
/usr/local/src/zabbix-3.2.3/misc/init.d/fedora/core5/zabbix_agentd:# chkconfig: - 95 5
/usr/local/src/zabbix-3.2.3/misc/init.d/fedora/core5/zabbix_server:# chkconfig: - 95 5
# cp /usr/local/src/zabbix-3.2.3/misc/init.d/fedora/core5/zabbix_agentd /etc/init.d
4.3 修改配置文件zabbix agent
如果sever是自己需要改成127.0.0.1
Server=127.0.0.1 #zabbix server地址,可以多个,用,隔开
ServerActive=127.0.0.1 #主动检查的意思,主动检查手机的数据的数据发送给Zabbix Server
Hostname=vmp001
UnsafeUserParameters=1
vim /etc/init.d/zabbix_agentd
//上一步生成了启动脚本,然后现在编辑脚本
ZABBIX_BIN="/usr/local/zabbix/sbin/zabbix_agentd" #修改此行
# chkconfig --add zabbix_agentd
# chkconfig zabbix_agentd on

# vim /usr/local/zabbix/etc/zabbix_agentd.conf
//客户端操作
Server=192.168.2.141 #zabbix server地址,可以多个,用,隔开
ServerActive=192.168.2.141 #主动检查的意思,主动检查手机的数据的数据发送给Zabbix Server
Hostname=vmp001
UnsafeUserParameters=1
4.4 重启zabbix agent
# /etc/init.d/zabbix_agentd restart
Restarting zabbix_agentd (via systemctl):                  [  OK  ]
# netstat -antup | grep zabbix
tcp        0      0 0.0.0.0:10050           0.0.0.0:*               LISTEN      9701/zabbix_agentd
                                      [  OK  ]
4.5 添加zabbix agent监控进程
4.5.1 修改配置文件
 vim /usr/local/zabbix/etc/zabbix_agentd.conf
UserParameter=oozie,ps -ef|grep oozie |grep -v grep|wc -l
UserParameter=tomcat,ps -ef|grep tomcat |grep -v grep|wc -l
重启agent
/etc/init.d/zabbix_agentd restart
测试一下
# ./zabbix_get -s 127.0.0.1 -p 10050 -k tomcat
1
# ./zabbix_get -s 127.0.0.1 -p 10050 -k oozie
1
4.5.2 在web页面添加对应的监控
在zabbix的web页面添加对应的监控:
添加监控项item
Confuguration --> Hosts --> 找到对应的主机,点开 Items --> Create item 创建监控项


这里监控项健值必须和UserParameter=oozie值一样
这里监控项健值必须和UserParameter=tomcat值一样
![]()
查看是否启用
4.6 添加zabbix监控项
同4.5操作
 UserParameter=vrv_tomcat,ps -ef|grep tomcat |grep -v grep|wc -l
#(例如)监控tomcat进程
UserParameter=vrv_memory,free -m |grep -i mem |awk '{print 100-($3/$2)*100}'
#监控内存空闲率
 UserParameter=fping.other.sys[*],/opt/check_fping.sh $1
#监控ping值
 UserParameter=vrv_physicalkernel,cat /proc/cpuinfo | grep
'physical id' | sort | uniq | wc -l
#监控cpu内核数
 UserParameter=vrv_processes,ps -ef | wc -l
#监控进程数
 UserParameter=vrv_memory_size,free -g |grep -i mem |awk '{print $2}'
#监控内存总大小
UserParameter=vrv_uptime,cat /proc/uptime| awk -F. '{run_days=$1 / 86400;run_hour=($1 % 86400)/3600;run_minute=($1 % 3600)/60;run_second=$1 % 60;printf("%d天%d时%d分%d秒\n",run_days,run_hour,run_minute,run_second)}'
#监控系统运行时间
注意:
#UserParameter=vrv_tomcat
#进程监控需要把
#UserParameter=vrv_uptime
#运行时间监控需要改成字符串格式上传


