Kaggle竞赛入门教程案例
Kaggle比赛入门新手教程(房价预测案例:前篇)
- Kaggle房价预测全流程详解
-
- 竞赛链接与背景介绍
- 竞赛代码解析
-
- 导入工具包
- 数据加载
- 数据预处理
-
- 异常值初筛
- 标签值对数变换
- 明确变量类型
- 缺失值处理
- 特征工程
-
- 特征创建:基于已有特征进行组合
- 对影响房价关键因子进行分箱
- 数值型变量偏度修正
- 删除单一值特征
- 特征简化:0/1二值化处理
- 特征编码
- 异常值复查:基于回归模型
- 消除one-hot特征矩阵的过拟合
Kaggle房价预测全流程详解
对于刚刚入门机器学习的童孩来说,如何快速地通过不同实战演练以提高代码能力和流程理解是一个需要关注的问题。Kaggle平台正好提供了数据科学家的所需要的交流环境,并且为痴迷于人工智能的狂热的爱好者举办了各种类型的竞赛(如,数据科学/图像分类/图像识别/自然语言处理/漏洞检测)。
Kaggle社区是一种全球性的交流社区,集中大量优秀的AI科学家和数据分析家,能够相互分享实战经验和代码,并且有基础入门教程,对新手非常友好~
竞赛链接与背景介绍
- Kaggle平台官网:https://www.kaggle.com
- 房价预测竞赛网址: https://www.kaggle.com/c/house-prices-advanced-regression-techniques
房价是一个生活中耳熟能详的概念,在大城市买房尤其成为了上班族几乎最大的苦恼(以后即将面临····),而在美国的爱荷华州埃姆斯市有许多因素影响着房屋的最终价格,例如房屋面积、地下室、浴室和车库等等;
kaggle平台收集了约80个可能影响房价的特征变量,要求数据科学家利用机器学习等工具对房价进行预测,即该案例是一种简单的回归问题。
官方提供的房屋特征描述文件我已翻译成中文,供大家参考。英文原版的可以点击Kaggle竞赛栏目下的下载按钮,数据集也是一样。如下所示:
- SalePrice: 房产销售价格,以美元计价。所要预测的目标变量
- MSSubClass: Identifies the type of dwelling involved in the sale 住所类型
- MSZoning: The general zoning classification 区域分类
- LotFrontage: Linear feet of street connected to property 房子同街道之间的距离
- LotArea: Lot size in square feet 建筑面积
- Street: Type of road access 主路的路面类型
- Alley: Type of alley access 小道的路面类型
- LotShape: General shape of property 房屋外形
- LandContour: Flatness of the property 平整度
- Utilities: Type of utilities available 配套公用设施类型
- LotConfig: Lot configuration 配置
- LandSlope: Slope of property 土地坡度
- Neighborhood: Physical locations within Ames city limits 房屋在埃姆斯市的位置
- Condition1: Proximity to main road or railroad 附近交通情况
- Condition2: Proximity to main road or railroad (if a second is present) 附近交通情况(如果同时满足两种情况)
- BldgType: Type of dwelling 住宅类型
- HouseStyle: Style of dwelling 房屋的层数
- OverallQual: Overall material and finish quality 完工质量和材料
- OverallCond: Overall condition rating 整体条件等级
- YearBuilt: Original construction date 建造年份
- YearRemodAdd: Remodel date 翻修年份
- RoofStyle: Type of roof 屋顶类型
- RoofMatl: Roof material 屋顶材料
- Exterior1st: Exterior covering on house 外立面材料
- Exterior2nd: Exterior covering on house (if more than one material) 外立面材料2
- MasVnrType: Masonry veneer type 装饰石材类型
- MasVnrArea: Masonry veneer area in square feet 装饰石材面积
- ExterQual: Exterior material quality 外立面材料质量
- ExterCond: Present condition of the material on the exterior 外立面材料外观情况
- Foundation: Type of foundation 房屋结构类型
- BsmtQual: Height of the basement 评估地下室层高情况
- BsmtCond: General condition of the basement 地下室总体情况
- BsmtExposure: Walkout or garden level basement walls 地下室出口或者花园层的墙面
- BsmtFinType1: Quality of basement finished area 地下室区域质量
- BsmtFinSF1: Type 1 finished square feet Type 1完工面积
- BsmtFinType2: Quality of second finished area (if present) 二次完工面积质量(如果有)
- BsmtFinSF2: Type 2 finished square feet Type 2完工面积
- BsmtUnfSF: Unfinished square feet of basement area 地下室区域未完工面积
- TotalBsmtSF: Total square feet of basement area 地下室总体面积
- Heating: Type of heating 采暖类型
- HeatingQC: Heating quality and condition 采暖质量和条件
- CentralAir: Central air conditioning 中央空调系统
- Electrical: Electrical system 电力系统
- 1stFlrSF: First Floor square feet 第一层面积
- 2ndFlrSF: Second floor square feet 第二层面积
- LowQualFinSF: Low quality finished square feet (all floors) 低质量完工面积
- GrLivArea: Above grade (ground) living area square feet 地面以上部分起居面积
- BsmtFullBath: Basement full bathrooms 地下室全浴室数量
- BsmtHalfBath: Basement half bathrooms 地下室半浴室数量
- FullBath: Full bathrooms above grade 地面以上全浴室数量
- HalfBath: Half baths above grade 地面以上半浴室数量
- Bedroom: Number of bedrooms above basement level 地面以上卧室数量
- KitchenAbvGr: Number of kitchens 厨房数量
- KitchenQual: Kitchen quality 厨房质量
- TotRmsAbvGrd: Total rooms above grade (does not include bathrooms) 总房间数(不含浴室和地下部分)
- Functional: Home functionality rating 功能性评级
- Fireplaces: Number of fireplaces 壁炉数量
- FireplaceQu: Fireplace quality 壁炉质量
- GarageType: Garage location 车库位置
- GarageYrBlt: Year garage was built 车库建造时间
- GarageFinish: Interior finish of the garage 车库内饰
- GarageCars: Size of garage in car capacity 车壳大小以停车数量表示
- GarageArea: Size of garage in square feet 车库面积
- GarageQual: Garage quality 车库质量
- GarageCond: Garage condition 车库条件
- PavedDrive: Paved driveway 车道铺砌情况
- WoodDeckSF: Wood deck area in square feet 实木地板面积
- OpenPorchSF: Open porch area in square feet 开放式门廊面积
- EnclosedPorch: Enclosed porch area in square feet 封闭式门廊面积
- 3SsnPorch: Three season porch area in square feet 时令门廊面积
- ScreenPorch: Screen porch area in square feet 屏风门廊面积
- PoolArea: Pool area in square feet 游泳池面积
- PoolQC: Pool quality 游泳池质量
- Fence: Fence quality 围栏质量
- MiscFeature: Miscellaneous feature not covered in other categories 其它条件中未包含部分的特性
- MiscVal: $Value of miscellaneous feature 杂项部分价值
- MoSold: Month Sold 卖出月份
- YrSold: Year Sold 卖出年份
- SaleType: Type of sale 出售类型
- SaleCondition: Condition of sale 出售条件
接下来的工作就是基于这些特征进行数据挖掘和构建模型来预测了。整体流程的思路如下:
竞赛代码解析
导入工具包
import numpy as np    #基本矩阵计算工具
import pandas as pd   #基本数据可视化工具
import matplotlib.pyplot as plt  #绘图工具
import seaborn as sns
from datetime import datetime   #记录时间
from scipy.stats import skew  #偏度计算
from scipy.special import boxcox1p  #box-cox变换工具
from scipy.stats import boxcox_normmax
from sklearn.linear_model import LinearRegression, ElasticNetCV, LassoCV, RidgeCV  #线性模型
from sklearn.ensemble import GradientBoostingRegressor   #GBDT模型
from sklearn.svm import SVR  #SVR模型
from sklearn.pipeline import make_pipeline  #构建Pipeline
from sklearn.preprocessing import RobustScaler  #稳健标准化,用于缩放包含许多异常值的数据
from sklearn.model_selection import KFold, RepeatedKFold, cross_val_score, GridSearchCV  #K折取样以及交叉验证
from sklearn.metrics import mean_squared_error   #均方根指标
from mlxtend.regressor import StackingCVRegressor   #带交叉验证的Stacking回归器
from xgboost import XGBRegressor    #XGBoost模型
from lightgbm import LGBMRegressor  #LGB模型
import warnings  #系统警告提示
import os   #系统读取工具
warnings.filterwarnings('ignore')  #忽略警告
数据加载
#文件根目录,输入本地下载好的文件目录地址

DATA_ROOT = 'D:/Kaggle比赛/房价回归预测/'
print(os.listdir(DATA_ROOT))
['data_description.txt', 'House_price_submission.csv', 'sample_submission.csv', 'test.csv', 'test_results.csv', 'train.csv', '数据描述中文介绍.txt']
#导入训练集、测试集和提交样本
train = pd.read_csv(f'{DATA_ROOT}/train.csv')
test = pd.read_csv(f'{DATA_ROOT}/test.csv')
sub = pd.read_csv(f'{DATA_ROOT}/sample_submission.csv')

#打印数据维度
print("Train set size:", train.shape)
print("Test set size:", test.shape)
输出结果:
Train set size: (1460, 81) , Test set size: (1459, 80)
#查看训练集数据摘要
print(train.info())
<class 'pandas.core.frame.DataFrame'>
RangeIndex: 1460 entries, 0 to 1459
Data columns (total 81 columns):
 #   Column         Non-Null Count  Dtype
---  ------         --------------  -----
 0   Id             1460 non-null   int64
 1   MSSubClass     1460 non-null   int64
 2   MSZoning       1460 non-null   object
 3   LotFrontage    1201 non-null   float64
 4   LotArea        1460 non-null   int64
 5   Street         1460 non-null   object
 6   Alley          91 non-null     object
 7   LotShape       1460 non-null   object
 8   LandContour    1460 non-null   object
 9   Utilities      1460 non-null   object
 10  LotConfig      1460 non-null   object
 ......
#查看测试集数据摘要
print(test.info())
	<class 'pandas.core.frame.DataFrame'>
RangeIndex: 1460 entries, 0 to 1459
Data columns (total 81 columns):
 #   Column         Non-Null Count  Dtype
---  ------         --------------  -----
 0   Id             1460 non-null   int64
 1   MSSubClass     1460 non-null   int64
 2   MSZoning       1460 non-null   object
 3   LotFrontage    1201 non-null   float64
 4   LotArea        1460 non-null   int64
 5   Street         1460 non-null   object
 6   Alley          91 non-null     object
 7   LotShape       1460 non-null   object
 8   LandContour    1460 non-null   object
 9   Utilities      1460 non-null   object
 10  LotConfig      1460 non-null   object
 .....
通过简单粗略看数据,我们知道这里有着数值型变量和非数值变量(类别型变量),除开ID和SalePrice以外共有79个特征。
数据预处理
异常值初筛
#先将样本ID赋值并删除
train_ID = train['Id']
test_ID = test['Id']

train.drop(['Id'], axis=1, inplace=True)
test.drop(['Id'], axis=1, inplace=True)

#整理出数值型特征和类别型特征
all_cols = test.columns.tolist()
numerical_cols = []
categorical_cols = []

for col in all_cols:
    if (test[col].dtype != 'object') :
        numerical_cols.append(col)
    else:
        categorical_cols.append(col)

print('数值型变量数目为:',len(numerical_cols))
print('类别型变量数目为:',len(categorical_cols))
数值型变量数目为: 36
类别型变量数目为: 43
#对训练集的连续性数值变量绘制箱型图筛选异常值

fig = plt.figure(figsize=(80,60),dpi=120)
for i in range(len(numerical_cols)):
    plt.subplot(6, 6, i+1)
    sns.boxplot(train[numerical_cols[i]], orient='v', width=0.5)
    plt.ylabel(numerical_cols[i], fontsize=36)
plt.show()
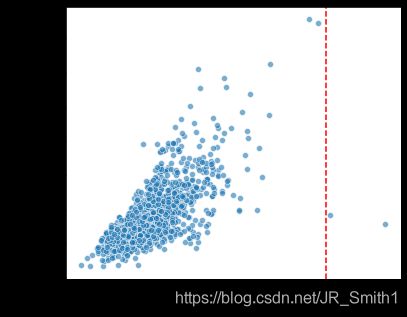
#地面上居住面积与房屋售价关系
fig = plt.figure(figsize=(6,5))
plt.axvline(x=4600, color='r', linestyle='--')
sns.scatterplot(x='GrLivArea',y='SalePrice',data=train, alpha=0.6)
#显然对于可居住面积越大,其售价肯定也越高,但图中显示有两个离散点不遵循此规则,查看其具体的数值
train.GrLivArea.sort_values(ascending=False)[:4]
1298    5642
523     4676
1182    4476
691     4316
Name: GrLivArea, dtype: int64
#地皮建筑面积与房屋售价关系
fig = plt.figure(figsize=(6,5))
plt.axvline(x=200000, color='r', linestyle='--')
sns.scatterplot(x='LotArea',y='SalePrice',data=train, alpha=0.6)
*强#地皮建筑面积与房屋售价关系
fig = plt.figure(figsize=(6,5))
plt.axvline(x=200000, color='r', linestyle='--')
sns.scatterplot(x='LotArea',y='SalePrice',data=train, alpha=0.6)

(通过数据集中能看出,对于地皮建筑面积越大,其售价却不一定更高,二者不成正比,因此异常值不用删除)
#地下室总面积与房屋售价关系
fig = plt.figure(figsize=(6,5))
plt.axvline(x=5900, color='r', linestyle='--')
sns.scatterplot(x='TotalBsmtSF',y='SalePrice',data=train, alpha=0.6)
#同上,查看其具体的数值
train.TotalBsmtSF.sort_values(ascending=False)[:3]
1298    6110
332     3206
496     3200
Name: TotalBsmtSF, dtype: int64
#第一层面积与房屋售价关系
fig = plt.figure(figsize=(6,5))
plt.axvline(x=4000, color='r', linestyle='--')
sns.scatterplot(x='1stFlrSF',y='SalePrice',data=train, alpha=0.6)
#同上,查看其具体的数值
train['1stFlrSF'].sort_values(ascending=False)[:3]
1298    4692
496     3228
523     3138
Name: 1stFlrSF, dtype: int64
你会发现原来这几个特征的离群点都是Index=1298的这个样本.
#装饰石材面积与房屋售价关系
fig = plt.figure(figsize=(6,5))
plt.axvline(x=1500, color='r', linestyle='--')
sns.scatterplot(x='MasVnrArea',y='SalePrice',data=train, alpha=0.6)
通过数据集中能看出,对于装饰石材面积越大,其售价却不一定更高,还需要看石材的类型,因此异常值不用删除。还有其余特征变量可以用来探索,具体方式是先看箱型图,再细看可能会存在离群值的一些特征做散点图,最最重要的就是不要过分地删除异常值,一定要基于人为经验或者可观事实判断。比如,住房面积大房价却很低,人的年龄超过200岁,月份数为-1等等。
综上,需要将部分异常值删除。
#剔除异常值并将数据集重新排序
train = train[train.GrLivArea < 4600]
train = train[train.TotalBsmtSF < 5000]
train = train[train['1stFlrSF'] < 4000]
train.reset_index(drop=True, inplace=True)
train.shape
(1458, 80)
标签值对数变换
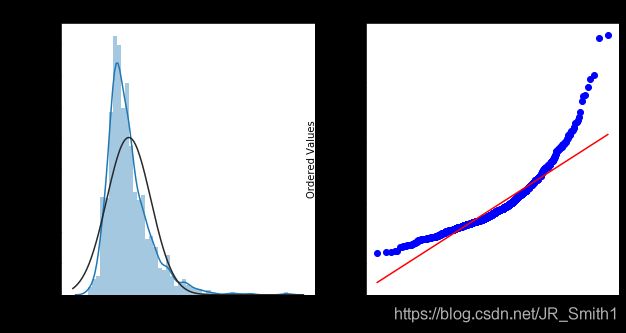
先对咱们的标签(房价)做一下偏度图,一般用直方图和Q-Q图来看。
不懂Q-Q图的小伙伴可以移步这里~
#对'SalePrice'绘制直方图和Q-Q图
from scipy import stats
plt.figure(figsize=(10,5))
ax_121 = plt.subplot(1,2,1)
sns.distplot(train["SalePrice"],fit=stats.norm)
ax_122 = plt.subplot(1,2,2)
res = stats.probplot(train["SalePrice"],plot=plt)

可见,咱们的房价分布并不完全符合正态,而是一种向左的偏态分布。
由于该竞赛最终的评估指标是取房价对数的RMSE值,因此有必要先将房价转化为对数形式,方便后续用于模型的评估。(这里可以用numpy.log()或者numpy.log1p()将数值转化为对数。注意,log()是指e为底数,而log1p代表了ln(1+x))
#使用log1p也就是log(1+x),用来对房价数据进行数据预处理,它的好处是转化后的数据更加服从正态分布,有利于后续的评估结果。
#但需要注意最后需要将预测出的平滑数据还原,而还原过程就是log1p的逆运算expm1
train["SalePrice"] = np.log1p(train["SalePrice"])
plt.figure(figsize=(10,5))
ax_121 = plt.subplot(1,2,1)
sns.distplot(train["SalePrice"],fit=stats.norm)
ax_122 = plt.subplot(1,2,2)
res = stats.probplot(train["SalePrice"],plot=plt)
接下来需要合并训练和测试数据,做一些统一的预处理变化,如果分开做会显得比较麻烦。
#分离标签和特征,合并训练集和测试集便于统一预处理
y = train['SalePrice'].reset_index(drop=True)
train_features = train.drop(['SalePrice'], axis=1)
test_features = testfeatures = pd.concat([train_features, test_features],axis=0).reset_index(drop=True)
print("剔除训练数据中的极端值后,将其特征矩阵和测试数据中的特征矩阵合并,维度为:",features.shape)
剔除训练数据中的极端值后,将其特征矩阵和测试数据中的特征矩阵合并,维度为: (2917, 79)
明确变量类型
通过阅读官方提供的说明文件(这一点很重要)能够加深对数据特征的理解,以便更好的进行特征处理。在这里,我们会发现有一些特征本身是数值型的数据,但是却没有连续值,而是一些单一分布的值,因此需要检验它们是不是原本就是类别型的数据,只不过用数值来表达了。
#寻找数值变量中实际应该为类别变量的特征(即并不连续分布)
transform_cols = []
for col in numerical_cols:
    if len(features[col].unique()) < 20:
        transform_cols.append(col)

transform_cols
['MSSubClass',
 'OverallQual',
 'OverallCond',
 'BsmtFullBath',
 'BsmtHalfBath',
 'FullBath',
 'HalfBath',
 'BedroomAbvGr',
 'KitchenAbvGr',
 'TotRmsAbvGrd',
 'Fireplaces',
 'GarageCars',
 'PoolArea',
 'MoSold',
 'YrSold']
通过对比文件描述 (data_distribution) 中的特征含义:
- MSSubClass – 确定销售涉及的住宅类型(拥有16个不同类型,且互相无优劣关系,实质为onehot类别型变量)
- OverallQual – 评估房子的整体材料和装修(拥有10个类型,且数值越低表示越差,实质为labelcoder类别型变量)
- OverallCond – 评估房子的整体状况(拥有10个类型,且数值越低表示越差,实质为labelcoder类别型变量)
- BsmtFullBath – 地下室全浴室个数(类型数未知,实质为数值型变量)
- BsmtHalfBath – 地下室半浴室个数(类型数未知,实质为数值型变量)
- FullBath – 地面上的全浴室个数(类型数未知,实质为数值型变量)
- HalfBath – 地面上的半浴室个数(类型数未知,实质为数值型变量)
- BedroomAbvGr – 地面上卧室个数(类型数未知,实质为数值型变量)
- KitchenAbvGr – 地面上厨房个数(类型数未知,实质为数值型变量)
- TotRmsAbvGrd – 地面上房间个数(类型数未知,实质为数值型变量)
- Fireplaces – 壁炉数量(类型数未知,实质为数值型变量)
- GarageCars – 车库容量(类型数未知,实质为数值型变量)
- PoolArea – 游泳池面积,平方英尺(类型数未知,实质为数值型变量)
- MoSold – 房屋的售出月份(拥有12个月,且互相无优劣关系,实质为onehot类别型变量)
- YrSold – 房屋的售出年份(拥有5个月,且互相无优劣关系,实质为onehot类别型变量)
故此,数值型变量中存在列名为’MSSubClass’、‘YrSold’、'MoSold’的特征列,实际为one-hot类别型变量需要更正为string形式。 (不懂one-hot和label_encoder区别的伙伴点这里)
#对于列名为'MSSubClass'、'YrSold'、'MoSold'的特征列,将列中的数据类型转化为string格式。
features['MSSubClass'] = features['MSSubClass'].apply(str)
features['YrSold'] = features['YrSold'].astype(str)
features['MoSold'] = features['MoSold'].astype(str)

#将其加入对应的组别
numerical_cols.remove('MSSubClass')
numerical_cols.remove('YrSold')
numerical_cols.remove('MoSold')
categorical_cols.append('MSSubClass')
categorical_cols.append('YrSold')
categorical_cols.append('MoSold')
缺失值处理
由dataframe.info()能看出对于训练和测试数据都有不同程度的缺失情况,而缺失值的存在会导致模型无法工作,因此需要题前将这部分数据处理好。
#数据总缺失情况查阅
(features.isna().sum()/features.shape[0]).sort_values(ascending=False)[:35]
PoolQC          0.996915
MiscFeature     0.964004
Alley           0.932122
Fence           0.804251
FireplaceQu     0.486802
LotFrontage     0.166610
GarageCond      0.054508
GarageQual      0.054508
GarageYrBlt     0.054508
GarageFinish    0.054508
GarageType      0.053822
BsmtCond        0.028111
......
GarageArea      0.000343
GarageCars      0.000343
OverallQual     0.000000
dtype: float64
注意,由特征文件说明中信息可知许多NA项并非缺失,而是表示“没有”此功能的含义, 如PoolQC游泳池质量的缺失NA,实际含义表示没有游泳池,故需要仔细对照说明信息进行处理。
以下根据缺失值实际情况进行填充:
#PoolQC, NA表示没有游泳池,为一个类型
print(features["PoolQC"].unique())
print(features["PoolQC"].fillna("None").unique())   #空值填充为str型数据"None",表示没有泳池。
[nan 'Ex' 'Fa' 'Gd']
['None' 'Ex' 'Fa' 'Gd']
#MiscFeature, NA表示-其他类别中“没有”未涵盖的其他特性,故填充为"None"
print(features["MiscFeature"].unique())
print(features["MiscFeature"].fillna("None").unique())
[nan 'Shed' 'Gar2' 'Othr' 'TenC']
['None' 'Shed' 'Gar2' 'Othr' 'TenC']
#由于类别型变量的许多NA均表示没有此功能,先从data_distribution中找出这样的列然后统一填充为"None"
(features[categorical_cols].isna().sum()/features.shape[0]).sort_values(ascending=False)[:25]
PoolQC          0.996915
MiscFeature     0.964004
Alley           0.932122
Fence           0.804251
FireplaceQu     0.486802
GarageCond      0.054508
.....
SaleType        0.000343
KitchenQual     0.000343
LotShape        0.000000
LandContour     0.000000
dtype: float64
for col in ('PoolQC', 'MiscFeature','Alley', 'Fence', 'FireplaceQu', 'MasVnrType', 'Utilities',
            'GarageCond', 'GarageQual', 'GarageFinish', 'GarageType',
            'BsmtQual', 'BsmtCond', 'BsmtExposure', 'BsmtFinType1', 'BsmtFinType2'):
    features[col] = features[col].fillna('None')

(features[categorical_cols].isna().sum()/features.shape[0]).sort_values(ascending=False)[:10]
MSZoning       0.001371
Functional     0.000686
SaleType       0.000343
Exterior2nd    0.000343
Exterior1st    0.000343
Electrical     0.000343
KitchenQual    0.000343
BldgType       0.000000
ExterQual      0.000000
MasVnrType     0.000000
dtype: float64
#其余类别型变量由所在列的众数填充
for col in ('Functional', 'SaleType', 'Electrical', 'Exterior2nd', 'Exterior1st', 'KitchenQual'):
    features[col] = features[col].fillna(features[col].mode()[0])

(features[categorical_cols].isna().sum()/features.shape[0]).sort_values(ascending=False)[:3]
MSZoning      0.001371
BldgType      0.000000
Foundation    0.000000
dtype: float64
#由于MSSubClass(确定销售涉及的住宅类型)和 MSZoning(销售分区的一般分类确定)之间有一定联系。
#具体来说是指在MSSubClass基础上确定MSZoning,故可以按照'MSSubClass'列中的元素分布进行分组,然后将'MSZoning'列分组后取众数填充。
features['MSZoning'] = features.groupby('MSSubClass')['MSZoning'].transform(lambda x: x.fillna(x.mode()[0]))
print('类别型数据缺失值数量为:', features[categorical_cols].isna().sum().sum())
类别型数据缺失值数量为: 0
最后的df.groupby()工具用法详见: Groupby的用法及原理详解
到这里,类别型数据缺失填充已经完成啦~
接下来就是数值型的特征:
#数值型变量缺失情况
(features[numerical_cols].isna().sum()/features.shape[0]).sort_values(ascending=False)[:12]
LotFrontage     0.166610
GarageYrBlt     0.054508
MasVnrArea      0.007885
BsmtFullBath    0.000686
BsmtHalfBath    0.000686
GarageArea      0.000343
GarageCars      0.000343
BsmtFinSF1      0.000343
BsmtFinSF2      0.000343
BsmtUnfSF       0.000343
TotalBsmtSF     0.000343
OpenPorchSF     0.000000
dtype: float64
#因为某些类别型变量为"None",表示不包含此项,所以造成数值型变量也会缺失,故将这样的数值变量缺失值填充为"0"
for col in ('GarageYrBlt', 'GarageArea', 'GarageCars', 'MasVnrArea',
            'BsmtHalfBath', 'BsmtFullBath', 'BsmtFinSF1', 'BsmtFinSF2', 'BsmtUnfSF', 'TotalBsmtSF'):
    features[col] = features[col].fillna(0)

(features[numerical_cols].isna().sum()/features.shape[0]).sort_values(ascending=False)[:3]
LotFrontage     0.16661
BsmtFullBath    0.00000
LotArea         0.00000
dtype: float64
#对于 LotFrontage (连接到地产的街道的直线英尺距离)而言,其受Neighborhood(城市限制内的物理位置)的影响
#故对于这两个特征进行分组后取列的中位数填充
features['LotFrontage'] = features.groupby('Neighborhood')['LotFrontage'].transform(lambda x: x.fillna(x.median()))
print('数值型数据缺失值数量为:',features[numerical_cols].isna().sum().sum())
数值型数据缺失值数量为: 0
至此,数据缺失值填充全部完成!!(先放一个小烟花,嘣~ 嘣 ~ 嘣~)
特征工程
这一步是整个Baseline中最核心的部分,特征工程的好坏将影响最终的模型效果。因此,业界都流传着一句话:“数据和特征决定了机器学习的上线,而模型和算法只是逼近这个上线而已”, 由此可见特征工程在机器学习中的重要性。具体来说,特征越好、灵活性越强,则构建的模型越简单且性能出色。(更多关于特征工程的知识请参考:机器学习实战之特征工程)
特征创建:基于已有特征进行组合
#GrLivArea: 地上居住总面积
#TotalBsmtSF: 地下室总面积
#将二者加和形成新的“总居住面积”特征
features['TotalSF'] = features['GrLivArea'] + features['TotalBsmtSF']

#LotArea: 建筑面积
#LotFrontage: 房子同街道之间的距离
#将二者乘积形成新的“区域面积”特征
features['Area'] = features['LotArea'] * features['LotFrontage']

#OpenPorchSF :开放式门廊面积
#EnclosedPorch :封闭式门廊面积
#3SsnPorch :时令门廊面积
#ScreenPorch :屏风门廊面积
#将四者加和形成新的"门廊总面积"特征
features['Total_porch_sf'] = (features['OpenPorchSF'] + features['EnclosedPorch'] +
                              features['3SsnPorch'] + features['ScreenPorch'])

#FullBath :地面上的全浴室数目
#HalfBath :地面以上半浴室数目
#BsmtFullBath :地下室全浴室数量
#BsmtHalfBath :地下室半浴室数量
#将半浴室权重设为0.5,全浴室为1,将四者加和形成新的"总浴室数目"特征
features['Total_Bathrooms'] = (features['FullBath'] + (0.5 * features['HalfBath']) +
                               features['BsmtFullBath'] + (0.5 * features['BsmtHalfBath']))

#将新特征加入到数值变量中
numerical_cols.append('TotalSF')
numerical_cols.append('Area')
numerical_cols.append('Total_porch_sf')
numerical_cols.append('Total_Bathrooms')
print('特征创建后的数据维度 :', features.shape)
特征创建后的数据维度 : (2917, 83)
小伙伴们可以根据自己对特征的理解来自定义构建新的特征,这里就因人而异了,充分发挥你们的创造力吧,奥里给~~
对影响房价关键因子进行分箱
许多与房价属性高度相关的特征可能需要分箱 binning 来表达更明确的含义,或者有效地去减少对于数值的拟合来增加其泛化性(在测试集上的准确度)。
分箱也是一门学问,我还是把知识链接给放上吧…
#查看与标签10个最相关的特征属性
train_ = features.iloc[:len(y),:]
train_ = pd.concat([train_,y],axis=1)
cols = train_ .corr().nlargest(10, 'SalePrice').index

plt.subplots(figsize=(8,8))
sns.set(font_scale=1.1)
sns.heatmap(train_ [cols].corr(),square=True, annot=True)

由热图可知,‘完工质量和材料’,‘总居住面积’,‘地面上居住面积’,'车库容量数’,‘总浴室数目’,‘车库面积’,‘总地下室面积’,'第一层面积’等都是与房价密切相关的特征。
#完工质量和材料
sns.distplot(features['OverallQual'],bins=10,kde=False)
#完工质量和材料分组
def OverallQual_category(cat):
    if cat <= 4:
        return 1
    elif cat <= 6 and cat > 4:
        return 2
    else:
        return 3

features['OverallQual_cat'] = features['OverallQual'].apply(OverallQual_category)
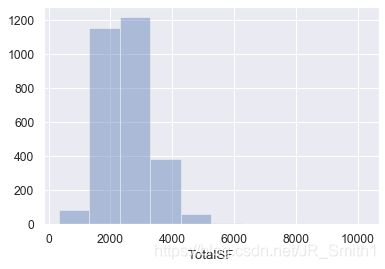
#总居住面积
sns.distplot(features['TotalSF'],bins=10,kde=False)
#总居住面积分组
def TotalSF_category(cat):
    if cat <= 2000:
        return 1
    elif cat <= 3000 and cat > 2000:
        return 2
    elif cat <= 4000 and cat > 3000:
        return 3
    else:
        return 4

features['TotalSF_cat'] = features['TotalSF'].apply(TotalSF_category)
博主后面还进行了车库面积、地面上居住面积、地下室总面积、建筑相关时间等特征的分箱操作,原理都一样,这里不再贴代码。
#然后将创建的分组加入类别型变量中
categorical_cols.append('GarageArea_cat')
categorical_cols.append('GrLivArea_cat')
categorical_cols.append('TotalBsmtSF_cat')
categorical_cols.append('TotalSF_cat')
categorical_cols.append('OverallQual_cat')
categorical_cols.append('LotFrontage_cat')
categorical_cols.append('YearBuilt_cat')
categorical_cols.append('YearRemodAdd_cat')
categorical_cols.append('GarageYrBlt_cat')

#打印当前数据维度
features.shape
(2917, 92)
数值型变量偏度修正
针对一些线性回归模型,它们本身对数据分布有一定要求,例如正态分布等。所以需要在使用这些模型之前将所使用的特征尽可能转化为正态分布状态,就需要对数据的偏度和峰度进行了解和转化。不了解数据偏度和峰度的小伙伴看这里。
#查看数值型特征变量的偏度情况并绘图
skew_features = features[numerical_cols].apply(lambda x: skew(x)).sort_values(ascending=False)

sns.set_style("white")
f, ax = plt.subplots(figsize=(8, 12))
ax.set_xscale("log")
ax = sns.boxplot(data=features[numerical_cols], orient="h", palette="Set1")
ax.xaxis.grid(False)
ax.set(ylabel="Feature names")
ax.set(xlabel="Numeric values")
ax.set(title="Numeric Distribution of Features")
sns.despine(trim=True, left=True)
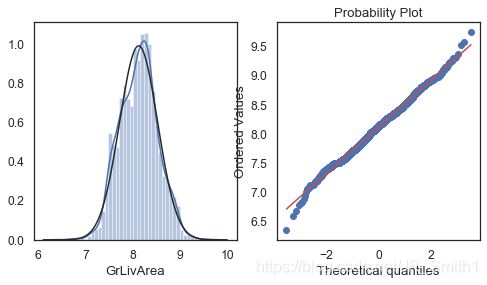
#对特征变量'GrLivArea',绘制直方图和Q-Q图,以清楚数据分布结构
plt.figure(figsize=(8,4))
ax_121 = plt.subplot(1,2,1)
sns.distplot(features['GrLivArea'],fit=stats.norm)
ax_122 = plt.subplot(1,2,2)
res = stats.probplot(features['GrLivArea'],plot=plt)
#以0.5作为阈值,统计偏度超过此数值的高偏度分布数据列,获取这些数据列的index
high_skew = skew_features[skew_features > 0.5]
skew_index = high_skew.index
print("There are {} numerical features with Skew > 0.5 :".format(high_skew.shape[0]))
high_skew.sort_values(ascending=False)
There are 28 numerical features with Skew > 0.5 :
MiscVal           21.939672
Area              18.642721
PoolArea          17.688664
LotArea           13.109495
LowQualFinSF      12.084539
3SsnPorch         11.372080
...
HalfBath           0.696666
TotalBsmtSF        0.671751
BsmtFullBath       0.622415
OverallCond        0.569314
dtype: float64
对高偏度数据进行处理,将其转化为正态分布时,一般使用Box-Cox变换。它可以使数据满足线性性、独立性、方差齐次以及正态性的同时,又不丢失信息。

#使用boxcox_normmax用于找出最佳的λ值
for i in skew_index:
    features[i] = boxcox1p(features[i], boxcox_normmax(features[i] + 1))

features[numerical_cols].apply(lambda x: skew(x)).sort_values(ascending=False)
BsmtFinSF2          2.578329
EnclosedPorch       2.149132
Area                1.000000
MasVnrArea          0.977618
2ndFlrSF            0.895453
WoodDeckSF          0.785550
HalfBath            0.732625
OpenPorchSF         0.621231
BsmtFullBath        0.616643
Fireplaces          0.553135
.....
GarageArea          0.216857
OverallQual         0.189591
FullBath            0.165514
LotFrontage         0.059189
BsmtUnfSF           0.054195
TotRmsAbvGrd        0.047190
TotalSF             0.027351
GrLivArea           0.008823
dtype: float64
#box-cox变换后的对特征变量'GrLivArea'
plt.figure(figsize=(8,4))
ax_121 = plt.subplot(1,2,1)
sns.distplot(features['GrLivArea'],fit=stats.norm)
ax_122 = plt.subplot(1,2,2)
res = stats.probplot(features['GrLivArea'],plot=plt)
(呼~好累,活动一下手臂继续肝!!)
删除单一值特征
在某些类别型特征中,某个种类占据了99%以上的部分,也就是说特征之间的具有明显的单一值特点,这些特征对模型也没有什么贡献可言,需要删除。
查看类别型特征的唯一值分布情况
features[categorical_cols].describe(include='O').T
count	unique	top	freq
MSZoning	2917	5	RL	2265
Street	2917	2	Pave	2905
Alley	2917	3	None	2719
LotShape	2917	4	Reg	1859
LandContour	2917	4	Lvl	2622
Utilities	2917	3	AllPub	2914
LotConfig	2917	5	Inside	2132
......
SaleType	2917	9	WD	2526
SaleCondition	2917	6	Normal	2402
MSSubClass	2917	16	20	1079
YrSold	2917	5	2007	691
MoSold	2917	12	6	503
#对于类别型特征变量中,单个类型占比超过99%以上的特征(即> 2888个)进行删除.
freq_ = features[categorical_cols].describe(include='O').T.freq
drop_cols = []
for index,num in enumerate(freq_):
    if (freq_[index] > 2888) :
        drop_cols.append(freq_.index[index])

features = features.drop(drop_cols, axis=1)
print('These drop_cols are:', drop_cols)
print('The new shape is :', features.shape)

categorical_cols.remove('Street')
categorical_cols.remove('PoolQC')
categorical_cols.remove('Utilities')
These drop_cols are: ['Street', 'Utilities', 'PoolQC']
The new shape is : (2917, 89)
特征简化:0/1二值化处理
对于某些分布单调的数字型数据列, 按照“有”和“没有”来进行二值化处理,以扩充更多地特征维度。
#通过对于特征含义理解,筛选出了以下几个变量进行二值化处理
features['HasPool'] = features['PoolArea'].apply(lambda x: 1 if x > 0 else 0)
features['HasWoodDeckSF'] = features['WoodDeckSF'].apply(lambda x: 1 if x > 0 else 0)
features['Hasfireplace'] = features['Fireplaces'].apply(lambda x: 1 if x > 0 else 0)
features['HasBsmt'] = features['TotalBsmtSF'].apply(lambda x: 1 if x > 0 else 0)
features['HasGarage'] = features['GarageArea'].apply(lambda x: 1 if x > 0 else 0)

#查看当前特征数
print("经过特征处理后的特征维度为 :",features.shape)
经过特征处理后的特征维度为 : (2917, 94)
至此,特征构造处理完成全部完成!
特征编码
对于类别型数据,一般采用独热编码onehot形式,对于彼此有数量关联的特征一般采用labelencoder编码。
#使用pd.get_dummies()方法对特征矩阵进行类似“坐标投影”操作,获得在新空间下onehot的特征表达。
final_features = pd.get_dummies(features,columns=categorical_cols).reset_index(drop=True)
print("经过onehot编码后的特征维度为 :", final_features.shape)
经过onehot编码后的特征维度为 : (2917, 370)
#训练集&测试集数据还原
X_train = final_features.iloc[:len(y), :]
X_sub = final_features.iloc[len(y):, :]
print("训练集特征维度为:", X_train.shape)
print("测试集特征维度为:", X_sub.shape)
训练集特征维度为: (1458, 370)
测试集特征维度为: (1459, 370)
异常值复查:基于回归模型
除了根据可视化的异常值筛查以外,使用模型对数据进行拟合,然后设定一个残差阈值(y_true - y_pred) 也能从另一个角度找出可能潜在的异常值。
#定义回归模型找出异常值并绘图的函数
def find_outliers(model, X, y, sigma=4):
    try:
        y_pred = pd.Series(model.predict(X), index=y.index)
    except:
        model.fit(X,y)
        y_pred = pd.Series(model.predict(X), index=y.index)

    #计算模型预测y值与真实y值之间的残差
    resid = y - y_pred
    mean_resid = resid.mean()
    std_resid = resid.std()

    #计算异常值定义的参数z参数,数据的|z|大于σ将会被视为异常
    z = (resid - mean_resid) / std_resid
    outliers = z[abs(z) > sigma].index

    #打印结果并绘制图像
    print('R2 = ',model.score(X,y))
    print('MSE = ',mean_squared_error(y, y_pred))
    print('RMSE = ',np.sqrt(mean_squared_error(y, y_pred)))
    print('------------------------------------------')

    print('mean of residuals',mean_resid)
    print('std of residuals',std_resid)
    print('------------------------------------------')

    print(f'find {len(outliers)}','outliers:')
    print(outliers.tolist())

    plt.figure(figsize=(15,5))
    ax_131 = plt.subplot(1,3,1)
    plt.plot(y,y_pred,'.')
    plt.plot(y.loc[outliers],y_pred.loc[outliers],'ro')
    plt.legend(['Accepted','Outliers'])
    plt.xlabel('y')
    plt.ylabel('y_pred');

    ax_132 = plt.subplot(1,3,2)
    plt.plot(y, y-y_pred, '.')
    plt.plot(y.loc[outliers],y.loc[outliers] - y_pred.loc[outliers],'ro')
    plt.legend(['Accepted','Outliers'])
    plt.xlabel('y')
    plt.ylabel('y - y_pred');

    ax_133 = plt.subplot(1,3,3)
    z.plot.hist(bins=50, ax=ax_133)
    z.loc[outliers].plot.hist(color='r', bins=30, ax=ax_133)
    plt.legend(['Accepted','Outliers'])
    plt.xlabel('z')

    return outliers
#使用LR回归模型
outliers_lr = find_outliers(LinearRegression(), X_train, y, sigma=3.5)
R2 =  0.9533461995514986
MSE =  0.007448781362371816
RMSE =  0.08630632284121376
------------------------------------------
mean of residuals -2.8022090059126034e-17
std of residuals 0.08633593557937841
------------------------------------------
find 15 outliers:
[30, 88, 431, 462, 580, 587, 631, 687, 727, 873, 967, 969, 1322, 1430, 1451]
#使用Elasnet模型
outliers_ent = find_outliers(ElasticNetCV(), X_train, y, sigma=3.5)
R2 =  0.8237243364637833
MSE =  0.028144306885302683
RMSE =  0.16776265044789523
------------------------------------------
mean of residuals -1.6593950721969417e-15
std of residuals 0.1678202118324841
------------------------------------------
find 10 outliers:
[30, 185, 410, 462, 495, 631, 687, 915, 967, 1243]
#使用XGB模型
outliers_xgb = find_outliers(XGBRegressor(), X_train, y, sigma=4)
R2 =  0.9993821316841015
MSE =  9.864932656333151e-05
RMSE =  0.00993223673516351
------------------------------------------
mean of residuals 6.241242620683598e-06
std of residuals 0.009935642643516977
------------------------------------------
find 3 outliers:
[883, 1055, 1279]

后面还用了LGB模型、GBDT模型和SVR模型来确定outliers,这里省略绘图了。
然后比较每个模型下的异常值序号,进行人工投票选择,超过半数即为异常值,这样最终确定了outliers,并在特征集和标签集中删除。
outliers = [30, 462, 631, 967]
X_train = X_train.drop(X_train.index[outliers])
y = y.drop(y.index[outliers])
消除one-hot特征矩阵的过拟合
当使用one-hot编码后,一些列可能会带来过拟合的风险。判断某一列是否将产生过拟合的条件是:
特征矩阵某一列中的某个值出现的次数除以特征矩阵的列数超过99.95%,即其几乎在被投影的各个维度上都有着同样的取值,并不具有“主成分”的性质,则记为过拟合的列。
#记录产生过拟合的数据列的序号
overfit = []
for i in X_train.columns:
    counts = X_train[i].value_counts(ascending=False)
    zeros = counts.iloc[0]
    if zeros / len(X_train) * 100 > 99.95:
        overfit.append(i)

overfit
['Area', 'MSSubClass_150']
#对训练集和测试集同时删除这些列
X_train = X_train.drop(overfit, axis=1).copy()
X_sub = X_sub.drop(overfit, axis=1).copy()
print('经过异常值和过拟合删除后训练集的特征维度为:', X_train.shape)
print('经过异常值和过拟合删除后测试集的特征维度为:', X_sub.shape)
经过异常值和过拟合删除后训练集的特征维度为: (1454, 368)
经过异常值和过拟合删除后测试集的特征维度为: (1459, 368)
至此,数据预处理和特征工程部分全部完成!(喘一口粗气)
那么本期的Kaggle入门案例解析就到此啦,实在没办法一下全部写完,分成两期写吧。数据处理和特征工程已经可以结束了,下一期的话给大家带来后面的模型搭建、调优和融合部分的代码解析和讲解。感谢努力学习知识,并且沉稳帅气/美丽动人的你~,咱们后续再见!


