Spring更简单的读取和存储Bean对象
1. 配置文件
首先,创建Spring配置文件并设置Bean扫描的根路径
<?xml version="1.0" encoding="UTF-8"?>
<beans xmlns="http://www.springframework.org/schema/beans"
       xmlns:xsi="http://www.w3.org/2001/XMLSchema-instance"
       xmlns:content="http://www.springframework.org/schema/context"
       xsi:schemaLocation="http://www.springframework.org/schema/beans http://www.springframework.org/schema/beans/spring-beans.xsd http://www.springframework.org/schema/context https://www.springframework.org/schema/context/spring-context.xsd">
    <content:component-scan base-package="需要扫描的类的目录(即需要放到spring中的类)"></content:component-scan>
</beans>
这段代码可以直接复制,修给你自己想要扫描的目录即可
2. 将Bean对象更简单的存储到Spring:使用注解【类注解/方法注解】
想要将对象存储在 Spring 中,有两种注解类型可以实现:
-
使用类注解(5大类注解)
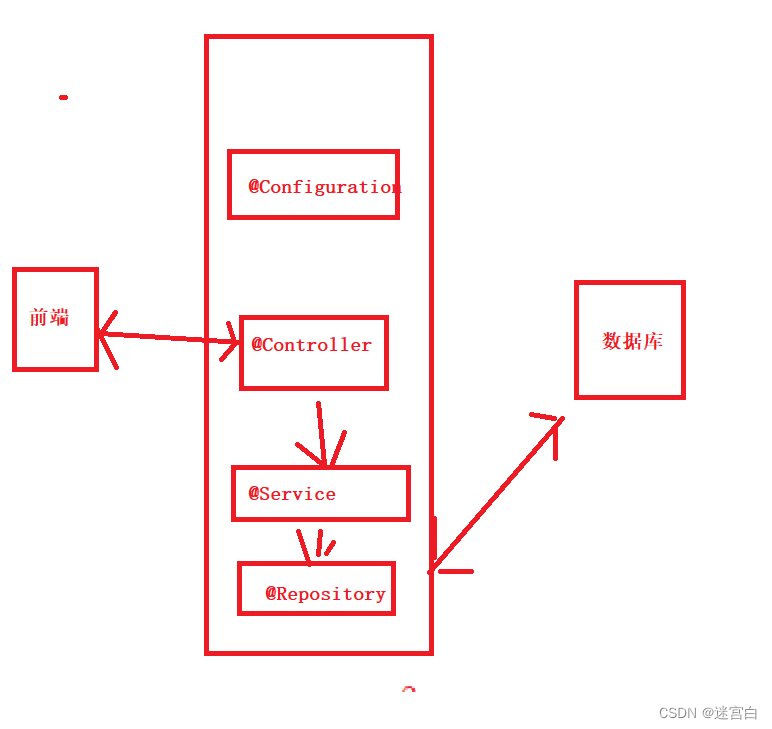
a. @Controller【控制器】验证前端传递的参数的【安全检查】
b.@Service【服务】服务调用的编排和汇总
c.@Repository【仓库(数据仓库…)】直接操作数据库
d.@Componet【组件】通用化的工具类
e.@Configuration【配置】项目的所有配置
-
使用了方法注解:@Bean
2.1使用5大类注解
代码示例
使⽤ @Controller 存储 bean 的代码如下所示:
@Controller // 将对象存储到 Spring 中

public class UserController {
 public void sayHi(String name) {
 System.out.println("Hi," + name);
 }
}
此时我们先使⽤之前读取对象的⽅式来读取上⾯的 UserController 对象,如下代码所示:
public class Application {
 public static void main(String[] args) {
 // 1.得到 spring 上下⽂

 ApplicationContext context =

 new ClassPathXmlApplicationContext("spring-config.xml");
 // 2.得到 bean

 UserController userController = (UserController) context.getBean(

"userController");
 // 3.调⽤ bean ⽅法

 userController.sayHi("卢世杰");
 }
}
其他四大类的注解与上面类似,这里就不演示了
2.2关于Bean的命名规则问题:
命名规则:默认情况下,使用5大类注解的Bean名称是将类首字母小写的命名规则 eg:UserController->userController
但是在有特殊情况:当首字母和第二个字母都是大写的情况下,那么Bean的名称为原类名,否则运行会报错!!!
举个例子看代码
SController sController = context.getBean("sController",SController.class);
SController sController = context.getBean("SController",SController.class);
为什么会这样呢,这个就要看看源码了
我们可以在 Idea 中使⽤搜索关键字“beanName”可以看到以下内容:

我们最后找到了 bean 对象的命名规则的⽅法:

它使⽤的是 JDK Introspector 中的 decapitalize ⽅法,源码如下:
public static String decapitalize(String name) {
 if (name == null || name.length() == 0) {
 return name;
 }
 // 如果第⼀个字⺟和第⼆个字⺟都为⼤写的情况,是把 bean 的⾸字⺟也⼤写存储了

 if (name.length() > 1 && Character.isUpperCase(name.charAt(1)) &&

 Character.isUpperCase(name.charAt(0))){
 return name;
 }
 // 否则就将⾸字⺟⼩写

 char chars[] = name.toCharArray();
 chars[0] = Character.toLowerCase(chars[0]);
 return new String(chars);
}
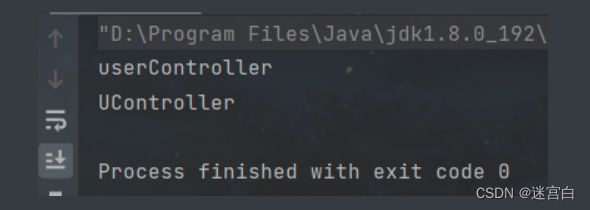
举个例子:你的String也可以调用Introspector.decapitalize
public abstract class Test10 {
public static void main(String[] args) {
String s1 = "UserController";
String s2 = "UController"; System.out.println(Introspector.decapitalize(s1)); System.out.println(Introspector.decapitalize(s2));
}}
3.使用方法注解
@Bean注解注意事项:
- 必须配合5大类注解一起使用(不然注入不进去)
- @Bean方法注解只能使用在无参的方法上(Spring初始化存储的时候,没办法提供相应的参数)
- @Bean方法注解的命名规则:使用对应的方法名
作用:将这个方法返回的对象存入到Spring中
@Controller
public class User {
 @Bean
 private User getUser{
 	return new User():
 	}
 	}
通过@Bean注解存入Spring中的对象名字默认是方法名,可以通过加入参数来将这个Bean对象重命名,但是@Bean重命名之后,使用方法名就不能获取Bean对象了
@Controller
public class User {
 @Bean(name="u1")//重命名Bean对象名
 private User getUser{
 	return new User():
 	}
 	}
 ### 获取Bean对象(对象装配)
 获取 bean 对象也叫做对象装配,是把对象取出来放到某个类中,有时候也叫对象注⼊。 对象装配(对象注⼊)的实现⽅法以下 3 种:

1. 属性注⼊

2. Setter 注⼊

3. 构造⽅法注⼊


#### 属性注入
可以在成员变量中添加@Autowired注解
```java
@RController
public class UserController {
    // 属性对象
    @Autowired
    private UserService userService;

    public UserInfo add() {
        return userService.doService();
    }
}
优点:属性注入最大的优点就是实现简单、使用简单,只需要给变量上添加一个注解(@Autowired),就可以在不 new 对象的情况下,直接获得注入的对象了
缺点:
- 无法注入一个不可变的对象(final 修饰的对象)(因为final修饰的变量初始化只能是在定义时就直接赋值,或者是用构造方法进行赋值)
- 只能适应于 IoC 容器,因为这种用法是建立在IoC容器上的
- 设计原则问题:更容易违背单一设计原则(使用简单,那么就容易滥用嘛,所以就很容易在一个类中同时注入多个对象,而这些对象的注入是否有必要?)。
通过setter注入
还是要用@Autowired注解
@Controller
public class UserController {
    // Setter 注入
    private UserService userService;

    @Autowired
    public void setUserService(UserService userService) {
        this.userService = userService;
    }

    public UserInfo add() {
        return userService.doService();
    }
}
优点:完全符合单一职责的设计原则,因为每一个 Setter 只针对一个对象
缺点:
- 不能注入不可变对象(final 修饰的对象(前面已经解释为什么了)
- 注入的对象可被修改。(Setter 注入提供了 setXXX 的方法,意味着你可以在任何时候、在任何地方,通过调用 setXXX 的方法来改变注入对象,所以 Setter 注入的问题是,被注入的对象可能随时被修改)
构造方法注入
还是用@Autowired注解
构造方法注入是 Spring 官方从 4.x 之后推荐的注入方式
@Controller
public class UserController {
    // 构造方法注入
    private UserService userService;

    @Autowired
    public UserController(UserService userService) {
        this.userService = userService;
    }

    public UserInfo add() {
        return userService.doService():
    }
}
优点:
- 可注入不可变对象(因为是在构造方法中赋值)
- 注入对象不会被修改(因为不想setter注入可以随时调用,构造方法在创建对象时只会执行一次)
- 注入对象会被完全初始化(因为依赖对象是在构造方法中执行的,而构造方法是在对象创建之初执行的,因此被注入的对象在使用之前,会被完全初始化)
- 通用性更好,其实就是可移植性好,构造方法注入可适用于任何环境,无论是 IoC 框架还是非 IoC 框架,构造方法注入的代码都是通用的,所以它的通用性更好,因为我们的jdk支持构造方法嘛,所以通用性就不止是在IoC容器里面了


