tensorflow实现猫狗分类器(一)
注:该代码均为在colab上通过挂载谷歌云盘实现,所以目录结构为linux结构。wget在jupyter中需要先安装。from google.colab import files为从谷歌云盘读取文件的代码
1.下载猫狗图片数据集
!wget --no-check-certificate \
  https://storage.googleapis.com/mledu-datasets/cats_and_dogs_filtered.zip \
  -O /tmp/cats_and_dogs_filtered.zip
–2021-09-20 14:17:50-- https://storage.googleapis.com/mledu-datasets/cats_and_dogs_filtered.zip
Resolving storage.googleapis.com (storage.googleapis.com)… 74.125.71.128, 66.102.1.128, 142.250.110.128, …
Connecting to storage.googleapis.com (storage.googleapis.com)|74.125.71.128|:443… connected.
HTTP request sent, awaiting response… 200 OK
Length: 68606236 (65M) [application/zip]
Saving to: ‘/tmp/cats_and_dogs_filtered.zip’
/tmp/cats_and_dogs_ 100%[===================>] 65.43M 205MB/s in 0.3s
2021-09-20 14:17:51 (205 MB/s) - ‘/tmp/cats_and_dogs_filtered.zip’ saved [68606236/68606236]
2.解压缩该文件至相应目录
import os
import zipfile

local_zip = '/tmp/cats_and_dogs_filtered.zip'

zip_ref = zipfile.ZipFile(local_zip, 'r')

zip_ref.extractall('/tmp')
zip_ref.close()
3.设置训练集和验证集目录
base_dir = '/tmp/cats_and_dogs_filtered'

train_dir = os.path.join(base_dir, 'train')
validation_dir = os.path.join(base_dir, 'validation')

# Directory with our training cat/dog pictures
train_cats_dir = os.path.join(train_dir, 'cats')
train_dogs_dir = os.path.join(train_dir, 'dogs')

# Directory with our validation cat/dog pictures
validation_cats_dir = os.path.join(validation_dir, 'cats')
validation_dogs_dir = os.path.join(validation_dir, 'dogs')
4.显示目录下部分图片名称
train_cat_fnames = os.listdir( train_cats_dir )
train_dog_fnames = os.listdir( train_dogs_dir )

print(train_cat_fnames[:10])
print(train_dog_fnames[:10])
[‘cat.504.jpg’, ‘cat.148.jpg’, ‘cat.560.jpg’, ‘cat.506.jpg’, ‘cat.182.jpg’, ‘cat.300.jpg’, ‘cat.178.jpg’, ‘cat.791.jpg’, ‘cat.260.jpg’, ‘cat.328.jpg’]
[‘dog.929.jpg’, ‘dog.725.jpg’, ‘dog.366.jpg’, ‘dog.9.jpg’, ‘dog.521.jpg’, ‘dog.590.jpg’, ‘dog.162.jpg’, ‘dog.492.jpg’, ‘dog.764.jpg’, ‘dog.695.jpg’]
5.打印数据集大小
print('total training cat images :', len(os.listdir( train_cats_dir ) ))
print('total training dog images :', len(os.listdir(  train_dogs_dir ) ))

print('total validation cat images :', len(os.listdir( validation_cats_dir ) ))
print('total validation dog images :', len(os.listdir( validation_dogs_dir ) ))
total training cat images : 1000
total training dog images : 1000
total validation cat images : 500
total validation dog images : 500
6.展示部分图片
%matplotlib inline

import matplotlib.image as mpimg
import matplotlib.pyplot as plt

# Parameters for our graph; we'll output images in a 4x4 configuration
nrows = 4
ncols = 4

pic_index = 0 # Index for iterating over images
# Set up matplotlib fig, and size it to fit 4x4 pics
fig = plt.gcf()
fig.set_size_inches(ncols*4, nrows*4)

pic_index+=8

next_cat_pix = [os.path.join(train_cats_dir, fname)
                for fname in train_cat_fnames[ pic_index-8:pic_index]
               ]

next_dog_pix = [os.path.join(train_dogs_dir, fname)
                for fname in train_dog_fnames[ pic_index-8:pic_index]
               ]

for i, img_path in enumerate(next_cat_pix+next_dog_pix):
  # Set up subplot; subplot indices start at 1
  sp = plt.subplot(nrows, ncols, i + 1)
  sp.axis('Off') # Don't show axes (or gridlines)

  img = mpimg.imread(img_path)
  plt.imshow(img)

plt.show()
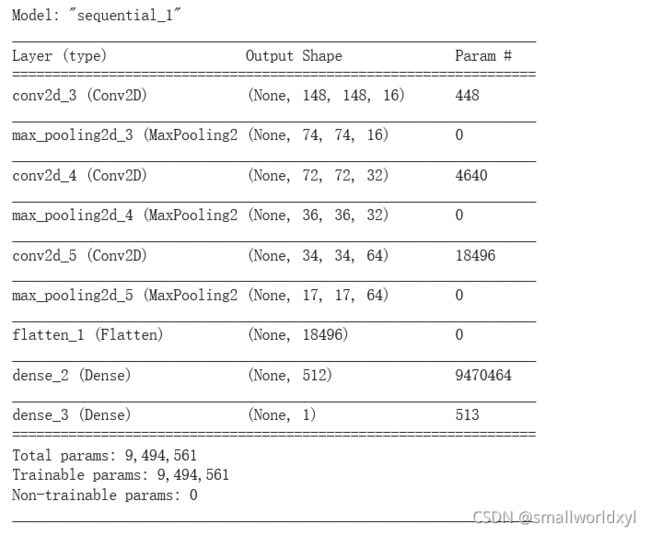
7.搭建网络结构
import tensorflow as tf
model = tf.keras.models.Sequential([
    # Note the input shape is the desired size of the image 150x150 with 3 bytes color
    tf.keras.layers.Conv2D(16, (3,3), activation='relu', input_shape=(150, 150, 3)),
    tf.keras.layers.MaxPooling2D(2,2),
    tf.keras.layers.Conv2D(32, (3,3), activation='relu'),
    tf.keras.layers.MaxPooling2D(2,2),
    tf.keras.layers.Conv2D(64, (3,3), activation='relu'),
    tf.keras.layers.MaxPooling2D(2,2),
    # Flatten the results to feed into a DNN
    tf.keras.layers.Flatten(),
    # 512 neuron hidden layer
    tf.keras.layers.Dense(512, activation='relu'),
    # Only 1 output neuron. It will contain a value from 0-1 where 0 for 1 class ('cats') and 1 for the other ('dogs')
    tf.keras.layers.Dense(1, activation='sigmoid')
])
8.打印网络结构
model.summary()
9. compile网络
from tensorflow.keras.optimizers import RMSprop

model.compile(optimizer=RMSprop(lr=0.001),
              loss='binary_crossentropy',
              metrics = ['acc'])
10.用ImageDataGenerator构造训练集生成器和验证集生成器。
-
因为我们下载的图片没有标签,ImageDataGenerator可以通过设置目录(如:train_dir),将该目录下的子目录的图片的标签映射为该子目录名称,方便我们使用不用去进行标注。

-
因为所有的图片大小不一,但是网络结构要求输入大小统一.利用ImageDataGenerator可以把目录下的所有图片全部进行大小统一化,这里设置target_size=(150,150)将所有图像转为150*150像素。
-
设置batch_size将图片批量送入生成器
-
设置分类模式(该例子为二分类,所以是’binary’)
from tensorflow.keras.preprocessing.image import ImageDataGenerator

//将数据归一化
train_datagen = ImageDataGenerator( rescale = 1.0/255. )
test_datagen  = ImageDataGenerator( rescale = 1.0/255. )

# --------------------
# Flow training images in batches of 20 using train_datagen generator
# --------------------
train_generator = train_datagen.flow_from_directory(train_dir,
            batch_size=20,
            class_mode='binary',
            target_size=(150, 150))
# --------------------
# Flow validation images in batches of 20 using test_datagen generator
# --------------------
validation_generator =  test_datagen.flow_from_directory(validation_dir,
           batch_size=20,
           class_mode  = 'binary',
           target_size = (150, 150))
Found 2000 images belonging to 2 classes.
Found 1000 images belonging to 2 classes.
11.训练
history = model.fit_generator(train_generator,
                              validation_data=validation_generator,
                              steps_per_epoch=100,
                              epochs=15,
                              validation_steps=50,
                              verbose=2)
Epoch 1/15
100/100 - 42s - loss: 0.7873 - acc: 0.5630 - val_loss: 0.6699 - val_acc: 0.6560
Epoch 2/15
100/100 - 10s - loss: 0.6742 - acc: 0.6385 - val_loss: 0.6189 - val_acc: 0.6880
Epoch 3/15
100/100 - 10s - loss: 0.5970 - acc: 0.7015 - val_loss: 0.6700 - val_acc: 0.6600
Epoch 4/15
100/100 - 10s - loss: 0.4974 - acc: 0.7600 - val_loss: 0.5941 - val_acc: 0.6960
Epoch 5/15
100/100 - 10s - loss: 0.4159 - acc: 0.8010 - val_loss: 1.3906 - val_acc: 0.5740
Epoch 6/15
100/100 - 10s - loss: 0.3159 - acc: 0.8620 - val_loss: 0.7493 - val_acc: 0.6770
Epoch 7/15
100/100 - 10s - loss: 0.2463 - acc: 0.9035 - val_loss: 0.7172 - val_acc: 0.7290
Epoch 8/15
100/100 - 12s - loss: 0.1605 - acc: 0.9405 - val_loss: 1.1974 - val_acc: 0.7010
Epoch 9/15
100/100 - 10s - loss: 0.1151 - acc: 0.9575 - val_loss: 1.1214 - val_acc: 0.7290
Epoch 10/15
100/100 - 10s - loss: 0.0880 - acc: 0.9650 - val_loss: 1.2706 - val_acc: 0.7250
Epoch 11/15
100/100 - 10s - loss: 0.0728 - acc: 0.9735 - val_loss: 1.3683 - val_acc: 0.7220
Epoch 12/15
100/100 - 10s - loss: 0.0555 - acc: 0.9840 - val_loss: 1.7307 - val_acc: 0.7340
Epoch 13/15
100/100 - 10s - loss: 0.0487 - acc: 0.9840 - val_loss: 1.7929 - val_acc: 0.7270
Epoch 14/15
100/100 - 10s - loss: 0.0524 - acc: 0.9895 - val_loss: 1.9813 - val_acc: 0.7130
Epoch 15/15
100/100 - 10s - loss: 0.0720 - acc: 0.9890 - val_loss: 1.4722 - val_acc: 0.6920
12. 打印loss和acc
acc      = history.history[     'acc' ]
val_acc  = history.history[ 'val_acc' ]
loss     = history.history[    'loss' ]
val_loss = history.history['val_loss' ]

epochs   = range(len(acc)) # Get number of epochs

# Plot training and validation accuracy per epoch
plt.plot  ( epochs,     acc )
plt.plot  ( epochs, val_acc )
plt.title ('Training and validation accuracy')
plt.figure()

# Plot training and validation loss per epoch
plt.plot  ( epochs,     loss )
plt.plot  ( epochs, val_loss )
plt.title ('Training and validation loss'   )

可以看到虽然在训练集上准去率不断提高,误差减小。但是验证集上误差先减小后增大存在过拟合现象。
13.用训练好的模型测试图片
import numpy as np

from google.colab import files
from keras.preprocessing import image

uploaded=files.upload()

for fn in uploaded.keys():

  # predicting images
  path='/content/sample_data/cat_dog_test/' + fn
  img=image.load_img(path, target_size=(150, 150))

  x=image.img_to_array(img)
  x=np.expand_dims(x, axis=0)
  images = np.vstack([x])

  classes = model.predict(images, batch_size=10)

  print(classes[0])

  if classes[0]>0:
    print(fn + " is a dog")

  else:
    print(fn + " is a cat")
这里我从百度图片下载两张全新的图片,命名为cat.png和dog.png并上传至云盘/content/sample_data/cat_dog_test/目录下


