【YOLOX 论文+源码解读】YOLOX: Exceeding YOLO Series in 2021
目录
- 前言
- 一、整体网络架构
- 二、改进点
-
- 1.1、解耦头
- 1.2、Anchor Free
- 1.3、SimOTA
- 三、源码解析
-
- 3.1、Backbone
- 3.2、Neck
- 3.3、head
- 3.4、预测:decode_outputs
- 3.5、训练:get_losses
-
- 3.5.1、准备工作:get_output_and_grid
- 3.5.2、get_losses函数:计算损失
- 3.5.3、get_assignments函数:正负样本匹配
- 3.5.4、get_in_boxes_info函数:确定候选框
- 3.5.5、dynamic_k_matching函数:确定每个gt的dynamic_k
- 四、总结
- Reference
前言
论文地址: https://arxiv.org/abs/2107.08430
源码地址:https://github.com/Megvii-BaseDetection/YOLOX
想要看懂源码,必须先把源码跑起来,网上这方面的教程很多,我就不重复造轮子了,这里我找了几个不错的b站教程,可以看看:
- 训练自己的VOC格式数据集: YOLO-X(yolox)训练自己的数据集
- 训练自己的COCO格式数据集: 【扫盲】YOLOX训练
原理部分不懂的,强烈推荐b站我导: 霹雳吧啦Wz-YOLOX网络详解,讲解的非常好,我的视觉代码入门就是看他的。
最后,我也把注释版的源码分享在我的github,欢迎大家Star: https://github.com/HuKai97/YOLOX-Annotations
好了,废话不多说,开搞!
一、整体网络架构
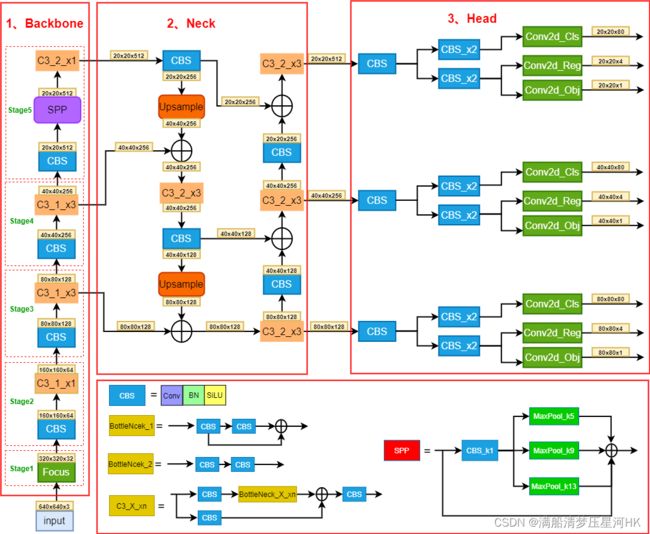
整个YOLOX是以YOLOv5-v5.0网络为基础改进的(在网络结构上,主要的改进点在head):
- backbone部分和YOLOv5-v5.0很像,沿用了Focus,不过各个阶段的bottleneck叠加的次数不太一样,而且spp层摆放的位置也有差别;
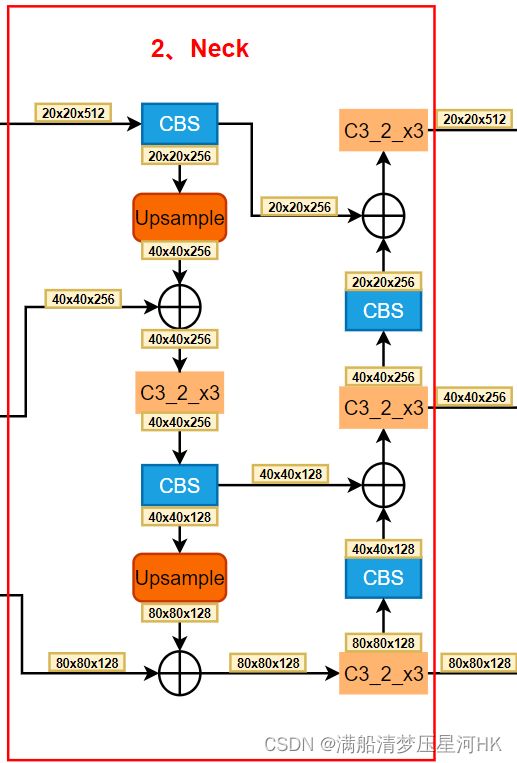
- neck部分完全一样,还是使用的PAFPN;
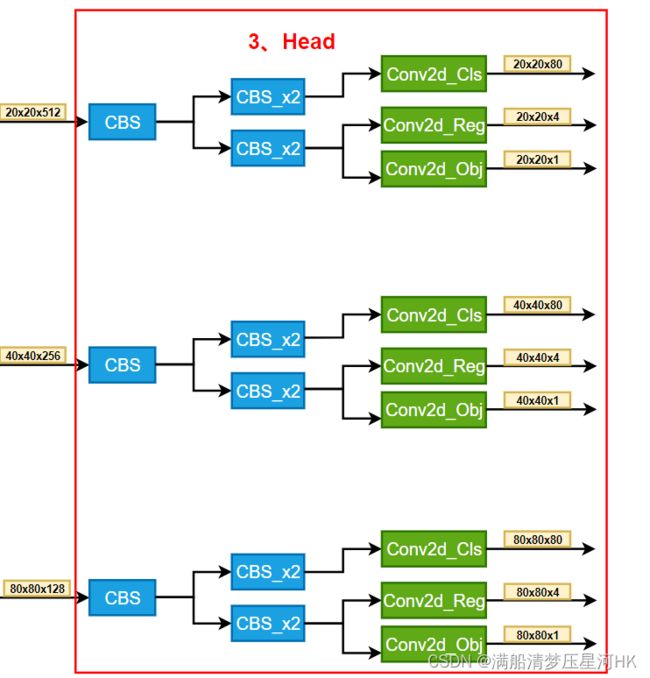
- head部分改动很大,YOLOv5的head就是一个1x1Conv,直接预测3个anchor的每个类别的概率和边界框回归参数。但是YOLOX使用的是decoupled detection head解耦头,把检测和分类问题分开处理(实验结构解耦头收敛更快且效果更好)
二、改进点
1.1、解耦头
YOLOv5的head是一个1x1卷积,直接回归出类别、置信度、边界框回归参数等信息。
YOLOX具体的head结构类别、置信度、边界框回归参数分开进行预测,各个head参数不共享。具体的结构可以看上面的结构图。
1.2、Anchor Free
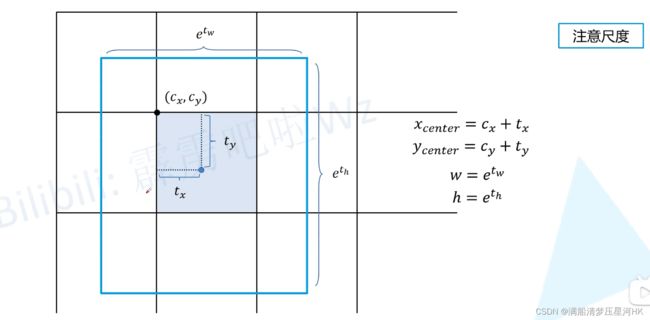
如下图为YOLOX的边界框回归解码公式:

针对每个grid cell都会预测4个参数:相对网格左上方的x偏移量( t x t_x tx)、y偏移量( t y t_y ty)、w回归参数( t w t_w tw)、h回归参数( t h t_h th),再带入公式,得到最终的相对当前特征图的边界框(xywh)。注意这里和其他的YOLO系列的区别是,在根据wh回归参数计算wh坐标的时候,是不需要预先设置的anchor的w和h的,是和anchor无关的。
1.3、SimOTA
将匹配正负样本的过程看成一个最优传输问题。
步骤:
- 确定正样本候选区域(使用中心先验);
- 计算每个anchor point和每个gt的iou矩阵;
- 计算每个anchor point和每个gt的cost矩阵,cost = Reg + Cls Loss;
- 使用iou矩阵,确定每个gt的dynamic_k;
a、获取与当前GT的iou最大的前10个样本;
b、将这TOP10样本的iou求和取整,就是当前GT的dynamic_k,而且dynamic_k大于等于1; - 为每个gt取cost排名最小的前dynamic_k个anchor point作为正样本,其他作为负样本;
- 最后再人工去除同一个样本被分配到多个GT作为正样本的情况(最小化cost原则);
三、源码解析
关于SPP、Bottleneck、Focus等源码在yolox/models/network_blocks.py中,yolov5中也已经讲过,不再赘述。
3.1、Backbone
Backbone用的是darknet,和yolov5很像,只是bottleneck重复次数和spp结构位置发生了改变,其他的部分一模一样。整体包括stem(Focus) + dark2 + dark3 + dark4 + dark5 五个stage。最终输入dark3 + dark4 + dark5 这三个stage的输出,作为neck的输入特征,shape分别是:dark2=[bs,128,w/8,h/8]、 dark3=[bs,256,w/16,h/16] 、dark4=[bs,512,w/32,h/32]。
具体代码见 yolox/models/darknet.py:
class CSPDarknet(nn.Module):
    def __init__(self, dep_mul, wid_mul, out_features=("dark3", "dark4", "dark5"), depthwise=False, act="silu"):
        """
        :param dep_mul: 确定网络的深度  卷积的个数  0.33
        :param wid_mul: 确定网络的宽度  通道数     0.5
        :param out_features: backbone输出的三个特征名
        :param depthwise: 是否使用深度可分离卷积  默认False
        :param act: 激活函数 默认silu
        """
        super().__init__()
        assert out_features, "please provide output features of Darknet"
        self.out_features = out_features  # ("dark3", "dark4", "dark5")
        Conv = DWConv if depthwise else BaseConv  # BaseConv = nn.Conv2d + bn + silu

        base_channels = int(wid_mul * 64)          # 32  stem输出的特征channel数
        base_depth = max(round(dep_mul * 3), 1)    # 1   bottleneck卷积个数

        # stem  [bs,3,w,h] -> [bs,32,w/2,h/2]
        self.stem = Focus(3, base_channels, ksize=3, act=act)

        # dark2 = Conv + CSPLayer
        self.dark2 = nn.Sequential(
            Conv(base_channels, base_channels * 2, 3, 2, act=act),  # [bs,32,w/2,h/2] -> [bs,64,w/4,h/4]
            CSPLayer(                                               # [bs,64,w/4,h/4] -> [bs,64,w/4,h/4]
                base_channels * 2,
                base_channels * 2,
                n=base_depth,            # 1个bottleneck
                depthwise=depthwise,     # False
                act=act,                 # silu
            ),
        )

        # dark3 = Conv + 3 * CSPLayer
        self.dark3 = nn.Sequential(
            Conv(base_channels * 2, base_channels * 4, 3, 2, act=act),  # [bs,64,w/4,h/4] -> [bs,128,w/8,h/8]
            CSPLayer(                                                   # [bs,128,w/8,h/8] -> [bs,128,w/8,h/8]
                base_channels * 4,
                base_channels * 4,
                n=base_depth * 3,         # 3个bottleneck
                depthwise=depthwise,      # False
                act=act,                  # silu
            ),
        )

        # dark4 = Conv + 3 * CSPLayer
        self.dark4 = nn.Sequential(
            Conv(base_channels * 4, base_channels * 8, 3, 2, act=act),  # [bs,128,w/8,h/8] -> [bs,256,w/16,h/16]
            CSPLayer(                                                   # [bs,256,w/16,h/16] -> [bs,256,w/16,h/16]
                base_channels * 8,
                base_channels * 8,
                n=base_depth * 3,      # 3个bottleneck
                depthwise=depthwise,   # False
                act=act,               # silu
            ),
        )

        # dark5 Conv + SPPBottleneck + CSPLayer
        self.dark5 = nn.Sequential(
            Conv(base_channels * 8, base_channels * 16, 3, 2, act=act),             # [bs,256,w/16,h/16] -> [bs,512,w/32,h/32]
            SPPBottleneck(base_channels * 16, base_channels * 16, activation=act),  # [bs,512,w/32,h/32] -> [bs,512,w/32,h/32]
            CSPLayer(                                                               # [bs,512,w/32,h/32] -> [bs,512,w/32,h/32]
                base_channels * 16,
                base_channels * 16,
                n=base_depth,         # 1个bottleneck
                shortcut=False,       # 没有shortcut
                depthwise=depthwise,  # False
                act=act,              # silu
            ),
        )

    def forward(self, x):
        # x: [bs,3,w,h]
        outputs = {}
        # [bs,3,w,h] -> [bs,32,w/2,h/2]
        x = self.stem(x)
        outputs["stem"] = x
        # [bs,32,w/2,h/2] -> [bs,64,w/4,h/4]
        x = self.dark2(x)
        outputs["dark2"] = x
        # [bs,64,w/4,h/4] -> [bs,128,w/8,h/8]
        x = self.dark3(x)
        outputs["dark3"] = x
        # [bs,128,w/8,h/8] -> [bs,256,w/16,h/16]
        x = self.dark4(x)
        outputs["dark4"] = x
        # [bs,256,w/16,h/16] -> [bs,512,w/32,h/32]
        x = self.dark5(x)
        outputs["dark5"] = x
        # 输出:dark2=[bs,128,w/8,h/8]  dark3=[bs,256,w/16,h/16]  dark4=[bs,512,w/32,h/32]
        return {k: v for k, v in outputs.items() if k in self.out_features}
3.2、Neck
neck用的还是yolov5的PAFPN,输入backbone输出的三个尺度的特征:dark2=[bs,128,w/8,h/8]、 dark3=[bs,256,w/16,h/16] 、dark4=[bs,512,w/32,h/32]。先后经过两次上采样和两次下采样,最终生成3个不同尺度的预测特征层:0=[bs,128,h/8,w/8]、 1=[bs,256,h/16,w/16] 、2=[bs,512,h/32,w/32]。
具体代码见yolox/models/yolo_pafpn.py:
class YOLOPAFPN(nn.Module):
    """
    YOLOv3 model. Darknet 53 is the default backbone of this model.
    """
    def __init__(self, depth=1.0, width=1.0, in_features=("dark3", "dark4", "dark5"),
                 in_channels=[256, 512, 1024], depthwise=False, act="silu"):
        """
        :param depth: 确定网络的深度系数  卷积的个数  0.33
        :param width: 确定网络的宽度系数  通道数     0.5
        :param in_features: backbone输出的三个特征名
        :param in_channels: backbone输出 并 传入head三个特征的channel
        :param depthwise: 是否使用深度可分离卷积  默认False
        :param act: 激活函数 默认silu
        """
        super().__init__()  # 继承父类的init方法
        # 创建backbone
        self.backbone = CSPDarknet(depth, width, depthwise=depthwise, act=act)
        self.in_features = in_features  # ("dark3", "dark4", "dark5")
        self.in_channels = in_channels  # [256, 512, 1024]
        Conv = DWConv if depthwise else BaseConv

        # 上采样1
        self.upsample = nn.Upsample(scale_factor=2, mode="nearest")
        self.lateral_conv0 = BaseConv(   # 512 -> 256
            int(in_channels[2] * width), int(in_channels[1] * width), 1, 1, act=act
        )
        # upsample + concat -> 512
        self.C3_p4 = CSPLayer(    # 512 -> 256
            int(2 * in_channels[1] * width),
            int(in_channels[1] * width),
            round(3 * depth),
            False,
            depthwise=depthwise,
            act=act,
        )

        # 上采样2
        self.reduce_conv1 = BaseConv(   # 256 -> 128
            int(in_channels[1] * width), int(in_channels[0] * width), 1, 1, act=act
        )
        # upsample + concat -> 256
        self.C3_p3 = CSPLayer(     # 256 -> 128
            int(2 * in_channels[0] * width),
            int(in_channels[0] * width),
            round(3 * depth),
            False,
            depthwise=depthwise,
            act=act,
        )

        # 下采样1  bottom-up conv
        self.bu_conv2 = Conv(  # 128 -> 128  3x3conv s=2
            int(in_channels[0] * width), int(in_channels[0] * width), 3, 2, act=act
        )
        # concat 128 -> 256
        self.C3_n3 = CSPLayer(   # 256 -> 256
            int(2 * in_channels[0] * width),
            int(in_channels[1] * width),
            round(3 * depth),
            False,
            depthwise=depthwise,
            act=act,
        )

        # 上采样2  bottom-up conv
        self.bu_conv1 = Conv(  # 256 -> 256   3x3conv s=2
            int(in_channels[1] * width), int(in_channels[1] * width), 3, 2, act=act
        )
        # concat 256 -> 512
        self.C3_n4 = CSPLayer(   # 512 -> 512
            int(2 * in_channels[1] * width),
            int(in_channels[2] * width),
            round(3 * depth),
            False,
            depthwise=depthwise,
            act=act,
        )

    def forward(self, input):
        """
        :param input: 一个batch的输入图片 [bs,3,h,w]
        :return outputs: {tuple:3}  neck输出3个不同尺度的预测特征层
                         0=[bs,128,h/8,w/8]  1=[bs,256,h/16,w/16]  2=[bs,512,h/32,w/32]
        """
        # backbone  {dict:3}
        # 'dark3'=[bs,128,h/8,w/8]  'dark4'=[bs,256,h/16,w/16]  'dark5'=[bs,512,h/32,w/32]
        out_features = self.backbone(input)
        # list:3  [bs,128,h/8,w/8]  [bs,256,h/16,w/16]  [bs,512,h/32,w/32]
        features = [out_features[f] for f in self.in_features]
        # x0=[bs,512,h/32,w/32]   x1=[bs,256,h/16,w/16]  x2=[bs,128,h/8,w/8]
        [x2, x1, x0] = features

        # 上采样1
        # [bs,512,h/32,w/32] -> [bs,256,h/32,w/32]
        fpn_out0 = self.lateral_conv0(x0)
        # [bs,256,h/32,w/32] -> [bs,256,h/16,w/16]
        f_out0 = self.upsample(fpn_out0)
        # [bs,256,h/16,w/16] cat [bs,256,h/16,w/16] -> [bs,512,h/16,w/16]
        f_out0 = torch.cat([f_out0, x1], 1)
        # [bs,512,h/16,w/16] -> [bs,256,h/16,w/16]
        f_out0 = self.C3_p4(f_out0)

        # 上采样2
        # [bs,256,h/16,w/16] -> [bs,128,h/16,w/16]
        fpn_out1 = self.reduce_conv1(f_out0)
        # [bs,128,h/16,w/16] -> [bs,128,h/8,w/8]
        f_out1 = self.upsample(fpn_out1)
        # [bs,128,h/8,w/8] cat [bs,128,h/8,w/8] -> [bs,256,h/8,w/8]
        f_out1 = torch.cat([f_out1, x2], 1)
        # [bs,256,h/8,w/8] -> [bs,128,h/8,w/8]
        pan_out2 = self.C3_p3(f_out1)

        # 下采样1
        # [bs,128,h/8,w/8] -> [bs,128,h/16,w/16]
        p_out1 = self.bu_conv2(pan_out2)
        # [bs,128,h/16,w/16] cat [bs,128,h/16,w/16] -> [bs,256,h/16,w/16]
        p_out1 = torch.cat([p_out1, fpn_out1], 1)
        # [bs,256,h/16,w/16] -> [bs,256,h/16,w/16]
        pan_out1 = self.C3_n3(p_out1)

        # 下采样2
        # [bs,256,h/16,w/16] -> [bs,256,h/32,w/32]
        p_out0 = self.bu_conv1(pan_out1)
        # [bs,256,h/32,w/32] cat [bs,256,h/32,w/32] -> [bs,512,h/32,w/32]
        p_out0 = torch.cat([p_out0, fpn_out0], 1)
        # [bs,512,h/32,w/32] -> [bs,512,h/32,w/32]
        pan_out0 = self.C3_n4(p_out0)

        outputs = (pan_out2, pan_out1, pan_out0)

        # {tuple:3}  neck输出3个不同尺度的预测特征层
        # 0=[bs,128,h/8,w/8]  1=[bs,256,h/16,w/16]  2=[bs,512,h/32,w/32]
        return outputs
3.3、head
head部分的代码比较简单,最终得到3个预测特征层的输出特征{list:3}:0=[bs,4+1+num_classes,h/8,w/8] 1=[bs,num_classes+4+1,h/16,w/16] 2=[bs,4+1+num_classes,h/32,w/32]
class YOLOXHead(nn.Module):
    def __init__(self, num_classes, width=1.0, strides=[8, 16, 32],
                 in_channels=[256, 512, 1024], act="silu", depthwise=False):
        """
        :param num_classes: 预测类别数
        :param width: 确定网络的宽度系数  通道数系数   0.5
        :param strides: 三个预测特征层的下采样系数 [8, 16, 32]
        :param in_channels: [256, 512, 1024]
        :param act: 激活函数 默认silu
        :param depthwise: 是否使用深度可分离卷积 False
        """
        super().__init__()

        self.n_anchors = 1  # anchor free 每个网格只需要预测1个框
        self.num_classes = num_classes  # 分类数
        self.decode_in_inference = True  # for deploy, set to False

        # 初始化
        self.cls_convs = nn.ModuleList()  # CBL+CBL
        self.reg_convs = nn.ModuleList()  # CBL+CBL
        self.cls_preds = nn.ModuleList()  # Conv
        self.reg_preds = nn.ModuleList()  # Conv
        self.obj_preds = nn.ModuleList()  # Conv
        self.stems = nn.ModuleList()      # BaseConv
        Conv = DWConv if depthwise else BaseConv

        # 遍历三个尺度
        for i in range(len(in_channels)):
            # stem = BaseConv x 3个尺度
            self.stems.append(
                BaseConv(  # 1x1conv
                    in_channels=int(in_channels[i] * width),
                    out_channels=int(256 * width),
                    ksize=1,
                    stride=1,
                    act=act,
                )
            )
            # cls_convs = (CBL+CBL) x 3个尺度
            self.cls_convs.append(
                nn.Sequential(
                    *[
                        Conv(
                            in_channels=int(256 * width),
                            out_channels=int(256 * width),
                            ksize=3,
                            stride=1,
                            act=act,
                        ),
                        Conv(
                            in_channels=int(256 * width),
                            out_channels=int(256 * width),
                            ksize=3,
                            stride=1,
                            act=act,
                        ),
                    ]
                )
            )
            # reg_convs = (CBL+CBL) x 3个尺度
            self.reg_convs.append(
                nn.Sequential(
                    *[
                        Conv(
                            in_channels=int(256 * width),
                            out_channels=int(256 * width),
                            ksize=3,
                            stride=1,
                            act=act,
                        ),
                        Conv(
                            in_channels=int(256 * width),
                            out_channels=int(256 * width),
                            ksize=3,
                            stride=1,
                            act=act,
                        ),
                    ]
                )
            )
            # cls_preds = Conv x 3个尺度
            self.cls_preds.append(
                nn.Conv2d(
                    in_channels=int(256 * width),
                    out_channels=self.n_anchors * self.num_classes,
                    kernel_size=1,
                    stride=1,
                    padding=0,
                )
            )
            # reg_preds = Conv x 3个尺度
            self.reg_preds.append(
                nn.Conv2d(
                    in_channels=int(256 * width),
                    out_channels=4,
                    kernel_size=1,
                    stride=1,
                    padding=0,
                )
            )
            # obj_preds = Conv x 3个尺度
            self.obj_preds.append(
                nn.Conv2d(
                    in_channels=int(256 * width),
                    out_channels=self.n_anchors * 1,
                    kernel_size=1,
                    stride=1,
                    padding=0,
                )
            )

        self.use_l1 = False   # 默认False
        # 初始化三个损失函数
        self.l1_loss = nn.L1Loss(reduction="none")
        self.bcewithlog_loss = nn.BCEWithLogitsLoss(reduction="none")
        self.iou_loss = IOUloss(reduction="none")
        self.strides = strides  # 三个特征层的下采样率 8 16 32
        self.grids = [torch.zeros(1)] * len(in_channels)  # 初始化每个特征层的每个网格的左上角坐标

    def initialize_biases(self, prior_prob):
        for conv in self.cls_preds:
            b = conv.bias.view(self.n_anchors, -1)
            b.data.fill_(-math.log((1 - prior_prob) / prior_prob))
            conv.bias = torch.nn.Parameter(b.view(-1), requires_grad=True)

        for conv in self.obj_preds:
            b = conv.bias.view(self.n_anchors, -1)
            b.data.fill_(-math.log((1 - prior_prob) / prior_prob))
            conv.bias = torch.nn.Parameter(b.view(-1), requires_grad=True)

    def forward(self, xin, labels=None, imgs=None):
        """
        :param xin: {tuple:3} neck输出3个不同尺度的预测特征层
                    0=[bs,128,h/8,w/8]  1=[bs,256,h/16,w/16]  2=[bs,512,h/32,w/32]
        :param labels: [bs,120,cls+xywh]
        :param imgs: [bs,3,w,h]
        :return:
        """
        outputs = []
        origin_preds = []
        x_shifts = []
        y_shifts = []
        expanded_strides = []

        # 分别遍历3个层预测特征层  下面以第一层预测进行分析
        for k, (cls_conv, reg_conv, stride_this_level, x) in enumerate(
            zip(self.cls_convs, self.reg_convs, self.strides, xin)):
            x = self.stems[k](x)   # 1x1 Conv [bs,128,h/8,w/8] -> [bs,128,h/8,w/8]
            cls_x = x              # [bs,128,h/8,w/8]
            reg_x = x              # [bs,128,h/8,w/8]

            cls_feat = cls_conv(cls_x)  # 2xCLB 3x3Conv s=1  [bs,128,h/8,w/8] -> [bs,128,h/8,w/8] -> [bs,128,h/8,w/8]
            cls_output = self.cls_preds[k](cls_feat)  # [bs,128,h/8,w/8] -> [bs,num_classes,h/8,w/8]

            reg_feat = reg_conv(reg_x)  # 2xCLB 3x3Conv s=1  [bs,128,h/8,w/8] -> [bs,128,h/8,w/8] -> [bs,128,h/8,w/8]
            reg_output = self.reg_preds[k](reg_feat)  # [bs,128,h/8,w/8] -> [bs,4(xywh),h/8,w/8]
            obj_output = self.obj_preds[k](reg_feat)  # [bs,128,h/8,w/8] -> [bs,1,h/8,w/8]

            if self.training:
                # [bs,4(xywh),h/8,w/8] [bs,1,h/8,w/8] [bs,num_classes,h/8,w/8] -> [bs,4+1+num_classes,h/8,w/8]
                output = torch.cat([reg_output, obj_output, cls_output], 1)
                # 将当前特征层每个网格的预测输出解码到相对原图上  并得到每个网格的左上角坐标
                # output: 当前特征层的每个网格的解码预测输出 [bs, 80x80, xywh(相对原图)+1+num_classes]
                # grid: 当前特征层每个网格的左上角坐标 [1, 80x80, wh]
                output, grid = self.get_output_and_grid(
                    output, k, stride_this_level, xin[0].type()
                )
                x_shifts.append(grid[:, :, 0])  # 得到3个特征层每个网格的左上角x坐标  [1,80x80] [1,40x40] [1,20x20]
                y_shifts.append(grid[:, :, 1])  # 得到3个特征层每个网格的左上角y坐标  [1,80x80] [1,40x40] [1,20x20]
                expanded_strides.append(        # 得到当前特征层每个网格的步长  [1,80x80]全是8 [1,40x40]全是16 [1,20x20]全是32
                    torch.zeros(1, grid.shape[1])
                    .fill_(stride_this_level)
                    .type_as(xin[0])
                )
                if self.use_l1:   # 默认False
                    batch_size = reg_output.shape[0]
                    hsize, wsize = reg_output.shape[-2:]
                    reg_output = reg_output.view(
                        batch_size, self.n_anchors, 4, hsize, wsize
                    )
                    reg_output = reg_output.permute(0, 1, 3, 4, 2).reshape(
                        batch_size, -1, 4
                    )
                    origin_preds.append(reg_output.clone())
            else:
                # [bs,4(xywh),h/8,w/8] [bs,1,h/8,w/8] [bs,num_classes,h/8,w/8] -> [bs,4+1+num_classes,h/8,w/8]
                output = torch.cat([reg_output, obj_output.sigmoid(), cls_output.sigmoid()], 1)

            outputs.append(output)

        # 【预测阶段】
        # outputs: {list:3}  注意这里得到的4 xywh都是预测的边界框回归参数
        #          0=[bs,4+1+num_classes,h/8,w/8]  1=[bs,num_classes+4+1,h/16,w/16]  2=[bs,4+1+num_classes,h/32,w/32]
        # 【训练阶段】
        # outputs: {list:3}  注意这里得到的4 xywh都是解码后的相对原图的边界框坐标
        # 0=[bs,h/8xw/8,4+1+num_classes] 1=[bs,h/16xw/16,4+1+num_classes] 2=[bs,h/32xw/32,4+1+num_classes]

        if self.training:
            return self.get_losses(imgs, x_shifts, y_shifts, expanded_strides,
                                   labels, torch.cat(outputs, 1), origin_preds, dtype=xin[0].dtype)
        else:
            # {list:3} 0=[h/8,w/8]  1=[h/16,w/16]  2=[h/32,w/32]
            self.hw = [x.shape[-2:] for x in outputs]
            # [bs, n_anchors_all, 4+1+num_classes] = [bs,h/8*w/8 + h/16*w/16 + h/32*w/32, 4+1+num_classes]
            outputs = torch.cat(
                [x.flatten(start_dim=2) for x in outputs], dim=2
            ).permute(0, 2, 1)
            # 解码
            # [bs, n_anchors_all, 4(预测的回归参数)+1+num_classes] -> [bs, n_anchors_all, 4(相对原图的坐标)+1+num_classes]
            if self.decode_in_inference:
                return self.decode_outputs(outputs, dtype=xin[0].type())
            else:
                return outputs
3.4、预测:decode_outputs
预测阶段,根据之前head输出的结果(预测的回归参数、置信度和类别分数),进行解码,转换为相对原图的框坐标为:
		# 【预测阶段】
        # outputs: {list:3}  注意这里得到的4 xywh都是预测的边界框回归参数
        #          0=[bs,4+1+num_classes,h/8,w/8]  1=[bs,num_classes+4+1,h/16,w/16]  2=[bs,4+1+num_classes,h/32,w/32]
        # 【训练阶段】
        # outputs: {list:3}  注意这里得到的4 xywh都是解码后的相对原图的边界框坐标
        # 0=[bs,h/8xw/8,4+1+num_classes] 1=[bs,h/16xw/16,4+1+num_classes] 2=[bs,h/32xw/32,4+1+num_classes]

        if self.training:
            return self.get_losses...
        else:
            self.hw = [x.shape[-2:] for x in outputs]  # {list:3} 0=[h/8,w/8]  1=[h/16,w/16]  2=[h/32,w/32]
            # [bs, n_anchors_all, 4+1+num_classes] = [bs,h/8*w/8 + h/16*w/16 + h/32*w/32, 4+1+num_classes]
            outputs = torch.cat(
                [x.flatten(start_dim=2) for x in outputs], dim=2
            ).permute(0, 2, 1)
            # 解码
            # [bs, n_anchors_all, 4(预测的回归参数)+1+num_classes] -> [bs, n_anchors_all, 4(相对原图的坐标)+1+num_classes]
            if self.decode_in_inference:
                return self.decode_outputs(outputs, dtype=xin[0].type())
            else:
                return outputs
	 def decode_outputs(self, outputs, dtype):
        """
        :param outputs: [bs, n_anchors_all, 4(预测的回归参数)+1+num_classes]
        :param dtype: 'torch.FloatTensor'
        :return outputs: [bs, n_anchors_all, 4(相对原图的坐标)+1+num_classes]
        """
        grids = []
        strides = []
        for (hsize, wsize), stride in zip(self.hw, self.strides):
            yv, xv = meshgrid([torch.arange(hsize), torch.arange(wsize)])
            grid = torch.stack((xv, yv), 2).view(1, -1, 2)
            grids.append(grid)
            shape = grid.shape[:2]
            strides.append(torch.full((*shape, 1), stride))

        grids = torch.cat(grids, dim=1).type(dtype)  # 得到每一层的每个网格左上角的坐标
        strides = torch.cat(strides, dim=1).type(dtype)  # 每一层的步长

        # 相对原图的xy = (网格左上角坐标 + 预测的xy偏移量) * 当前层stride
        # 相对原图的wh = e^(预测wh回归参数) * 当前层stride
        outputs = torch.cat([
            (outputs[..., 0:2] + grids) * strides,
            torch.exp(outputs[..., 2:4]) * strides,
            outputs[..., 4:]
        ], dim=-1)
        return outputs
然后再把解码的结果,送入nms等后处理即可。
3.5、训练:get_losses
3.5.1、准备工作:get_output_and_grid
先进行一些准备工作,把三个head输出的特征图进行解码到相对原图坐标output,并得到3个特征图上每个网格左上角x坐标x_shifts、左上角y坐标y_shifts:
    def get_output_and_grid(self, output, k, stride, dtype):
        """
        :param output: 网络预测的结果 [bs, xywh(回归参数)+1+num_classes, 80, 80]
        :param k: 第k层预测特征层  0
        :param stride: 当前层stride  8
        :param dtype: 'torch.cuda.HalfTensor'
        :return output: 当前特征层的每个网格的解码预测输出 [bs, 80x80, xywh(相对原图)+1+num_classes]
        :return grid: 当前特征层每个网格的左上角坐标 [1, 80x80, hw]
        """
        grid = self.grids[k]

        batch_size = output.shape[0]
        n_ch = 5 + self.num_classes
        hsize, wsize = output.shape[-2:]  # 特征层h w
        # 生成当前特征层上每个网格的左上角坐标 self.grids[0]=[1,1,80,80,2(hw)]
        if grid.shape[2:4] != output.shape[2:4]:
            yv, xv = meshgrid([torch.arange(hsize), torch.arange(wsize)])
            grid = torch.stack((xv, yv), 2).view(1, 1, hsize, wsize, 2).type(dtype)
            self.grids[k] = grid

        # [bs,xywh(回归参数)+1+num_classes,80,80] -> [bs,1,xywh(回归参数)+1+num_classes,80,80]
        output = output.view(batch_size, self.n_anchors, n_ch, hsize, wsize)
        # [bs,1,xywh(回归参数)+1+num_classes,80,80] -> [bs,1,80,80,xywh(回归参数)+1+num_classes] -> [bs,1x80x80,xywh(回归参数)+1+num_classes]
        output = output.permute(0, 1, 3, 4, 2).reshape(
            batch_size, self.n_anchors * hsize * wsize, -1
        )

        # [1,1,80,80,2(hw)] -> [1, 1x80x80, 2(hw)]
        grid = grid.view(1, -1, 2)

        # 解码
        # 相对原图的xy = (网格左上角坐标 + 预测的xy偏移量) * 当前层stride
        # 相对原图的wh = e^(预测wh回归参数) * 当前层stride
        output[..., :2] = (output[..., :2] + grid) * stride
        output[..., 2:4] = torch.exp(output[..., 2:4]) * stride
        return output, grid
再调用get_losses函数:
        if self.training:
            return self.get_losses(imgs, x_shifts, y_shifts, expanded_strides,
                                   labels, torch.cat(outputs, 1), origin_preds, dtype=xin[0].dtype)
        else:
        	...
3.5.2、get_losses函数:计算损失
主要步骤:
- 准备SimOTA匹配所需要的数据;
- 遍历每一张图片,调用get_assignments函数,为每一张图片进行正负样本匹配;
- 根据正负样本匹配结果计算loss,loss计算公式:

其中: λ \lambda λ源码中=5.0、 N p o s N_pos Npos表示被分为正样本的Anchor point数;分类损失和置信度损失都是交叉熵损失,回顾损失是iou损失;分类损失和回顾损失只计算所有正样本的损失,而置信度损失需要计算正样本+负样本=所有anchor point的损失。
    def get_losses(self, imgs, x_shifts, y_shifts, expanded_strides, labels, outputs, origin_preds, dtype):
        """
        :param imgs: 一个batch的图片[bs,3,h,w]
        :param x_shifts: 3个特征图每个网格左上角的x坐标 {list:3} 0=[1,h/8xw/8]  1=[1,h/16xw/16]  2=[1,h/32xw/32]
        :param y_shifts: 3个特征图每个网格左上角的y坐标 {list:3} 0=[1,h/8xw/8]  1=[1,h/16xw/16]  2=[1,h/32xw/32]
        :param expanded_strides: 3个特征图每个网格对应的stride {list:3} 0=[1,h/8xw/8]全是8  1=[1,h/16xw/16]全是16  2=[1,h/32xw/32]全是32
        :param labels: 一个batch的gt [bs,120,class+xywh]  规定每张图片最多有120个目标  不足的部分全部填充为0
        :param outputs: 3个特征图每个网格预测的预测框   注意这里的xywh是相对原图的坐标
                        [bs,h/8xw/8+h/16xw/16+h/32xw/32,xywh+1+num_classes]=[bs,n_anchors_all,xywh+1+num_classes]
        :param origin_preds: []
        :param dtype: torch.float16
        :return:
        """
        bbox_preds = outputs[:, :, :4]  # [bs, n_anchors_all, 4]
        obj_preds = outputs[:, :, 4].unsqueeze(-1)  # [bs, n_anchors_all, 1]
        cls_preds = outputs[:, :, 5:]  # [bs, n_anchors_all, num_classes]

        # 计算每张图片有多少个gt框   [bs,]   例如:tensor([5, 5], device='cuda:0')
        nlabel = (labels.sum(dim=2) > 0).sum(dim=1)

        # 总的anchor point个数 = 总的网格个数 = total_num_anchors = h/8*w/8 + h/16*w/16 + h/32*w/32
        total_num_anchors = outputs.shape[1]

        x_shifts = torch.cat(x_shifts, 1)  # 3个特征的所有网格的左上角x坐标 [1, n_anchors_all]
        y_shifts = torch.cat(y_shifts, 1)  # 3个特征的所有网格的左上角y坐标 [1, n_anchors_all]

        expanded_strides = torch.cat(expanded_strides, 1)  # 3个特征的所有网格对应的下采样倍率 [1, n_anchors_all]

        if self.use_l1:  # 默认不执行
            origin_preds = torch.cat(origin_preds, 1)

        cls_targets = []
        reg_targets = []
        l1_targets = []
        obj_targets = []
        fg_masks = []

        num_fg = 0.0
        num_gts = 0.0

        # 遍历每一张图片
        for batch_idx in range(outputs.shape[0]):
            num_gt = int(nlabel[batch_idx])  # 当前图片的gt个数
            num_gts += num_gt   # 总的gt个数
            if num_gt == 0:  # 默认不执行
                cls_target = outputs.new_zeros((0, self.num_classes))
                reg_target = outputs.new_zeros((0, 4))
                l1_target = outputs.new_zeros((0, 4))
                obj_target = outputs.new_zeros((total_num_anchors, 1))
                fg_mask = outputs.new_zeros(total_num_anchors).bool()
            else:
                gt_bboxes_per_image = labels[batch_idx, :num_gt, 1:5]  # 当前图片所有gt的坐标 [1,num_gt,4(xywh)]
                gt_classes = labels[batch_idx, :num_gt, 0]  # 当前图片所有gt的类别 [bs,num_gt,1]
                bboxes_preds_per_image = bbox_preds[batch_idx]  # 当前图片的所有预测框 [n_anchors_all,4(xywh)]

                # 调用SimOTA正负样本匹配策略
                try:
                    # gt_matched_classes: 每个正样本所匹配到的真实框所属的类别 [num_fg,]
                    # fg_mask: 记录哪些anchor是正样本 哪些是负样本 [total_num_anchors,] True/False
                    # pred_ious_this_matching: 每个正样本与所属的真实框的iou  [num_fg,]
                    # matched_gt_inds: 每个正样本所匹配的真实框idx  [num_fg,]
                    # num_fg: 最终这张图片的正样本个数
                    (gt_matched_classes, fg_mask, pred_ious_this_matching, matched_gt_inds, num_fg_img) = \
                        self.get_assignments(batch_idx, num_gt, total_num_anchors, gt_bboxes_per_image,
                                             gt_classes, bboxes_preds_per_image, expanded_strides, x_shifts,
                                             y_shifts, cls_preds, bbox_preds, obj_preds, labels,imgs)
                except RuntimeError as e:   # 不执行
                    # TODO: the string might change, consider a better way
                    if "CUDA out of memory. " not in str(e):
                        raise  # RuntimeError might not caused by CUDA OOM

                    logger.error(
                        "OOM RuntimeError is raised due to the huge memory cost during label assignment. \
                           CPU mode is applied in this batch. If you want to avoid this issue, \
                           try to reduce the batch size or image size."
                    )
                    torch.cuda.empty_cache()
                    (
                        gt_matched_classes,
                        fg_mask,
                        pred_ious_this_matching,
                        matched_gt_inds,
                        num_fg_img,
                    ) = self.get_assignments(  # noqa
                        batch_idx,
                        num_gt,
                        total_num_anchors,
                        gt_bboxes_per_image,
                        gt_classes,
                        bboxes_preds_per_image,
                        expanded_strides,
                        x_shifts,
                        y_shifts,
                        cls_preds,
                        bbox_preds,
                        obj_preds,
                        labels,
                        imgs,
                        "cpu",
                    )

                torch.cuda.empty_cache()  # 情况显存
                num_fg += num_fg_img  # 当前batch张图片的总正样本数

                # 独热编码 每个正样本所匹配到的真实框所属的类别 [num_fg,] -> [num_fg, num_classes]
                # 得到当前图片的gt class  [num_fg, num_classes]
                cls_target = F.one_hot(gt_matched_classes.to(torch.int64), self.num_classes) * pred_ious_this_matching.unsqueeze(-1)
                # 得到当前图片的gt obj  [8400, 1]
                obj_target = fg_mask.unsqueeze(-1)
                # 得到当前图片的gt box [num_gt, xywh]
                reg_target = gt_bboxes_per_image[matched_gt_inds]
                if self.use_l1:
                    l1_target = self.get_l1_target(
                        outputs.new_zeros((num_fg_img, 4)),
                        gt_bboxes_per_image[matched_gt_inds],
                        expanded_strides[0][fg_mask],
                        x_shifts=x_shifts[0][fg_mask],
                        y_shifts=y_shifts[0][fg_mask],
                    )

            cls_targets.append(cls_target)
            reg_targets.append(reg_target)
            obj_targets.append(obj_target.to(dtype))
            fg_masks.append(fg_mask)
            if self.use_l1:
                l1_targets.append(l1_target)

        # 假设batch张图片所有的正样本个数 = P
        # batch张图片的所有正样本对应的gt class  独热编码   {list:bs} -> [P, 80]
        cls_targets = torch.cat(cls_targets, 0)
        # batch张图片的所有正样本对应的gt box  {list:bs} -> [P, 4]
        reg_targets = torch.cat(reg_targets, 0)
        # batch张图片的所有正样本对应的gt obj  {list:bs} -> [bsx8400, 1]
        obj_targets = torch.cat(obj_targets, 0)
        # [bsx8400]  记录batch张图片的所有anchor point哪些anchor是正样本 哪些是负样本  True/False
        fg_masks = torch.cat(fg_masks, 0)
        if self.use_l1:
            l1_targets = torch.cat(l1_targets, 0)

        # 分别计算3个loss
        num_fg = max(num_fg, 1)   # batch张图片所有的正样本个数
        # 回归损失: iou loss 正样本
        loss_iou = (self.iou_loss(bbox_preds.view(-1, 4)[fg_masks], reg_targets)).sum() / num_fg
        # 置信度损失: 交叉熵损失 正样本 + 负样本
        loss_obj = (self.bcewithlog_loss(obj_preds.view(-1, 1), obj_targets)).sum() / num_fg
        # 分类损失: 交叉熵损失 正样本
        loss_cls = (self.bcewithlog_loss(cls_preds.view(-1, self.num_classes)[fg_masks], cls_targets)).sum() / num_fg
        if self.use_l1:
            loss_l1 = (self.l1_loss(origin_preds.view(-1, 4)[fg_masks], l1_targets)).sum() / num_fg
        else:
            loss_l1 = 0.0

        # 合并总loss
        reg_weight = 5.0
        loss = reg_weight * loss_iou + loss_obj + loss_cls + loss_l1

        return (loss, reg_weight * loss_iou, loss_obj, loss_cls, loss_l1, num_fg / max(num_gts, 1))
3.5.3、get_assignments函数:正负样本匹配
步骤:
- 确定正样本候选区域(使用中心先验)【调用get_in_boxes_info函数】;
- 计算每个anchor point和每个gt的iou矩阵;
- 计算每个anchor point和每个gt的cost矩阵,cost = Reg + Cls Loss;
- 使用iou矩阵,确定每个gt的dynamic_k 【调用dynamic_k_matching函数】;
a、获取与当前GT的iou最大的前10个样本;
b、将这TOP10样本的iou求和取整,就是当前GT的dynamic_k,而且dynamic_k大于等于1; - 为每个gt取cost排名最小的前dynamic_k个anchor point作为正样本,其他作为负样本;
- 最后再人工去除同一个样本被分配到多个GT作为正样本的情况(最小化cost原则);
	@torch.no_grad()
    def get_assignments(self, batch_idx, num_gt, total_num_anchors, gt_bboxes_per_image, gt_classes,
                        bboxes_preds_per_image, expanded_strides, x_shifts, y_shifts, cls_preds,
                        bbox_preds, obj_preds, labels, imgs, mode="gpu"):
        """正负样本匹配
        :param batch_idx: 第几张图片
        :param num_gt: 当前图片的gt个数
        :param total_num_anchors: 当前图片总的anchor point个数  640x640 -> 80x80+40x40+20x20 = 8400
        :param gt_bboxes_per_image: [num_gt, 4(xywh相对原图)] 当前图片的gt box
        :param gt_classes: [num_gt,] 当前图片的gt box所属类别
        :param bboxes_preds_per_image: [total_num_anchors, xywh(相对原图)] 当前图片的每个anchor point相对原图的预测box坐标
        :param expanded_strides: [1, total_num_anchors]  当前图片每个anchor point的下采样倍率
        :param x_shifts: [1, total_num_anchors] 当前图片每个anchor point的网格左上角x坐标
        :param y_shifts: [1, total_num_anchors] 当前图片每个anchor point的网格左上角y坐标
        :param cls_preds: [bs, total_num_anchors, num_classes] bs张图片每个anchor point的预测类别
        :param bbox_preds: [bs, total_num_anchors, 4(xywh相对原图)] bs张图片每个anchor point相对原图的预测box坐标
        :param obj_preds: [bs, total_num_anchors, 1] bs张图片每个anchor point相对原图的预测置信度
        :param labels: [bs, 200, class+xywh]  batch张图片的原始gt信息  每张图片最多200个gt  不足的全是0
        :param imgs: [bs, 3, 640, 640] 输入batch张图片
        :param mode: 'gpu'
        :return gt_matched_classes: 每个正样本所匹配到的真实框所属的类别 [num_fg,]
        :return fg_mask: 记录哪些anchor是正样本 哪些是负样本 [total_num_anchors,] True/False
        :return pred_ious_this_matching: 每个正样本与所属的真实框的iou  [num_fg,]
        :return matched_gt_inds: 每个正样本所匹配的真实框idx  [num_fg,]
        :return num_fg: 最终这张图片的正样本个数
        """
        if mode == "cpu":   # 默认不执行
            print("------------CPU Mode for This Batch-------------")
            gt_bboxes_per_image = gt_bboxes_per_image.cpu().float()
            bboxes_preds_per_image = bboxes_preds_per_image.cpu().float()
            gt_classes = gt_classes.cpu().float()
            expanded_strides = expanded_strides.cpu().float()
            x_shifts = x_shifts.cpu()
            y_shifts = y_shifts.cpu()

        # 1、确定正样本候选区域(使用中心先验)
        # fg_mask: [total_num_anchors] gt内部和中心区域内部的所有anchor point都是候选框  所以是两者的并集
        #          True/False   假设所有True的个数为num_candidate
        # is_in_boxes_and_center: [num_gt, num_candidate]  对应这张图像每个gt的候选框anchor point True/False
        #                         而且这些候选框anchor point是既在gt框内部也在fixed center area区域内的
        fg_mask, is_in_boxes_and_center = self.get_in_boxes_info(gt_bboxes_per_image, expanded_strides, x_shifts,
                                                                 y_shifts, total_num_anchors, num_gt)

        bboxes_preds_per_image = bboxes_preds_per_image[fg_mask]  # 得到当前图片所有候选框的预测box [num_candidate, xywh(相对原图)]
        cls_preds_ = cls_preds[batch_idx][fg_mask]  # 得到当前图片所有候选框的预测cls [num_candidate, num_classes]
        obj_preds_ = obj_preds[batch_idx][fg_mask]  # 得到当前图片所有候选框的预测obj [num_candidate, 1]
        num_in_boxes_anchor = bboxes_preds_per_image.shape[0]  # 候选框个数

        if mode == "cpu":
            gt_bboxes_per_image = gt_bboxes_per_image.cpu()
            bboxes_preds_per_image = bboxes_preds_per_image.cpu()

        # 2、计算每个候选框anchor point和每个gt的iou矩阵
        # [num_gt, 4(xywh相对原图)] [num_candidate, 4(xywh相对原图)] -> [num_gt, num_candidate]
        pair_wise_ious = bboxes_iou(gt_bboxes_per_image, bboxes_preds_per_image, False)

        # 3、计算每个候选框和每个gt的cost矩阵
        # gt cls转为独热编码  方便后面计算cls loss
        # [num_gt] -> [num_gt, num_classes] -> [num_gt, 1, num_classes] -> [num_gt, num_candidate, num_classes]
        gt_cls_per_image = (F.one_hot(gt_classes.to(torch.int64), self.num_classes).float()
                            .unsqueeze(1).repeat(1, num_in_boxes_anchor, 1))
        # 计算每个候选框和每个gt的iou loss = -log(iou)  为什么不是1-iou?
        pair_wise_ious_loss = -torch.log(pair_wise_ious + 1e-8)

        if mode == "cpu":
            cls_preds_, obj_preds_ = cls_preds_.cpu(), obj_preds_.cpu()

        # 计算每个候选框和每个gt的分类损失pair_wise_cls_loss
        with torch.cuda.amp.autocast(enabled=False):
            cls_preds_ = (cls_preds_.float().unsqueeze(0).repeat(num_gt, 1, 1).sigmoid_()
                          * obj_preds_.float().unsqueeze(0).repeat(num_gt, 1, 1).sigmoid_())
            pair_wise_cls_loss = F.binary_cross_entropy(cls_preds_.sqrt_(), gt_cls_per_image, reduction="none").sum(-1)
        del cls_preds_

        # 计算每个候选框和每个gt的cost矩阵  [num_gt, num_candidate]
        # 其中cost = cls loss + 3 * iou loss + 100000.0 * (~is_in_boxes_and_center)
        # is_in_boxes_and_center表示gt box和fixed center area交集的区域  取反就是并集-交集的区域
        # 给这些区域的cost取一个非常大的数字 那么在后续的dynamic_k_matching根据最小化cost原则
        # 我们会优先选取这些交集的区域  如果交集区域还不够才回去选取并集-交集的区域
        cost = (pair_wise_cls_loss + 3.0 * pair_wise_ious_loss + 100000.0 * (~is_in_boxes_and_center))

        # 4、使用iou矩阵,确定每个gt的dynamic_k
        # num_fg: 最终的正样本个数
        # gt_matched_classes: 每个正样本所匹配到的真实框所属的类别 [num_fg,]
        # pred_ious_this_matching: 每个正样本与所属的真实框的iou  [num_fg,]
        # matched_gt_inds: 每个正样本所匹配的真实框idx  [num_fg,]
        (num_fg, gt_matched_classes, pred_ious_this_matching, matched_gt_inds) = \
            self.dynamic_k_matching(cost, pair_wise_ious, gt_classes, num_gt, fg_mask)
        del pair_wise_cls_loss, cost, pair_wise_ious, pair_wise_ious_loss

        if mode == "cpu":
            gt_matched_classes = gt_matched_classes.cuda()
            fg_mask = fg_mask.cuda()
            pred_ious_this_matching = pred_ious_this_matching.cuda()
            matched_gt_inds = matched_gt_inds.cuda()

        return (gt_matched_classes, fg_mask, pred_ious_this_matching, matched_gt_inds, num_fg)
3.5.4、get_in_boxes_info函数:确定候选框
步骤:
- 计算哪些网格的中心点是在gt内部的;
- 计算哪些网格是在fixed center area(5xstride * 5xstride)区域内;
- 得到最终的候选框anchor point,确定所有的候选框(=在gt内部 和 在fixed center area区域的交集),但是在最终会倾向于选取两者的并集区域;
    def get_in_boxes_info(self, gt_bboxes_per_image, expanded_strides, x_shifts, y_shifts, total_num_anchors, num_gt):
        """确定正样本候选区域
        :param gt_bboxes_per_image: [num_gt, 4(xywh相对原图的)] 当前图片的gt box
        :param expanded_strides: [1, total_num_anchors]  当前图片每个anchor point的下采样倍率
        :param x_shifts: [1, total_num_anchors] 当前图片每个anchor point的网格左上角x坐标
        :param y_shifts: [1, total_num_anchors] 当前图片每个anchor point的网格左上角y坐标
        :param total_num_anchors: 当前图片总的anchor point个数  640x640 -> 80x80+40x40+20x20 = 8400
        :param num_gt: 当前图片的gt个数
        :return is_in_boxes_anchor: [total_num_anchors] gt内部和中心区域内部的所有anchor point都是候选框  所以是两者的并集
                                    True/False   假设所有True的个数为num_candidate
        :return is_in_boxes_and_center: [num_gt, num_candidate]  对应这张图像每个gt的候选框anchor point True/False
                                        而且这些候选框anchor point是既在gt框内部也在fixed center area区域内的
        """
        # 一、计算哪些网格的中心点是在gt内部的
        # 计算每个网格的中心点坐标
        # [total_num_anchors,] 当前图片的3个特征图中每个grid cell的缩放比
        expanded_strides_per_image = expanded_strides[0]
        # [total_num_anchors,] 当前图片3个特征图中每个grid cell左上角在原图上的x坐标
        x_shifts_per_image = x_shifts[0] * expanded_strides_per_image
        # [total_num_anchors,] 当前图片3个特征图中每个grid cell左上角在原图上的y坐标
        y_shifts_per_image = y_shifts[0] * expanded_strides_per_image
        # 得到每个网格中心点的x坐标(相对原图) [total_num_anchors,] -> [1, total_num_anchors] -> [num_gt, total_num_anchors]
        x_centers_per_image = ((x_shifts_per_image + 0.5 * expanded_strides_per_image).unsqueeze(0).repeat(num_gt, 1))
        # 得到每个网格中心点的y坐标(相对原图) [total_num_anchors,] -> [1, total_num_anchors] -> [num_gt, total_num_anchors]
        y_centers_per_image = ((y_shifts_per_image + 0.5 * expanded_strides_per_image).unsqueeze(0).repeat(num_gt, 1))

        # 计算所有gt框相对原图的左上角和右下角坐标  gt: [num_gt, 4(xywh)]  xy为中心点坐标  wh为宽高
        # 计算每个gt左上角的x坐标  x - 0.5 * w      [num_gt, ] -> [num_gt, 1] -> [num_gt, total_num_anchors]
        gt_bboxes_per_image_l = ((gt_bboxes_per_image[:, 0] - 0.5 * gt_bboxes_per_image[:, 2]).unsqueeze(1).repeat(1, total_num_anchors))
        # 计算每个gt右下角的x坐标  x + 0.5 * w      [num_gt, ] -> [num_gt, 1] -> [num_gt, total_num_anchors]
        gt_bboxes_per_image_r = ((gt_bboxes_per_image[:, 0] + 0.5 * gt_bboxes_per_image[:, 2]).unsqueeze(1).repeat(1, total_num_anchors))
        # 计算每个gt左上角的y坐标  y - 0.5 * h      [num_gt, ] -> [num_gt, 1] -> [num_gt, total_num_anchors]
        gt_bboxes_per_image_t = ((gt_bboxes_per_image[:, 1] - 0.5 * gt_bboxes_per_image[:, 3]).unsqueeze(1).repeat(1, total_num_anchors))
        # 计算每个gt右下角的y坐标  y + 0.5 * h      [num_gt, ] -> [num_gt, 1] -> [num_gt, total_num_anchors]
        gt_bboxes_per_image_b = ((gt_bboxes_per_image[:, 1] + 0.5 * gt_bboxes_per_image[:, 3]).unsqueeze(1).repeat(1, total_num_anchors))

        # 计算哪些网格的中心点是在gt内部的
        # 每个网格中心点x坐标 - 每个gt左上角的x坐标
        b_l = x_centers_per_image - gt_bboxes_per_image_l  # [num_gt, total_num_anchors]
        # 每个gt右下角的x坐标 - 每个网格中心点x坐标
        b_r = gt_bboxes_per_image_r - x_centers_per_image  # [num_gt, total_num_anchors]
        # 每个网格中心点的y坐标 - 每个gt左上角的y坐标
        b_t = y_centers_per_image - gt_bboxes_per_image_t  # [num_gt, total_num_anchors]
        # 每个gt右下角的y坐标 - 每个网格中心点的y坐标
        b_b = gt_bboxes_per_image_b - y_centers_per_image  # [num_gt, total_num_anchors]
        bbox_deltas = torch.stack([b_l, b_t, b_r, b_b], 2) # 4x[num_gt, total_num_anchors] -> [num_gt, total_num_anchors, 4]
        # b_l, b_t, b_r, b_b中最小的一个>0.0 则为True  也就是说要保证b_l, b_t, b_r, b_b四个都大于0 此时说明这个网格中心点位于这个gt的内部(可以画个图理解下)
        # [num_gt, total_num_anchors]  True表示当前这个网格是落在这个gt内部的
        is_in_boxes = bbox_deltas.min(dim=-1).values > 0.0
        # [total_num_anchors]  某个网格只要落在一个gt内部就是True   否则False
        is_in_boxes_all = is_in_boxes.sum(dim=0) > 0

        # 二、计算哪些网格是在fixed center area区域内  计算步骤和一是一样的 就不赘述了
        # fixed center area  中心区域大小是 (5xstride) x (5xstride)  中心点是每个gt的中心点
        center_radius = 2.5
        # 计算所有中心区域相对原图的左上角和右下角坐标  [num_gt, total_num_anchors]
        gt_bboxes_per_image_l = (gt_bboxes_per_image[:, 0]).unsqueeze(1).repeat(1, total_num_anchors) \
                                - center_radius * expanded_strides_per_image.unsqueeze(0)
        gt_bboxes_per_image_r = (gt_bboxes_per_image[:, 0]).unsqueeze(1).repeat(1, total_num_anchors) \
                                + center_radius * expanded_strides_per_image.unsqueeze(0)
        gt_bboxes_per_image_t = (gt_bboxes_per_image[:, 1]).unsqueeze(1).repeat(1, total_num_anchors) \
                                - center_radius * expanded_strides_per_image.unsqueeze(0)
        gt_bboxes_per_image_b = (gt_bboxes_per_image[:, 1]).unsqueeze(1).repeat(1, total_num_anchors) \
                                + center_radius * expanded_strides_per_image.unsqueeze(0)

        # 计算哪些网格的中心点是在fixed center area区域内的
        c_l = x_centers_per_image - gt_bboxes_per_image_l
        c_r = gt_bboxes_per_image_r - x_centers_per_image
        c_t = y_centers_per_image - gt_bboxes_per_image_t
        c_b = gt_bboxes_per_image_b - y_centers_per_image
        center_deltas = torch.stack([c_l, c_t, c_r, c_b], 2)
        is_in_centers = center_deltas.min(dim=-1).values > 0.0
        # [total_num_anchors]  某个网格只要落在一个中心区域内部就是True   否则False
        is_in_centers_all = is_in_centers.sum(dim=0) > 0

        # 三、得到最终的所有的c
        # is_in_boxes_anchor: [total_num_anchors] gt内部和中心区域内部的所有anchor point都是候选框  所以是两者的并集
        #                     True/False   假设所有True的个数为num_candidate
        is_in_boxes_anchor = is_in_boxes_all | is_in_centers_all

        # is_in_boxes_and_center: [num_gt, num_candidate]  对应这张图像每个gt的候选框anchor point True/False
        # &: 表示这些候选框anchor point是既在gt框内部也在fixed center area区域内的
        is_in_boxes_and_center = (is_in_boxes[:, is_in_boxes_anchor] & is_in_centers[:, is_in_boxes_anchor])

        return is_in_boxes_anchor, is_in_boxes_and_center
3.5.5、dynamic_k_matching函数:确定每个gt的dynamic_k
    def dynamic_k_matching(self, cost, pair_wise_ious, gt_classes, num_gt, fg_mask):
        """确定每个gt的dynamic_k
        正样本筛选过程:8400 -> num_candidate -> num_fg
        :param cost: 每个候选框和每个gt的cost矩阵  [num_gt, num_candidate]
        :param pair_wise_ious: 每个候选框和每个gt的iou矩阵 [num_gt, num_candidate]
        :param gt_classes: 当前图片的gt box所属类别 [num_gt,]
        :param num_gt: 当前图片的gt个数
        :param fg_mask: [total_num_anchors,] gt内部和中心区域内部的所有anchor point都是候选框  所以是两者的并集
                        True/False   假设所有True的个数为num_candidate
        :return num_fg: 最终的正样本个数
        :return gt_matched_classes: 每个正样本所匹配到的真实框所属的类别 [num_fg,]
        :return pred_ious_this_matching: 每个正样本与所属的真实框的iou  [num_fg,]
        :return matched_gt_inds: 每个正样本所匹配的真实框idx  [num_fg,]
        """
        # 初始化匹配矩阵 [num_gt, num_candidate]
        matching_matrix = torch.zeros_like(cost, dtype=torch.uint8)

        ious_in_boxes_matrix = pair_wise_ious

        # 每个gt选取前topk个iou
        n_candidate_k = min(10, ious_in_boxes_matrix.size(1))
        # [num_gt, num_candidate] -> [num_gt, 10]
        topk_ious, _ = torch.topk(ious_in_boxes_matrix, n_candidate_k, dim=1)
        # 再对应位置相加求出每个gt的正样本数量(>=1)  [num_gt,]
        dynamic_ks = torch.clamp(topk_ious.sum(1).int(), min=1)
        # {list:num_gt}  [5, 6, 4, 7, 5, 7, 4, 4, 7, 6, 8]  对应每个gt的正样本数量
        dynamic_ks = dynamic_ks.tolist()
        # 遍历每个gt, 选取前dynamic_ks个最小的cost对应的anchor point作为最终的正样本
        for gt_idx in range(num_gt):
            # pos_idx: 正样本对应的idx
            _, pos_idx = torch.topk(cost[gt_idx], k=dynamic_ks[gt_idx], largest=False)
            # 把匹配矩阵的gt和anchor point对应的idx置为1 意为这个anchor point是这个gt的正样本
            matching_matrix[gt_idx][pos_idx] = 1
        del topk_ious, dynamic_ks, pos_idx

        # 消除重复匹配: 如果有1个anchor point是多个gt的正样本,那么还是最小化原则,它是cost最小的那个gt的正样本,其他gt的负样本
        # 计算每个候选anchor point匹配的gt个数  [num_candidate,]
        anchor_matching_gt = matching_matrix.sum(0)
        # 如果大于1 说明有1个anchor分配给了多个gt  那么要重新分配这个anchor:把这个anchor分配给cost小的那个gt
        if (anchor_matching_gt > 1).sum() > 0:
            _, cost_argmin = torch.min(cost[:, anchor_matching_gt > 1], dim=0)  # 取cost小的位置idx
            matching_matrix[:, anchor_matching_gt > 1] *= 0            # 重复匹配的区域(大于1)全为0
            matching_matrix[cost_argmin, anchor_matching_gt > 1] = 1   # cost小的改为1

        # fg_mask_inboxes: [num_candidate] True/False  最终的正样本区域为True  负样本为False
        fg_mask_inboxes = matching_matrix.sum(0) > 0
        # 最终的正样本总个数
        num_fg = fg_mask_inboxes.sum().item()

        # fg_mask: [total_num_anchors]  True/False  最终的正样本区域为True  负样本为False
        fg_mask[fg_mask.clone()] = fg_mask_inboxes

        # 每个正样本所匹配的真实框idx  [num_fg,]  注意每个真实框可能会有多个正样本,但是每个正样本只能是一个真实框的正样本
        # [num_gt, num_candidate] -> [num_gt, num_fg] -> [num_fg,]
        matched_gt_inds = matching_matrix[:, fg_mask_inboxes].argmax(0)
        # 每个正样本所匹配到的真实框所属的类别 [num_fg,]
        gt_matched_classes = gt_classes[matched_gt_inds]

        # 每个正样本与所属的真实框的iou  [num_fg,]
        pred_ious_this_matching = (matching_matrix * pair_wise_ious).sum(0)[fg_mask_inboxes]

        return num_fg, gt_matched_classes, pred_ious_this_matching, matched_gt_inds
四、总结
-
网络结构上:backbone和v5的差不多,有Focus,只是bottleneck的个数不一样,SPP层的位置也不一样;Neck沿用的还是PAFPN;Head使用了全新的解耦头,分类、回归、置信度分开预测;
-
loss方面:

其中: λ \lambda λ源码中=5.0、 N p o s N_pos Npos表示被分为正样本的Anchor point数;分类损失和置信度损失都是交叉熵损失,回顾损失是iou损失;分类损失和回顾损失只计算所有正样本的损失,而置信度损失需要计算正样本+负样本=所有anchor point的损失。 -
正负样本匹配:SimOTA
- 使用中心先验的方式确定正样本的候选区域:每个gt内部和每个gt中心点的固定区域(5xstride * 5xstride)并集的区域(不过会更倾向于选取交集区域,实在不够了才会选取并集-交集的区域);
- 计算每个候选框anchor point和每个gt的iou矩阵
- 计算每个候选框和每个gt的cost矩阵,cost = cls loss + 3 * iou loss + 100000.0 * (~is_in_boxes_and_center),其中 ( ~is_in_boxes_and_center)表示并集-交集的区域,所以并集-交集的区域的cost会特别大,依据最小化cost原则,这些区域只有在实在没办法了才会选为正样本;
- 根据每个候选框和每个gt的cost矩阵和iou矩阵筛选出每个gt的正样本,确定最终的正样本和负样本(正样本 + 负样本 = 8400 所有的anchor point);
1. 初始化每个候选框和每个gt的匹配矩阵;
2. 每个gt选取前topk个iou(10个),再把每个gt的topk个iou相加,动态选取每个gt的正样本数量dynamic_ks(>=1);
3. 根据最小化cost原则:遍历每个gt, 选取前dynamic_ks个最小的cost对应的anchor point作为最终的正样本;
4. 消除重复匹配: 如果有1个anchor point是多个gt的正样本,那么还是最小化原则,它是cost最小的那个gt的正样本,其他gt的负样本;
-
SimOTA的强大之处:
- simOTA能够做到自动的动态分析每个gt要拥有多少个正样本;
- 能自动决定每个gt要从哪个特征图来检测:正样本分配的时候,是取候选区域anchor中cost排名最小的前dynamic_k个anchor。在这一步时候,不同特征图都可以作为候选区域,所以可以自动决定哪个特征图来做检测;
Reference
b站:霹雳吧啦Wz-YOLOX网络详解-原理
b站:YOLOX-创新点原理、代码精讲-源码
知乎:如何评价旷视开源的YOLOX,效果超过YOLOv5?
知乎:YOLOX深度解析(二)-simOTA详解


