C++调用Python(Yolov5)
首先在VS中【项目】-【属性】进行环境配置:
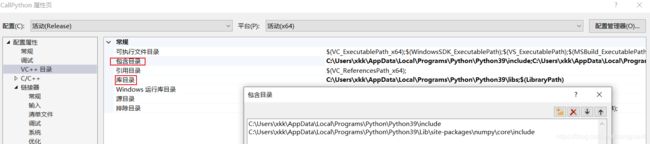
1、【VC++目录】-【包含目录】加入python安装目录的include路径:C:\你的路径\Python\Python39\include
(代码中用到了numpy,所以同时加上numpy的include路径:C:\你的路径\Python\Python39\Lib\site-packages\numpy\core\include)
2、【VC++目录】-【库目录】加入python安装目录的libs路径:C:\你的路径\Python\Python39\libs
3、【链接器】-【输入】-【附加依赖项】加入库名:
python39.lib(Release模式下)
python39_d.lib(Debug模式下,如果没有此文件,复制python39.lib重命名为python39_d.lib)

项目中用C++调用yolov5,将图片直接传给函数,返回结果值。
C++
#include "stdafx.h"
#include
#include
#include
#include

using namespace std;
int initNumpy()
{
    //该宏Debug下编译不通过,python3.7需要将python-include路径下"object.h"文件中第56行"#define Py_TRACE_REFS"注释掉;
    //python3.9需要将python-include路径下"pyconfig.h"文件中第316行"#define Py_DEBUG"注释掉
	import_array();
	return 1;
}

int main()
{
	Py_SetPythonHome(L"D:/Anaconda/envs/py3/envs/yolov5");//安装的Python路径
	Py_Initialize();
	PyRun_SimpleString("import sys");
	PyRun_SimpleString("sys.path.append('F:/Yolov5/')");//要执行的Python文件路径
	initNumpy();
	//检查初始化是否成功
	if (!Py_IsInitialized())
		return 0;

    /*直接执行Python脚本文件

    wchar_t *argv[2];
    argv[0] = L"python";
    argv[1] = L"F:/Yolov5/test.py";
    Py_Main(2, argv);

    */


	PyObject * pModule = PyImport_ImportModule("detect001");      //detect001:要执行的Python文件名
	PyObject * pFunc = PyObject_GetAttrString(pModule, "detect"); //detect:Python文件中的函数名

	PyObject *pReturn = NULL;
	cv::Mat img = cv::imread("./source.jpg"); //图片作为参数传入Python
	if (img.empty())
		return 0;

	PyObject *ArgList = PyTuple_New(1);//储存Python参数,参数个数为1

	int x = img.size().width;
	int y = img.size().height;
	int z = img.channels();
	uchar *CArrays = new uchar[x*y*z];//这一行申请的内存需要释放指针,否则存在内存泄漏的问题
	int iChannels = img.channels();
	int iRows = img.rows;
	int iCols = img.cols * iChannels;
	if (img.isContinuous())
	{
		iCols *= iRows;
		iRows = 1;
	}

	uchar* p;
	int id = -1;
	for (int i = 0; i < iRows; i++)
	{
		// get the pointer to the ith row
		p = img.ptr(i);
		// operates on each pixel
		for (int j = 0; j < iCols; j++)
			CArrays[++id] = p[j];//连续空间
	}
	npy_intp Dims[3] = { y, x, z };
	PyObject *PyArray = PyArray_SimpleNewFromData(3, Dims, NPY_UBYTE, CArrays);
	PyTuple_SetItem(ArgList, 0, PyArray);//图片数据PyArray加入到ArgList的0位
	pReturn = PyObject_CallObject(pFunc, ArgList); //调用Python中detect(imgdata)函数
	/*pReturn返回类型为tuple:5,其中array大小为n x 7

	(221, 222, 222, 222, array([[          2,      6112.1,         480, ...,       0.793,           0,           1],
	   [       1026,      531.91,        1505, ...,     0.78835,           0,           3],
	   [          2,      5348.8,         481, ...,      0.7863,           0,           1],
	   ...,
	   [        512,      5304.8,         994, ...,     0.46315,           0,           2],
	   [        772,      2652.3,         994, ...,     0.46234,           0,           2],
	   [        357,      5304.2,         483, ...,     0.45566,           0,           1]]))


	*/

	PyObject *pInt0 = PyTuple_GetItem(pReturn, 0);
	PyObject *pInt1 = PyTuple_GetItem(pReturn, 1);
	PyObject *pInt2 = PyTuple_GetItem(pReturn, 2);
	PyObject *pInt3 = PyTuple_GetItem(pReturn, 3);
	PyObject *pNdarray4 = PyTuple_GetItem(pReturn, 4);

	//Python array 转C++
	PyArrayIterObject *pIter = (PyArrayIterObject *)PyArray_IterNew(pNdarray4);
	vector >ArrayVec4(pIter->size);
	vector tmpVec(7);
	int i = 0;
	int j = 0;
	while (pIter->index < pIter->size) {
		tmpVec[i++ % 7] = *(double *)pIter->dataptr;
		if (i % 7 == 0)
			ArrayVec4[j++] = tmpVec;

		PyArray_ITER_NEXT(pIter);
	}

	//Python int 转C++
	int result;
	PyArg_Parse(pInt0, "i", &result);
	cout << "-------------------------" << result << "-------------------------" << endl;
	PyArg_Parse(pInt1, "i", &result);
	cout << "-------------------------" << result << "-------------------------" << endl;
	PyArg_Parse(pInt2, "i", &result);
	cout << "-------------------------" << result << "-------------------------" << endl;
	PyArg_Parse(pInt3, "i", &result);
	cout << "-------------------------" << result << "-------------------------" << endl;

	for (int i = 0; i < pIter->size / 7; i++)
	{
		for (int j = 0; j < 7; j++)
			cout << "----------array---------------" << ArrayVec4[i][j] << "-------------array------------" << endl;
	}

	delete[]CArrays;
	CArrays = nullptr;
	Py_Finalize();

	system("pause");
    return 0;
}
Python
def detect(imgdata):
    # cv2.imwrite("source.jpg",imgdata)
    opt = argparse.Namespace()
    opt.agnostic_nms = False
    opt.augment = False
    opt.classes = None
    opt.conf_thres = 0.3
    opt.device = ''
    .
    .
    .