Ubuntu18.04安装Nvidia显卡驱动+CUDA10.1
背景介绍
公司突然说有台“废旧”的服务器,密码不知道是啥,需要重装一下并部署我的环境。我堂堂一个算法工程师竟沦落到如此地步,摇身一变变成一名运维工程师。那就开始此次“踩坑”之旅。
先来看一下机器,鬼鬼,4卡2080Ti,听说有一张卡坏了,nvidia-smi显示不出来,于是又多了一个支线任务,找出哪张卡是坏的。可是我懒啊,不想一张一张拆下来试,于是我通过某种方式还是找到了他,这个检测方式另起一篇博文来讲。
环境需求
Ubuntu 18.04
Nvidia Driver
CUDA 10.1 (相对而言,对于pytorch和tensorflow的兼容性较强)
Docker 18
安装流程
-
首先最简单的,找一个Ubuntu18.04的启动盘,直接从U盘启动开始重装
-
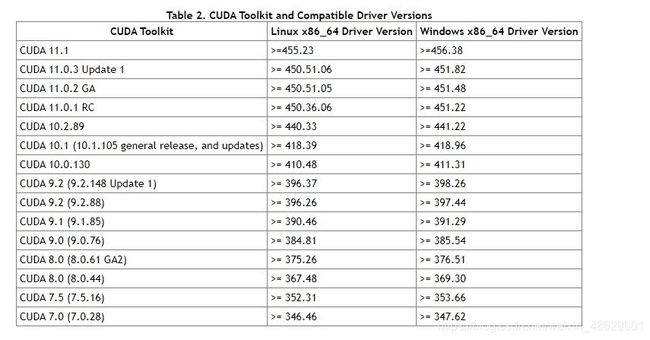
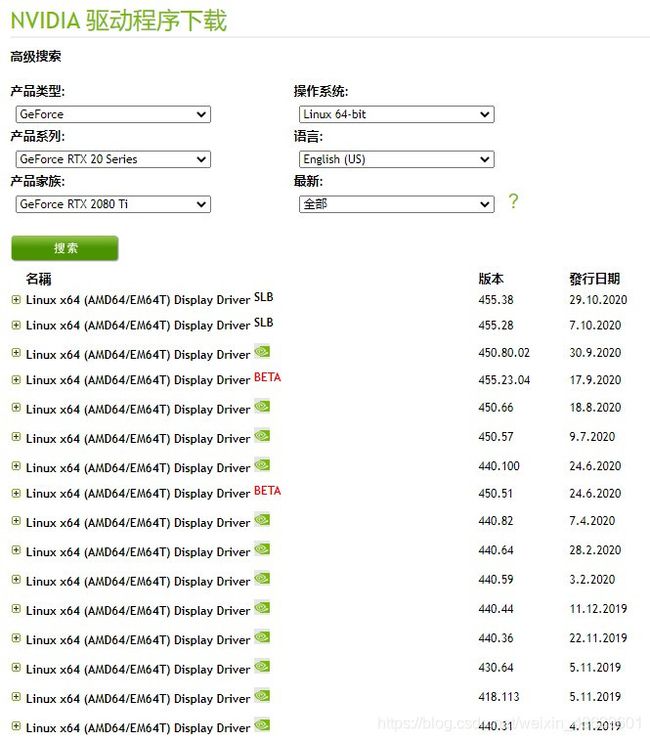
从官网寻找合适的驱动版本

https://www.nvidia.cn/Download/Find.aspx?lang=cn
从链接搜索相对应的驱动版本

-
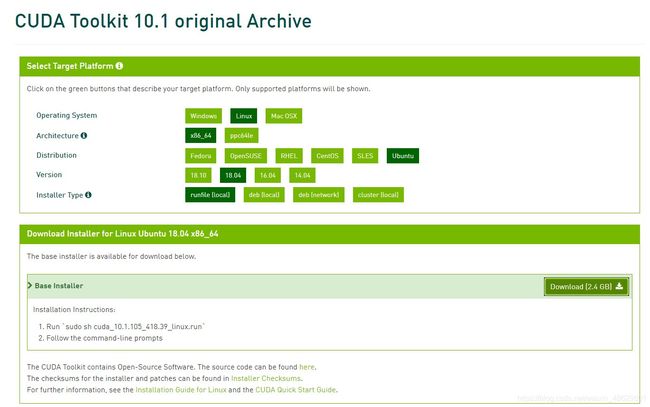
下载所需的CUDA版本
https://developer.nvidia.com/cuda-toolkit-archive
我这里使用的是CUDA10.1,因此选择CUDA10.1,根据系统环境选择相应的.run进行下载。

-
安装gcc g++ make
$ sudo apt-get install gcc g++ make
- 禁用nouveau
修改文件:
$ sudo gedit /etc/modprobe.d/blacklist.conf
尾部加入:
blacklist nouveau
options nouveau modeset=0
更新配置并重启:
$ sudo update-initramfs -u
$ sudo reboot
重启后终端输入lsmod | grep nouveau若无返回,则表明禁用成功。
- 安装显卡驱动
$ sudo chmod a+x NVIDIA-Linux-x86_64-450.80.02.run
$ sudo ./NVIDIA-Linux-x86_64-430.50.run --no-opengl-files --no-nouveau-check --no-x-check
–no-opengl-files 只安装驱动文件,不安装OpenGL文件。这个参数最重要,不加很有可能出现循环登录;
–no-x-check 安装驱动时不检查X服务;
--no-nouveau-check安装驱动时禁用nouveau;
其他参数可通过 --help查看;
跟随引导步骤安装,这中间没什么问题。
安装完成后输入
$ nvidia-smi
Mon Nov  2 21:08:06 2020
+-----------------------------------------------------------------------------+
| NVIDIA-SMI 430.50       Driver Version: 430.50       CUDA Version: 10.1     |
|-------------------------------+----------------------+----------------------+
| GPU  Name        Persistence-M| Bus-Id        Disp.A | Volatile Uncorr. ECC |
| Fan  Temp  Perf  Pwr:Usage/Cap|         Memory-Usage | GPU-Util  Compute M. |
|===============================+======================+======================|
|   0  GeForce RTX 208...  Off  | 00000000:03:00.0 Off |                  N/A |
| 49%   55C    P0    65W / 250W |      0MiB / 11019MiB |      0%      Default |
+-------------------------------+----------------------+----------------------+
|   1  GeForce RTX 208...  Off  | 00000000:82:00.0 Off |                  N/A |
| 49%   52C    P0    55W / 250W |      0MiB / 11019MiB |      1%      Default |
+-------------------------------+----------------------+----------------------+
|   2  GeForce RTX 208...  Off  | 00000000:83:00.0 Off |                  N/A |
| 39%   53C    P0    55W / 250W |      0MiB / 11019MiB |      0%      Default |
+-------------------------------+----------------------+----------------------+

+-----------------------------------------------------------------------------+
| Processes:                                                       GPU Memory |
|  GPU       PID   Type   Process name                             Usage      |
|=============================================================================|
|  No running processes found                                                 |
+-----------------------------------------------------------------------------+
表明显卡驱动安装成功
- 安装CUDA10.1
$ sudo chmod a+x cuda_10.1.105_418.39_linux.run
$ ./cuda_10.1.105_418.39_linux.run --no-opengl-libs
同样,不安装opengl相关库文件。
安装过程询问:
accept #同意安装
n #不安装Driver,因为已安装驱动
y #安装CUDA Toolkit
#安装到默认目录
安装完成后,进行以下测试
#编译并测试设备 deviceQuery:
$ cd /usr/local/cuda-8.0/samples/1_Utilities/deviceQuery
$ sudo make
$ ./deviceQuery

#编译并测试带宽 bandwidthTest:
$ cd ../bandwidthTest
$ sudo make
$ ./bandwidthTest
如果这两个测试最后的结果都是Result = PASS,则说明CUDA安装成功!
- 安装Docker
官方安装指南https://docs.docker.com/engine/install/ubuntu/#install-using-the-repository
安装依赖
$ sudo apt-get update

$ sudo apt-get install \
    apt-transport-https \
    ca-certificates \
    curl \
    gnupg-agent \
    software-properties-common
更新官方GPG key
$ curl -fsSL https://download.docker.com/linux/ubuntu/gpg | sudo apt-key add -
根据架构选择进行安装仓库
$ sudo add-apt-repository \
   "deb [arch=amd64] https://download.docker.com/linux/ubuntu \
   $(lsb_release -cs) \
   stable"
安装Docker
 $ sudo apt-get update
 $ sudo apt-get install docker-ce docker-ce-cli containerd.io
安装完成后进行测试
sudo docker run hello-world
Unable to find image 'hello-world:latest' locally
latest: Pulling from library/hello-world
0e03bdcc26d7: Pull complete
Digest: sha256:8c5aeeb6a5f3ba4883347d3747a7249f491766ca1caa47e5da5dfcf6b9b717c0
Status: Downloaded newer image for hello-world:latest
Hello from Docker!
This message shows that your installation appears to be working correctly.

To generate this message, Docker took the following steps:
 1. The Docker client contacted the Docker daemon.
 2. The Docker daemon pulled the "hello-world" image from the Docker Hub.
    (amd64)
 3. The Docker daemon created a new container from that image which runs the
    executable that produces the output you are currently reading.
 4. The Docker daemon streamed that output to the Docker client, which sent it
    to your terminal.

To try something more ambitious, you can run an Ubuntu container with:
 $ docker run -it ubuntu bash

Share images, automate workflows, and more with a free Docker ID:
 https://hub.docker.com/

For more examples and ideas, visit:
 https://docs.docker.com/get-started/
Docker安装完成!