【vue面试-精简篇2】http分类有哪些,http五大分类有什,vue2路由,跳转几种方式并怎么传参,http和https有什么区别,组件的通信方式 ,directive自定义指令
vue2-精简篇2
- http分类有哪些,http五大分类有什么
- vue2路由
-
- 跳转几种方式,怎么传参
-
- 1.声明式-router-link
- 2.函数式 this.$router.push('/me')
-
- 不带参数
- 带参数
- 3.this.$router.replace()
- 4.this.$router.go(n)
- 5.也算跳转但不能指定跳转
- route和router的区别
- http和https有什么区别
- 组件的通信方式
-
- 1.父传子
- 2.子传父
- 3.Vuex 核心
- 4.事件总线
-
- 通过点击事件传参
- 5.ref
-
- 获取dom元素
- 获取组件
- 6.本地缓存
-
- 扩展: sessionStorage与localStorage的异同?
- 7.插槽——类似于子传父
-
- 1.以最简单插槽为例(普通插槽):在子组件中放一个占位符
- 2.插槽使用 - 具名插槽
- directive自定义指令
http分类有哪些,http五大分类有什么
| Type | Reason-phrase | Note |
|---|---|---|
| 1XX | Informational | 信息性状态码,表示接受的请求正在处理 |
| 2XX | Success | 成功状态码,表示请求正常处理完毕 |
| 3XX | Redirection | 重定向状态码,表示需要客户端需要进行附加操作 |
| 4XX | Client Error | 客户端错误状态码,表示服务器无法处理请求 |
| 5XX | Server Error | 服务器错误状态码,表示服务器处理请求出错 |
vue2路由
路由分类
-
后端路由
- 理解:value是function,用于处理客户端提交的请求
- .工作过程:服务器接收到一个请求时,根据请求路径找到匹配的函数来处理请求,返回响应数据
-
前端路由
- 理解:value是component ,用于展示页面内容
- 工作过程:当浏览器的路径改变时,对应的组件就会显示
active-class 可配置高亮样式
<router-link to="/index" active-class="active">选中后的颜色</router-link>
跳转几种方式,怎么传参
1.声明式-router-link
 < router-link to="/me"> 我的 < /router-link>
  < router-link to="//me?id=15265"> 我的 < /router-link>
  < router-link to="//me?id=  **:id** "> 我的 < /router-link>
2.函数式 this.$router.push(‘/me’)
不带参数
this.$router.push('/home')
this.$router.push({name:'home'})
this.$router.push({path:'/home'})
带参数
query传参
query相当于GET请求,页面跳转的时候,可以在地址栏看到请求参数
uery传参**
this.$router.push({name:'home',query: {id:'1'}})
this.$router.push({path:'/home',query: {id:'1'}})

// html 取参  $route.query.id
// script 取参  this.$route.query.id
params传参
params相当于POST请求,参数不会在地址栏中显示
his.$router.push({name:'home',params: {id:'1'}})  // 只能用 name

// 路由配置 path: "/home/:id" 或者 path: "/home:id" ,
// 不配置path ,第一次可请求,刷新页面id会消失,配置path,刷新页面id会保留

// html 取参  $route.params.id
// script 取参  this.$route.params.id
使用path方式跳转路由 path会忽略params 所以path不能和params一起使用
推荐使用name和query方式实现路由跳转
// 字符串,不带参数
this.$router.push('home')

// 对象,不带参数
this.$router.push({ path: 'home' })

// params(推荐):命名的路由,params 必须和 name 搭配使用
this.$router.push({ name:'user',params: { userId: 123 }})

// 这里的 params 不生效
this.$router.push({ path:'/user',params: { userId: 123 }})

// query:带查询参数,变成 /register?plan=private
this.$router.push({ path: 'register', query: { plan: 'private' }})

//meta方式:路由元信息
export default new Router({
    routes: [
        {
            path: '/user',
            name: 'user',
            component: user,
            meta:{
                title:'个人中心'
            }
        }
    ]
})
通过 $route 对象获取,注意是route,没有r ,不是router
this.$route.params
this.$route.query
this.$route.meta
3.this.$router.replace()
this.$router.replace('/home')
this.$router.replace({name:'home'})
this.$router.replace({path:'/home'})
4.this.$router.go(n)
向前或者向后跳转n个页面,n可为正整数或负整数1
this.$router.go(-1)  // 返回上一页
this.$router.go(1)  //前进一页
5.也算跳转但不能指定跳转
this.$router.back() // 返回上一页
this.$router.forwarp()  //前进一页
route和router的区别
$route : 路由信息对象,只读对象
$router : 是路由操作对象,只写对象
http和https有什么区别
1、安全性——https比http 多一层 ssl协议的存在,会对网站与客户端之前传输的数据进行加密,不存在数据泄露的问题。
2、响应速度——理论上,http响应速度更快,这是因为http只需三次握手,也就是3个包即可建立连接, 而https除了三次握手,还需进行ssl握手,一共需要12个包。
3、端口——http和https采用两种完全不同的连接方式,前者采用的是80端口,后者则是443端口。
4、消耗资源——https是构建在SSL之上的http协议,所以https会 消耗更多 的服务器资源。
5、费用不同——https需为网站购买和配置ssl证书,会产生一定的费用。
6、展示方式——http会被浏览器标记 不安全字样 https则会被标记 安全字样
组件的通信方式
1.父传子
在Vue.component(){}中,加入与template、data同级的props用来接受传值
.
父组件
//父组件
<template>
  <div>
    <h1>{{ title }}</h1>
    <h1>{{ titleted }}</h1>
                                         <!--    传入字符串-->
    <SonView @getMessage="showMsg" sontitleted="sontitleted" />
                                          <!--    传入变量-->
    <SonView @getMessage="showMsg" :sontitleted="sontitleted" />

  </div>
</template>

export default {
  name: "FatherView",
  components: {SonView,},
  data() {
    return {
      title: '我是父组件',
      titleted: '我是子组件',
      sontitleted: '我是父组件传参给sonview',
    }
  },
  methods: {
    showMsg(title) {
      console.log(title)
      this.title = title;
    }
  },
}
子组件
3种接受方式:
- props:[‘xxx’]
- props:{xxx:string}
- props:{
xxx:{
type:String, //类型
required:true, //必要性
default:‘老王’ //默认值
}
}
<template>
  <div>
    <h3>我是SonView子组件</h3>
    <h3>{{sontitleted}}</h3>
    <h3>我要给
      <button @click="clickEvent()"> 传给twosonview组件</button>
    </h3>
  </div>
</template>

<script>
import EventBus from '@/event-bus/event-bus'

export default {
  name: "SonView",
  data() {
    return {
      title: '456'
    }
  },
  //灵活有默认参数默认参数
  // props:{
  //   type:String,
  //   sontitleted:{
  //     type:String,
  //     default:'默认父组件传参'
  //   }
  // },

  //方便 单方面接收
  // props:['sontitleted'],
  props:{sontitleted:String},
  //将编译好的html挂载到页面完成后执行的钩子函数
  //页面从内存中渲染到html的过程
  created() {
    console.log('getMessage', this)
    this.$emit('getMessage', '我是SonView子组件传过来的父组件!自动传')
  }
}
</script>

<style scoped>

</style>
2.子传父
自定义事件:@on,@emit 可以实现子给父通信即vm.$emit( event, arg )
$emit绑定一个自定义事件event,当这个这个语句被执行到的时候,就会将参数arg传递给父组件,父组件通过@event监听并接收参数。
//父组件
<template>
  <div>
    <h1>{{title}}</h1>
    <h1>{{titleted}}</h1>
    <SonView @getMessage="showMsg"/>
    <TwoSonView @getMessage="showTitle"/>
  </div>
</template>

<script>
import SonView from "@/views/SonView";
import TwoSonView from "@/views/TwoSonView";

export default {
  name: "FatherView",
  components: {SonView,TwoSonView},
  data() {
    return {
      title: '我是父组件',
      titleted:'我是子组件'
    }
  },
  methods: {
    showMsg(title) {
      console.log(title)
      this.title = title;
    },
    showTitle(data){
      console.log(data)
      this.titleted = data;
    }
  }
}
</script>

<style scoped>

</style>
注意:
scoped 样式隔离,为了不影响全局样式
mounted 将编译好的html挂载到页面完成后执行的钩子函数——页面从内存中渲染到html的过程
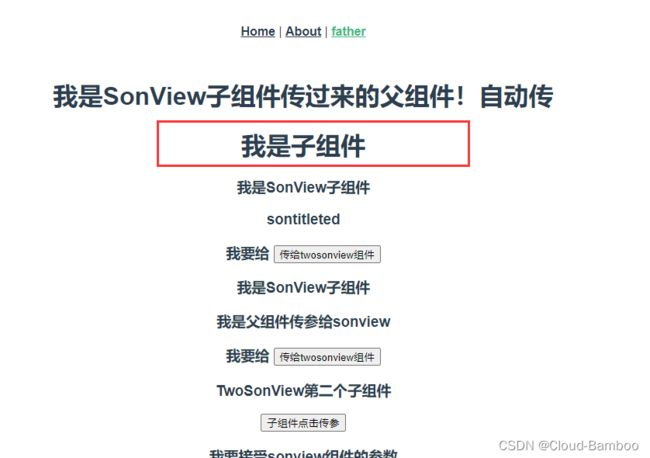
通过生命周期传参
//子组件
<template>
  <div>
    <h3>我是SonView子组件</h3>
  </div>
</template>

<script>
export default {
  name: "SonView",
  data() {
    return {
      title: '456'
    }
  },
  //将编译好的html挂载到页面完成后执行的钩子函数
  //页面从内存中渲染到html的过程
  mounted () {
    console.log('getMessage',this)
    this.$emit('getMessage', '我是SonView子组件传过来的父组件!自动传')
  }
}
</script>

<style scoped>

</style>
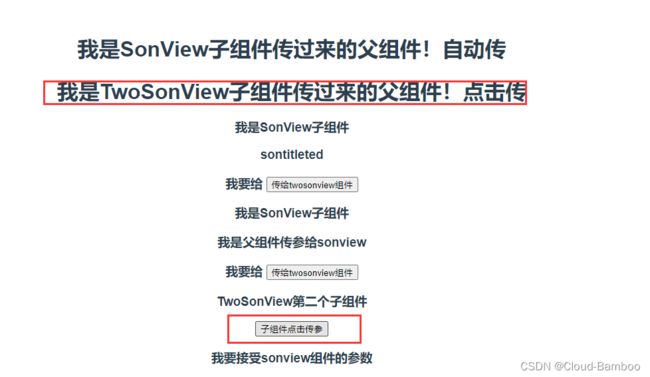
通过点击事件传参
//子组件
<template>
  <div>
    <h3>TwoSonView第二个子组件</h3>
    <button @click="clickFun()">子组件点击传参</button>
  </div>
</template>

<script>
export default {
  name: "TwoSonView",
  methods: {
    clickFun(){
      console.log('TwoSonView子组件打印')
      this.$emit('getMessage', '我是TwoSonView子组件传过来的父组件!点击传')
    }
  }
}
</script>

<style scoped>

</style>
变换后
3.Vuex 核心
State:保存所有组件的共享状态
Getters:类似状态值的计算属性
Mutations:修改 State中状态值的唯一方法,里面包含状态变化监听器和记录器
Actions:用于异步处理 State中状态值,异步函数结束后调用Mutations
Modules:当一个 State 对象比较庞大时,可以将 State 分割成多个Modules 模块。
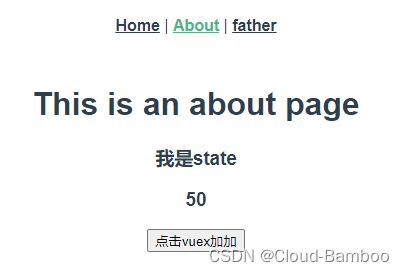
about页面
//About页
<template>
  <div class="about">
    <h1>This is an about page</h1>
    <h3>{{ $store.state.user.name }}</h3>
    <h3>{{ $store.state.user.num }}</h3>

    <div>
      <button @click="clickFun"> 点击vuex加加</button>
    </div>
  </div>
</template>
<script>
export default {
  name: 'About',
  data() {
    return {
      num: 1
    }
  },
  methods: {
    clickFun() {
      this.$store.commit('stateClickFun', this.$store.state.user.num + this.num)
    }
  },
  created() {
    console.log('store', this.$store.state.user)
  }
}
</script>
store 文件中的index .js
//引入Vue核心库
import Vue from 'vue'
//引入Vuex
import Vuex from 'vuex'
//应用Vuex插件
Vue.use(Vuex)


//创建并暴露store
export default new Vuex.Store({
    state: {
        user: {
            name: '我是state',
            num: 50
        }
    },
    mutations: {
        stateClickFun(state, data) {
            // console.log(state,data)
            state.user.num = data
        }

    },
    actions: {},
    getters: {},
    modules: {}
})
main 文件中,直接引入就能用
import store from './store'		//这里因为vue中的定义配置,自动寻找index.js文件

new Vue({
  store,
}).$mount('#app')
4.事件总线
-
对于比较小型的项目,没有必要引入 vuex 的情况下,可以使用 eventBus。
-
它的实现思想也很好理解,在要相互通信的两个组件中,都引入同一个新的vue实例,然后在两个组件中通过分别调用这个实例的事件触发和监听来实现通信
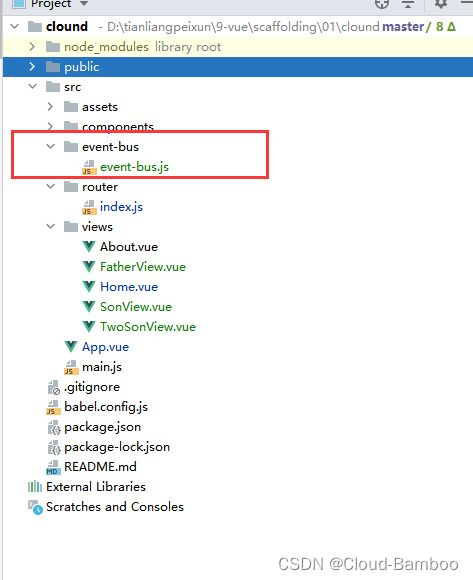
在src目录下创建 event-bus文件夹 event-bus js文件
event-bus 文件内容
// 引入vue,创建一个vue实例,并导出这个实例
import Vue from 'vue'
export default new Vue()
通过点击事件传参
//发送子组件
<template>
  <div>
    <h3>我是SonView子组件</h3>
    <h3>我要给
      <button @click="clickEvent()"> 传给twosonview组件</button>
    </h3>
  </div>
</template>

<script>
import EventBus from '@/event-bus/event-bus'

export default {
  name: "SonView",
  methods: {
    clickEvent() {
      // 通过vue实例方法$emit发送事件名称和需要传递的数据
      EventBus.$emit('msgAHandler', 'hello world')
    }
  }
}
</script>

<style scoped>

</style>
//接收的子组件
<template>
  <div>
    <h3>{{msg}}</h3>
  </div>
</template>

<script>
import EventBus from '@/event-bus/event-bus'

export default {
  name: "TwoSonView",
  data() {
    return {msg: '我要接受sonview组件的参数'}
  },
  created() {
    // 通过vue实例方法$on监听到事件和接受到数据
    // 接收数据的组件,通常挂载监听在vue生命周期created和mounted当中
    EventBus.$on('msgAHandler', (value) => {
      this.msg = value
    })
  }
}
</script>

<style scoped>

</style>
5.ref
获取dom元素
-
给dom节点记上ref属性,可以理解为给dom节点起了个名字。
给dom节点记上ref属性,可以理解为给dom节点起了个名字。
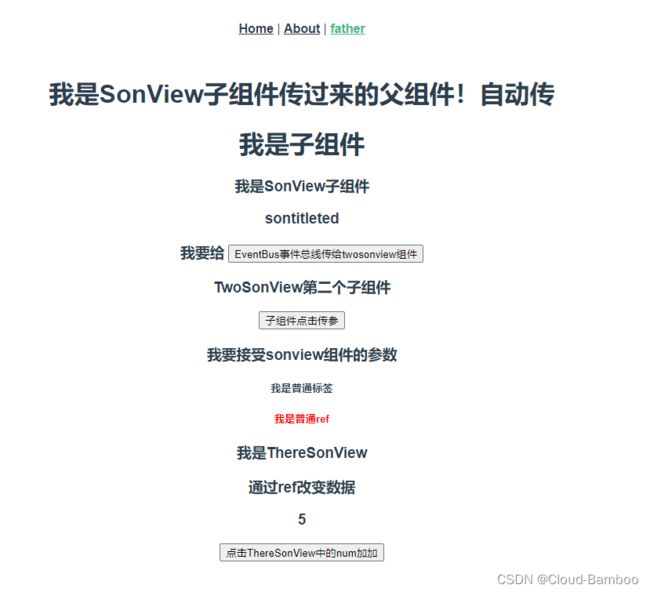
我是普通标签
我是普通ref
-
加上ref之后,在$refs属性中多了这个元素的引用。
-
通过vue实例的$refs属性拿到这个dom元素。
注意:
created 也就是拿不到dom 节点,只有 beforeMount 之后的可以拿到
<template>
  <div>
    <div><h5>我是普通标签</h5></div>
    <div ref="refChild" id="refChild"><h5>我是普通ref</h5></div>

  </div>
</template>

<script>
export default {
  name: "FatherView",

  created() {
    console.log(document.getElementById('refChild'))  //拿不到ref created也就是拿不到dom节点
    console.log(this.$refs)
  },
  mounted() {
    console.log(document.getElementById('refChild'))
    console.log(this.$refs)
    this.$refs.refChild.style.color="red"
  }

}
</script>

<style scoped>

</style>
获取组件
1.通过点击事件加加
//父组件
<template>
  <div>
    <ThereSonView ref="thereSon"/>
    <button @click="jiaFun()">点击ThereSonView中的num加加</button>

  </div>
</template>

<script>
import ThereSonView from "@/views/ThereSonView";

export default {
  name: "ThereSonView",
  components: {ThereSonView},
  data() {
    return {
      number: 1,
    }
  },
  methods: {
    jiaFun() {
      console.log(this.$refs.thereSon)
      this.$refs.thereSon.num = this.$refs.thereSon.num + this.number
    }
  },
}
</script>

<style scoped>

</style>
//子组件
<template>
  <div>
    <h3>我是ThereSonView</h3>
    <h3>{{ msg }}</h3>
    <h3>{{ num }}</h3>

  </div>
</template>

<script>
export default {
  name: "ThereSonView",
  data() {
    return {
      msg: '我是ThereSonView的msg数据',
      num: 5,
    }
  }
}
</script>

<style scoped>

</style>
通过mounted改变数据
//父组件
<template>
  <div>

    <div><h5>我是普通标签</h5></div>
    <div ref="refChild" id="refChild"><h5>我是普通ref</h5></div>

    <ThereSonView ref="thereSon"/>
    <button @click="jiaFun()">点击ThereSonView中的num加加</button>

  </div>
</template>

<script>
import ThereSonView from "@/views/ThereSonView";

export default {
  name: "ThereSonView",
  components: {ThereSonView},
  data() {
    return {
      number: 1,
    }
  },
   mounted() {
    this.$refs.refChild.style.color = "red"
    this.$refs.thereSon.msg = '通过ref改变数据'
  }
}
</script>

<style scoped>

</style>
子组件不变 同上
完整代码 在 gitee Communication分支中的cloud-com文件夹
6.本地缓存
-
localStorage永久储存
- 保存数据:localStorage.setItem(key,value)
- 读取数据:localStorage.getItem(key)
- 删除单个数据:localStorage.removeItem(key)
- 删除所有数据:localStorage.clear()
- 得到某个索引的key:localStorage.key(index)
-
sessionStorage临时储存
- 保存数据:sessionStorage.setItem(key,value)
- 读取数据:sessionStorage.getItem(key)
- 删除单个数据:sessionStorage.removeItem(key)
- 删除所有数据:sessionStorage.clear()
- 得到某个索引的key:sessionStorage.key(index)
扩展: sessionStorage与localStorage的异同?
- 共同点:都是保存在浏览器端,且同源的,一样都是用来存储客户端临时信息的对象。他们均只能存储字符串类型的对象(虽然规范中可以存储其他原生类型的对象,但是目前为止没有浏览器对其进行实现)。
- 不同点:两者的主要区别为:localstorage为永久储存,sessionstorage为临时储存
1.其中 session 是指用户在浏览某个网站时,从进入网站到浏览器关闭的所经过的时间。seesion对象可以用来保存在这段时间内要求保存的任何数据—生命周期仅在当前会话下有效
2.localstorage通常将数据保存在客户端本地的硬件设备中,即使浏览器关闭了以后,数据仍然存在。----生命周期是永久的
7.插槽——类似于子传父
-
作用:让父组件可以向子组件指定位置插入html结构,也是一种组件间通信的方式,
适用于父组件 ===> 子组件。 -
分类:默认插槽、具名插槽、作用域插槽
插槽就是子组件中的提供给父组件使用的一个占位符,用
1.以最简单插槽为例(普通插槽):在子组件中放一个占位符
//子组件
<template>
    <div>
        <h1>今天天气状况:</h1>
        <slot></slot>
    </div>
</template>
<script>
    export default {
        name: 'child'
    }
</script>
2、在父组件中给这个占位符填充内容
//父组件
<template>
    <div>
        <div>使用slot分发内容</div>
        <div>
            <child>
                <div style="margin-top: 30px">多云,最高气温34度,最低气温28度,微风</div>
            </child>
        </div>
    </div>
</template>
<script>
    import child from "./child.vue";
    export default {
        name: 'father',
        components:{
            child
        }
    }
</script>
总结:如果子组件没有使用插槽,父组件如果需要往子组件中填充模板或者html, 是没法做到的。
2.插槽使用 - 具名插槽
描述:具名插槽其实就是给插槽取个名字。一个子组件可以放多个插槽,而且可以放在不同的地方,而父组件填充内容时,可以根据这个名字把内容填充到对应插槽中。代码如下:
1、子组件的代码,设置了两个插槽(header和footer):
<template>
    <div>
        <div class="header">
            <h1>我是页头标题</h1>
            <div>
                <slot name="header"></slot>
            </div>
        </div>
        <div class="footer">
            <h1>我是页尾标题</h1>
            <div>
                <slot name="footer"></slot>
            </div>
        </div>
    </div>
</template>

<script>
    export default {
        name: "child1"
    }
</script>

<style scoped>

</style>
2、父组件填充内容, 父组件通过 v-slot:[name] 的方式指定到对应的插槽中
<template>
<div>
    <div>slot内容分发</div>
    <child1>
        <template slot="header">
            <p>我是页头的具体内容</p>
        </template>
        <template slot="footer">
            <p>我是页尾的具体内容</p>
        </template>
    </child1>
</div>
</template>

<script>
    import child1 from "./child1.vue";

    export default {
        name: "father1",
        components: {
            child1
        }
    }
</script>

<style scoped>

</style>
directive自定义指令
参数1 指令名字(定义不加v-,使用时加v-)
参数2 对象 {bind(el绑定的dom元素)}
// 参数1 指令名字(定义不加v-,使用时加v-)
// 参数二,对象 {bind(el绑定的dom元素)}
Vue.directive("color", {
bind(el, binding) {
// console.log(el);
// console.log(binding);
// el.style.color = 'red'
el.style.color = binding.value
},
inserted(el) {
// 这个元素已经渲染到界面上之后执行
// console.log(el);
},
// update 当元素有更新的时候执行
update(el) {
console.log(el);
}
})
Bad luck, I guess. It floats around, It’s got to land on somebody. It was my turn, that’s all. I was in the path of the tornado. I just didn’t expect the storm would last as long as it has.
运气太差,我想是。霉运四处飘荡,总会有人碰上。刚巧轮到我而已。我刚好挡了飓风的道!只是没想到这场风暴会刮这么久!


