手把手叫你从头搭建SSH2项目(二)(原创)
接着 手把手叫你从头搭建SSH2项目(一)(原创)
我们在dao文件夹下已经创建了EmployeeDaoImp类,它用来处理数据业务,与数据库交互
们创建一个接口EmployeeDao用来增加我们的数据访问方法(增删改查)代码如下
package com.ucap.emp.dao;

import java.util.List;

import com.ucap.emp.pojo.Employee;

public interface EmployeeDao {
	  public void saveEmployee(Employee employee);

	  public void removeEmployee(Employee employee);

	  public void updateEmployee(Employee employee);

	  public Employee findEmployeeById(Integer id);

	  public List<Employee> findAllEmployee(Employee employee);

	  public List<Employee> findAllEmployee();
}
接下来当然是回去修改我们的EmployeeDaoImp类了 代码如下:
package com.ucap.emp.dao;

import java.util.List;

import org.slf4j.Logger;
import org.slf4j.LoggerFactory;
import org.springframework.orm.hibernate3.support.HibernateDaoSupport;

import com.ucap.emp.pojo.Employee;

/**
 	* A data access object (DAO) providing persistence and search support for TEmployee entities.
 			* Transaction control of the save(), update() and delete() operations
		can directly support Spring container-managed transactions or they can be augmented	to handle user-managed Spring transactions.
		Each of these methods provides additional information for how to configure it for the desired type of transaction control.
	 * @see com.ucap.emp.pojo.TEmployee
  * @author MyEclipse Persistence Tools
 */

public class EmployeeDaoImp extends HibernateDaoSupport implements EmployeeDao {
	private static final Logger log = LoggerFactory.getLogger(EmployeeDaoImp.class);

      public List<Employee> findAllEmployee(Employee employee) {
		log.debug("finding All Employee");
        try {
        	String hql="from Employee";
    		String where =" where 1= 1 ";
    		if(employee.getName()!=null&&!"".equals(employee.getName())){
    			hql+=where+" and name like '%"+employee.getName()+"%' order by id desc";
    		}
    		System.out.println("hql语句:"+hql+" 记录条数:"+this.getHibernateTemplate().find(hql).size());
    		return this.getHibernateTemplate().find(hql);
        } catch (RuntimeException re) {
            log.error("find failed", re);
            throw re;
        }

	}

	public List<Employee> findAllEmployee() {
		log.debug("finding TEmployee instance");
        try {
        	String hql="from Employee";
    		String where =" where 1= 1 ";
    		System.out.println("hql语句:"+hql+" 记录条数:"+this.getHibernateTemplate().find(hql).size());
    		return this.getHibernateTemplate().find(hql);
        } catch (RuntimeException re) {
            log.error("find failed", re);
            throw re;
        }

	}

	public void saveEmployee(Employee employee) {
		log.debug("saving new Employee with name=" + employee.getName());
        try {
        	System.out.println("保存增加项 name=" + employee.getName());
    		this.getHibernateTemplate().save(employee);
    		System.out.println("增加完");
            log.debug("save successful");
        } catch (RuntimeException re) {
            log.error("save failed", re);
            throw re;
        }

	}

	public void updateEmployee(Employee employee) {
		log.debug("updatting TEmployee instance");
        try {
        	this.getHibernateTemplate().update(employee);
        	log.debug("update successful");
        } catch (RuntimeException re) {
            log.error("update failed", re);
            throw re;
        }

	}

	public void removeEmployee(Employee employee) {
		log.debug("deleting TEmployee instance");
        try {
        	this.getHibernateTemplate().delete(employee);
            log.debug("delete successful");
        } catch (RuntimeException re) {
            log.error("delete failed", re);
            throw re;
        }

	}

	public Employee findEmployeeById(Integer id) {
		log.debug("finding TEmployee with id=" + id);
        try {
        	Employee employ=(Employee) this.getHibernateTemplate().get(Employee.class, id);
    		return employ;
        } catch (RuntimeException re) {
            log.error("find failed", re);
            throw re;
        }


	}
}
做完以上我们就完成了持久化类的创建和dao类的创建。
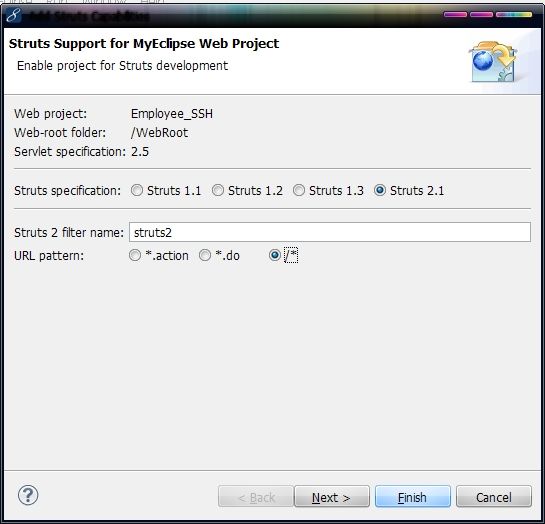
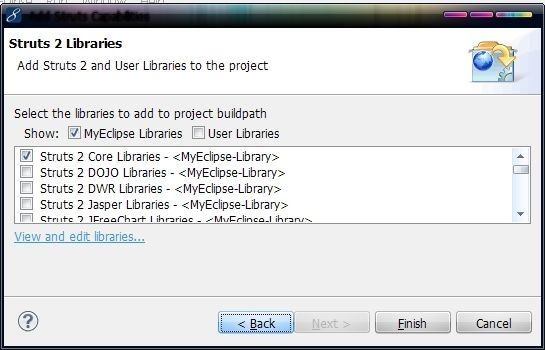
第八步 搭建 Struts2 选择项目,然后添加Struts。MyEclipse→Project Capabilities→Add Struts Capabilities
点击finish,你会在项目的src下发现自动创建好的struts.xml文件当然,里面的内容要自己写,但我们的项目的默认文件web.xml文件中会自动添加struts2的拦截器,
这时我们可以将spring监听器的和日志的配置文件log4j.properties添加到web.xml文件中, 这样web.xml基本必要项就全了,代码如下:
<?xml version="1.0" encoding="UTF-8"?>
<web-app version="2.5"
	xmlns="http://java.sun.com/xml/ns/javaee"
	xmlns:xsi="http://www.w3.org/2001/XMLSchema-instance"
	xsi:schemaLocation="http://java.sun.com/xml/ns/javaee
	http://java.sun.com/xml/ns/javaee/web-app_2_5.xsd">

  <context-param>
    <param-name>log4jConfigLocation</param-name>
    <param-value>/WEB-INF/log4j.properties</param-value>
  </context-param>

   <listener>

    <listener-class>org.springframework.web.util.Log4jConfigListener</listener-class>

   </listener>


  <filter>
  	<filter-name>struts2</filter-name>
  	<filter-class>
  		org.apache.struts2.dispatcher.ng.filter.StrutsPrepareAndExecuteFilter
  	</filter-class>
  </filter>
  <filter-mapping>
  	<filter-name>struts2</filter-name>
  	<url-pattern>/*</url-pattern>
  </filter-mapping>

  <listener>
    <listener-class>
  		org.springframework.web.context.ContextLoaderListener
  	 </listener-class>
  </listener>

  <welcome-file-list>
    <welcome-file>index.jsp</welcome-file>
  </welcome-file-list>

  </web-app>
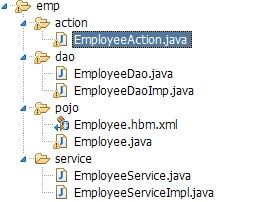
第九步 在src—>com—>ucb—emp>service下创建我们的spring的实现业务控制的类EmployeeServiceImpl 和其接口EmployeeService代码如下:
package com.ucap.emp.service;

import java.util.List;

import com.ucap.emp.pojo.Employee;

public interface EmployeeService {
	public void save(Employee employ);
	public void update(Employee employ);
	public void delete(Employee employ);
	public List<Employee> findAll(Employee employee);
	public Employee findById(Integer id);
}
package com.ucap.emp.service;
import java.util.List;

import com.ucap.emp.dao.*;
import com.ucap.emp.pojo.Employee;

public class EmployeeServiceImpl implements EmployeeService {
	private EmployeeDao employeeDao;

	public EmployeeDao getEmployeeDao() {
		return employeeDao;
	}
	public void setEmployeeDao(EmployeeDao employeeDao) {
		this.employeeDao = employeeDao;
	}

       //服务层方法
	public void delete(Employee employ) {
		this.employeeDao.removeEmployee(employ);
	}

	public List<Employee> findAll(Employee employ) {
		return this.employeeDao.findAllEmployee(employ);
	}

	public Employee findById(Integer id) {
		return this.employeeDao.findEmployeeById(id);
	}

	public void save(Employee employ) {
     this.employeeDao.saveEmployee(employ);
	}

	public void update(Employee employ) {
     this.employeeDao.updateEmployee(employ);
	}
}
第十步 在src—>com—>ucb—emp>action下创建我们的struts2的action类代码如下:
package com.ucap.emp.action;

import java.util.List;
import java.util.UUID;

import org.apache.struts2.ServletActionContext;

import com.opensymphony.xwork2.ActionSupport;
import com.ucap.emp.pojo.Employee;
import com.ucap.emp.service.EmployeeService;

public class EmployeeAction extends ActionSupport {
	 private Employee employee;
	 private List<Employee> list;
	 private EmployeeService employeeService;

	 public List<Employee> getList() {
			return list;
	 }

	 public void setList(List<Employee> list) {
			this.list = list;
	 }

	 public EmployeeService getEmployeeService() {
			return employeeService;
	 }

	 public void setEmployeeService(EmployeeService employeeService) {
			this.employeeService = employeeService;
	 }

	 public Employee getEmployee() {
			return employee;
	 }

	 public void setEmployee(Employee employee) {
			this.employee = employee;
	 }


	 //查询
	 public String list(){
		    list = this.employeeService.findAll(employee);
			//ServletActionContext.getRequest().setAttribute("list", list);
			System.out.println("list.size:"+list.size());
		    return "list";
	 }

	 //增加
	 public String add(){
		 	System.out.println("现在进入增加页面");
			return "add";
	 }

	 //增加保存
	 public String addSave(){
//		 	int id=Integer.parseInt(UUID.randomUUID().toString());
//			employee.setId(id);
		 	this.employeeService.save(this.employee);
			System.out.println("现在保存增加的employee");
			return "relist";
	 }

	 //更改之前
	 public String update(){
			  employee=this.employeeService.findById(employee.getId());
			  System.out.println("employee.id="+employee.getId());
			  return "update";
	 }

	 //更改
	 public String updateSave(){
			    this.employeeService.update(employee);
			return "relist";
	 }

	 //删除
	 public String delete(){
			    this.employeeService.delete(employee);
			return "relist";
	 }
}
第十一步 做完了这些,我们的类也写完了,现在就开始修改我们的配置文件包括struts.xml文件和applicationContent.xml文件
struts.xml代码如下
<?xml version="1.0" encoding="UTF-8" ?>
<!DOCTYPE struts PUBLIC "-//Apache Software Foundation//DTD Struts Configuration 2.1//EN" "http://struts.apache.org/dtds/struts-2.1.dtd">
<struts>
 <package name="employ" namespace="/emp" extends="struts-default">
     <action name="employee" class="employeeAction">
        <result name="add" >/add.jsp</result>
        <result name="update" >/update.jsp</result>
        <result name="list" >/list.jsp</result>
        <result name="relist" type="redirect">/emp/employee!list.action</result>
      </action>
   </package>
</struts>
applicationContent.xml代码如下
<?xml version="1.0" encoding="UTF-8"?>
<beans
	xmlns="http://www.springframework.org/schema/beans"
	xmlns:xsi="http://www.w3.org/2001/XMLSchema-instance"
	xmlns:p="http://www.springframework.org/schema/p"
	xsi:schemaLocation="http://www.springframework.org/schema/beans http://www.springframework.org/schema/beans/spring-beans-3.0.xsd">


	<bean id="sessionFactory"
		class="org.springframework.orm.hibernate3.LocalSessionFactoryBean">
		<property name="configLocation"
			value="classpath:hibernate.cfg.xml">
		</property>

		<!-- 注入映射文件 -->
	    <property name="mappingResources">
            <list>
                <!-- 要修改的地方:注入自己需要的映射文件,可以是多个 -->
	        	<value>com/ucap/emp/pojo/Employee.hbm.xml</value>
	    	</list>
		</property>

	</bean>

	 <!-- 配置事务管理器   -->
    <bean id="hibernateTransactionManager" class="org.springframework.orm.hibernate3.HibernateTransactionManager">
     <property name="sessionFactory">
        <ref local="sessionFactory"/>
     </property>
    </bean>

    <!-- 定义事务管理器(声明式的事务) -->
    <bean id="transactionManager"
        class="org.springframework.orm.hibernate3.HibernateTransactionManager">
        <property name="sessionFactory" ref="sessionFactory" />
    </bean>

    <bean id="transactionInterceptor"
        class="org.springframework.transaction.interceptor.TransactionInterceptor">
        <property name="transactionManager" ref="transactionManager" />
        <!-- 配置事务属性 -->
        <property name="transactionAttributes">
            <props>
                <prop key="*">PROPAGATION_REQUIRED</prop>
            </props>
        </property>
    </bean>

    <bean class="org.springframework.aop.framework.autoproxy.BeanNameAutoProxyCreator">
        <property name="beanNames">
            <list>
                <value>*Dao</value>
            </list>
        </property>
        <property name="interceptorNames">
            <list>
                <value>transactionInterceptor</value>
            </list>
        </property>
    </bean>

	 <!-- 配置DAO -->
	<bean id="employeeDao" class="com.ucap.emp.dao.EmployeeDaoImpl" scope="singleton">
	    <property name="sessionFactory" ref="sessionFactory"></property>
	</bean>

	 <!-- 配置注入:service<-DAO,可以多个dao注入同一个service -->
	<bean id="employeeService" class="com.ucap.emp.service.EmployeeServiceImpl">
	    <property name="employeeDao" ref="employeeDao"></property>
	</bean>

	    <!-- 配置注入:Action<-service  -->
	<bean id="employeeAction" class="com.ucap.emp.action.EmployeeAction">
	   <property name="employeeService" ref="employeeService"></property>
	</bean>


	</beans>
最后在webroot—>web-inf先创建日志的配置文件 log4j.properties
代码如下:
# For JBoss: Avoid to setup Log4J outside $JBOSS_HOME/server/default/deploy/log4j.xml!
# So, must comment the Log4J listener out (in web.xml)
# For all other servers: un-comment (not comment) the Log4J listener in web.xml to activate Log4J.
log4j.rootLogger=ERROR, stdout, logfile

log4j.appender.stdout=org.apache.log4j.ConsoleAppender
log4j.appender.stdout.layout=org.apache.log4j.PatternLayout
log4j.appender.stdout.Threshold=trace
log4j.appender.stdout.Target=System.out
# no date info for fast debug
#log4j.appender.stdout.layout.ConversionPattern=%p [%c] - %m%n
log4j.appender.stdout.layout.ConversionPattern=%d %p [%c] - %m%n

log4j.appender.logfile=org.apache.log4j.RollingFileAppender
#\u4ee5\u4e0b\u8def\u5f84\u5c06\u65e5\u5fd7\u6587\u4ef6\u7f6e\u4e8e C:\Documents and Settings\\u4f60\u5f53\u524d\u7684\u64cd\u4f5c\u7cfb\u7edf\u7528\u6237\u540d\log\log\petestore.log \u4e2d
log4j.appender.logfile.File=${user.home}/log/petstore.log
log4j.appender.logfile.MaxFileSize=512KB
# Keep three backup files.
log4j.appender.logfile.MaxBackupIndex=3
# Pattern to output: date priority [category] - message
log4j.appender.logfile.layout=org.apache.log4j.PatternLayout

# no date info for fast debug
#log4j.appender.logfile.layout.ConversionPattern=%p [%c] - %m%n
log4j.appender.logfile.layout.ConversionPattern=%d %p [%c] - %m%n

########  hibernate ####
log4j.logger.org.hibernate=info

### log HQL query parser activity
#log4j.logger.org.hibernate.hql.ast.AST=info

### log HQL parse trees
log4j.logger.org.hibernate.hql=info

### log just the SQL
log4j.logger.org.hibernate.SQL=info

### log JDBC bind parameters and value
log4j.logger.org.hibernate.type=all

# hibernate query engine
#org.hibernate.engine.query=all
#org.hibernate.engine=all

### log schema export/update ###
#log4j.logger.org.hibernate.tool.hbm2ddl=debug

### Log all second-level cache activity
log4j.logger.org.hibernate.cache=all

### Log the state of all entities (max 20 entities) associated with the session at flush time
log4j.logger.org.hibernate.pretty=info

### log transaction activity
#log4j.logger.org.hibernate.transaction=debug

### log JDBC resource acquisition
#log4j.logger.org.hibernate.jdbc=info

### enable the following line if you want to track down connection ###
### leakages when using DriverManagerConnectionProvider ###
#log4j.logger.org.hibernate.connection.DriverManagerConnectionProvider=trace

####### spring framework #########
#log4j.logger.org.springframework=info
第十二步 加入jsp页面
1.list.jsp
<%@ page language="java" import="java.util.*" pageEncoding="UTF-8"%>
<%@ taglib uri="http://java.sun.com/jsp/jstl/core" prefix="c"%>
<%@ taglib prefix="s" uri="/struts-tags" %>
<%
String path = request.getContextPath();
String basePath = request.getScheme()+"://"+request.getServerName()+":"+request.getServerPort()+path+"/";
%>

<!DOCTYPE HTML PUBLIC "-//W3C//DTD HTML 4.01 Transitional//EN">
<html>
  <head>
    <base href="<%=basePath%>">

    <title>My JSP 'start.jsp' starting page</title>

	<meta http-equiv="pragma" content="no-cache">
	<meta http-equiv="cache-control" content="no-cache">
	<meta http-equiv="expires" content="0">
	<meta http-equiv="keywords" content="keyword1,keyword2,keyword3">
	<meta http-equiv="description" content="This is my page">
	<!--
	<link rel="stylesheet" type="text/css" href="styles.css">
	-->

  </head>

  <body>
     <h1>员工信息表</h1>
     <form action="emp/employee!list.action" method="post">
      员工姓名<input type="text" name="employee.name" value="${empoyee.name}">
      <input type="submit" value="查询">
           <a href="${pageContext.request.contextPath}/emp/employee!add.action">新增</a>
     <table align="left" border="2" width="100%" bgcolor="">
       <tr bgcolor="#8080c0">
           <td align="center">姓名</td>
           <td align="center">年龄</td>
           <td align="center">性别</td>
           <td align="center">电话</td>
           <td align="center">地址</td>
           <td align="center">操作</td>
       </tr>

       <c:forEach var="item" items="${requestScope.list}">
       <tr>
          <td align="center">${item.name}</td>
          <td align="center">${item.age}</td>
          <td align="center">${item.sex==0?"男":"女"}</td>
          <td align="center">${item.tel}</td>
          <td align="center">${item.address}</td>
          <td align="center"><a href="${pageContext.request.contextPath}/emp/employee!delete.action?employee.id=${item.id }">删除</a>
            <a href="${pageContext.request.contextPath}/emp/employee!update.action?employee.id=${item.id }">修改${item.id }</a>
          </td>
       </tr>
       </c:forEach>
     </table>
     </form>
  </body>
</html>
2 add.jsp
<%@ page language="java" import="java.util.*" pageEncoding="UTF-8"%>
<%@ taglib uri="http://java.sun.com/jsp/jstl/core" prefix="c"%>
<%@ taglib prefix="s" uri="/struts-tags" %>
<%
String path = request.getContextPath();
String basePath = request.getScheme()+"://"+request.getServerName()+":"+request.getServerPort()+path+"/";
%>

<!DOCTYPE HTML PUBLIC "-//W3C//DTD HTML 4.01 Transitional//EN">
<html>
  <head>
    <base href="<%=basePath%>">

    <title>My JSP 'start.jsp' starting page</title>

	<meta http-equiv="pragma" content="no-cache">
	<meta http-equiv="cache-control" content="no-cache">
	<meta http-equiv="expires" content="0">
	<meta http-equiv="keywords" content="keyword1,keyword2,keyword3">
	<meta http-equiv="description" content="This is my page">
	<!--
	<link rel="stylesheet" type="text/css" href="styles.css">
	-->

  </head>

  <body>
     <h1 align="center">员工信息</h1>
     <form action="${pageContext.request.contextPath}/emp/employee!addSave.action" method="post">
      <table align="center" border="2" bgcolor="">
        <tr><td align="center" colspan="2">员工信息录入</td></tr>
        <tr><td>姓名</td><td><input type="text" name="employee.name"></td></tr>
        <tr><td>年龄</td><td><input type="text" name="employee.age"></td></tr>
        <tr><td>性别</td><td>
          	男<input type="radio" name="employee.sex" value="0" checked>
          	女<input type="radio" name="employee.sex" value="1">
        </td></tr>
        <tr><td>电话</td><td><input type="text" name="employee.tel"></td></tr>
        <tr><td>地址</td><td><input type="text" name="employee.address"></td></tr>
        <tr><td align="center" colspan="2"><input type="submit" value="提交"></td>
        </tr>
      </table>
     </form>
  </body>
</html>
3 add.jsp
<%@ page language="java" import="java.util.*" pageEncoding="UTF-8"%>
<%@ taglib uri="http://java.sun.com/jsp/jstl/core" prefix="c"%>
<%@ taglib prefix="s" uri="/struts-tags" %>
<%
String path = request.getContextPath();
String basePath = request.getScheme()+"://"+request.getServerName()+":"+request.getServerPort()+path+"/";
%>

<!DOCTYPE HTML PUBLIC "-//W3C//DTD HTML 4.01 Transitional//EN">
<html>
  <head>
    <base href="<%=basePath%>">

    <title>My JSP 'start.jsp' starting page</title>

	<meta http-equiv="pragma" content="no-cache">
	<meta http-equiv="cache-control" content="no-cache">
	<meta http-equiv="expires" content="0">
	<meta http-equiv="keywords" content="keyword1,keyword2,keyword3">
	<meta http-equiv="description" content="This is my page">
	<!--
	<link rel="stylesheet" type="text/css" href="styles.css">
	-->

  </head>

  <body>
     <h1 align="center">员工信息</h1>
     <form action="${pageContext.request.contextPath}/emp/employee!updateSave.action" method="post">
       <input type="hidden" name="employee.id" value="${employee.id}">
      <table align="center" border="2" bgcolor="">
        <tr><td align="center" colspan="2">修改员工信息</td></tr>
        <tr><td>姓名</td><td><input type="text" name="employee.name" value="${employee.name }"></td></tr>
        <tr><td>年龄</td><td><input type="text" name="employee.age" value="${employee.age }"></td></tr>
        <tr><td>性别</td><td>
          男<input type="radio" name="employee.sex" value="0" ${employee.sex==0?"checked":"" }>
          女<input type="radio" name="employee.sex" value="1" ${employee.sex==1?"checked":"" }>
        </td></tr>
        <tr><td>电话</td><td><input type="text" name="employee.tel" value="${employee.tel }"></td></tr>
        <tr><td>地址</td><td><input type="text" name="employee.address" value="${employee.address }"></td></tr>
        <tr><td align="center" colspan="2"><input type="submit" value="提交"></td>
        </tr>
      </table>
     </form>
  </body>
</html>
现在就全做完了,对了看看你项目的webroot下lib中是否有struts2-spring-plugin-2.0.11.1.jar包,没有的话自己加进去,不让会报错。
让我们将项目发布在tomcat服务器中运行后我们会看到
这样我们的第一个SSH2的项目就完成了,中间的细节有问题,可以留言我,或自己上网查
还有就是DAO测试类没有写,但在我的另一篇SSH2的错误集锦中有介绍,可以看看再自己写个测试类


