关键点检测数据准备和基于U-net网络的模型设计——工业组件4个关键点的检测模型
关键点检测数据准备和基于U-net网络的模型设计
- 整个项目代码
- 简单介绍
- 数据准备
- 代码说明
-
-
- config.py
- data_pre.py
- determine_rotation_angle.py
- models.py
- net_util.py
- test_main.py
- train_main.py
-
- 模型效果
整个项目代码
已经在GitHub上开源,仅上传了一张效果展示图,可以根据自己遇到的实际项目进行改进
旧的项目地址(对应以下代码) https://github.com/ExileSaber/Industry-Keypoint-Detection
新的项目地址https://github.com/ExileSaber/KeyPoint-Detection/tree/main
(其中offset文件夹下是旧的代码,heatmap中是新的代码,新的代码在旧代码的基础上提升了约5~10倍的精度)
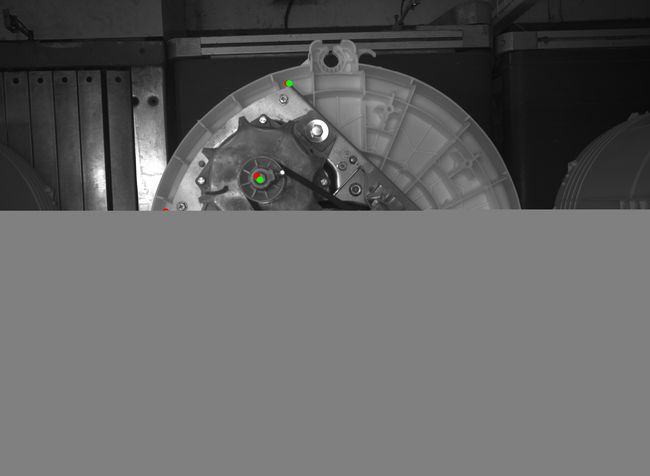
模型的效果如下
简单介绍
基于自己标注的工业图像的关键点检测,每张图片标注了4个关键点,采用的U-net网络
-
主要内容
- 这部分主要是个人第一次做目标检测方面的任务,用于练手和理解网络
- 网络采用的是U-net
- 标签构建采用的Coordinate方法,损失函数仅采用了真实坐标点和预测坐标点之间的距离平方和
-
之后的探索过程
- 标签构建尝试Heatmap和Heatmap + Offsets
- 网络结构改进
数据准备
首先要在图片上标注自己需要检测的关键点位置,笔者采用的标注软件为labelme,图片标注完成后可以得到一个包含标注点信息的json文件
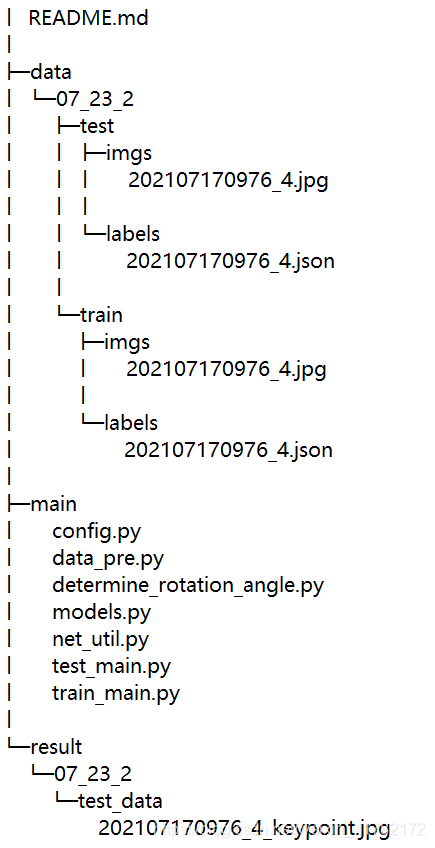
将标注的图片和对应的json文件保存在相应文件夹下,在本项目中将标注的数据分为了训练集和测试集,保存的路径如下所示

路径中只给出了一张图片示范,如果图片格式不是jpg或者json文件中存储关键点坐标的键名和笔者不一致等数据预处理问题,通过修改 data_pre.py 即可解决问题
代码说明
对每个python文件的作用做简单的说明,具体的内容见GitHub: https://github.com/ExileSaber/Industry-Keypoint-Detection
config.py
网络模型参数、训练路径、测试路径等参数
import torch

config = {
    # 网络训练部分
    'device': torch.device("cuda" if torch.cuda.is_available() else "cpu"),
    'batch_size': 1,
    'epochs': 1000,
    'save_epoch': 100,

    # 网络评估部分
    'test_batch_size': 1,
    'test_threshold': 0.5,

    # 设置路径部分
    'train_date': '07_23_2',
    'train_way': 'train',
    'test_date': '07_23_2',
    'test_way': 'test',

}
data_pre.py
根据图片读取对应的json文件并获取标注的N个坐标点数据,转化为一个 N×2 的二维 ndarray 数据类型
import os
import json
import numpy as np
import matplotlib.pyplot as plt
from config import config as cfg
import cv2


# json变成加入高斯的np
def json_to_numpy(dataset_path):
    # 保存的路径
    imgs_path = os.path.join(dataset_path, 'imgs')
    labels_path = os.path.join(dataset_path, 'labels')

    # 开始处理
    for name in os.listdir(imgs_path):
        # 读入label
        with open(os.path.join(os.path.join(labels_path),
                               name.split('.')[0] + '.json'), 'r', encoding='utf8')as fp:
            json_data = json.load(fp)
            points = json_data['shapes']

        landmarks = []
        for point in points:
            for p in point['points'][0]:
                landmarks.append(p)

        landmarks = np.array(landmarks)

        return landmarks
determine_rotation_angle.py
计算物体旋转角度(项目中的一部分,基于检测出来的关键点计算物体在某个方向上的旋转角度)
models.py
构建4个关键点检测的U-net网络模型,网络的最后两层为全连接层,卷积后的三维数据转化为4个关键点的坐标数据
from torchsummaryX import summary
from net_util import *


# Unet的下采样模块,两次卷积
class DoubleConv(nn.Module):

    def __init__(self, in_channels, out_channels, channel_reduce=False):  # 只是定义网络中需要用到的方法
        super(DoubleConv, self).__init__()

        # 通道减少的系数
        coefficient = 2 if channel_reduce else 1

        self.down = nn.Sequential(
            nn.Conv2d(in_channels, coefficient * out_channels, kernel_size=(3, 3), padding=1),
            nn.BatchNorm2d(coefficient * out_channels),
            nn.ReLU(inplace=True),
            nn.Conv2d(coefficient * out_channels, out_channels, kernel_size=(3, 3), padding=1),
            nn.BatchNorm2d(out_channels),
            nn.ReLU(inplace=True)
        )

    def forward(self, x):
        return self.down(x)


# 上采样(转置卷积加残差链接)
class Up(nn.Module):

    # 千万注意输入,in_channels是要送入二次卷积的channel,out_channels是二次卷积之后的channel
    def __init__(self, in_channels, out_channels):
        super().__init__()
        # 先上采样特征图
        self.up = nn.ConvTranspose2d(in_channels // 2, in_channels // 2, kernel_size=4, stride=2, padding=1)
        self.conv = DoubleConv(in_channels, out_channels, channel_reduce=True)

    def forward(self, x1, x2):
        x1 = self.up(x1)
        x = torch.cat([x1, x2], dim=1)
        x = self.conv(x)
        return x


# simple U-net模型
class U_net(nn.Module):

    def __init__(self):  # 只是定义网络中需要用到的方法
        super(U_net, self).__init__()

        # 下采样
        self.double_conv1 = DoubleConv(3, 32)
        self.double_conv2 = DoubleConv(32, 64)
        self.double_conv3 = DoubleConv(64, 128)
        self.double_conv4 = DoubleConv(128, 256)
        self.double_conv5 = DoubleConv(256, 256)

        # 上采样
        self.up1 = Up(512, 128)
        self.up2 = Up(256, 64)
        self.up3 = Up(128, 32)
        self.up4 = Up(64, 16)

        # 最后一层
        self.conv = nn.Conv2d(16, 1, kernel_size=(1, 1), padding=0)
        self.fc1 = nn.Linear(180224, 1024)
        self.fc2 = nn.Linear(1024, 8)

    def forward(self, x):
        # down
        # print(x.shape)
        c1 = self.double_conv1(x)  # (,32,512,512)
        p1 = nn.MaxPool2d(2)(c1)  # (,32,256,256)
        c2 = self.double_conv2(p1)  # (,64,256,256)
        p2 = nn.MaxPool2d(2)(c2)  # (,64,128,128)
        c3 = self.double_conv3(p2)  # (,128,128,128)
        p3 = nn.MaxPool2d(2)(c3)  # (,128,64,64)
        c4 = self.double_conv4(p3)  # (,256,64,64)
        p4 = nn.MaxPool2d(2)(c4)  # (,256,32,32)
        c5 = self.double_conv5(p4)  # (,256,32,32)
        # 最后一次卷积不做池化操作

        # up
        u1 = self.up1(c5, c4)  # (,128,64,64)
        u2 = self.up2(u1, c3)  # (,64,128,128)
        u3 = self.up3(u2, c2)  # (,32,256,256)
        u4 = self.up4(u3, c1)  # (,16,512,512)

        # 最后一层,隐射到3个特征图
        x1 = self.conv(u4)
        # print(x1.shape)
        x1 = x1.view(x1.size(0), -1)

        # print(x1.shape)
        x = self.fc1(x1)
        out = self.fc2(x)

        return out

    def summary(self, net):
        x = torch.rand(cfg['batch_size'], 3, 352, 512)  # 352*512
        # 送入设备
        x = x.to(cfg['device'])
        # 输出y的shape
        # print(net(x).shape)

        # 展示网络结构
        summary(net, x)
net_util.py
读取图片数据及其对应的
import torch
import os
import numpy as np
from torch import nn
import torchvision
from config import config as cfg
import torch.utils.data
from torchvision import datasets, transforms, models
import cv2
from data_pre import json_to_numpy


# box_3D的数据仓库
class Dataset(torch.utils.data.Dataset):
    # 初始化
    def __init__(self, dataset_path):
        self.dataset_path = dataset_path
        self.img_name_list = os.listdir(os.path.join(dataset_path, 'imgs'))

    # 根据 index 返回位置的图像和label
    def __getitem__(self, index):
        # 先处理img
        img = cv2.imread(os.path.join(self.dataset_path, 'imgs', self.img_name_list[index]))
        img = cv2.resize(img, (512, 352))
        img = transforms.ToTensor()(img)

        # 读入标签
        mask = json_to_numpy(self.dataset_path)
        # mask = np.load(os.path.join(self.dataset_path, 'masks', self.img_name_list[index].split('.')[0] + '.npy'))
        mask = torch.tensor(mask, dtype=torch.float32)

        return img, mask

    # 数据集的大小
    def __len__(self):
        return len(self.img_name_list)
test_main.py
在测试集(有标注关键点的json)上测试模型效果
train_main.py
在训练集上训练模型
